1. Introduction
This document lists the different functionalities available in the Mimbus Chemistry simulator.
First, the general functions of the simulator will be listed.
In a second step, we will detail each instruction associated with an exercise in the simulator, i.e. how to accomplish the task given by the system to move to the next step during the simulation.
2. General Operation
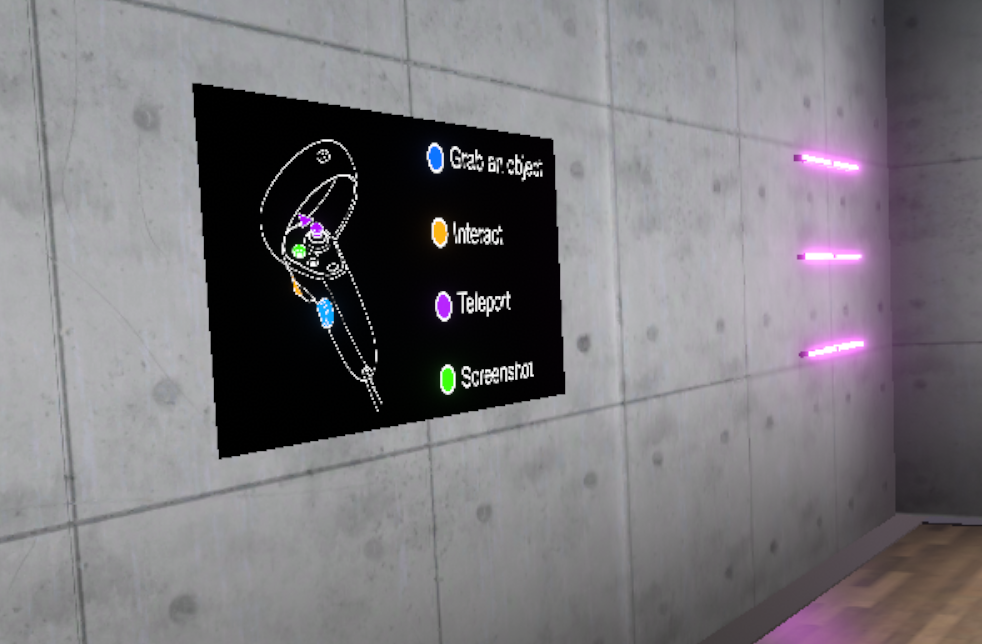
2.1. Controllers
The application is compatible with all OpenXR complient headsets. Depending on the virtual reality headset used, the controllers and hence the associated keys are different.
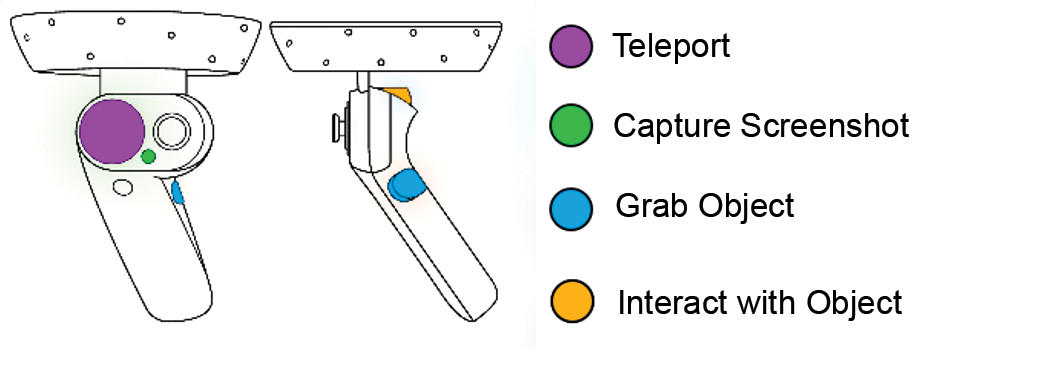
2.1.1. Windows Mixed Reality
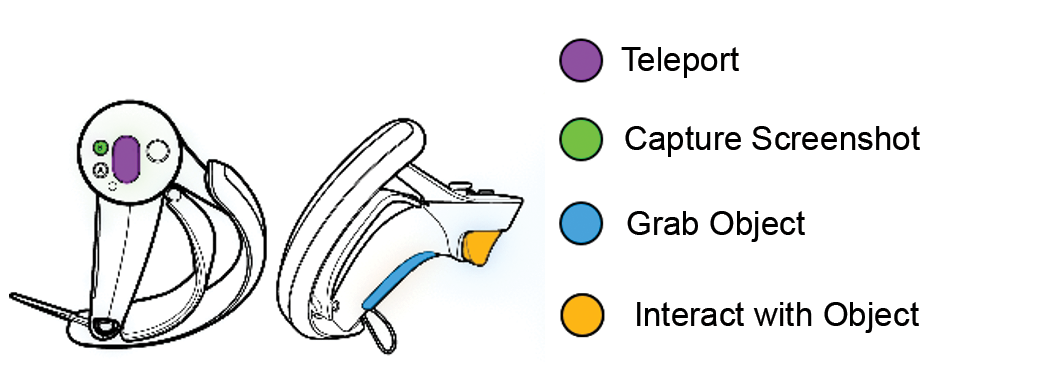
2.1.2. Valve Index
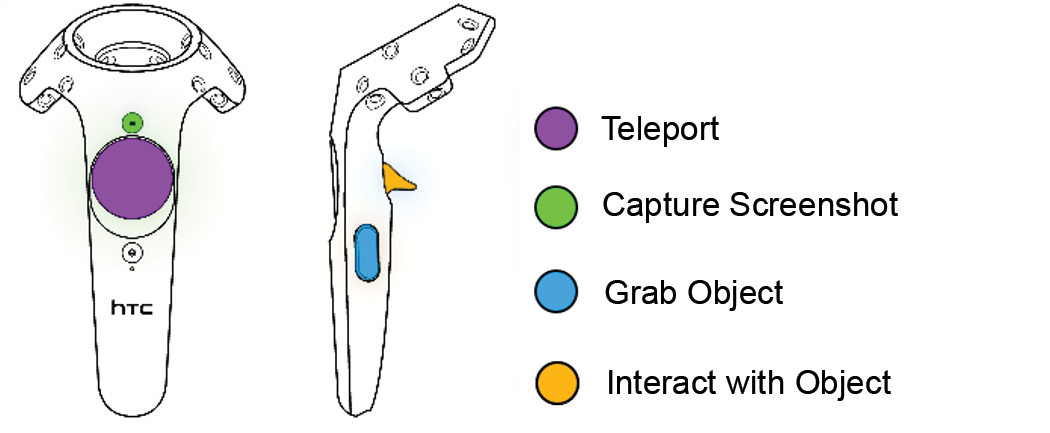
2.1.3. HTC Vive
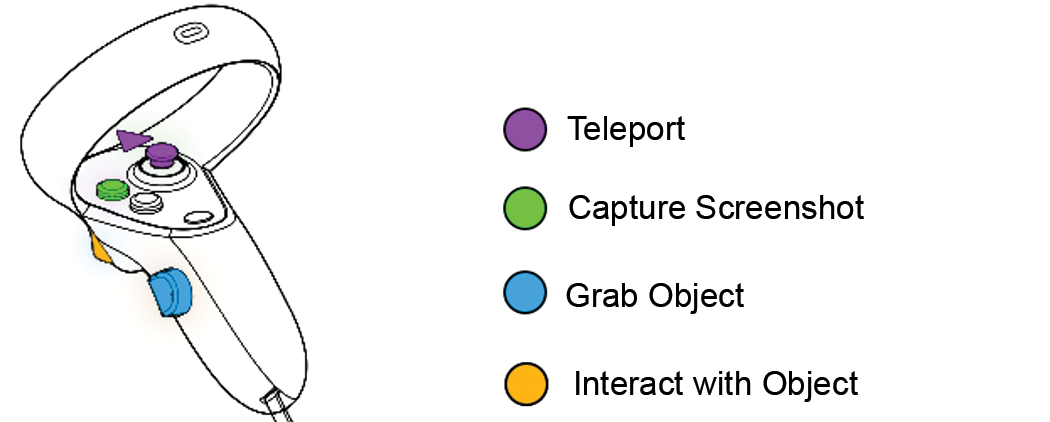
2.1.4. Oculus Rift
2.1.5. PICO 4

2.2. Authentification
2.2.1. Main Menu
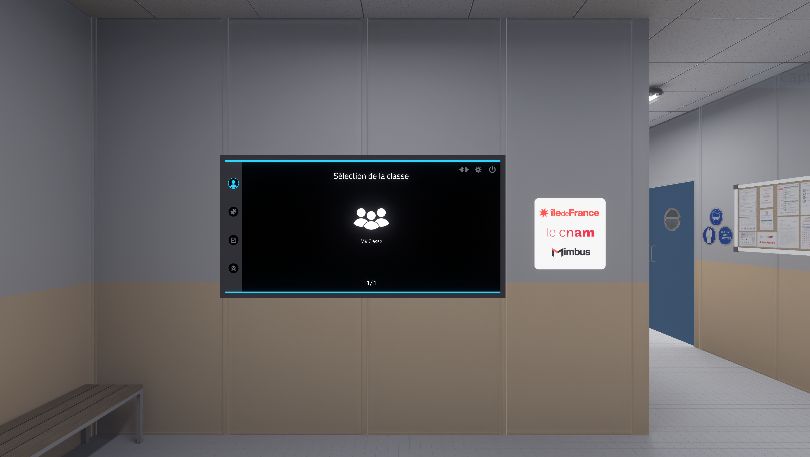
When the application is launched, the user is in a corridor called the "Welcome Hall" where a screen displaying the main menu of the simulator is located.
The main menu allows the user to authenticate themselves and to select the exercise to be performed. At the end of each exercise, the user will be teleported back to this screen.
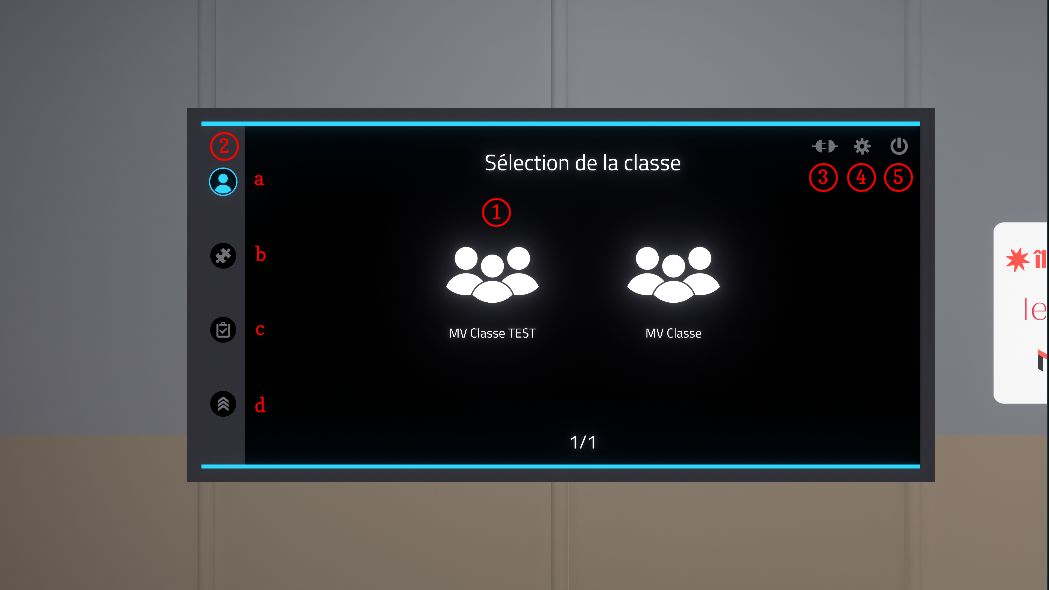
The main menu is organized as follows:
-
Class selection (online mode only): classes are configured on the Vulcan online platform.
-
Visual progress indicator in the authentication and exercise choice pages:
-
Authentication
-
Choice of module
-
Choice of exercise
-
Choice of level
-
-
Switch to offline mode: exercises are no longer retrieved from Vulcan and the results will not be sent back to Vulcan. A generic user named Demo is used instead of a student connected to Vulcan.
-
Displaying the settings screen: the settings screen allows you to change the language of the simulator.
-
Quit the application
2.2.2. Class selection
First, the user should select their class.
This menu is only displayed when the simulator is connected to the Vulcan platform.
A first click allows the user to select the class, a second allows them to confirm the choice.
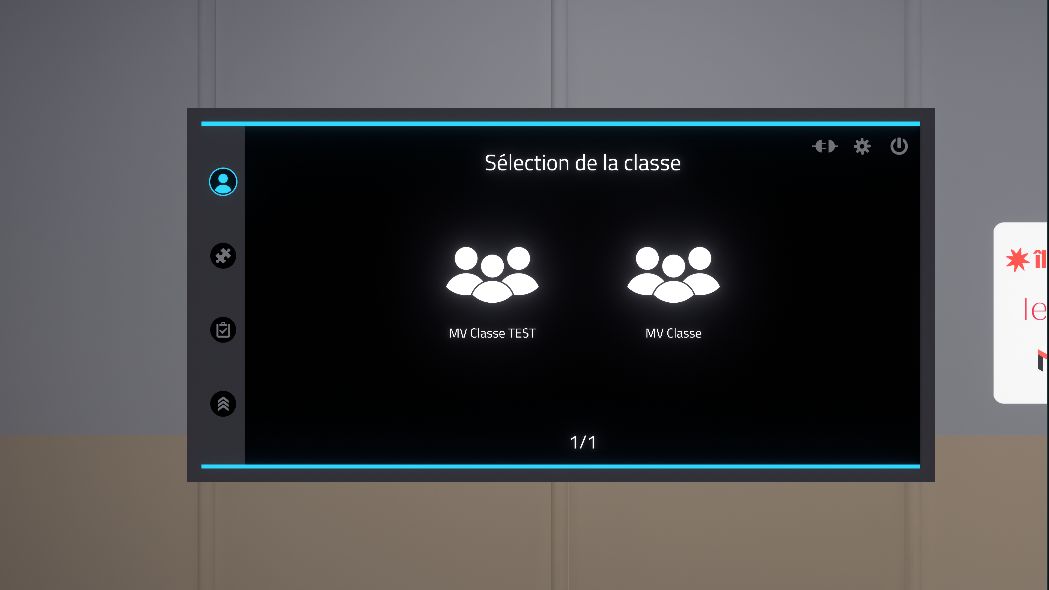
2.2.3. User Selection
Once the class has been selected, the user must be authenticated. Clicking on the user’s name will bring up a window where the user’s PIN code, a four-digit number configured on Vulcan, must be entered. Users who are not assigned to a Chemistry learning path will appear in grey. It will not be possible to log in as them on the simulator.


In offline mode, a demo user will be automatically selected.
2.3. Exercises selection
2.3.1. Module selection
Once the user is authenticated, the module selection menu is displayed.

The available modules are "Tutorial", "Free laboratory visit", "Safety in the laboratory" and "Manipulations". A first click allows to select and see the description of the module while a second click allows to confirm the choice.
The tutorial allows you to familiarize yourself with the controls using a simplified scenario.
2.3.2. Selection of the exercise
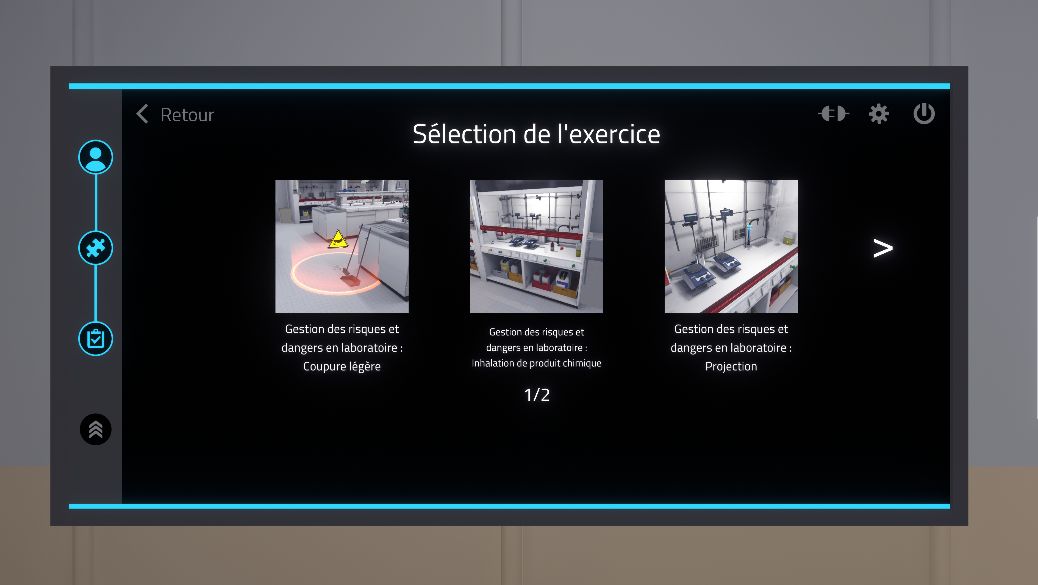
On this page, the exercises corresponding to the previously selected module are displayed. A first click on an exercise displays a description of the selected exercise, a second click allows to confirm the choice.
2.3.3. Selection of the difficulty mode
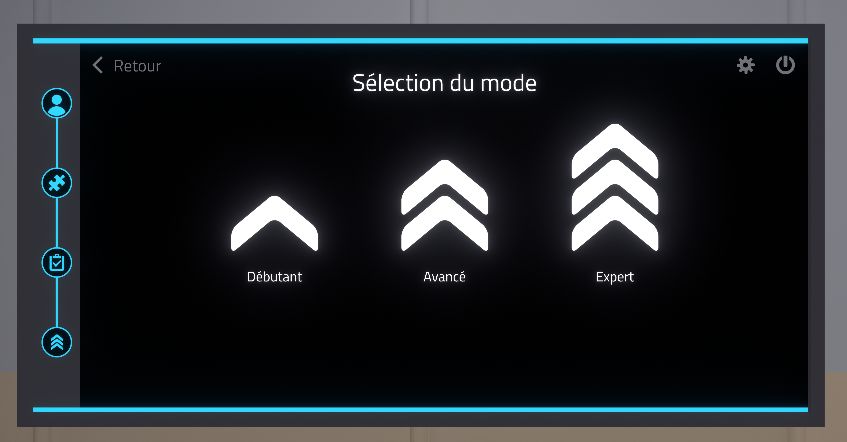
On this page the difficulty levels are displayed: Beginner, Advanced, and Expert. Depending on the exercise, the difficulty changes the instructions and objectives. A double click on the difficulty level will start the exercise.
2.4. Tablet
A tablet appears on the user’s left hand controller, at wrist level. This will accompany the user throughout the exercise and offers the user guidance throughout the exercise thanks to its multiple functions:
-
Title: Title of the exercise.
-
Abort button: The user can abandon the exercise at any time by clicking on this button. In many exercises, to complete the exercise the user will have to affirmatively selection this option to end the exercise and leave the laboratory.
-
Instructions: Displays the procedures required to move on to the next step. When the user starts a step, a voice reads the instruction.
The tablet can change its appearance dynamically in some exercises.
|
Note
|
In most exercises, clicking on the help button will illuminate objects in the lab with which the user will need to interact. |
To press the buttons on the tablet, the user can point in their direction with their right hand. A laser is activated when the right hand approaches the tablet. It allows the user to interact with the buttons by clicking on the interaction button of the right-hand controller.
2.5. Assessment screen
At the end of each exercise, the user is either automatically teleported back to the lobby, or affirmatively teleports themselves, to see a assessment screen showing the results of the exercise.
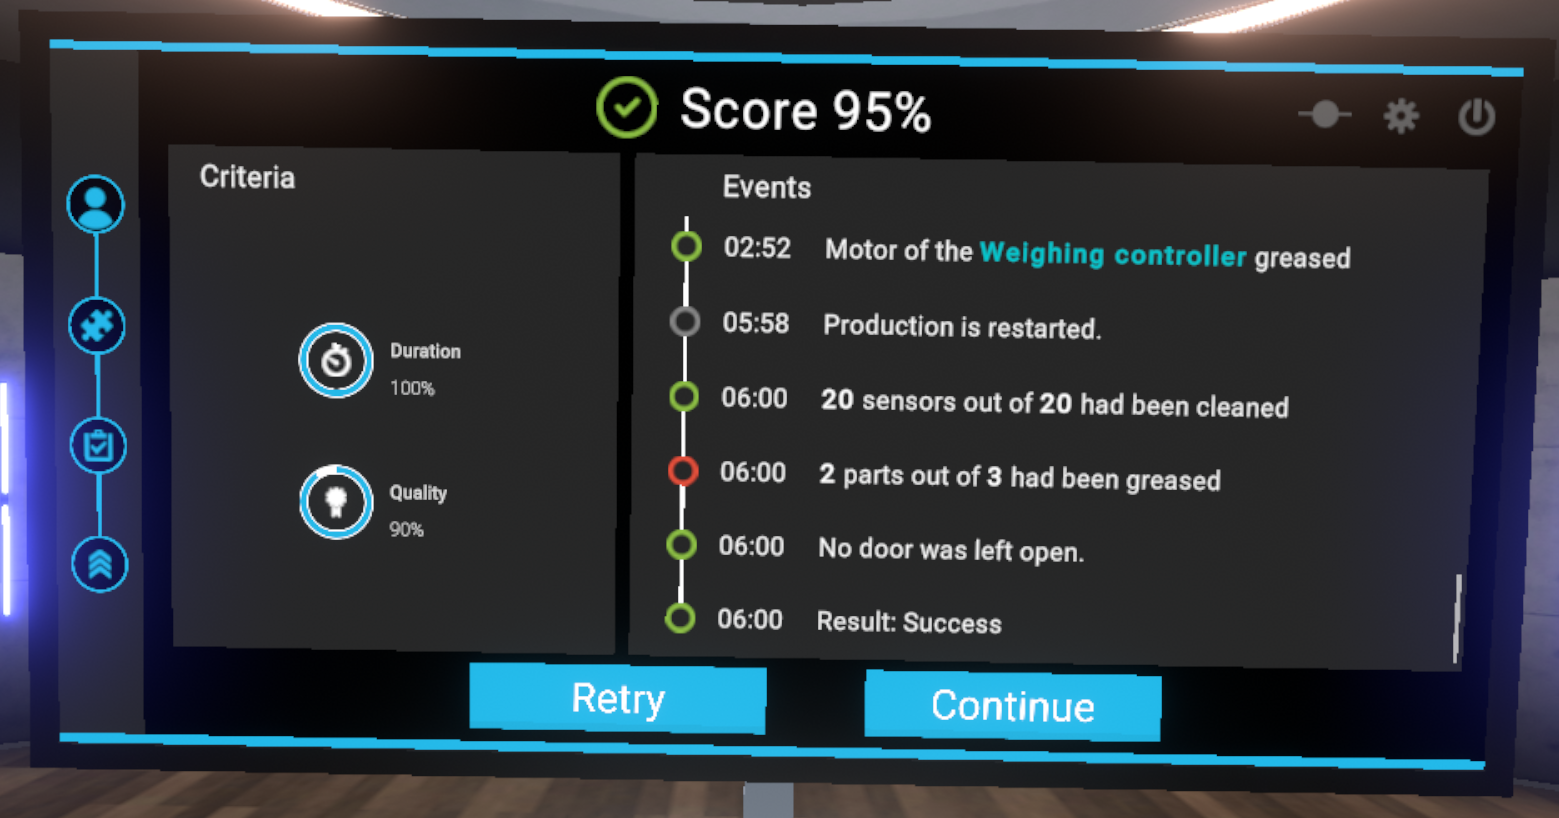
The assessment screen is organised as follows:
-
Results of the exercise with the score displayed as a percentage
-
Evaluation criteria for the exercise. The evaluation criteria are specific to each exercise
-
The events indicating all the actions performed by the user ordered by the time elapsed since the start of the exercise.
2.6. Tutorial
In order to familiarize the user with the available interactions, a tutorial scenario can be launched from the module selection menu.
The aim of the tutorial is to teach the user the commands of the virtual reality equipment and the different metaphors used in the application in a clear and progressive way. It will take place in a neutral and uncluttered environment so as not to distract the user from the various actions expected.
A panel detailing the association between the user’s controllers and the actions will always be visible during the experience.
The tutorial is presented in the form of successive themed rooms, which the user will have to perform one after the other:
-
Moving around
-
Grabbing and moving an object
-
Interacting with an object
In each of the rooms, the user will learn an action (i.e., use of a button) in a dedicated space, and then will have to put this action into practice to leave the room and move on to the next. Once the three rooms are completed, the user will go through a final door to finish the tutorial.
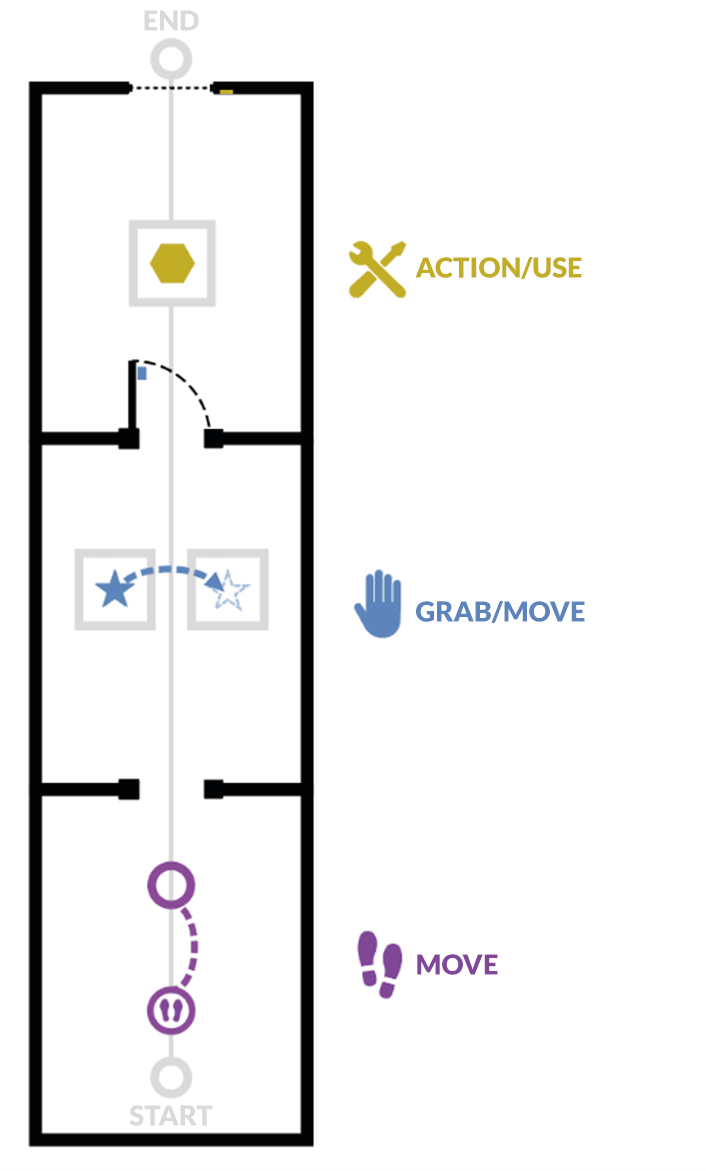
2.6.1. Moving
Objective: to learn how to move around the virtual world and recognize markers that indicate a specific location.
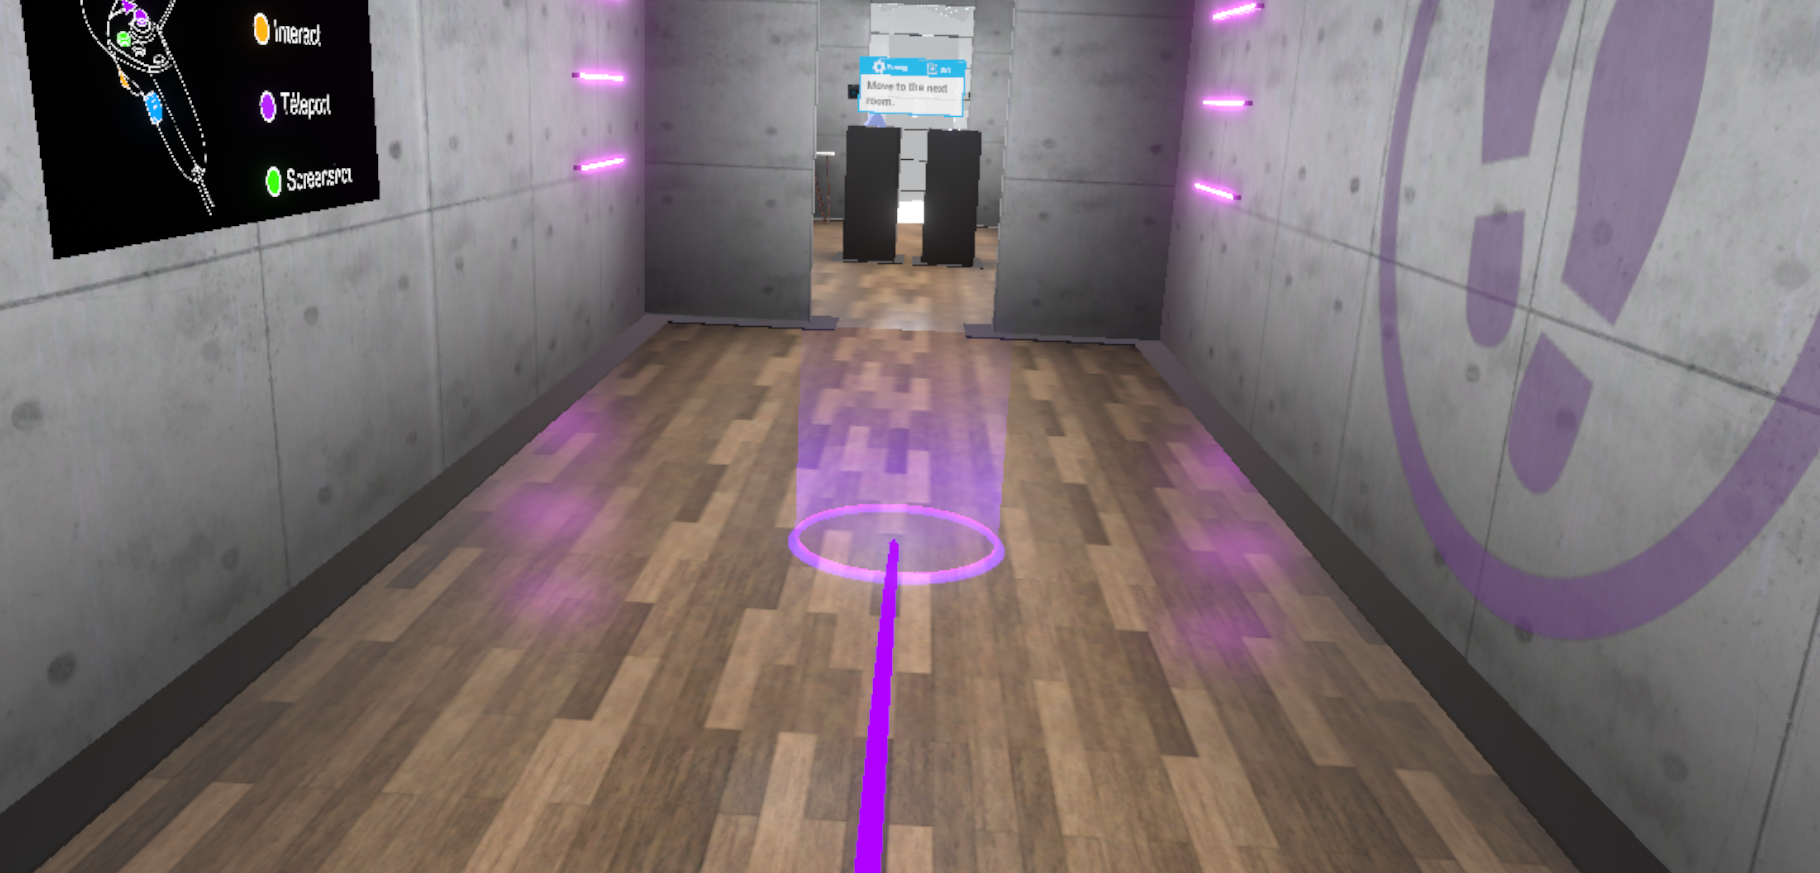
The user will learn to move by teleportation. To leave this first room, the user will be asked to teleport to the next room.
By pressing the "Teleportation" button, it is possible to initiate a teleportation. As long as the button is held down, you can choose the teleportation destination. When you release the button, the teleportation will be performed.
A parabolic pointer coming out of the controller will then be visible, symbolizing the path taken during a teleportation. If teleportation is possible, this pointer is violet; if not, it is red.

2.6.2. Picking Up/Moving an Object
Objective: To learn to pick up an object, release it and place it on a magnetized area, and to recognize the associated visual feedback.
The user will be invited to bring their hand close to an object, visualize the associated visual feedback (blue outline), then pick up the object using the associated button and drop it onto a designated area on a second display.
Once this action is completed, the user will be prompted to exit the room by opening a door, giving them the opportunity to use the "Grab an item" interaction again on the handle.

2.6.3. Action/Using a Tool
Objective: To learn how to interact with tools or buttons, and recognize the associated visual feedback.
The user will be asked to interact with an object on a display (the object will be surrounded by a yellow outline indicating the possibility of activating it) and activate it using the associated button.
To exit the tutorial, the user will have to move to the back of the room and press the elevator button using the "Interact" button. A fade to black will return the user to the lobby.

2.7. Interactions in the laboratory
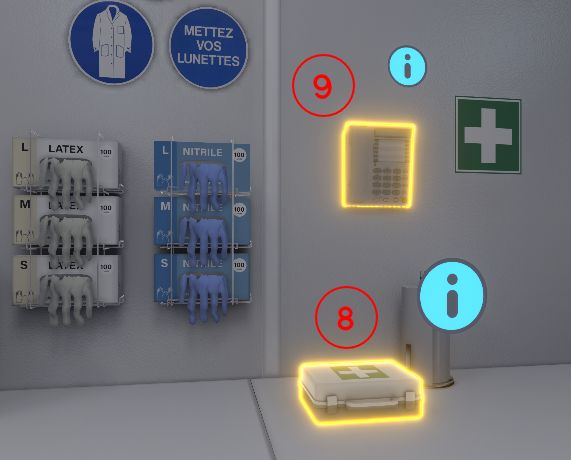
2.7.1. Equipping PPE
PPE (Personal Protective Equipment) must be equipped in most exercises before entering the laboratory, otherwise the score will be lowered.
Nitrile gloves, goggles and a lab coat must be fitted.
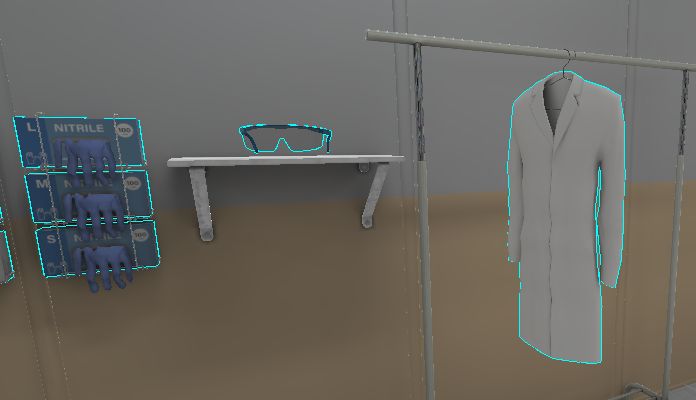
-
Nitrile gloves: Press the interaction button on the controller. To remove them, press the button again in the same place.
-
Goggles: Grasp them, bring them close to your face until you see the associated visual feedback (blue outline), then release them so that they settle on your face. To remove, bring your hand up to your face, grasp it and place it on the starting area.
-
Lab coat: Press the interaction button on the controller. To remove it, press the button again in the same place.
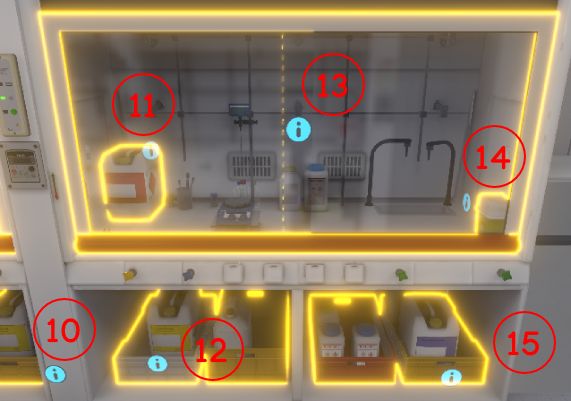
2.7.2. Using the Fume Hood
Several exercises will take place under a fume hood. To open a fume hood, the user must grab the glass of the fume hood and move it upwards from below, then let go of the glass so that it opens. It can be opened halfway or fully. If the fume hood is fully open, there are more safety risks. If the fume hoood is left open too long, an audible alarm will sound. The user must close the fume cupboard to stop it.
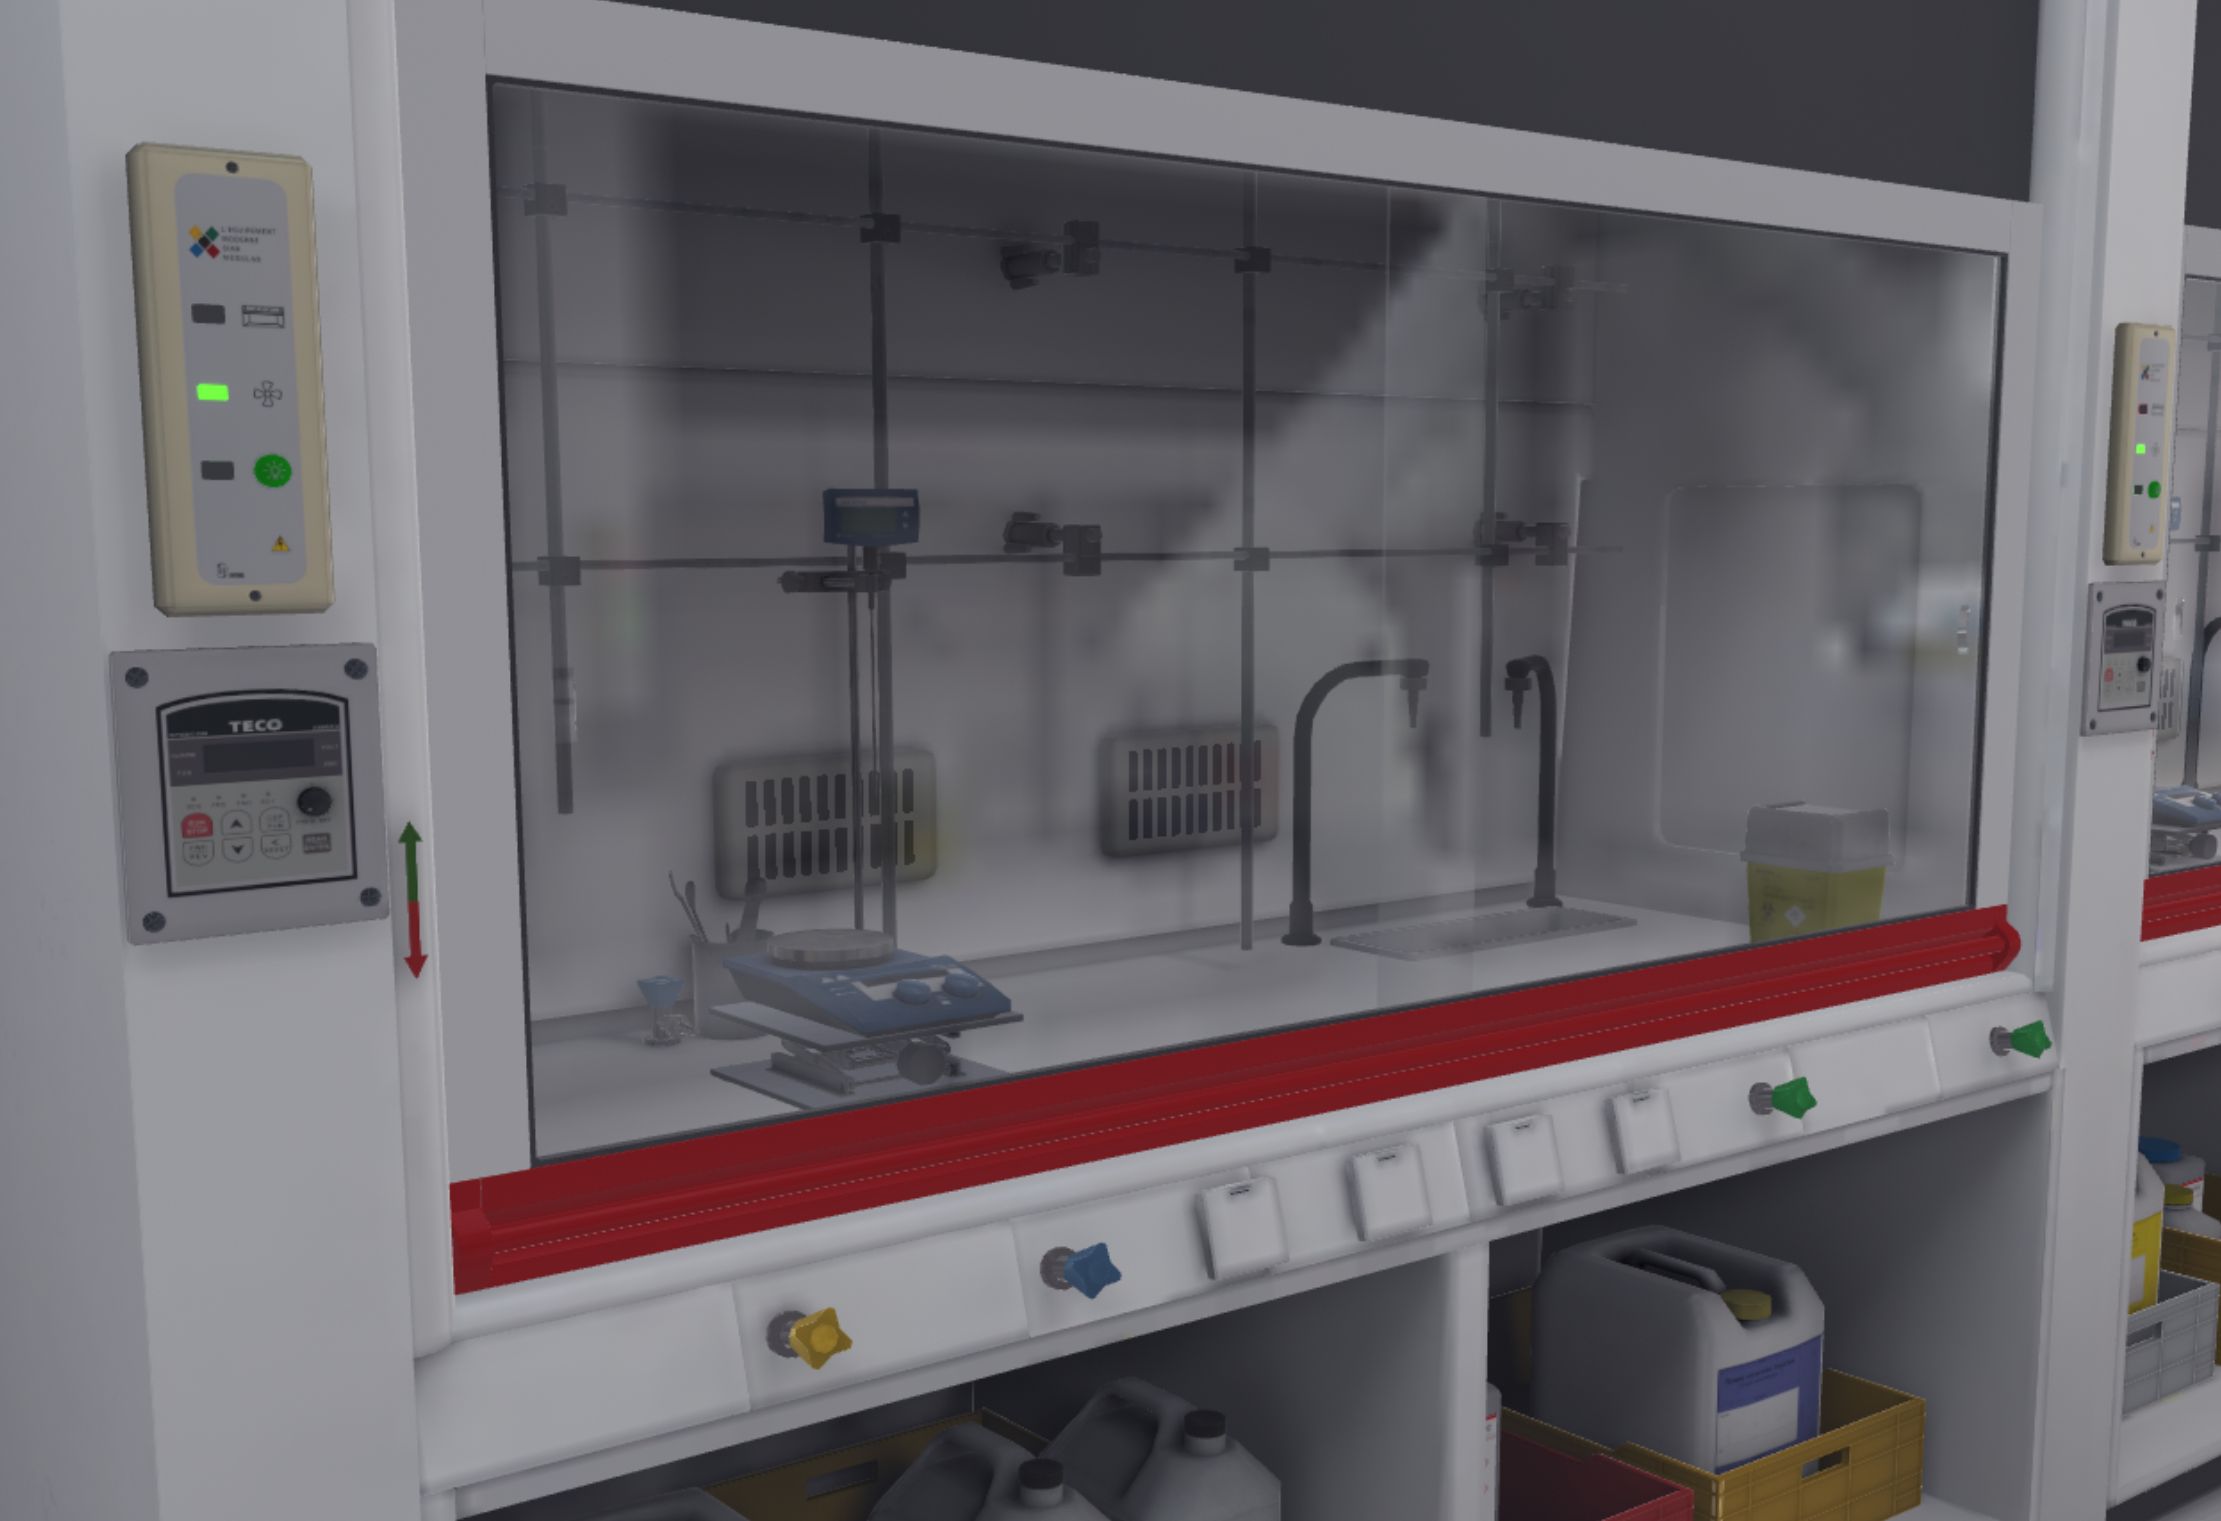
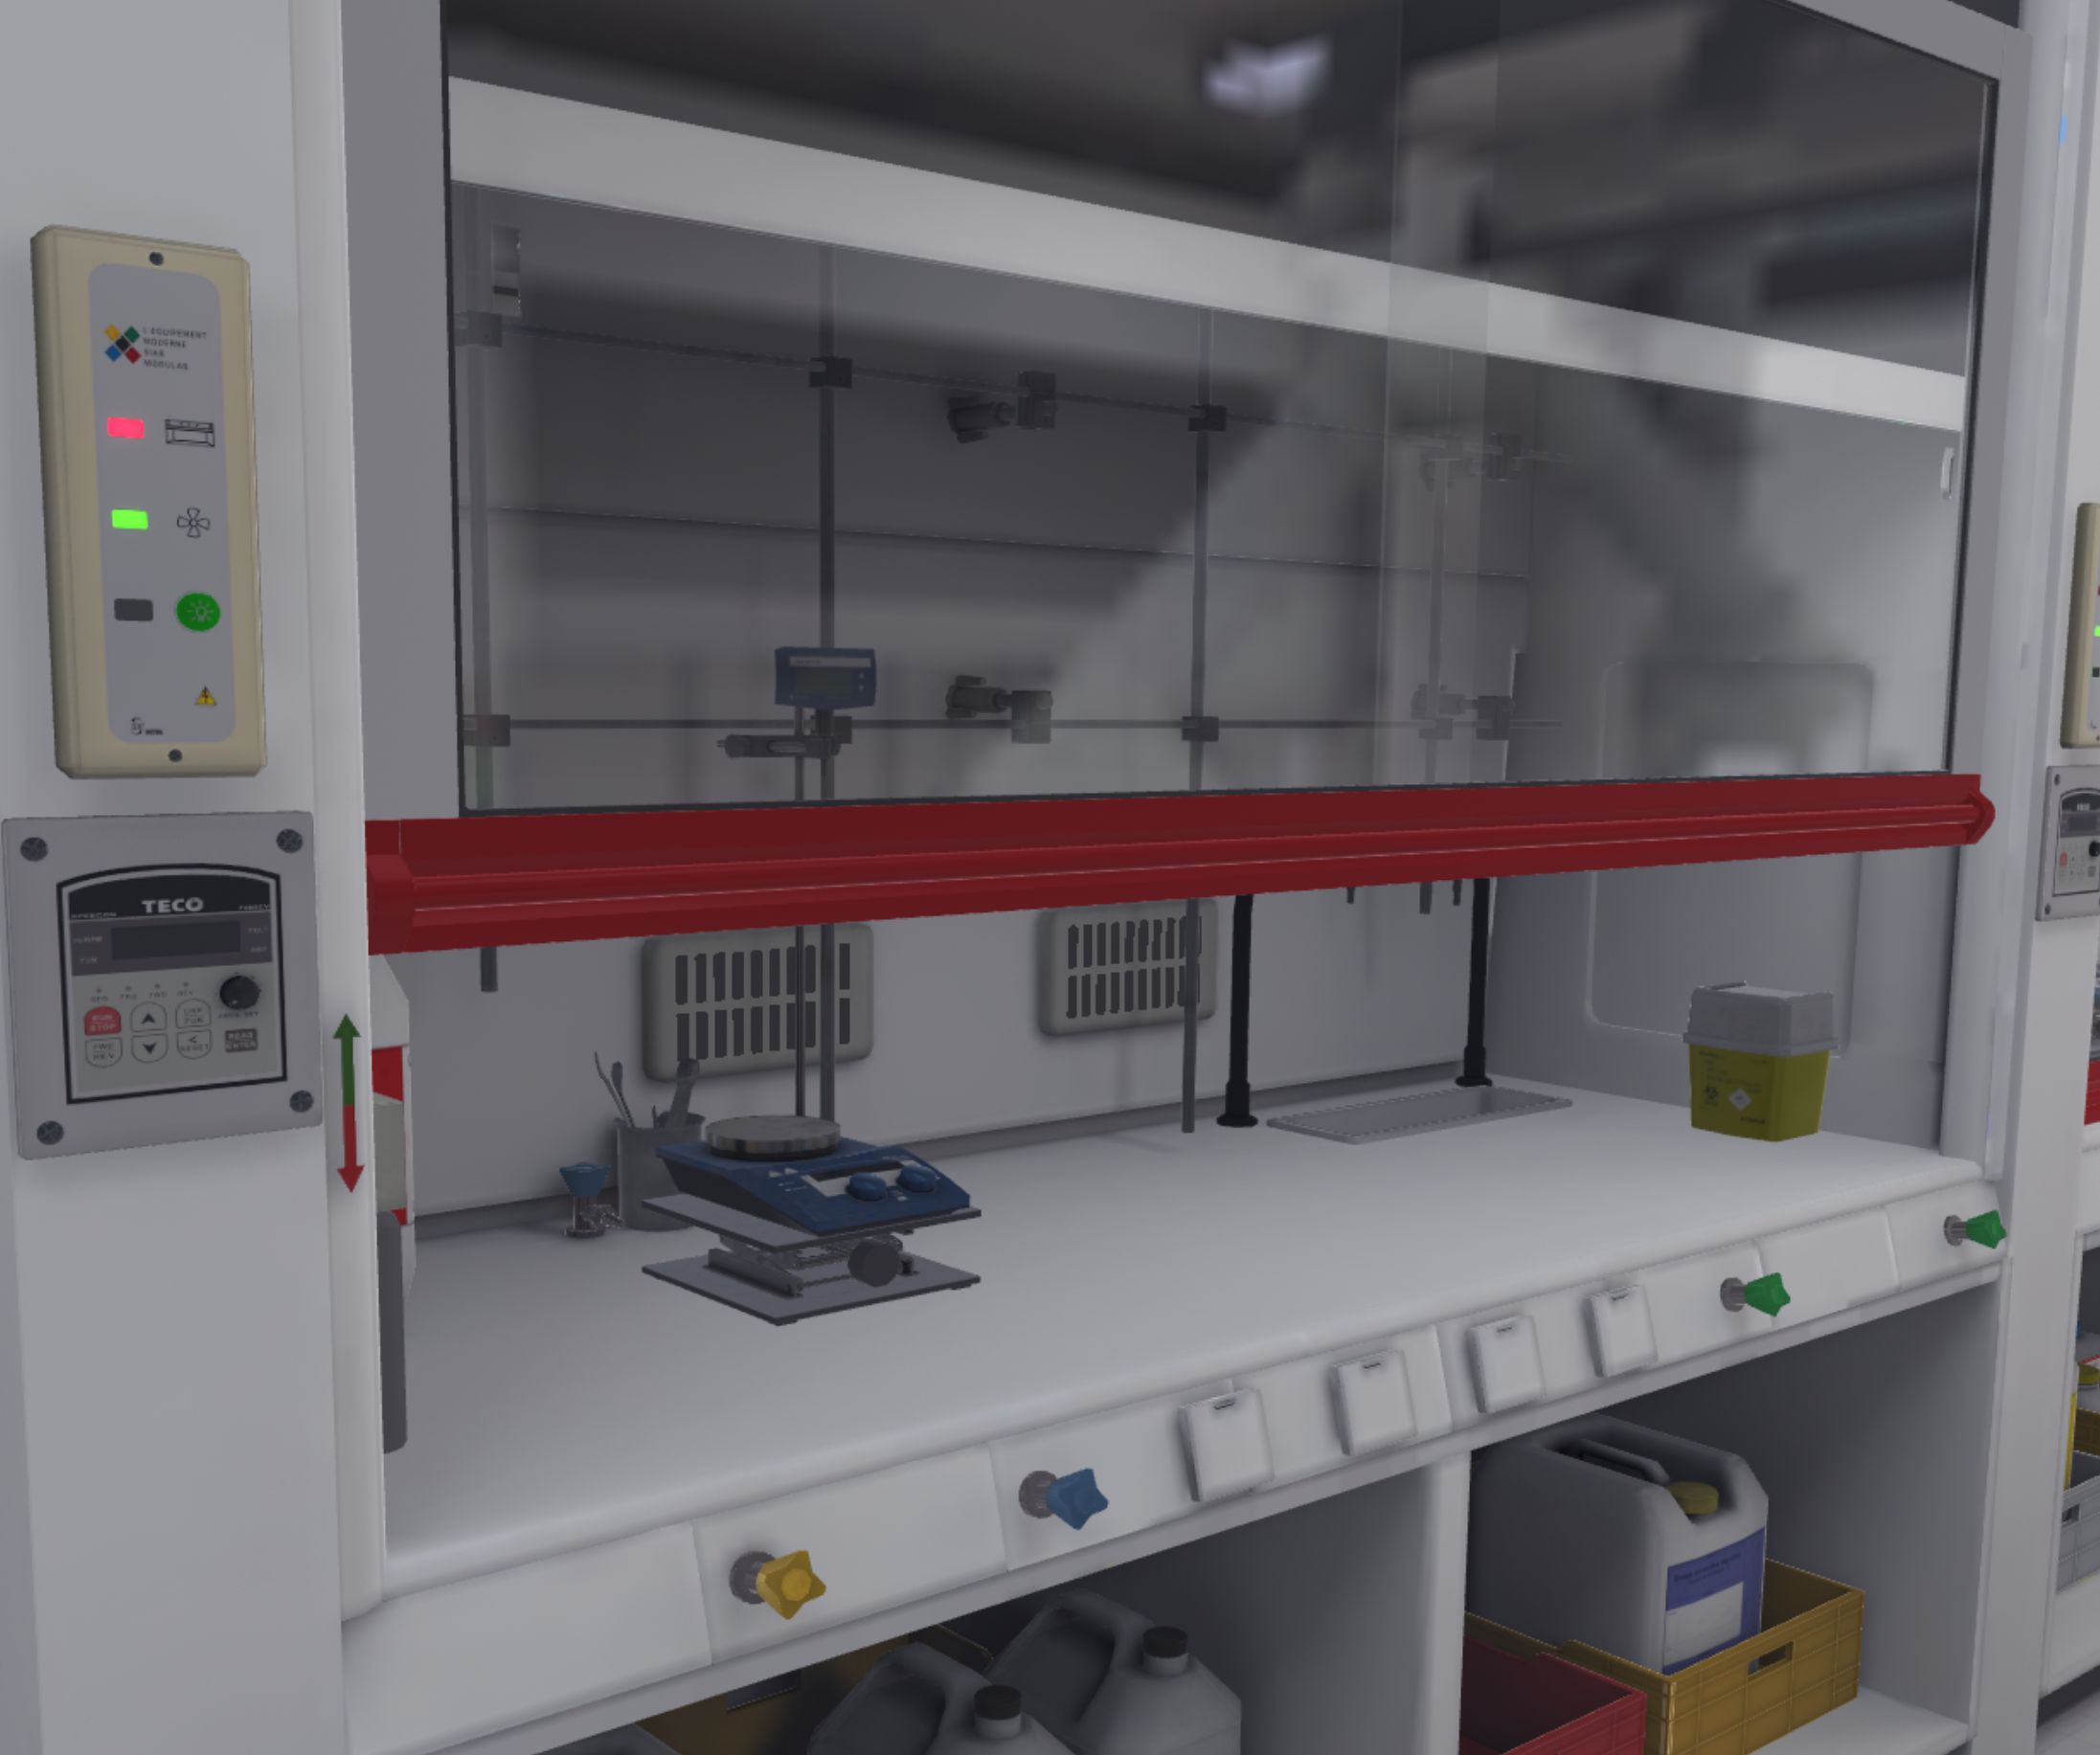

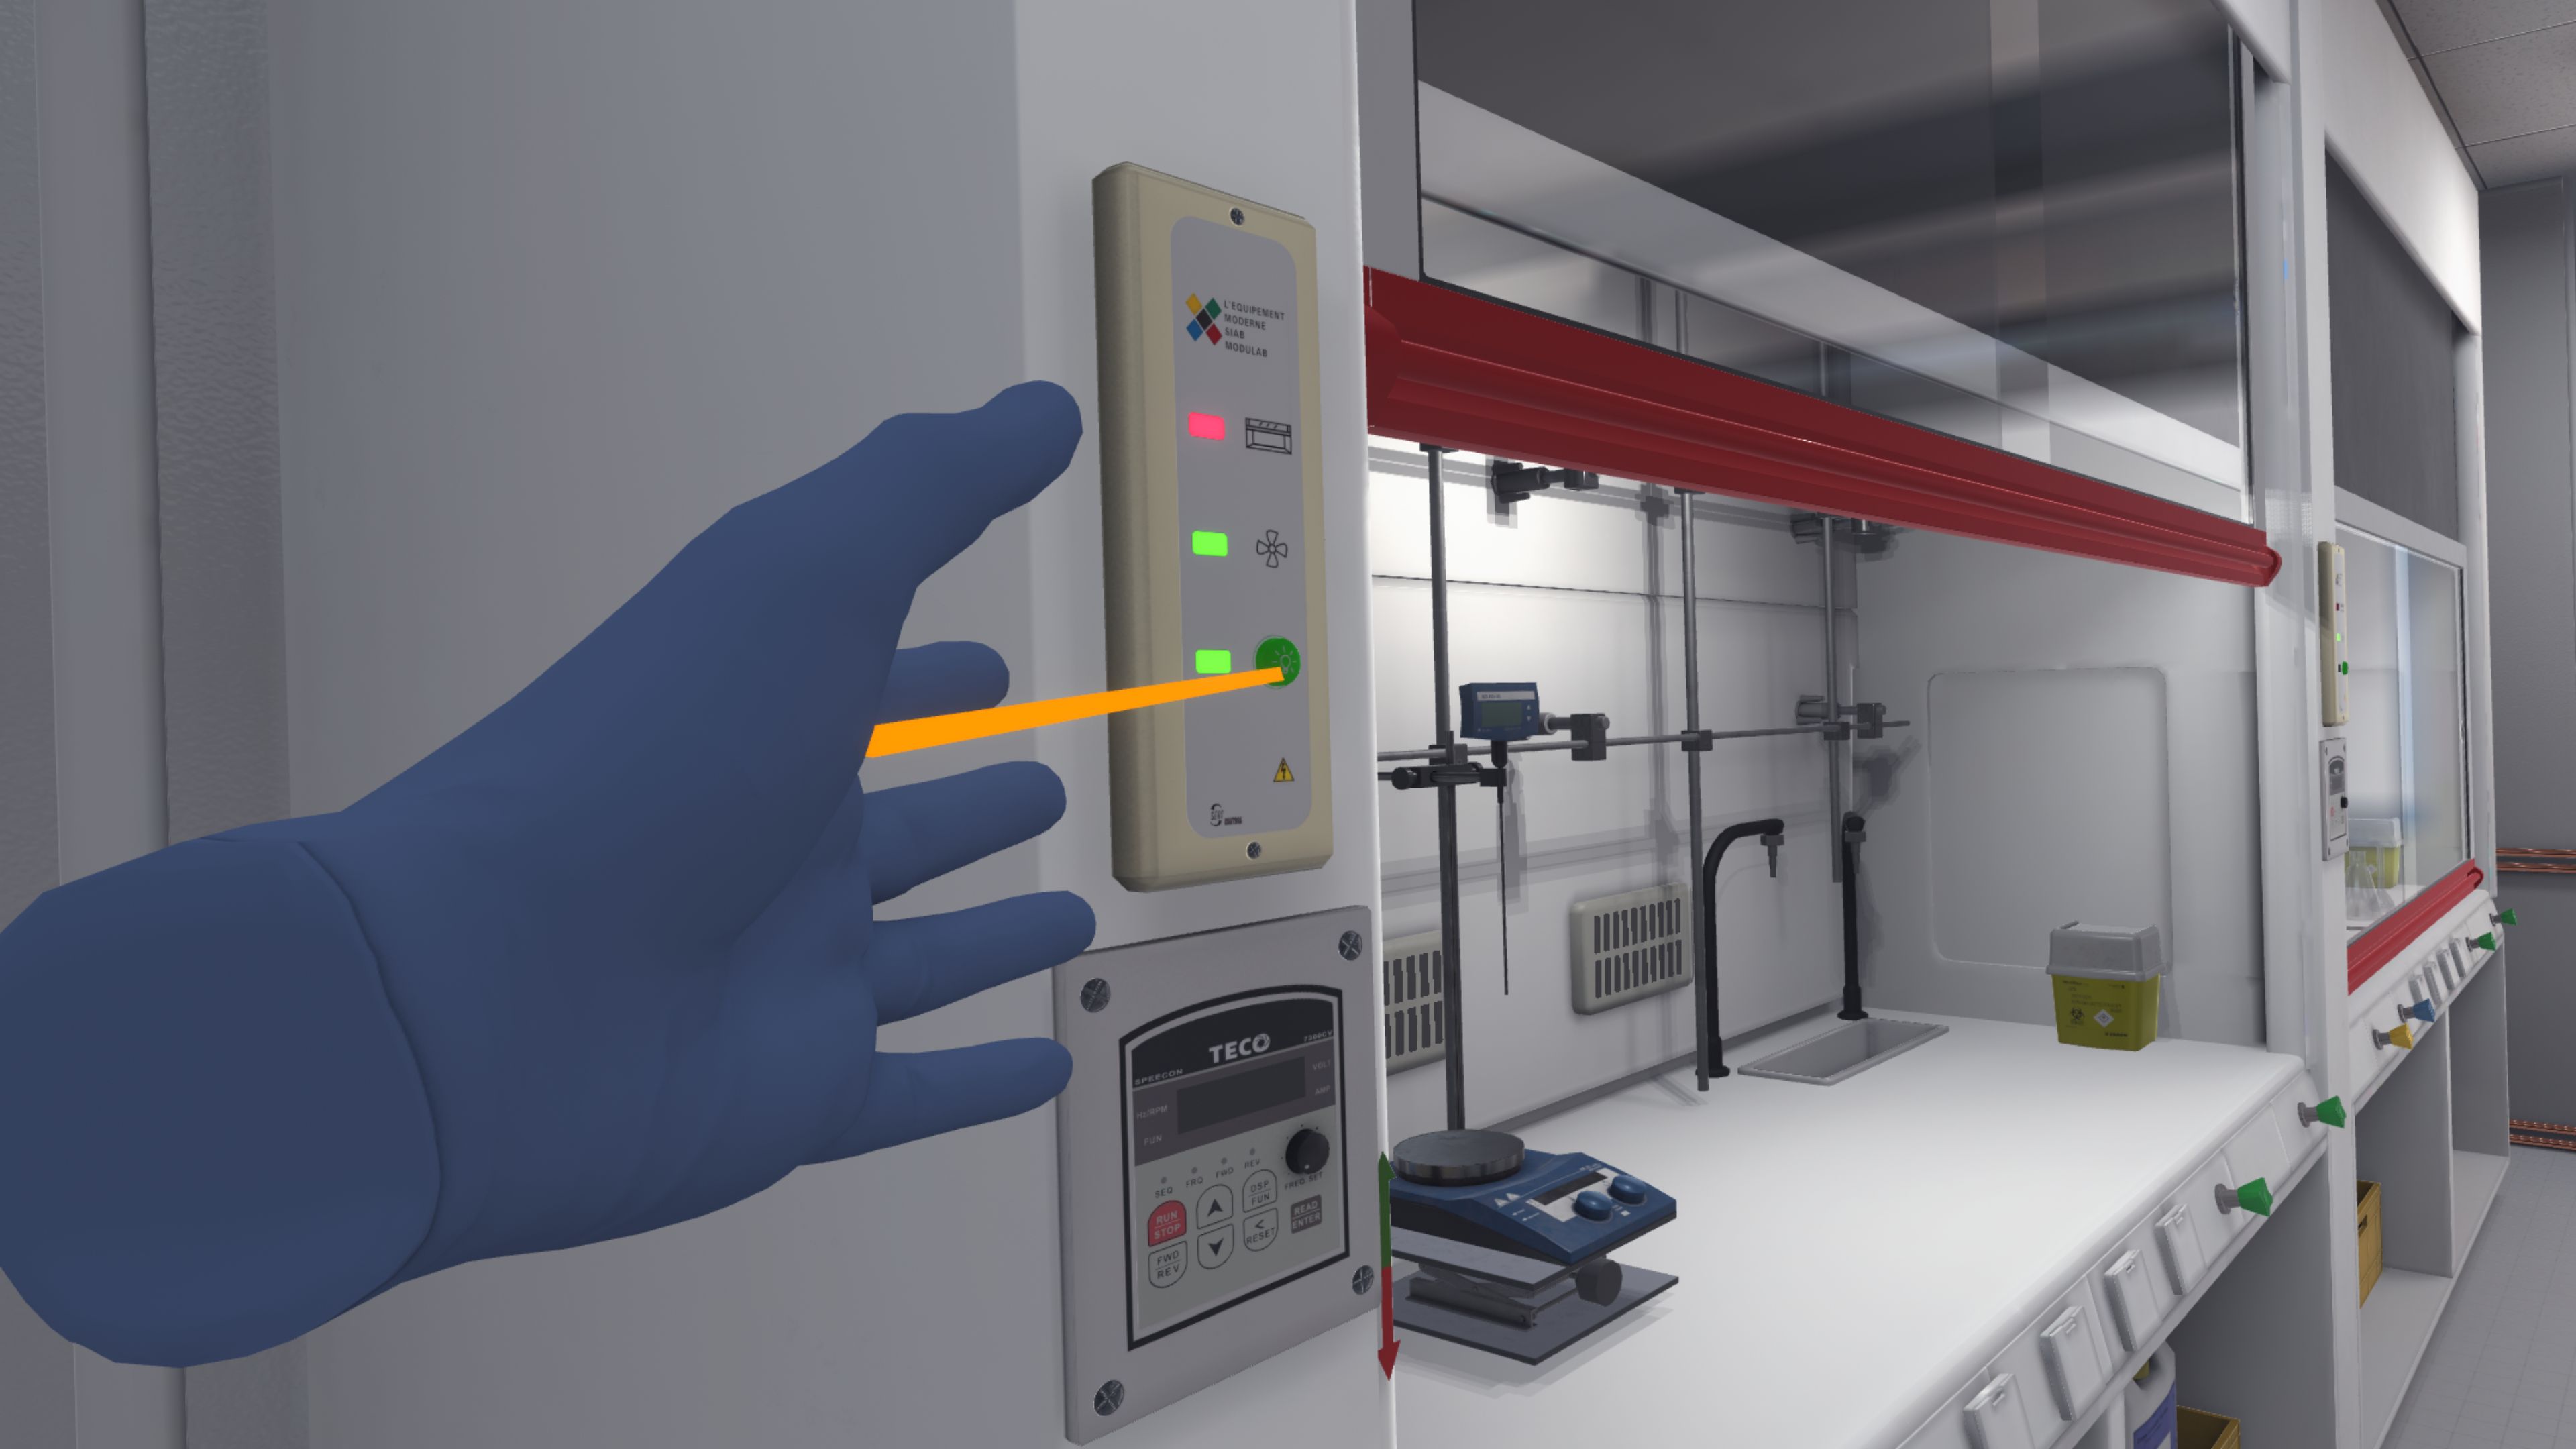
The user can also switch on the fume cupboard light by pressing the green button on the control panel.
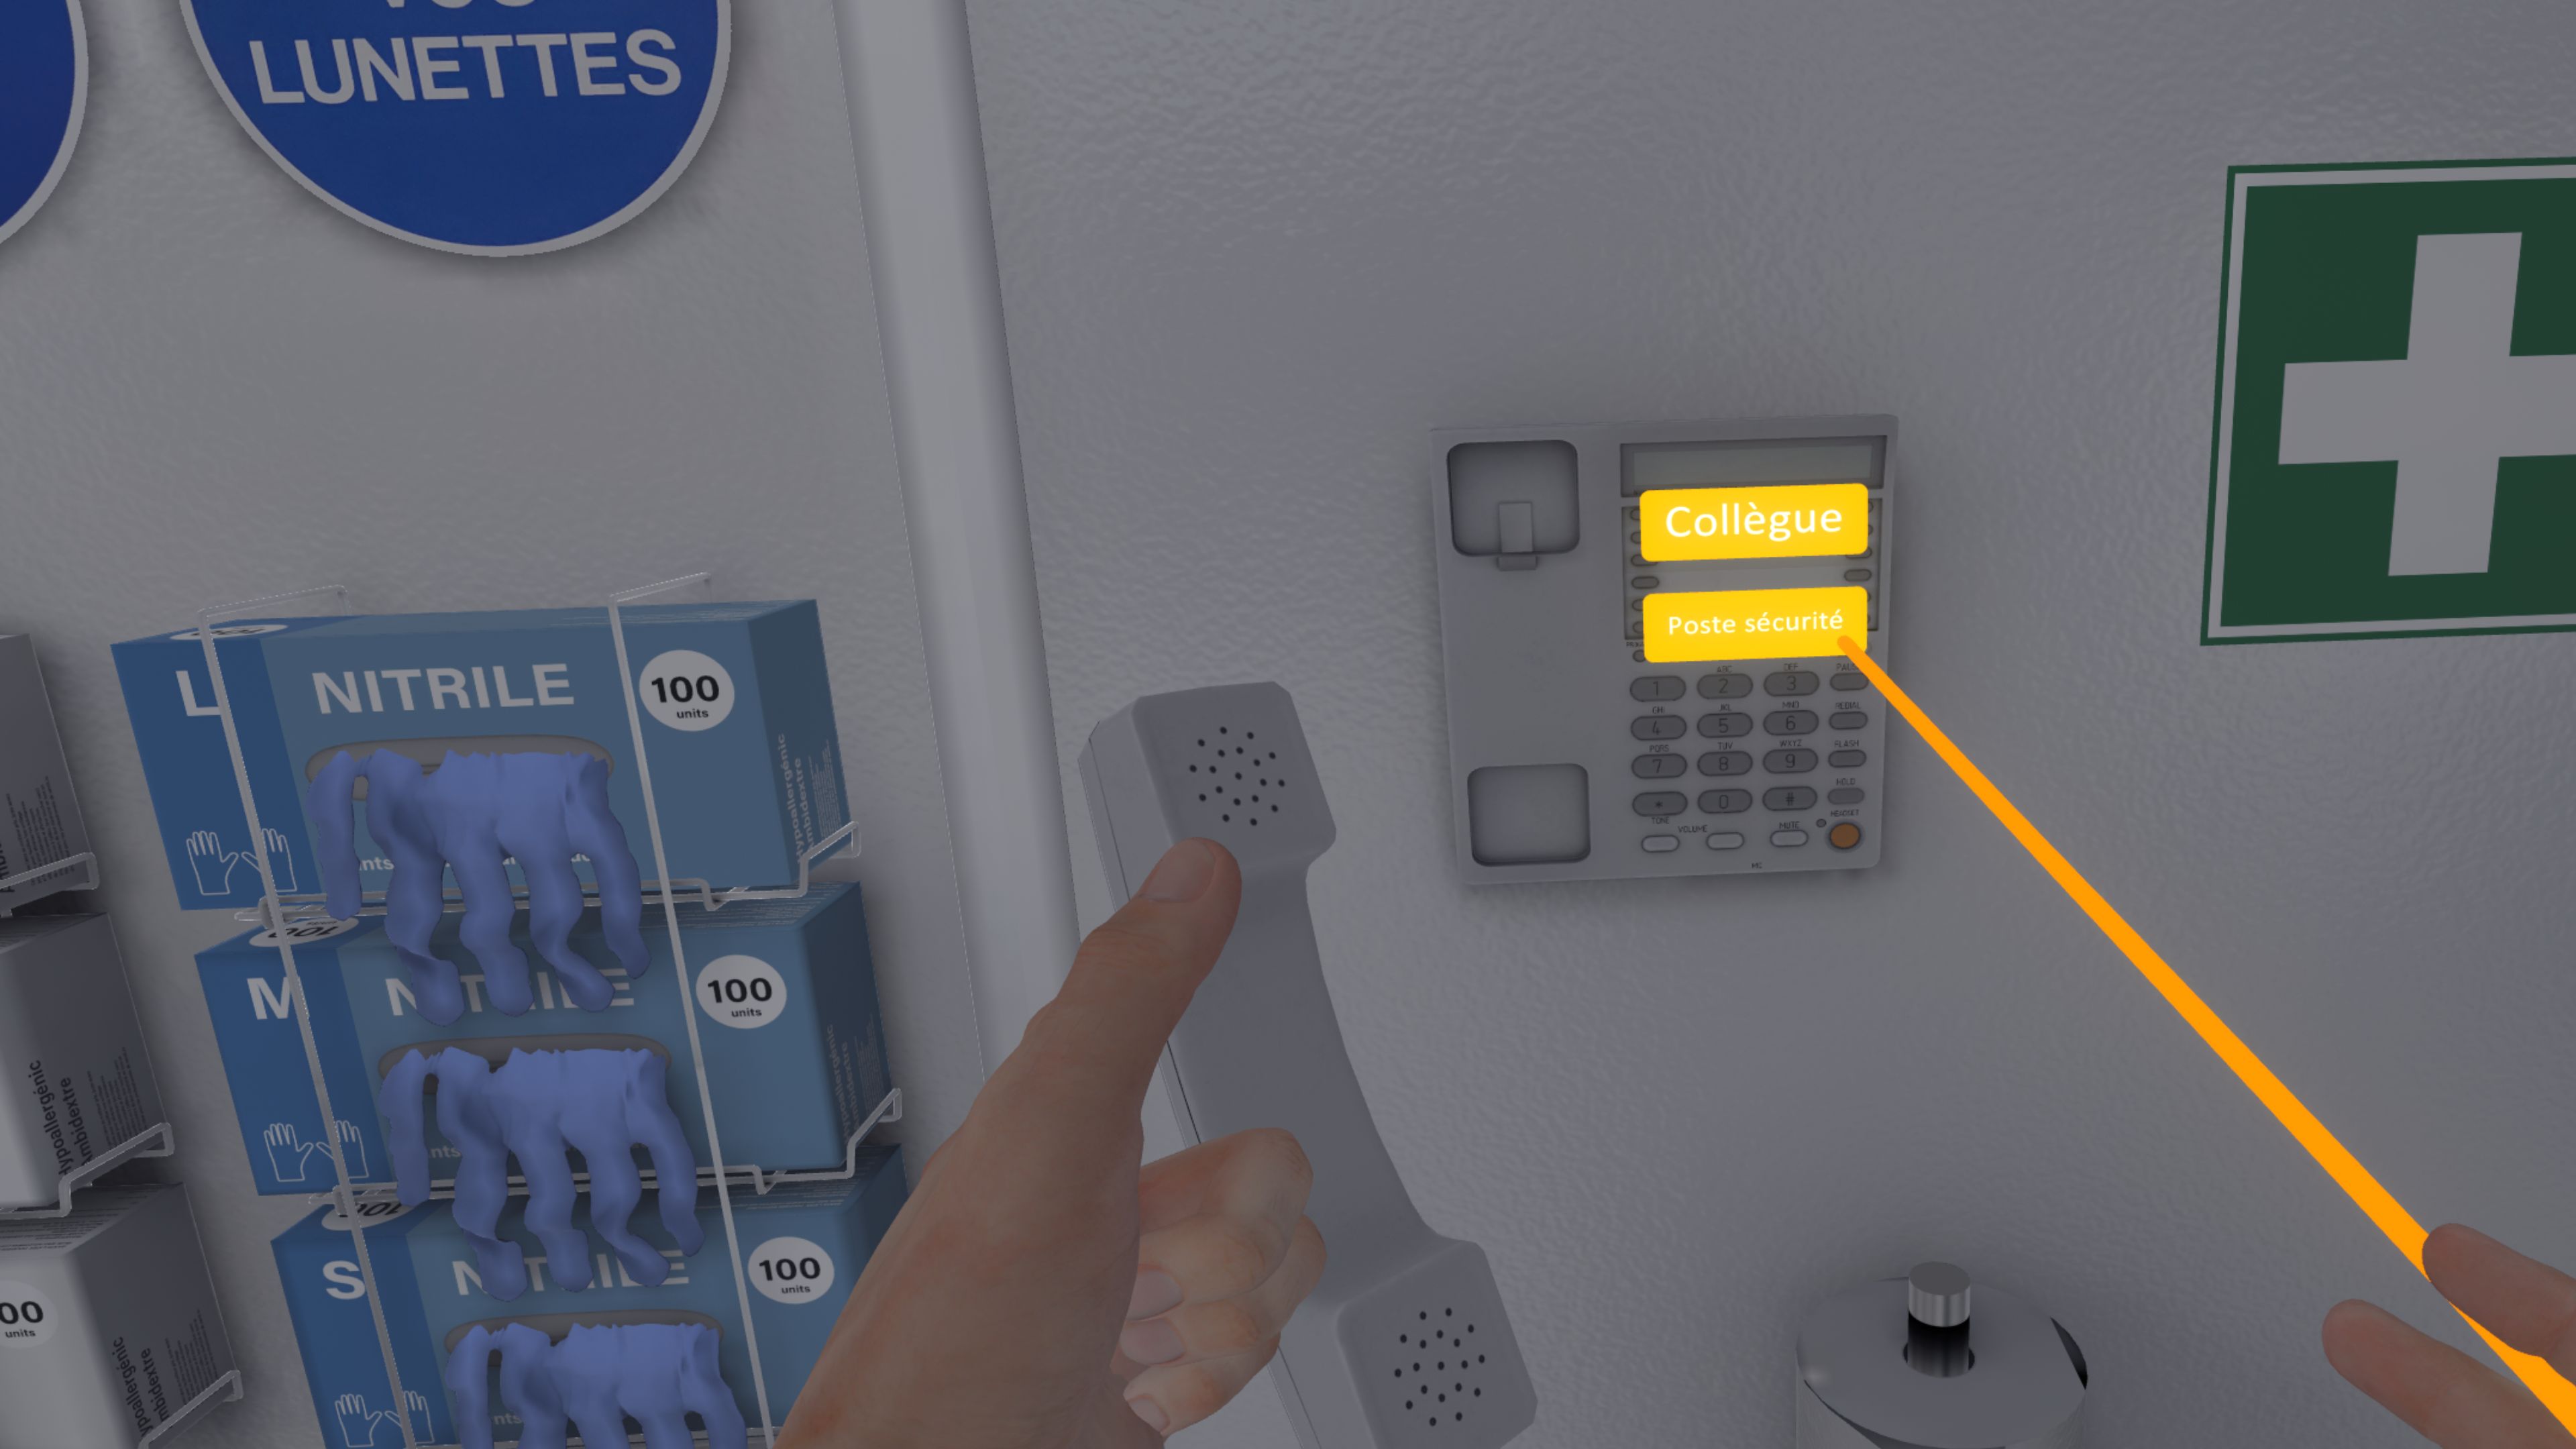
2.7.3. Using the phone
During some exercises, the user will be in a dangerous situation and will have to use the telephone to call a colleague or the security station. To do this, the user must pick up the phone and with the other hand select the corresponding button with the laser and click on the interaction button.
2.7.4. Product transfer
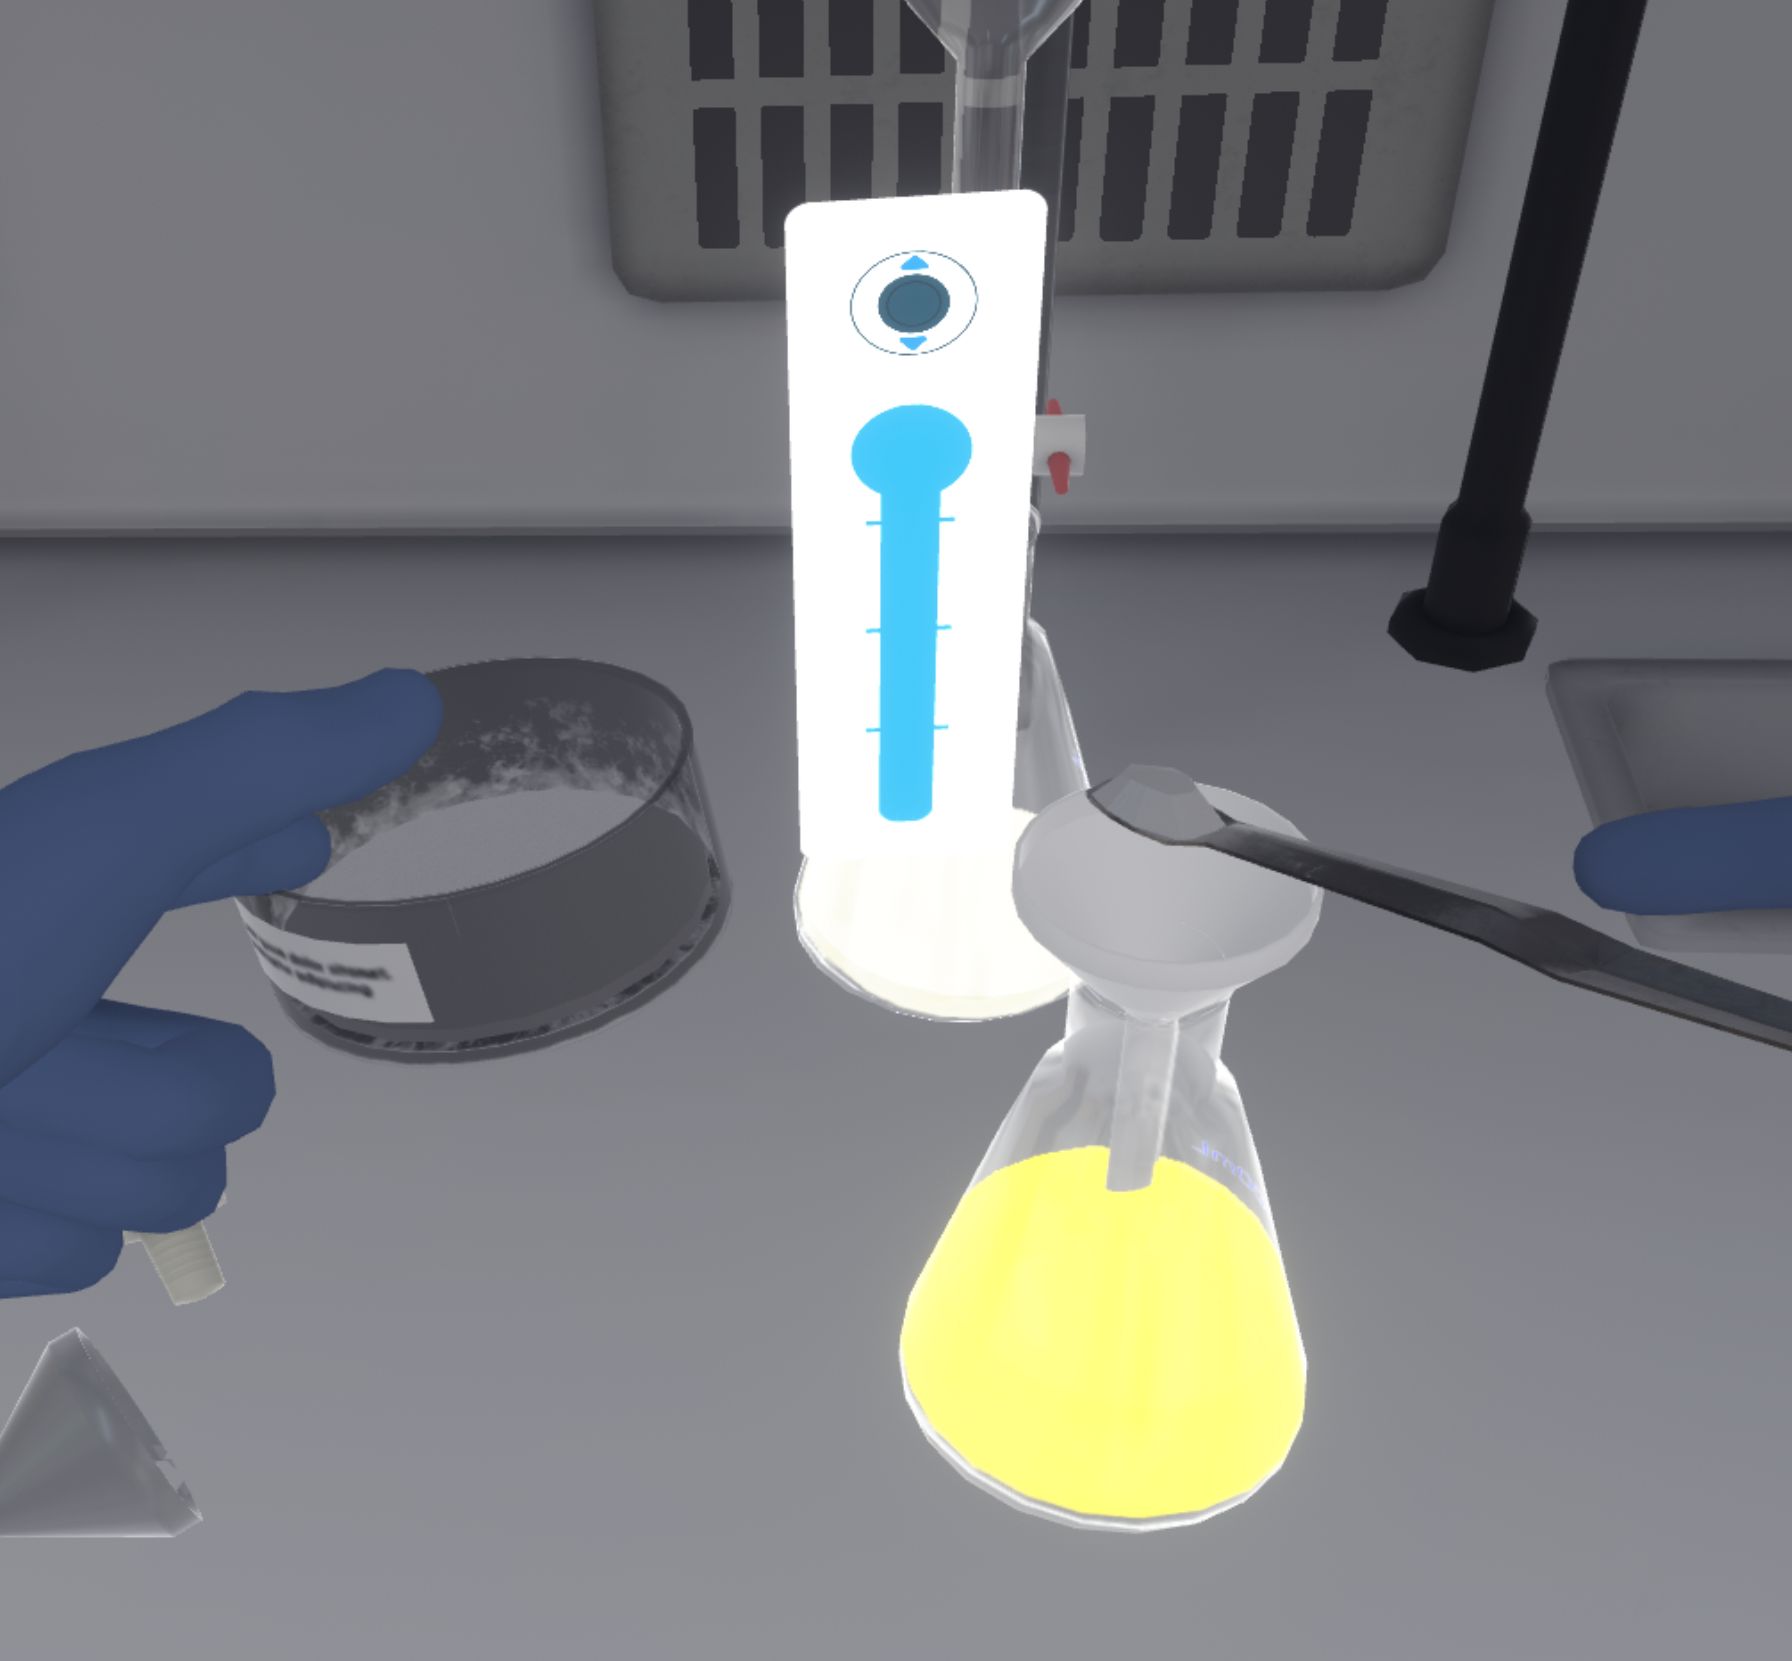
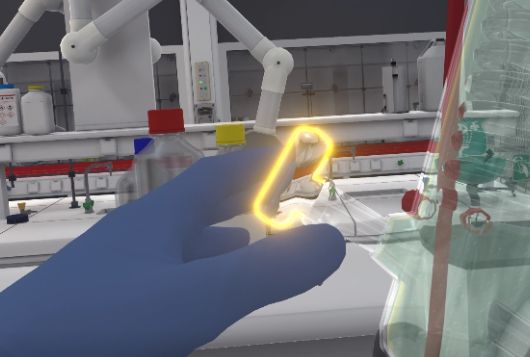
Spatula and syringe
The user can transfer powders with the spatulas and liquids with the syringes. The handling is the same in both cases. The user must bring the spatula/syringe close to the bottle (or ramekin) containing the product, until a coloured gauge appears. With the controller of the hand gripping the spatula/syringe, the user pushes the joystick up to fill the spatula/syringe or down to empty it.
In the case of the syringe, the amount it contains is displayed on the interface.
-
Large spatula | Capacity: 100mg (0.1g)
-
Small Spatula | Capacity: 10mg (0.01g)
Liquid transfer
The user can also transfer liquids from one container to another directly. The user can grab the first container and tip it over until liquid flows out, and aim for the mouth of the second container.

|
Note
|
As long as a second container is not targeted, the first container will not see its product quantity change. |
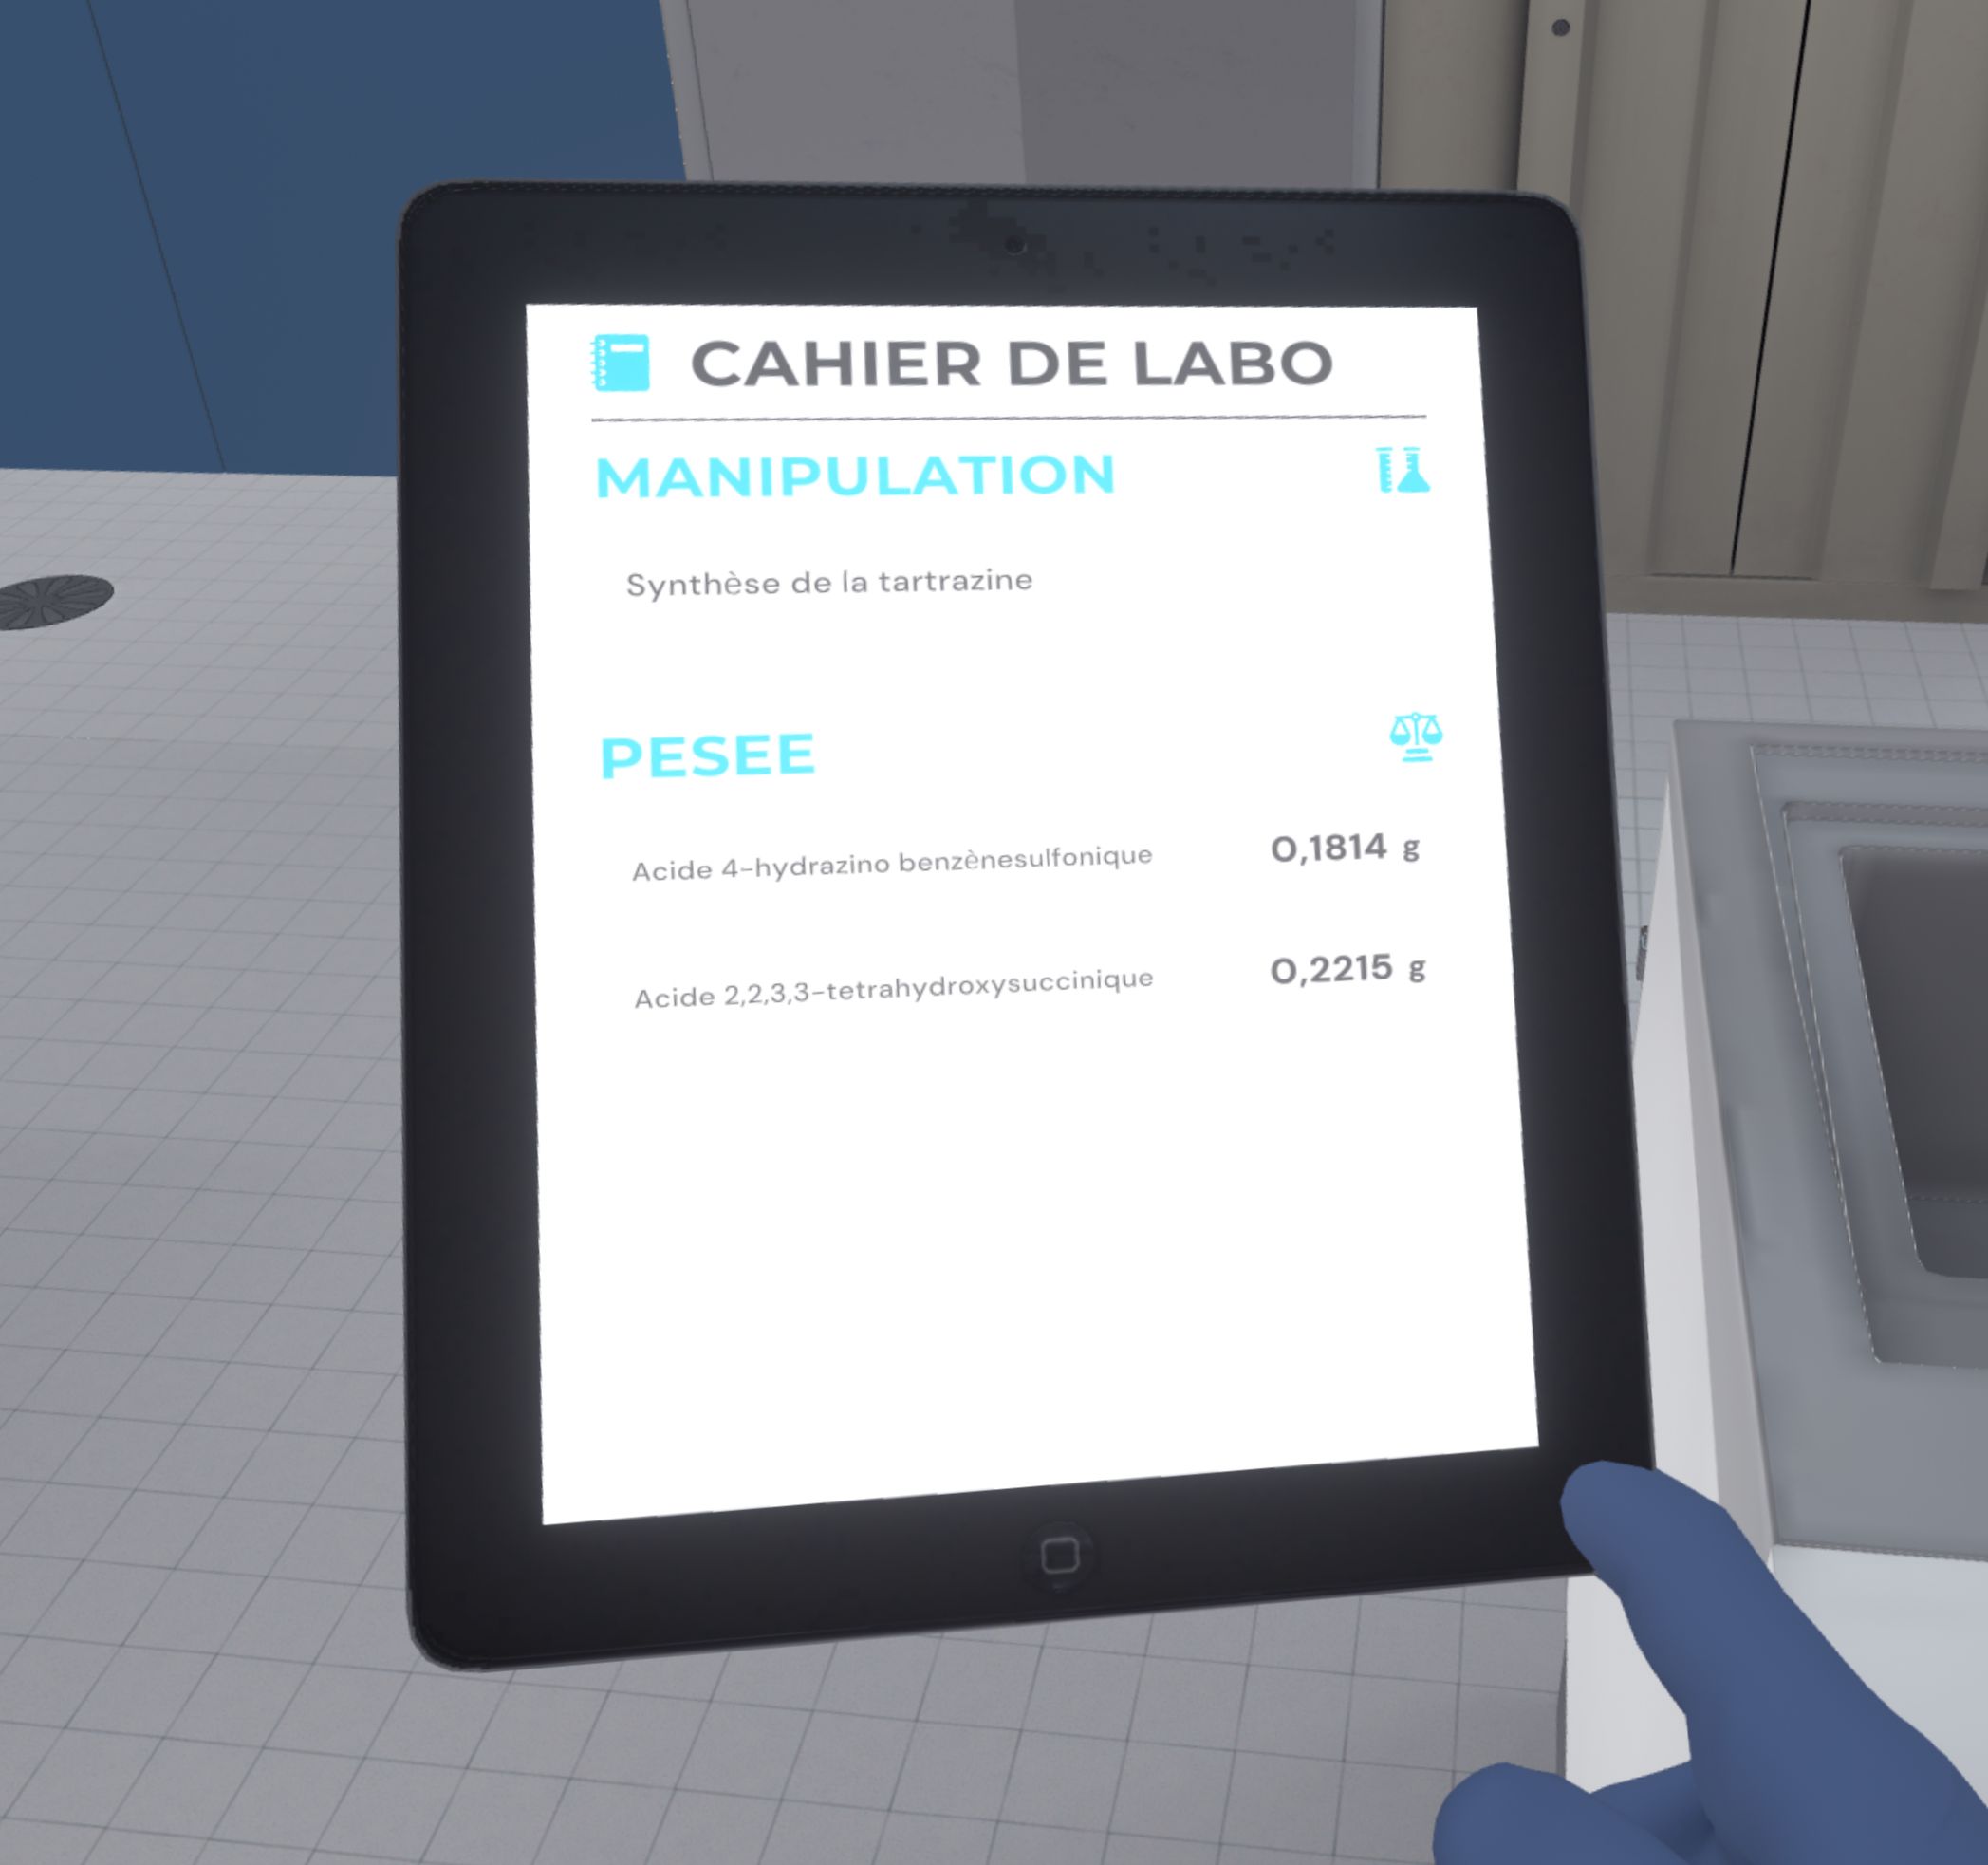
2.7.5. Laboratory notebook
In several manipulative exercises, the user can find their laboratory notebook in the form of a tablet. Depending on the exercise, different information will be presented, and from time to time the user will have to confirm steps on this tablet.
3. Open Laboratory Visit
3.1. Open visit to the chemistry lab
The user faces a door leading to the chemistry laboratory. They will be able to move freely in the laboratory to visit it and identify various elements. To leave the exercise, they must leave the laboratory.
3.1.1. Instructions
To complete the exercise, the user should follow the following instructions:
-
Enter the chemistry laboratory
-
Move freely in the chemistry laboratory. Leave the laboratory to end the exercise.
3.1.2. Scenario sequence
In front of each piece of equipment there is an icon indicating a point of interest.
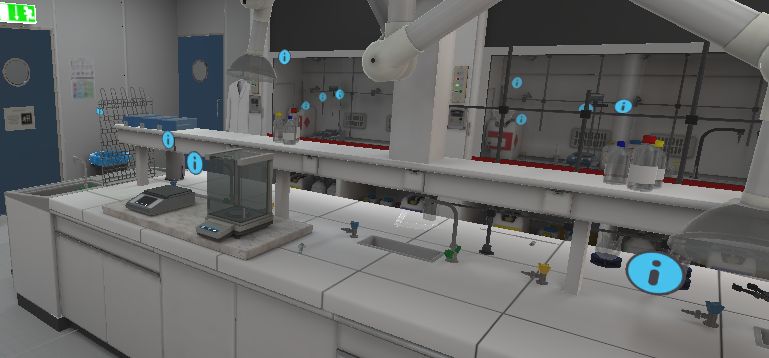
Point in the direction of a point of interest with one hand. A laser is activated.
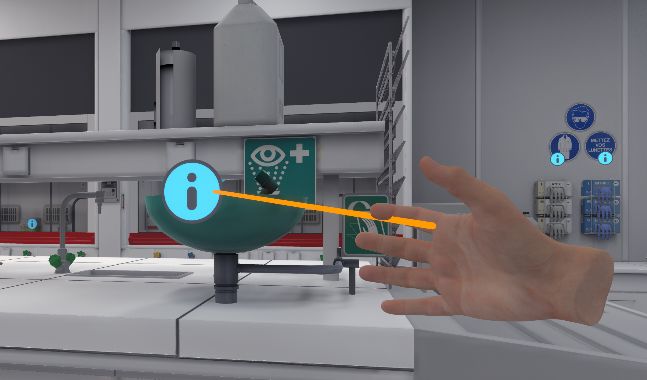
The user must press the interaction button on the hand controller to display a pop-up window containing the name, description, and classification of the equipment.
When the user feels that they have seen enough, they can leave the exercise by exiting the laboratory.
3.1.3. Evaluation criteria for the exercise
![]() Duration: Time taken by the user to complete the exercise.
Duration: Time taken by the user to complete the exercise.
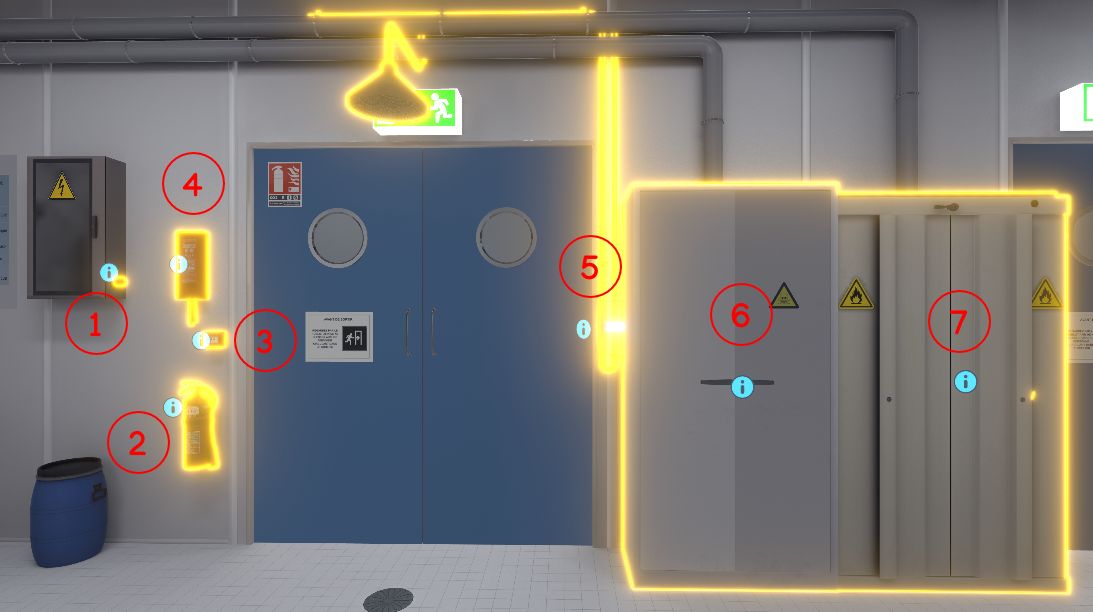
4. Laboratory Safety
4.1. Managing protective equipment in the laboratory
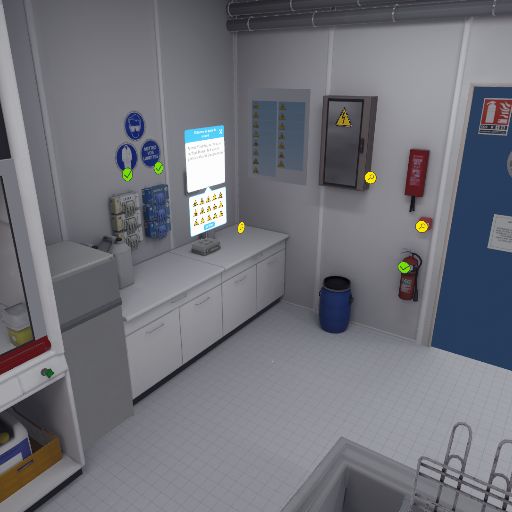
In this module the user is asked to identify the protective equipment in the chemical laboratory. Depending on the level of difficulty chosen, the objectives and aids differ.
4.1.1. Instructions
To complete the whole exercise, the user must follow the following instructions:
Beginner
-
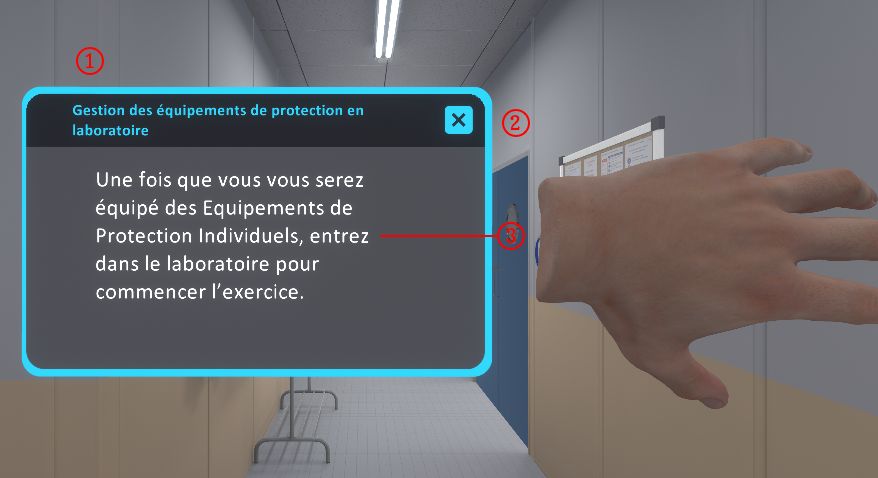
Once you have equipped yourself with Personal Protective Equipment, enter the laboratory to begin the exercise.
-
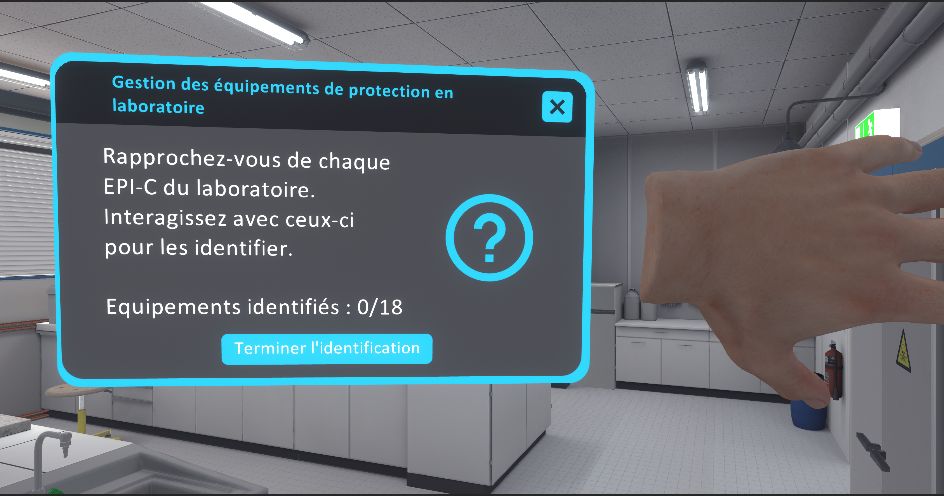
Approach each item of safety equipment in the laboratory. Interact with them to identify them.
-
Click "Finish Identification" on your tablet or leave the lab to complete the exercise.
Advanced
-
Once you have equipped yourself with PPE, enter the laboratory to begin the exercise.
-
Walk up to each item of safety equipment in the laboratory. Touch them to identify them. Then classify each piece of equipment according to the hazard to which it is attached.
-
Click "Finish Identification" on your tablet or leave the lab to complete the exercise.
Expert
-
Enter the laboratory to start the exercise.
-
Walk up to each item of safety equipment in the laboratory. Interact with them to identify them.
-
Click "Finish Identification" on your tablet or leave the lab to complete the exercise.
4.1.2. Scenario sequence
The user starts the scenario with the following briefing:
You are going to make your first visit to a chemistry laboratory. This laboratory has equipment to ensure your safety in case of danger. You must identify them. You will not be handling any chemicals in this scenario.
The user must equip their PPE, then enter the laboratory. They must identify all safety-related equipment. Point in the direction of the equipment with one hand. A laser is activated.
The user must press the interaction button on the hand controller to identify the equipment. A pop-up window appears describing the equipment.
In advanced and expert difficulty, after selecting the equipment, the user must classify it according to the hazard to which it is attached. In beginner mode, this action is performed automatically.
After the user selects a hazard classification and confirms, the results appear.
-
Blue: Missing answer
-
Green: Correct answer
-
Red: Wrong answer
After identifying an item and closing the pop-up (or identifying a new item), an icon appears in place of the pop-up.
Equipment identified but not classified:
![]()
Equipment identified and classified:
![]()
On their tablet, the user can see the number of items they still have to find. They can also click on the help button to make an unidentified equipment light up in yellow.
|
Note
|
In Expert difficulty, the number of equipment items still to be identified and the help button are not displayed on the tablet. |
4.1.3. List of hazard pictograms to be identified
![]() Biological hazard
Biological hazard
![]() Corrosive substances
Corrosive substances
![]() Risk of cut
Risk of cut
![]() Electrical hazard
Electrical hazard
![]() Explosive atmosphere
Explosive atmosphere
![]() Explosive materials, explosion hazard
Explosive materials, explosion hazard
![]() Falling from a height
Falling from a height
![]() Flammable materials or high temperature
Flammable materials or high temperature
![]() General hazard
General hazard
![]() Harmful or irritating materials
Harmful or irritating materials
![]() Laser radiation
Laser radiation
![]() Magnetic field
Magnetic field
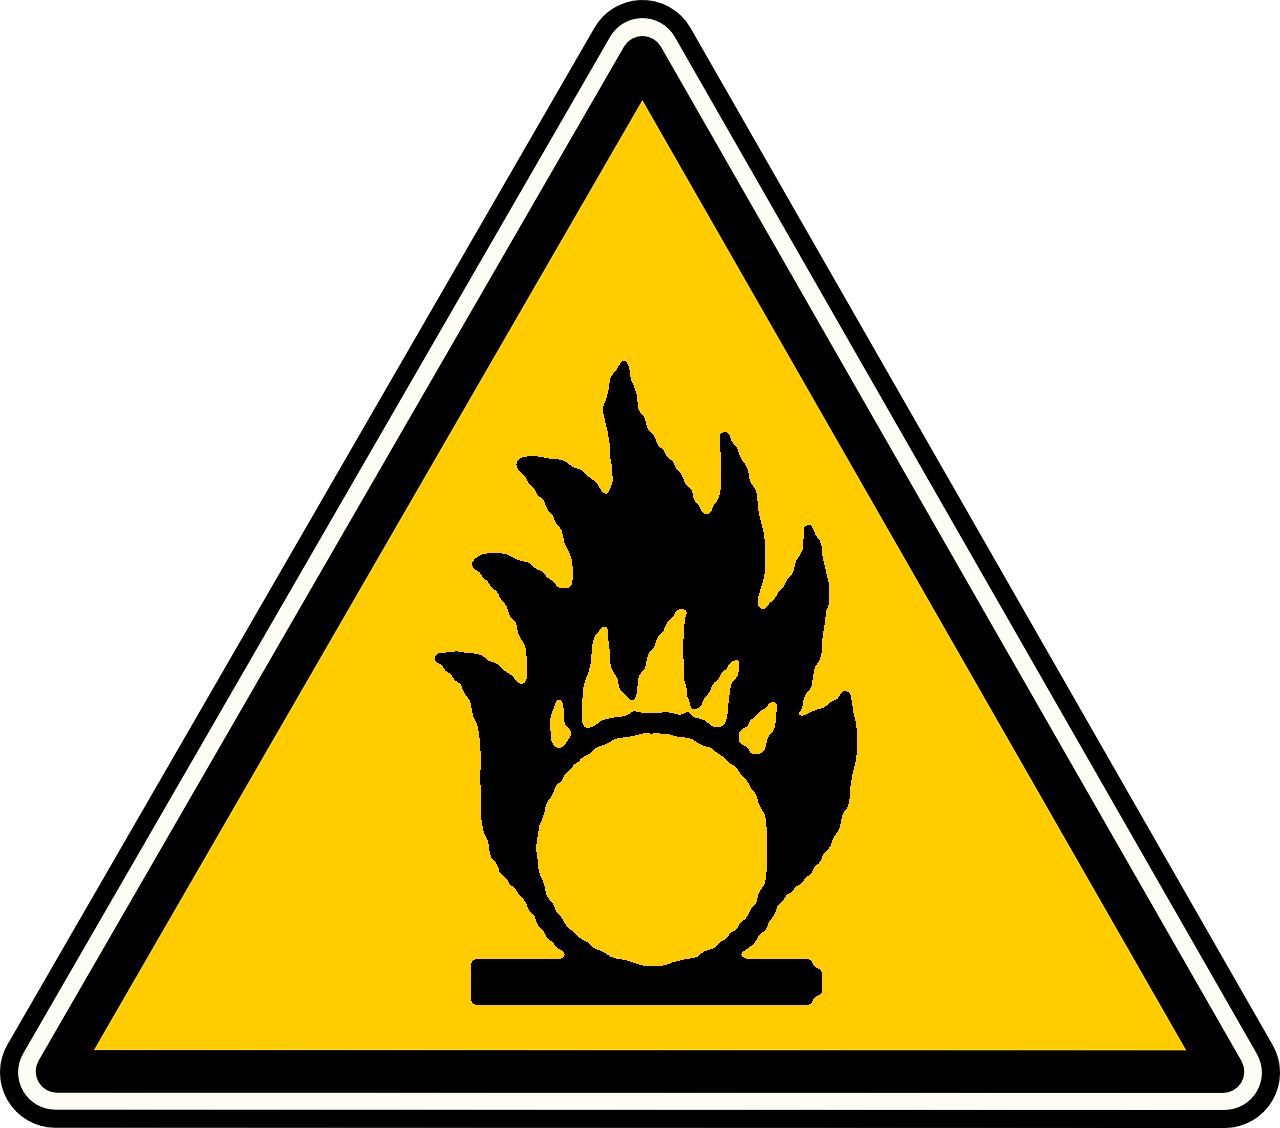
![]() Oxidising substances
Oxidising substances
![]() Tripping
Tripping
![]() Toxic materials
Toxic materials
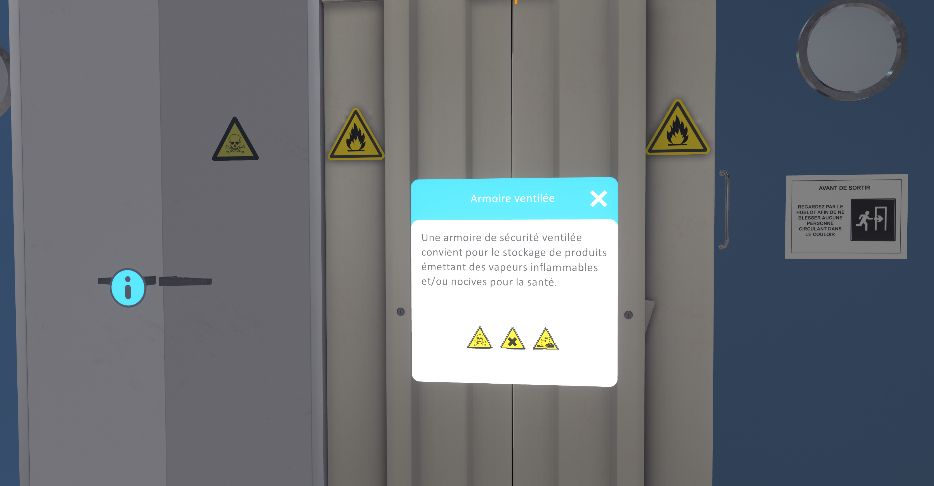
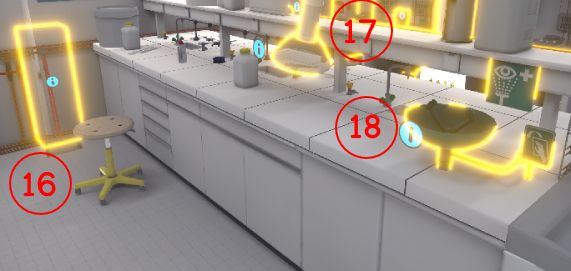
4.1.4. List of equipment to be identified
-
Emergency stop button

-
Fire extinguisher

-
Alarm button


-
Fire blanket
-
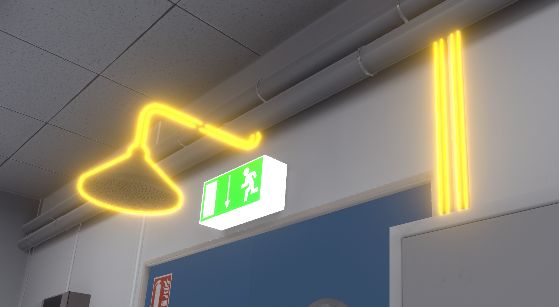
Safety shower


-
Single cabinet

-
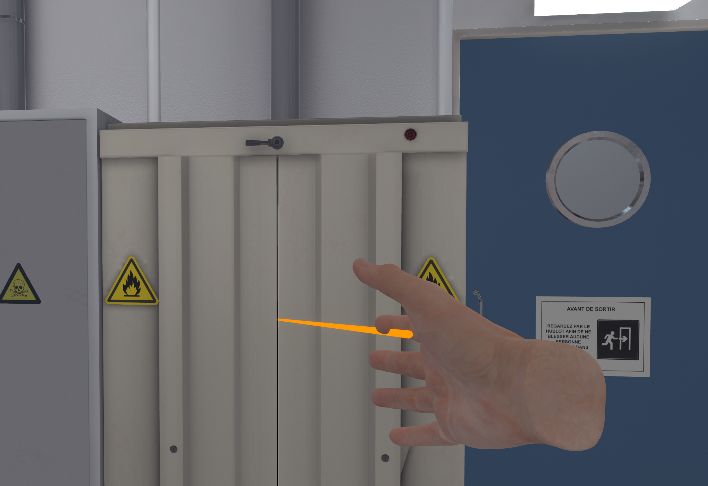
Ventilated cupboard
-
First aid kit

-
Telephone at the security post
-
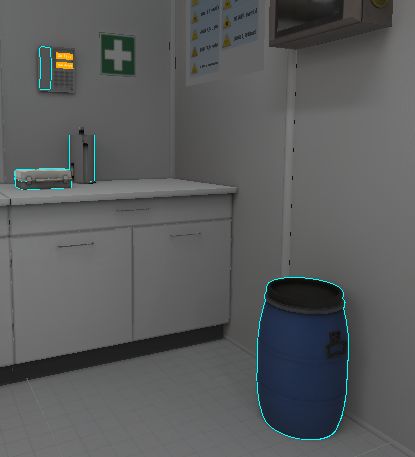
Retention tank
-
Toxic liquid recovery canister
-
Organic and mineral acid recovery canister
-
Fume cupboard
-
Syringe bin
-
Mineral bases canister
-
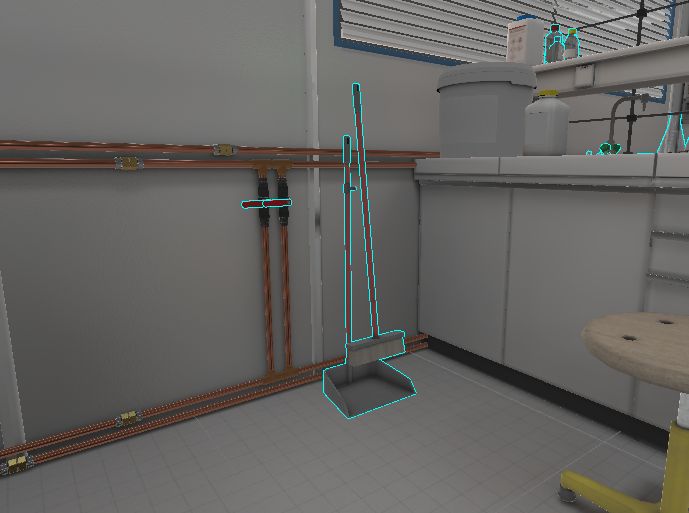
Broom + shovel
-
Extractors (suction arms)
-
Eyewash Station
4.1.5. Evaluation criteria for the exercise
![]() Protection: wearing the correct PPE equipment.
Protection: wearing the correct PPE equipment.
![]() Identification: the number of items identified.
Identification: the number of items identified.
![]() Classification: equipment properly classified. Only in advanced and expert modes.
Classification: equipment properly classified. Only in advanced and expert modes.
![]() Autonomy: The score decreases according to the number times help was requested. Only in beginner and advanced.
Autonomy: The score decreases according to the number times help was requested. Only in beginner and advanced.
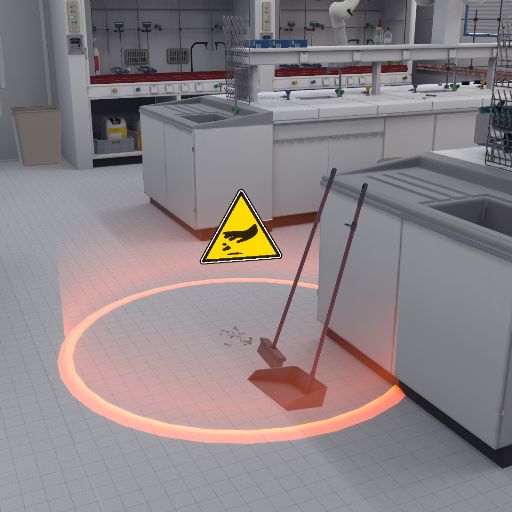
4.2. Risk and hazard management in the laboratory: Light cut
In this exercise, the user will accidentally break a beaker and will have to react accordingly to safely eliminate the danger. Depending on the level of difficulty chosen, the objectives and aids differ.
4.2.1. Instructions
To complete the exercise, the user must follow the following instructions:
Beginner
-
Once you have equipped yourself with Personal Protective Equipment, enter the laboratory to start the exercise. To complete the exercise, exit the laboratory.
-
Take a moment to observe your surroundings and retrieve the beaker from the draining rack.
-
Move to a safe area and exit the danger zone.
-
Cut (Optional)
-
Immmediately treat your minor cut using the first aid kit.
-
Use the telephone to call a colleague.
-
-
With the help of your broom, go and clean up all the shards of glass.
Advanced
-
Once you have equipped yourself with Personal Protective Equipment, enter the laboratory to begin the exercise. To complete the exercise, leave the laboratory.
-
Take a moment to observe your surroundings and retrieve the beaker from the draining rack.
-
Get out of the danger zone to safety.
-
Classify the hazard you have been exposed to by selecting the appropriate pictogram(s).
-
Cut (Optional)
-
Immediately treat your minor cut.
-
Call for help.
-
-
Remove or reduce the danger generated.
Expert
-
Enter the laboratory to start the exercise. To complete the exercise, leave the laboratory.
-
Take a moment to observe your surroundings and retrieve the beaker from the draining rack for weighing.
-
Remove the hazard safely and then exit the laboratory.
|
Note
|
The user may virtually injure themselves in this exercise. If this is the case, the scenario is different. The changes are described in the next section. |
4.2.2. Scenario flow
The user starts the scenario with the following briefing:
You have to prepare an aqueous solution in the beaker currently on the sink.
The user must equip their PPE (Equipping PPE), then enter the laboratory. They will have to pick up the beaker placed on the edge of the drainer. As the hand approaches, the beaker automatically falls and breaks. A danger zone appears and the user must move to get out of it.
Depending on the level of difficulty, the user must classify the danger by selecting the pictogram corresponding to the type of danger. Here there is a risk of cut
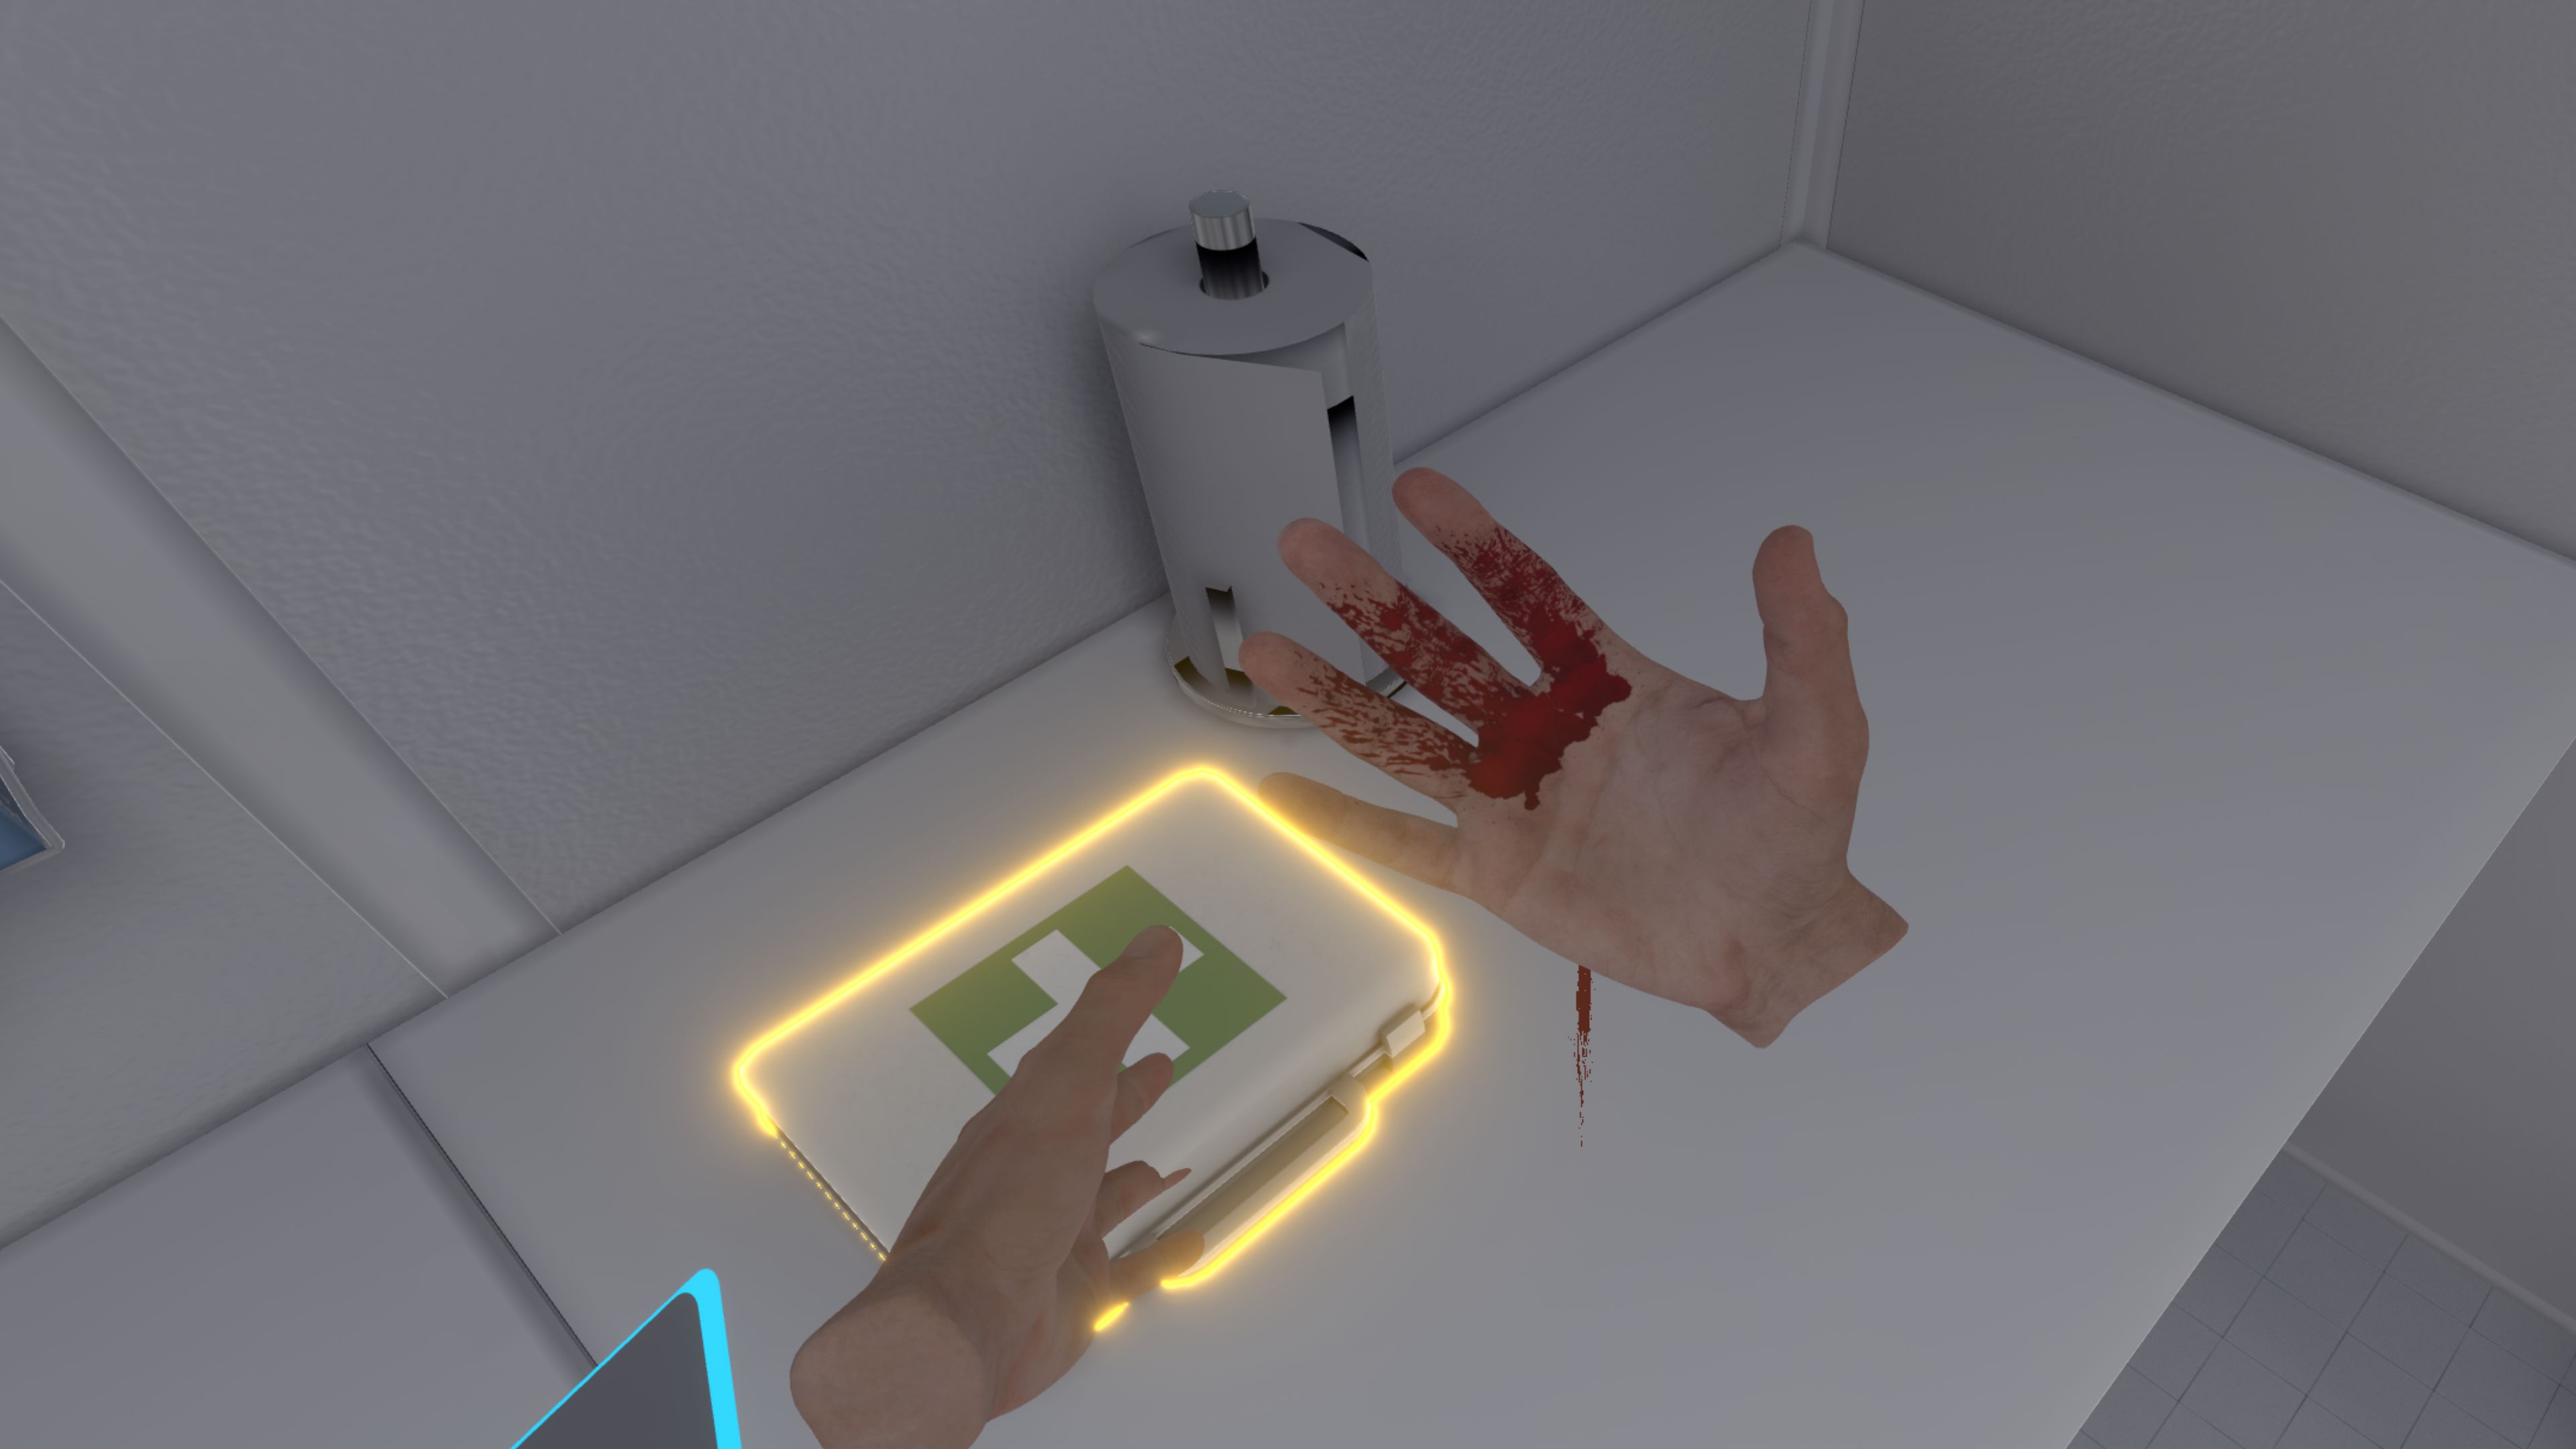
If the user brings one of their hands close to the broken beaker, they will cut themselves and their hand will start to bleed. At this point, they should use the first aid kit to treat themselves and use the telephone to call a colleague (Use of the telephone).
With the help of the broom, the user should clean up all the glass fragments. They should grab the broom with one hand and the shovel with the other and use them to slide all the pieces of glass into the shovel. Then they need to bring the shovel close to the bin to throw away the glass.
At this point, the user will be teleported to the reception area in front of the assessment screen.
4.2.3. Evaluation criteria for the exercise
![]() Protection: wearing the correct PPE equipment.
Protection: wearing the correct PPE equipment.
![]() Reaction time: the time taken by the user to resolve the dangerous situation.
Reaction time: the time taken by the user to resolve the dangerous situation.
![]() Autonomy: The score decreases with the number of times help is requested. Only in advanced.
Autonomy: The score decreases with the number of times help is requested. Only in advanced.
![]() Safety: Analyses the time spent in a dangerous situation. Only in Advanced and Expert.
Safety: Analyses the time spent in a dangerous situation. Only in Advanced and Expert.
![]() Classification: the user correctly classifies the dangerous situation. Only in advanced and expert.
Classification: the user correctly classifies the dangerous situation. Only in advanced and expert.
4.3. Risk and Hazard Management in the Laboratory: Chemical Inhalation
In this exercise, the user will have to act safely to use a container of tiophenol.
If they open the tiophenol under a fume cupboard, they will have utilized the proper safety proceedures . Conversely, if they open it outside a fume cupboard, they will inhale the chemical and will have to react accordingly to safely eliminate the danger. Depending on the level of difficulty chosen, the objectives and aids differ.
4.3.1. Instructions
To complete the exercise, the user should follow the following instructions:
Beginner
-
Once you have equipped yourself with Personal Protective Equipment, enter the laboratory to start the exercise. To complete the exercise, exit the laboratory.
-
Take a 10 ml sample of the thiophenol provided.
-
Open the tiophenol outside a fume cupboard (Optional)
-
Replace the cap on the vial and transport it into a fume cupboard.
-
Use the telephone to call the security station.
-
Advanced
-
Once you have equipped yourself with Personal Protective Equipment, enter the laboratory to begin the exercise. To complete the exercise, exit the laboratory.
-
Take a 10 ml sample of the thiophenol provided.
-
Open the tiophenol outside a fume cupboard (Optional)
-
Secure the vial.
-
Classify the hazard you were exposed to by selecting the appropriate pictogram(s).
-
Call for help.
-
Expert
-
Enter the laboratory to start the exercise. To complete the exercise, leave the laboratory.
-
Take a 10 ml sample of the thiophenol provided.
-
Open the tiophenol outside a fume cupboard (Optional)
-
Remove the hazard safely and then exit the laboratory.
-
|
Note
|
The user may make a mistake and open tiophenol outside a fume cupboard in this exercise. If this is the case, the scenario is different. The changes are described in the next section. |
4.3.2. Scenario flow
The user starts the scenario with the following briefing:
Pipette 10 ml of thiophenol into a beaker.
The user must equip their PPE, then enter the laboratory.
In order to carry out the procedure correctly, the user must transport the tiophenol into a fume cupboard, together with the beaker and the pipette. At this point, the exercise is automatically completed.
However, if they opens it outside a fume cupboard, they will inhale chemical and put themselves in danger.
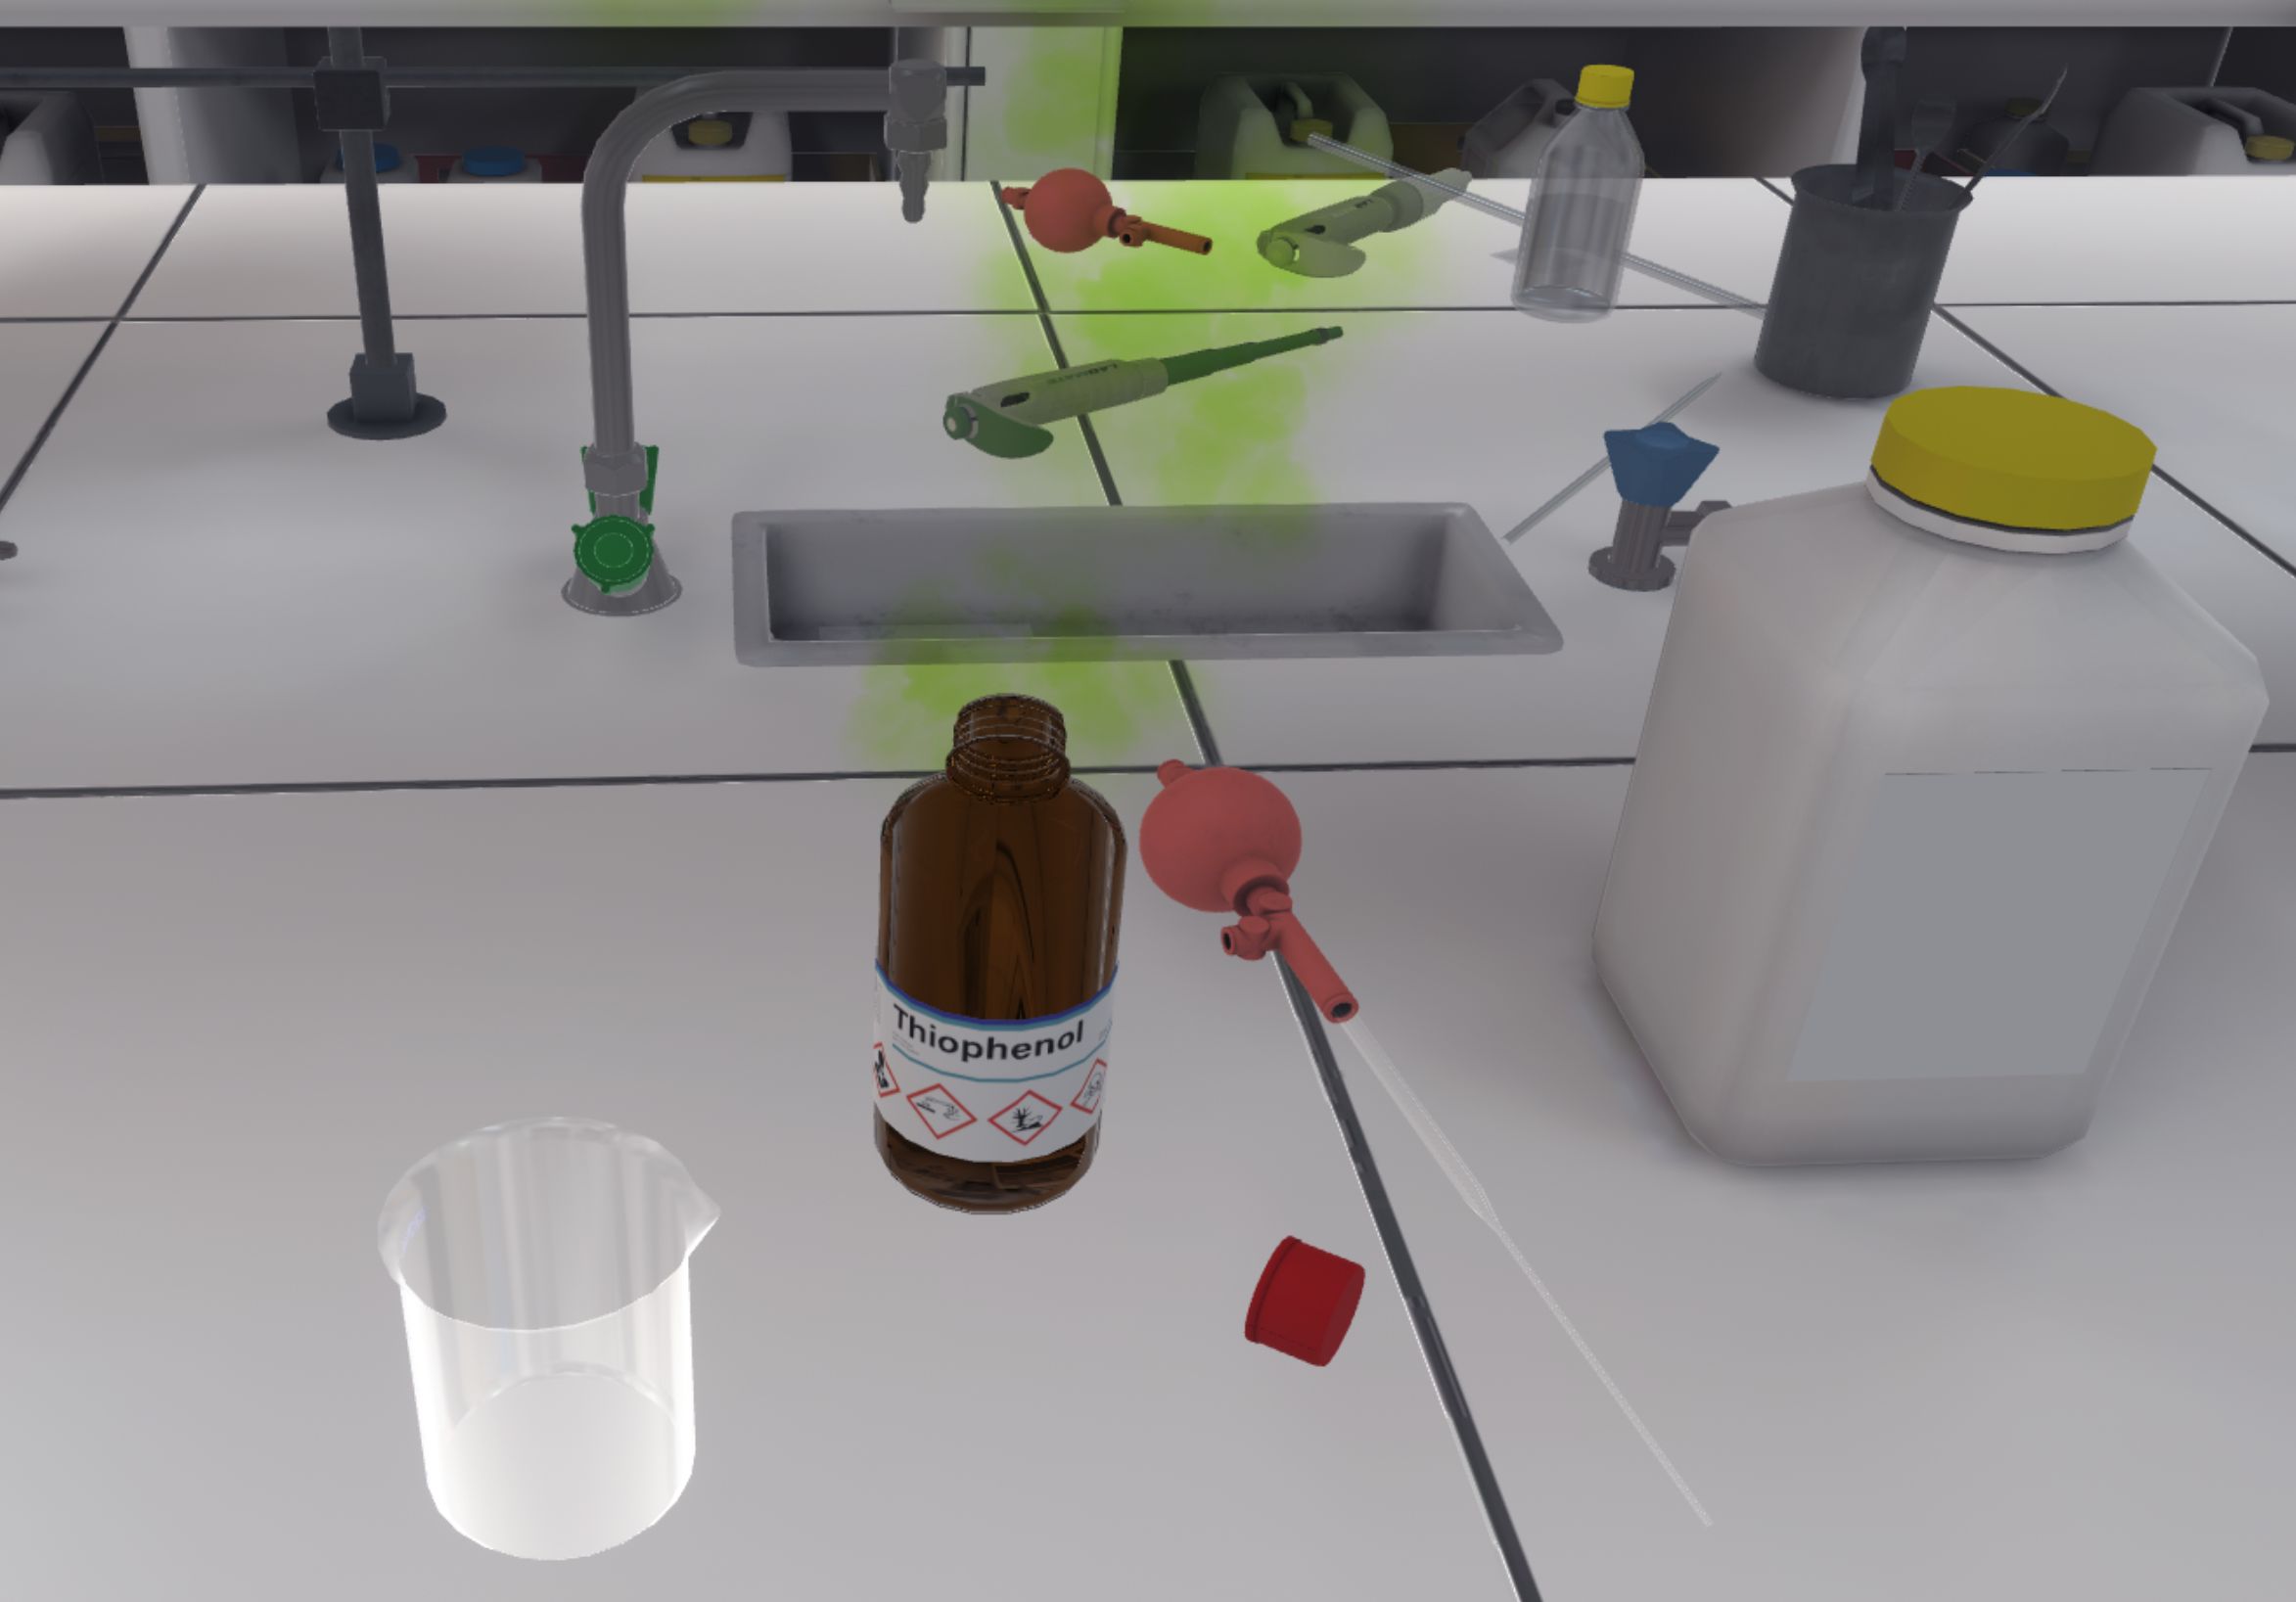
The user must put the cap back on the bottle and transport it into a fume cupboard.
Depending on the level of difficulty, the user must classify the hazard by selecting the pictogram corresponding to the level of the hazard zone. Here, there is a risk of toxicity
Then, they must use the telephone to call the safety post.
Once the steps have been completed, the user will be teleported to the reception area in front of the assessment screen.
4.3.3. Evaluation criteria for the exercise
![]() Protection: Wearing the correct PPE equipment.
Protection: Wearing the correct PPE equipment.
![]() Reaction time: The time taken by the user to resolve the dangerous situation.
Reaction time: The time taken by the user to resolve the dangerous situation.
![]() Autonomy: The score decreases with the number of times help is requested. Only in advanced.
Autonomy: The score decreases with the number of times help is requested. Only in advanced.
![]() Safety: Analyses the time spent in a dangerous situation. Only in Advanced and Expert.
Safety: Analyses the time spent in a dangerous situation. Only in Advanced and Expert.
![]() Classification: The user correctly classifies the dangerous situation. Only in advanced and expert.
Classification: The user correctly classifies the dangerous situation. Only in advanced and expert.
![]() Duration: Time taken by the user to finish the exercise.
Duration: Time taken by the user to finish the exercise.
4.4. Risk and Hazard Management in the Laboratory: Chemical Spill
In this exercise, the user will try to perform a liquid/liquid extraction and accidentally spill some chemicals in the fume cupboard and onto themselves. They will have to react accordingly to safely eliminate the hazard. Depending on the level of difficulty chosen, the objectives and aids differ.

4.4.1. Instructions
To complete the exercise, the user must follow the following instructions:
Beginner
-
Once you have equipped yourself with Personal Protective Equipment, enter the laboratory to start the exercise. To complete the exercise, exit the laboratory.
-
Open the fume cupboard halfway.
-
Stir the solution.
Accident: the ampoule opens and liquid spills in the fume cupboard.
-
Place the separating funnel back on its stand.
-
Two possible outcomes:
-
Normal case: The fume cupboard was half open and the ampoule was shaken inside
-
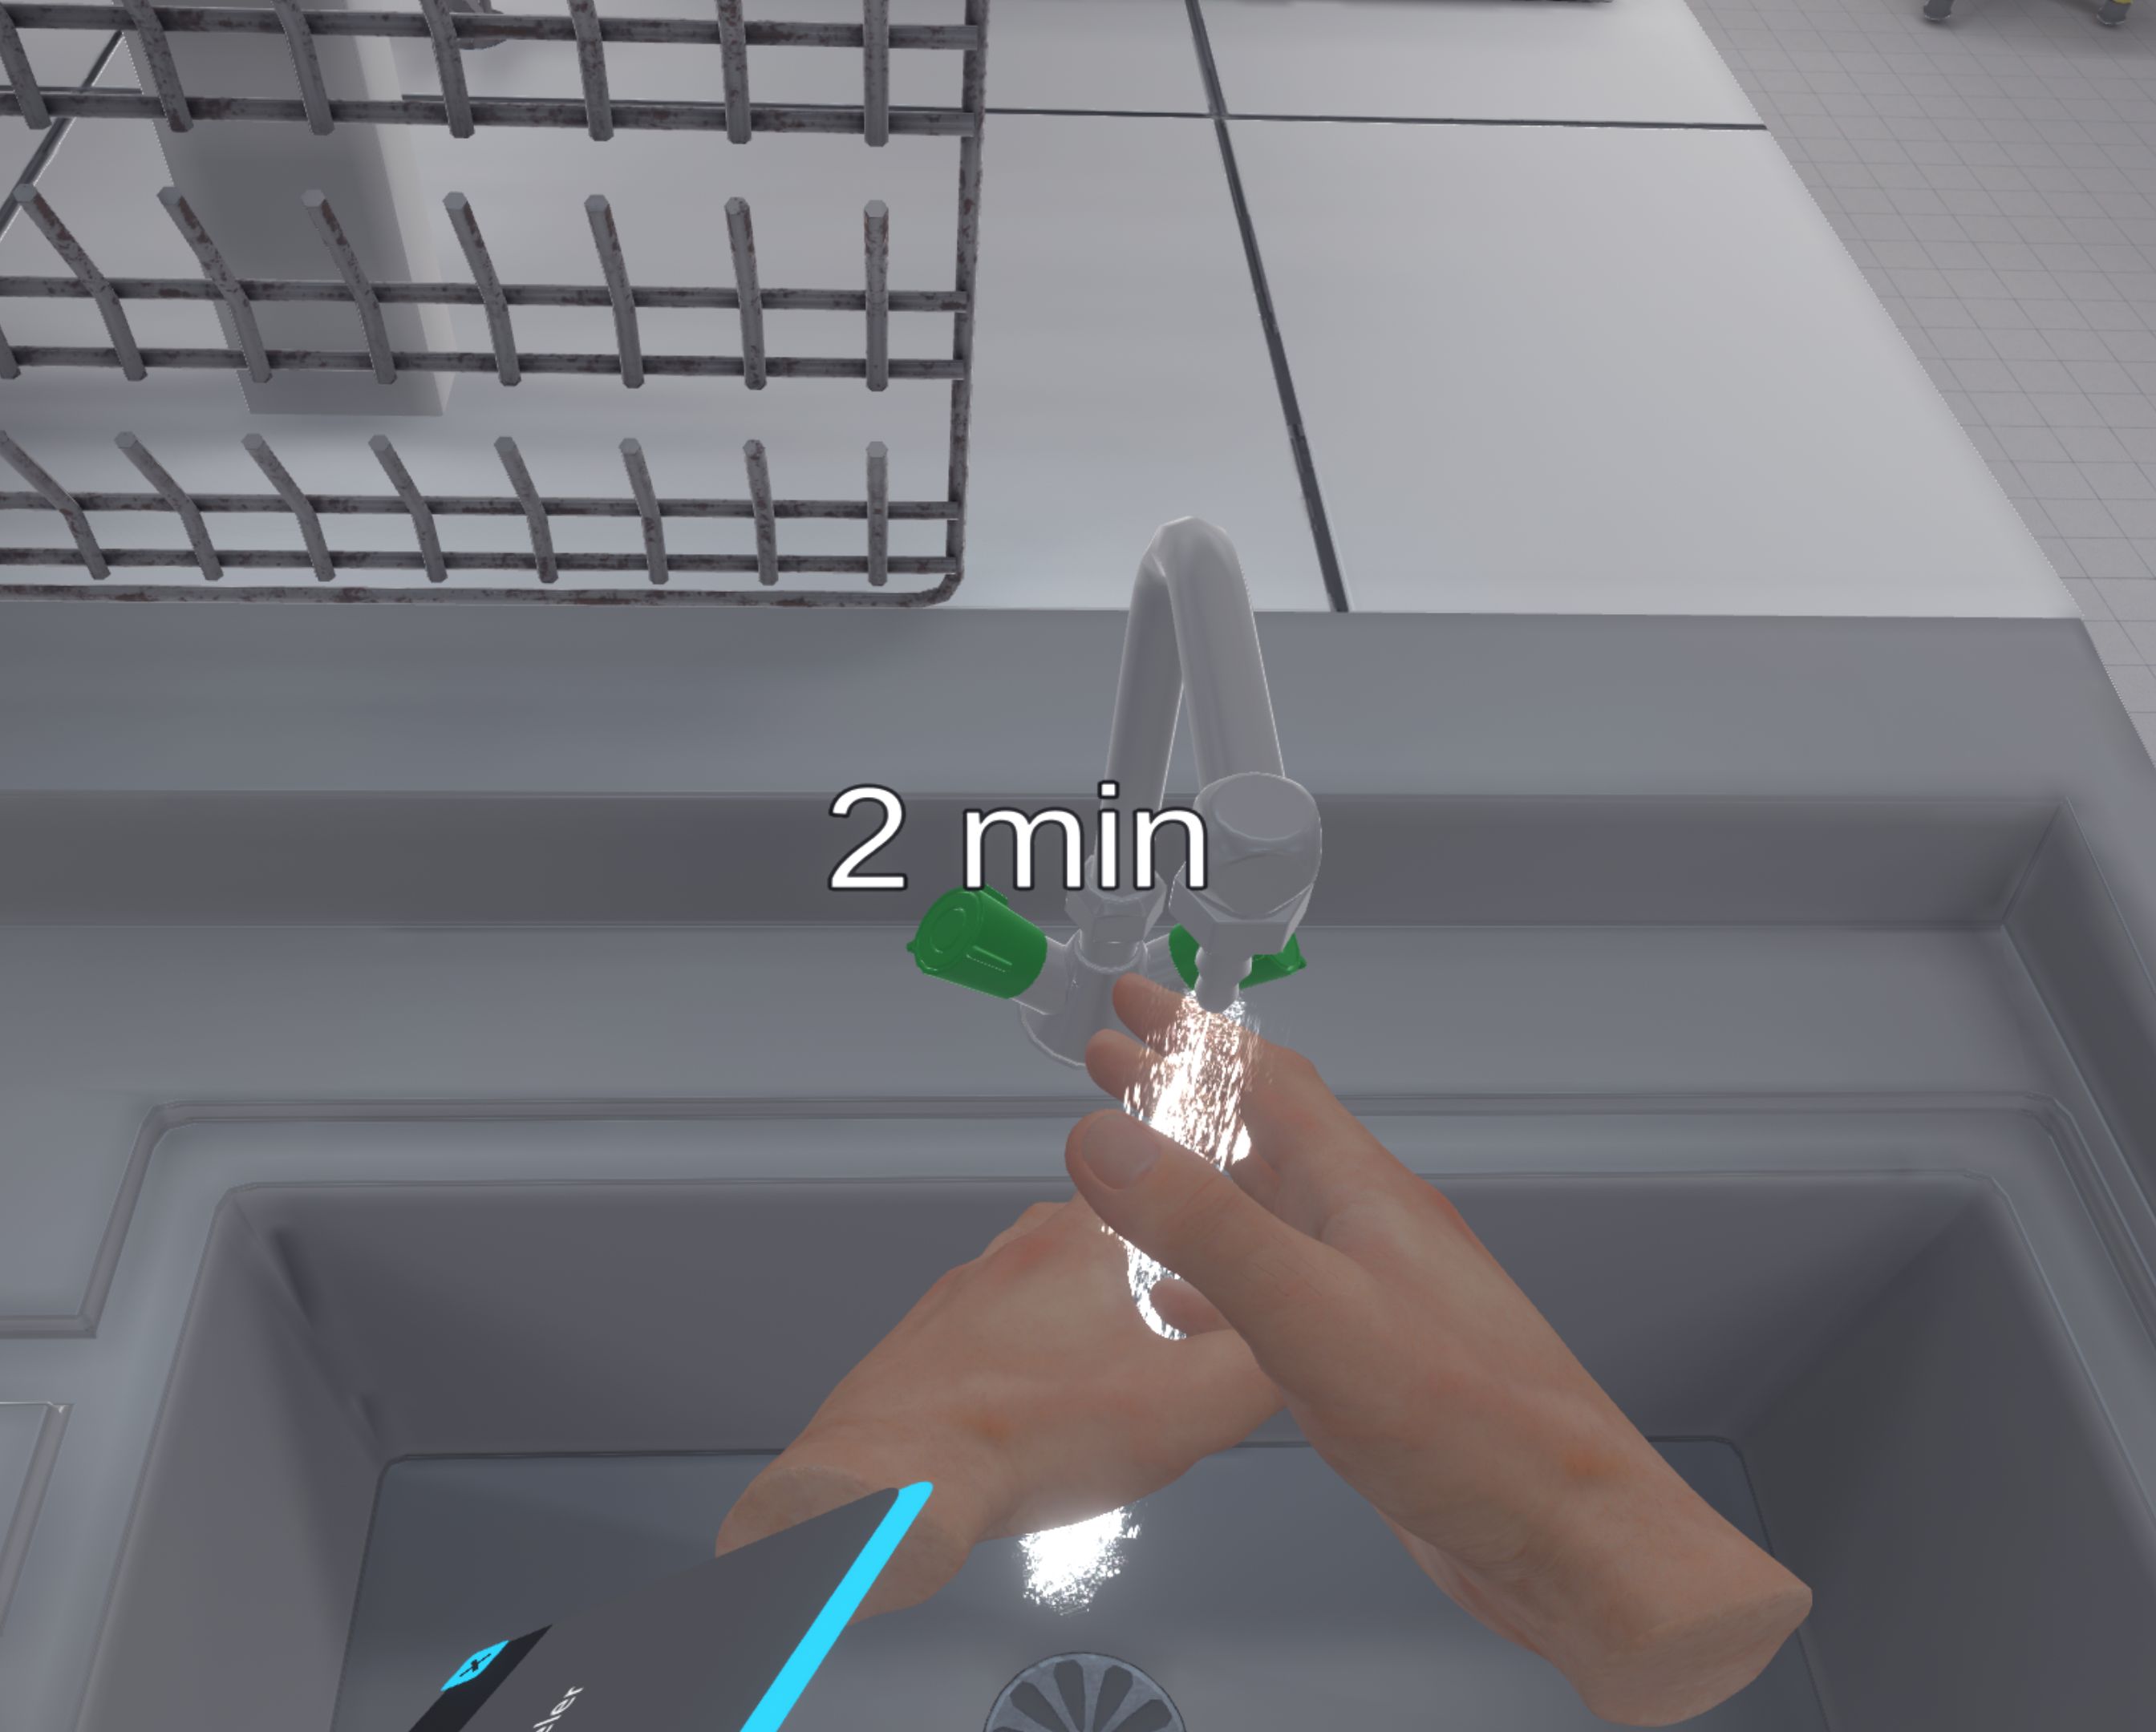
Discard your gloves and wash your hands for 10 minutes using the sink.
-
Use the telephone to call the safety post.
-
Put on clean gloves.
-
-
Special case: The fume cupboard was completely open or the bulb was shaken outside of the fume cupboard
-
Remove your glasses and wash your eyes for 10 minutes at the eyewash station.
-
Use the telephone to call the safety post.
-
Pick up the soiled gown and place it in the gown bin and put on a clean gown.
-
-
-
Use a paper towel to clean the bench.
-
Dispose of the paper towel in the waste bin.
Advanced
-
Once you have equipped yourself with Personal Protective Equipment, enter the laboratory to begin the exercise. To complete the exercise, exit the laboratory.
-
Open the fume cupboard.
-
Stir the solution.
Accident: the ampoule opens and liquid spills into the fume cupboard.
-
Replace the separating funnel.
-
Wash off spillage with appropriate CPE.
-
Call for help.
-
Safely respond to the hazard.
-
Dispose of the paper towel in the waste bin.
Expert
-
Enter the laboratory to start the exercise. To complete the exercise, leave the laboratory.
-
Stir the solution.
Accident: the ampoule opens and liquid spills into the fume cupboard.
-
Safely respond to the hazard and then leave the laboratory.
4.4.2. Scenario sequence
The user starts the scenario with the following briefing:
You are performing a liquid/liquid extraction (organic solvent dichloromethane). Go to your workstation to continue the manipulation.
The user must equip their PPE (Equipping PPE), then enter the laboratory. They will have to approach the fume cupboard, open it halfway (Use fume cupboard) and shake a decanter. The ampoule opens and liquid spills in the fume cupboard. A danger zone appears. The user must replace the ampoule on its stand and move away from the danger.
Depending on the level of difficulty, the user must classify the hazard by selecting the pictogram corresponding to the type of the hazard zone. Here, there is a risk of harmful or irritating substances.
If the fume cupboard was half open and the bulb was shaken inside, the user has splashed on their gloves. They have to throw them away, so they have to go to the waste bin and click on the "waste bin" icon. Then they have to go to a sink, turn on the tap, and wash their hands for 10 minutes.
If the fume cupboard was fully open or the bulb was shaken outside of the fume cupboard, the user’s eyes will be splashed and their vision will turn blue.

The user must approach the eyewash station and activate it by pressing the button on the right. Then they should remove their glasses and wash their eyes for 10 minutes by moving their head towards the eyewash station.
They must collect the soiled coat and put it in the appropriate bin.

The user must then use the telephone to call the safety post.
The user must put on new PPE if it has been soiled. This PPE is located in the laboratory.
The user should take a paper towel to completely clean up the spills on the bench (all stains should be wiped up), and then dispose of the paper towel in the waste bin.

Once the steps have been completed, the user will be teleported to the reception area in front of the assessment screen.
4.4.3. Evaluation criteria for the exercise
![]() Protection: Wearing the correct PPE equipment.
Protection: Wearing the correct PPE equipment.
![]() Reaction time: The time taken by the user to resolve the dangerous situation.
Reaction time: The time taken by the user to resolve the dangerous situation.
![]() Autonomy: The score decreases with the number of times help is requested. Only in advanced.
Autonomy: The score decreases with the number of times help is requested. Only in advanced.
![]() Safety: Analyses the time spent in a dangerous situation. Only in Advanced and Expert.
Safety: Analyses the time spent in a dangerous situation. Only in Advanced and Expert.
![]() Classification: The user correctly classifies the dangerous situation. Only in advanced and expert.
Classification: The user correctly classifies the dangerous situation. Only in advanced and expert.
4.5. Risk and Hazard Management in the laboratory: Fire and Electrical Risk
An experiment goes awry, and the user finds themselves in front of a pool of burning oil. They must react accordingly to safely eliminate the danger.
Depending on the difficulty level chosen, the objectives and assistance options vary.
4.5.1. Instructions
The procedure is the same for each user, regardless of the chosen difficulty level. Only the aids are different.
-
Beginner: Instructions are detailed, and objects are clearly highlighted at each step to facilitate understanding.
-
Advanced: Instructions remain the same, but objects are no longer automatically highlighted. However, the user can request assistance at any time to highlight the necessary objects.
-
Expert: Instructions are simplified for greater user autonomy. No help is available.
![]() In Advanced Difficulty, on the companion screen, the user can click this icon to request help..
In Advanced Difficulty, on the companion screen, the user can click this icon to request help..
4.5.2. Scenario Outline
The user starts the scenario with the following briefing:
A colleague asks you to supervise an ongoing experiment involving an oil bath reflux heating setup. This involves the synthesis of an organomagnesium compound.
The user must put on their PPE (Equipping PPE) and then enter the laboratory. An alarm goes off, and they can see that the oil bath in the fume cupboard is on fire. They must approach to observe the situation.
The user’s first response should be to call the safety station (Using the phone).
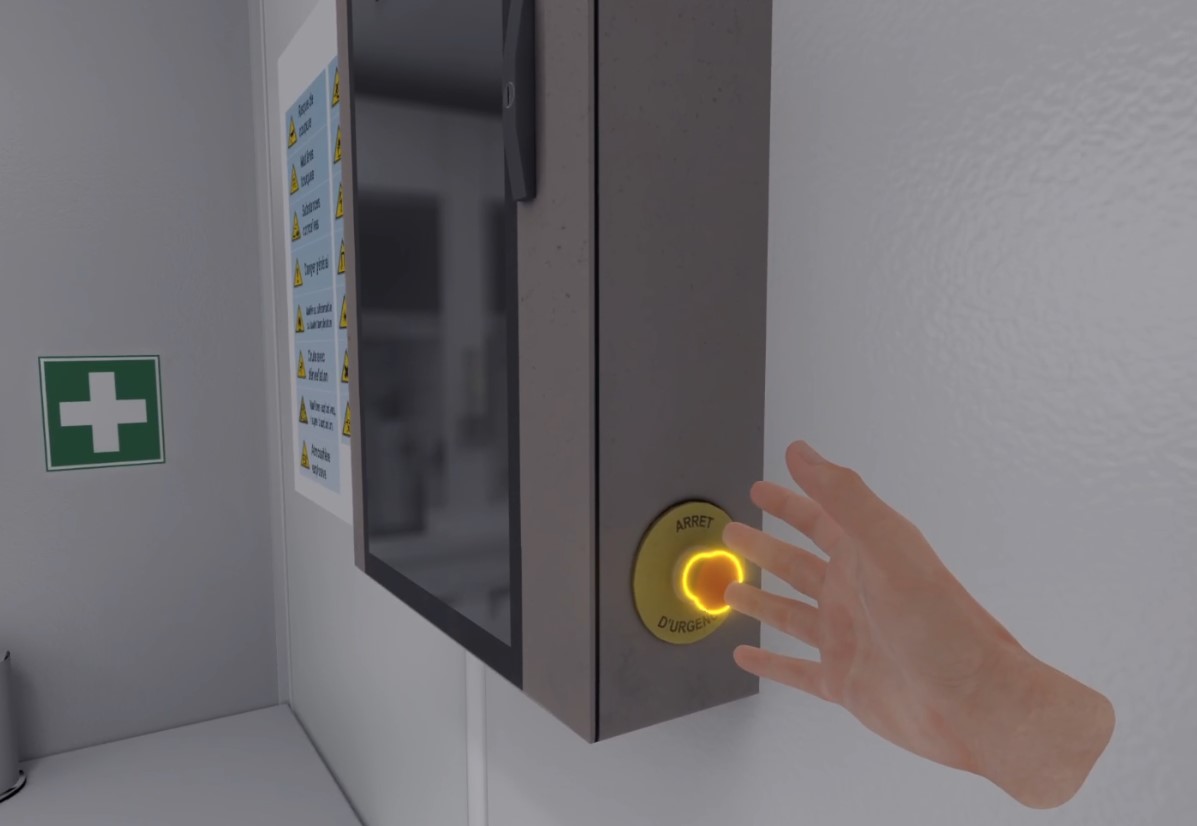
Then they must turn off the power to avoid electrocution. If the user touches the electrical sparks, they will be electrocuted, which is a fatal error that will end the exercise.
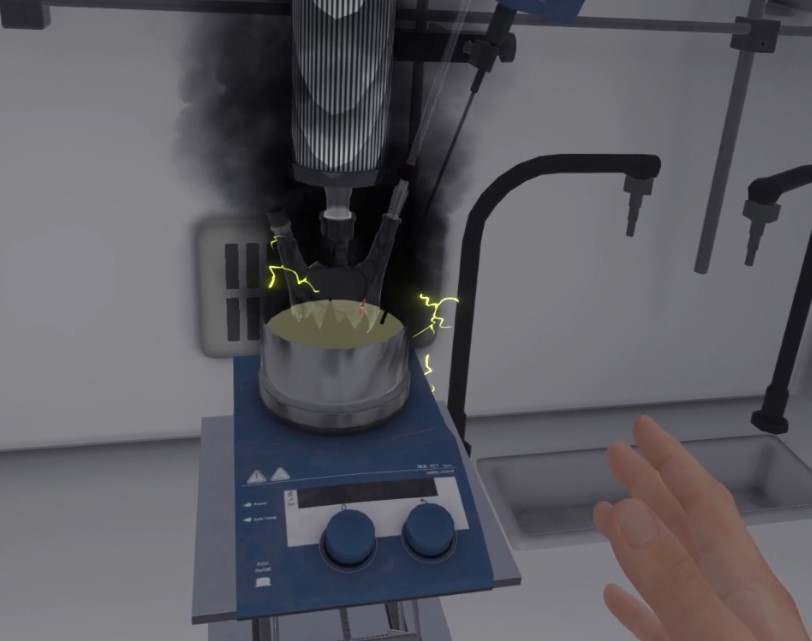
The user must cut the power by pressing the circuit breaker button in the electrical cabinet. The lights go out and the sparks disappear.
The fire remains. If the user touches it with their hands, they will be seriously burned; this is a fatal error that will end the exercise.
To safely extinguish the fire, there are several ways, and only two of them are correct:
-
CO2 fire extinguisher ✅
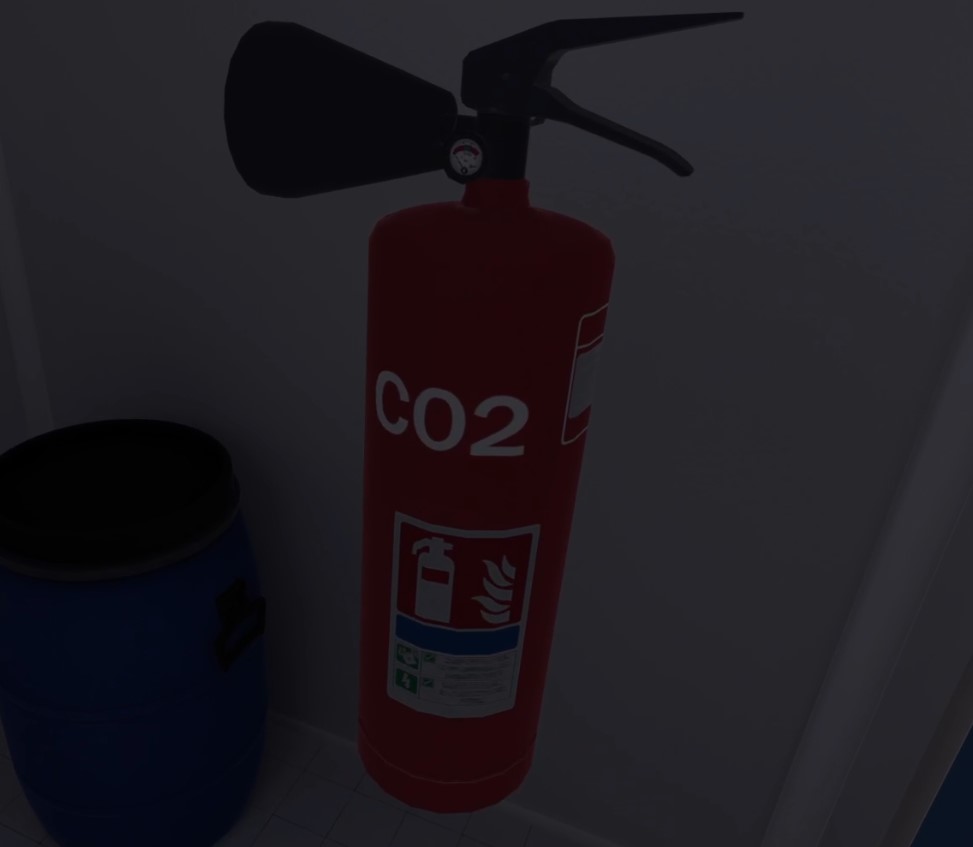 Figure 61. CO2 Fire Extinguisher
The CO2 extinguisher is located next to the electrical cabinet.
To use it, the user must grasp the handle of the fire extinguisher while releasing the pin with their other hand.
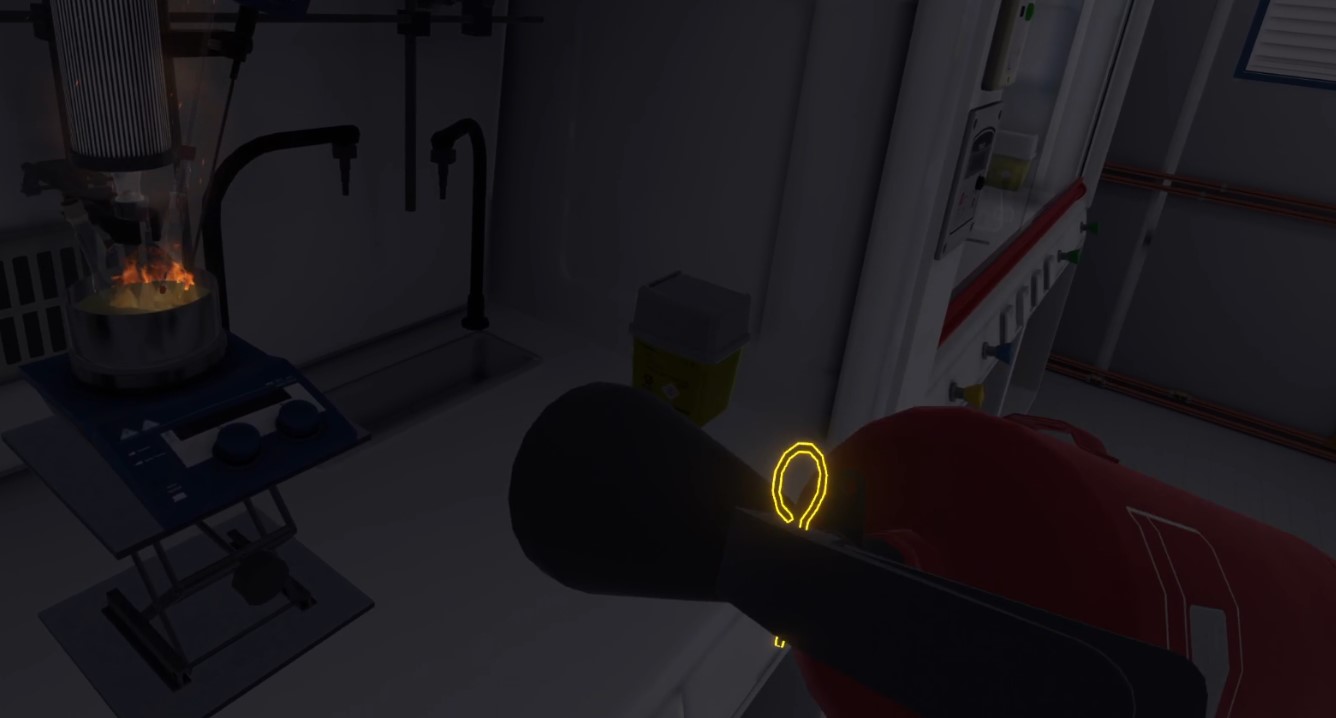 Figure 62. CO2 extinguisher pin
From this point on, the user can use it if they hold it and press the action button. If the user ever drops the extinguisher on the ground, it is counted as an error.
For safety reasons, the user should first test the extinguisher briefly outside the flames.
Then they should approach within three feet of the flames and move upwards from the base of the flames until the fire is extinguished.
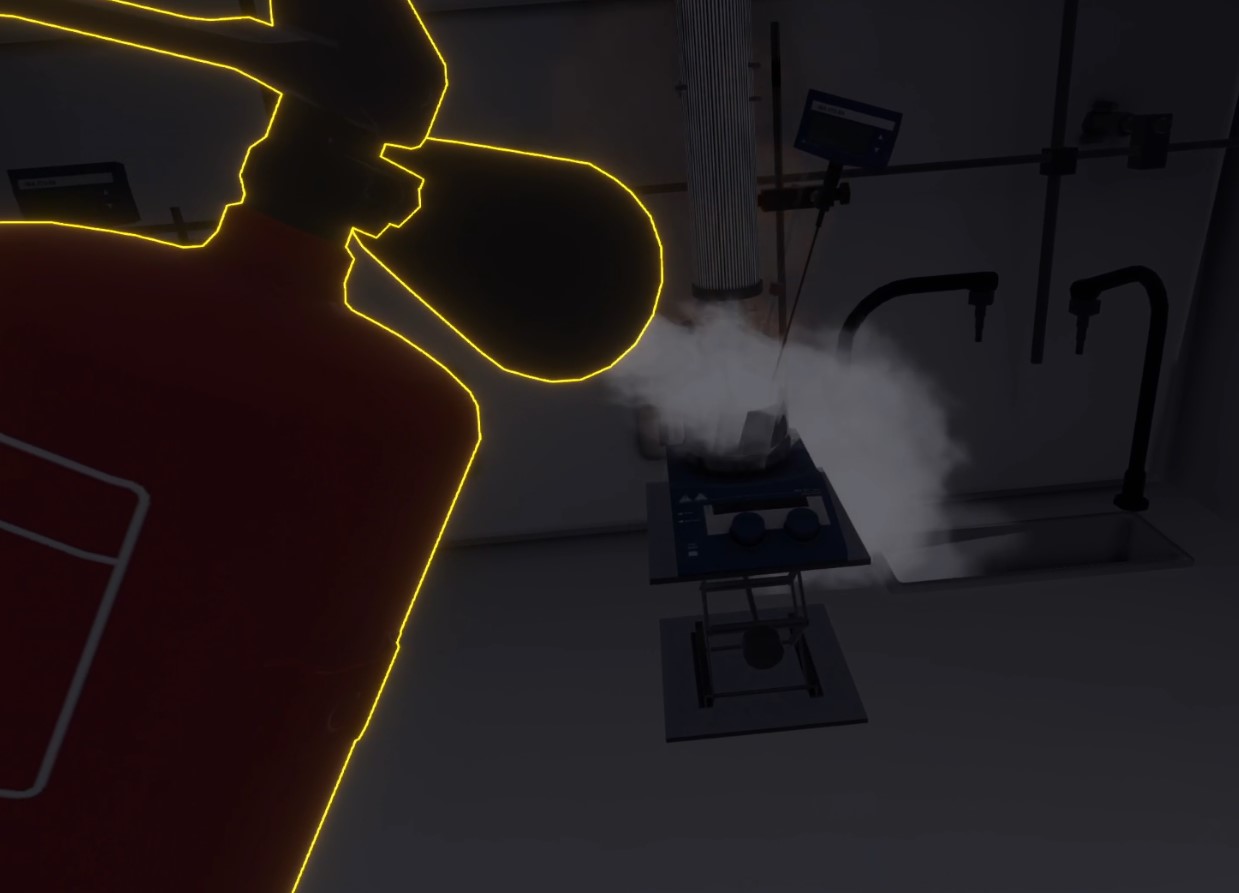 Figure 63. Extinguishing the fire with a CO2 extinguisher
If the user empties the extinguisher without having extinguished the fire, they can extinguish the fire with the sand bucket.
-
Sand Bucket ✅
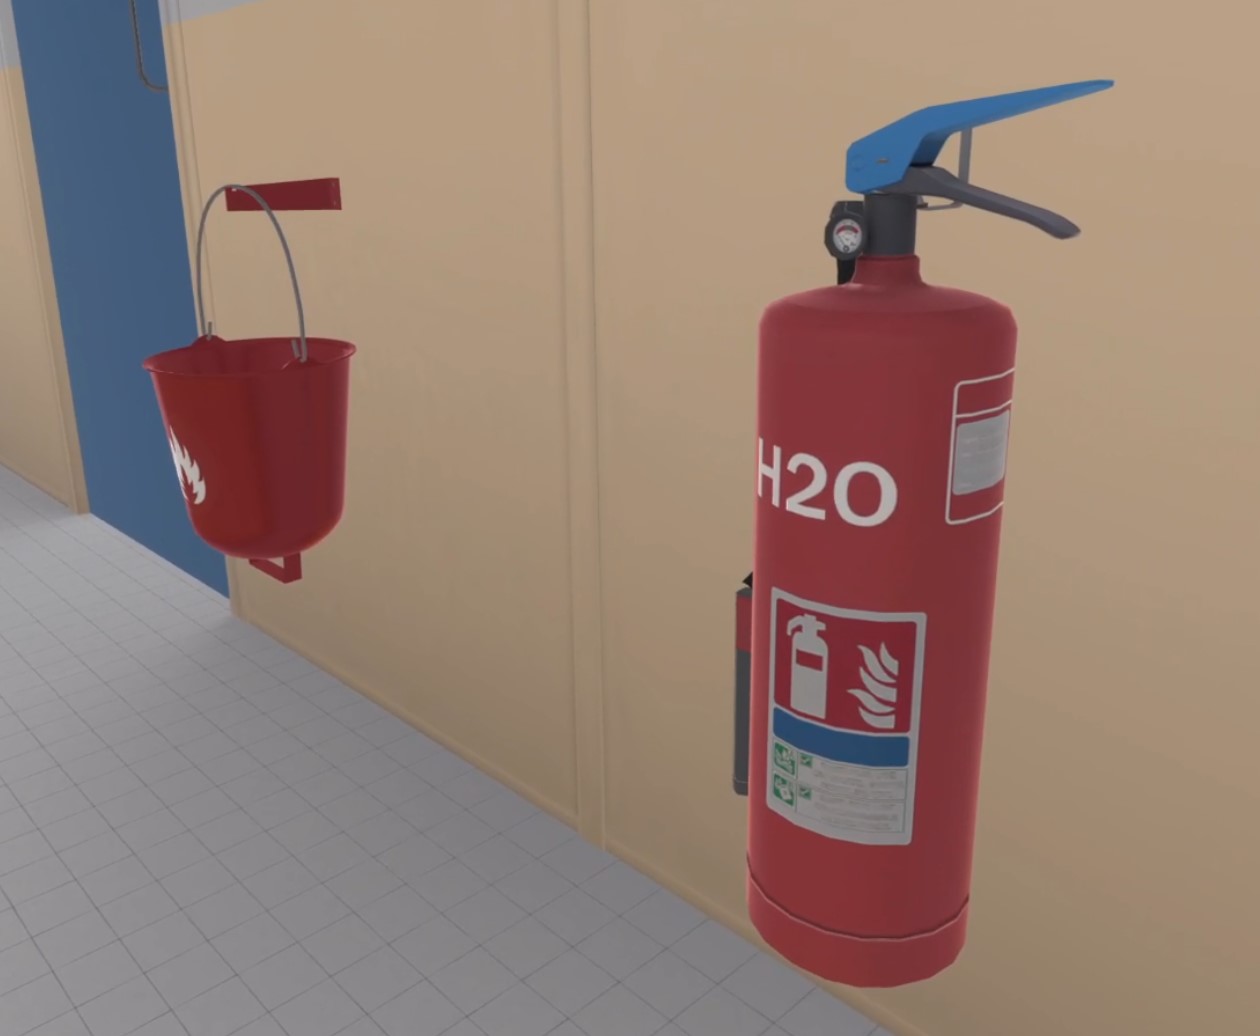 Figure 64. Water Extinguisher and Sand Bucket
By going into the hallway, the user can find the sand bucket. They can grab it and make a sudden movement towards the fire to smother it with the sand.
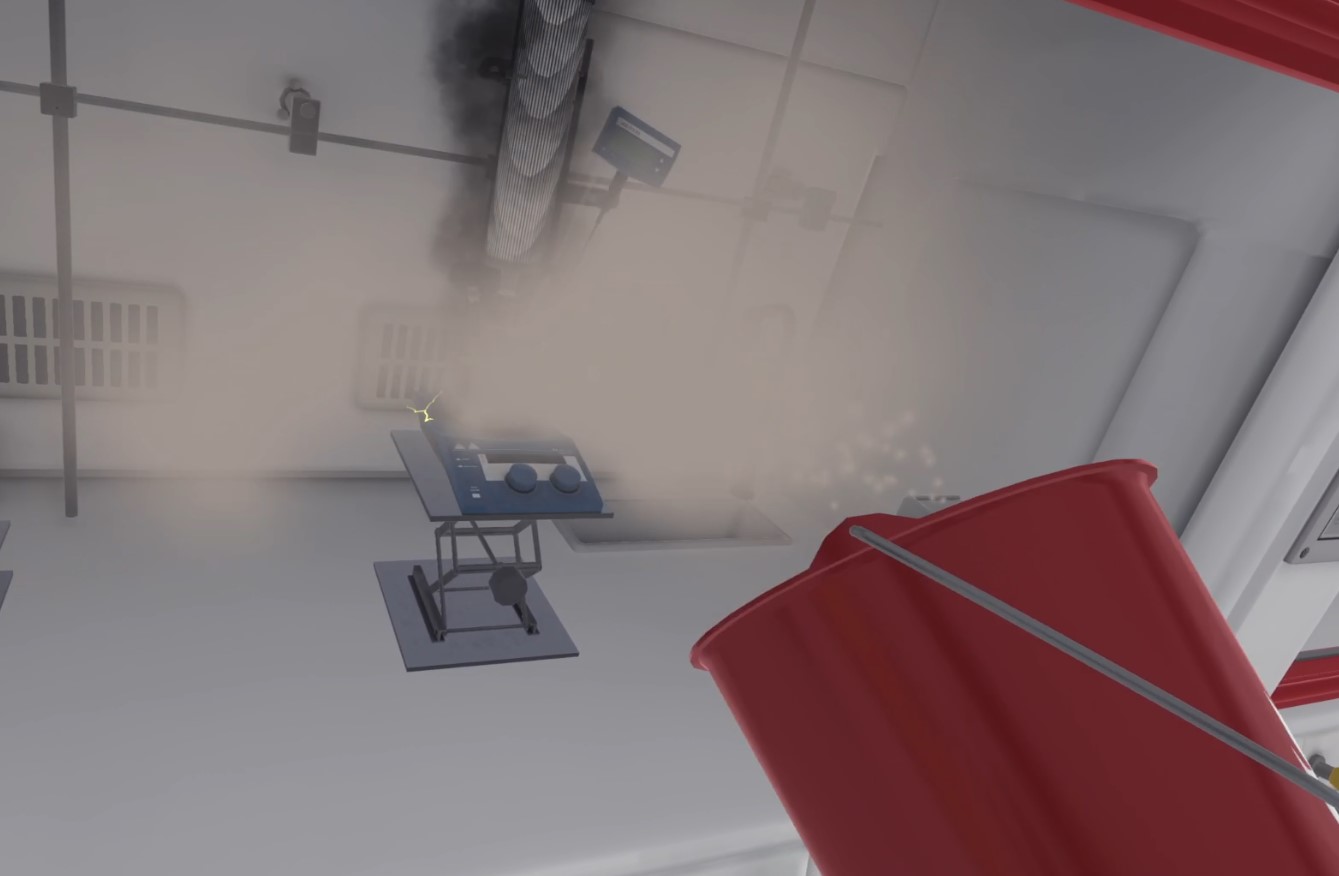 Figure 65. Extinguishing the fire with the sand bucket
 -
Water extinguisher ❌
In the hallway, next to the sand bucket, you can see the water extinguisher. As with the CO2 extinguisher, The user must grasp it and release the pin with their other hand. The user can then spray the water by aiming the sprayer and pressing the action button.
If the user ever drops the extinguisher on the ground, it’s a mistake.
If the water comes into contact with the fire, it will cause an explosion (indeed, you should never mix water and burning oil)!
This is a fatal mistake and the user is teleported to the lobby.
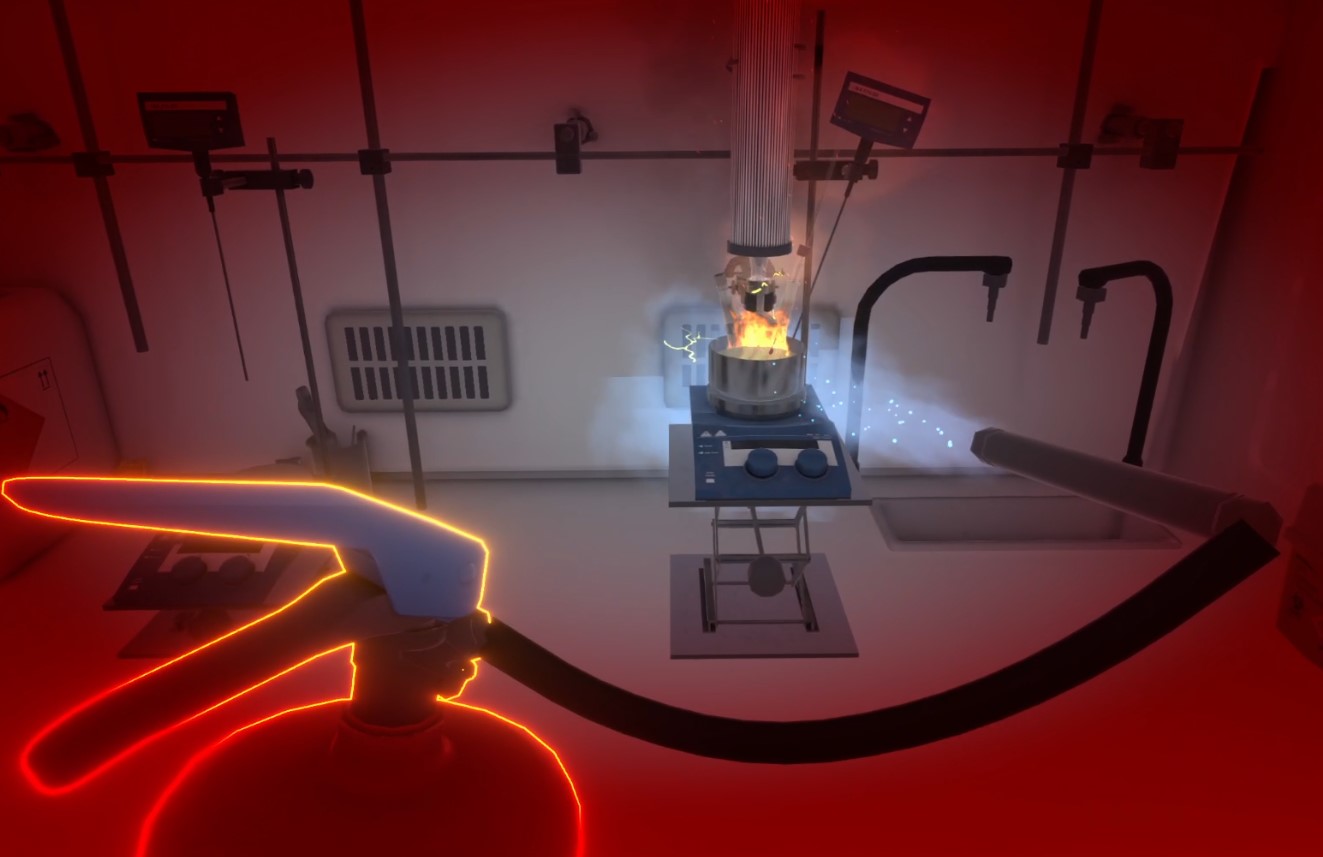 Figure 66. Injury while using water extinguisher
 -
Water bucket ❌
In front of the fume cupboard, on the work surface, the user can find an empty basin. They can fill it from the tap and throw its contents onto the stove.
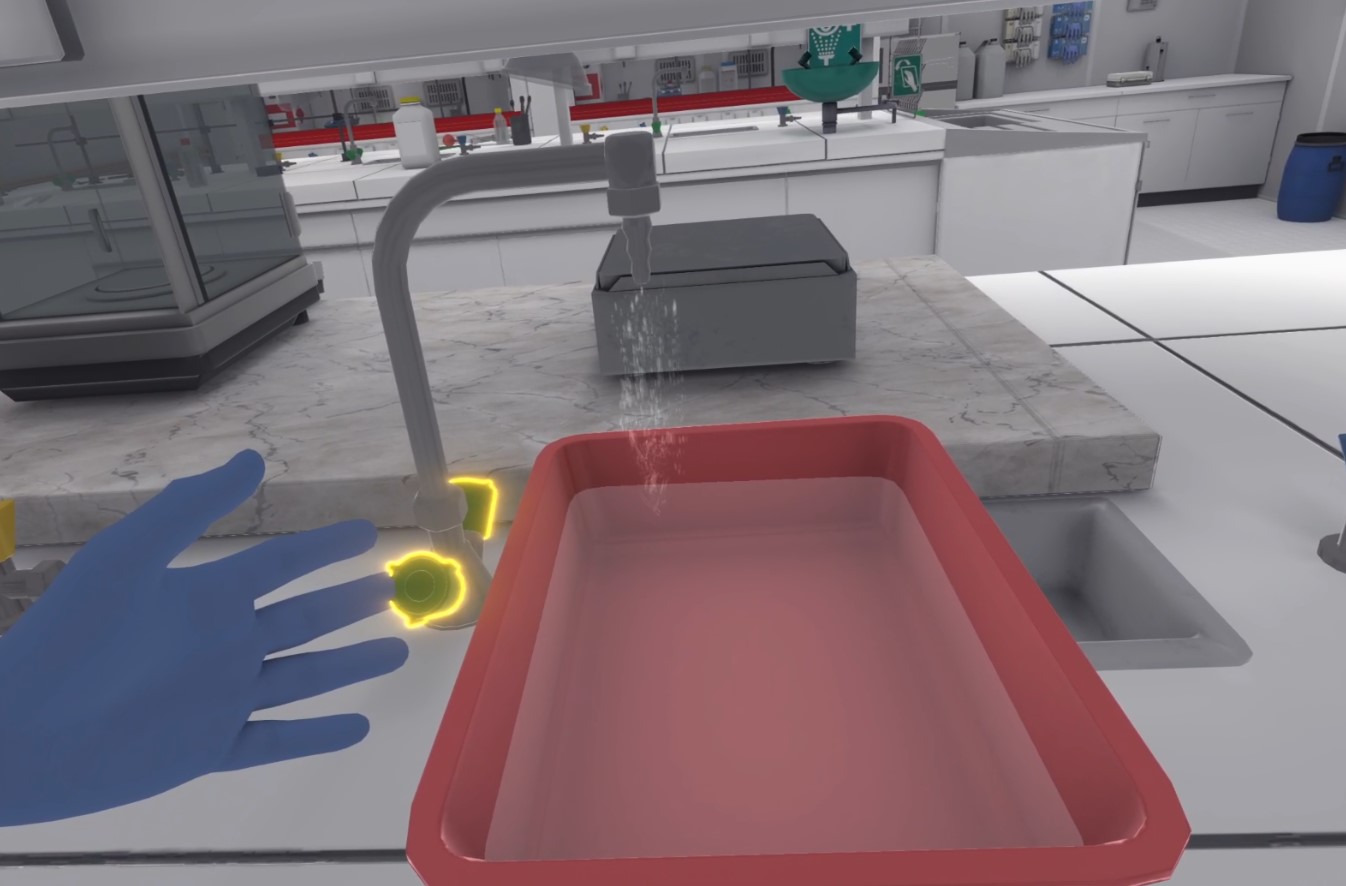 Figure 67. Filling the basin with water
The same thing happens as with the water extinguisher: an explosion and a fatal error.
Once the fire is out, if the user was too close to the flames, burning oil will be sprayed onto their hands. There is a 50/50 chance that flames will appear on the hands.
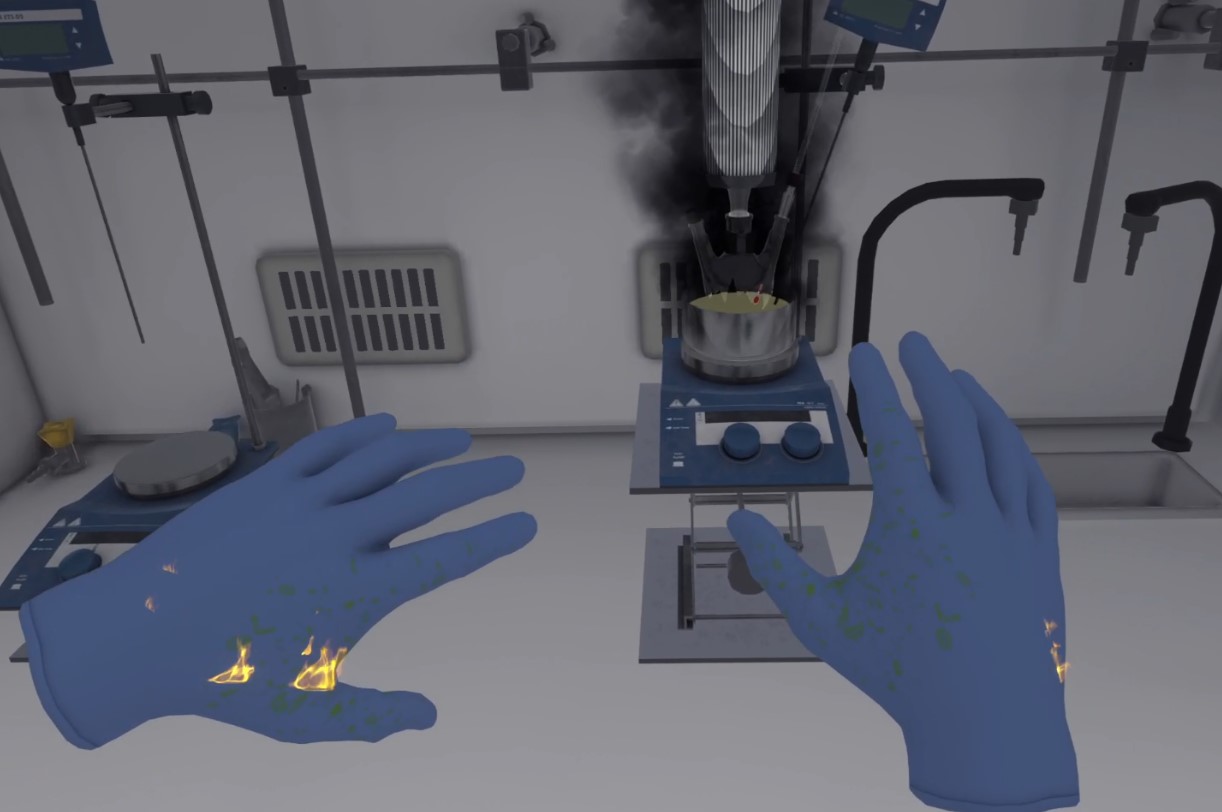
-
Burning Oil Spill
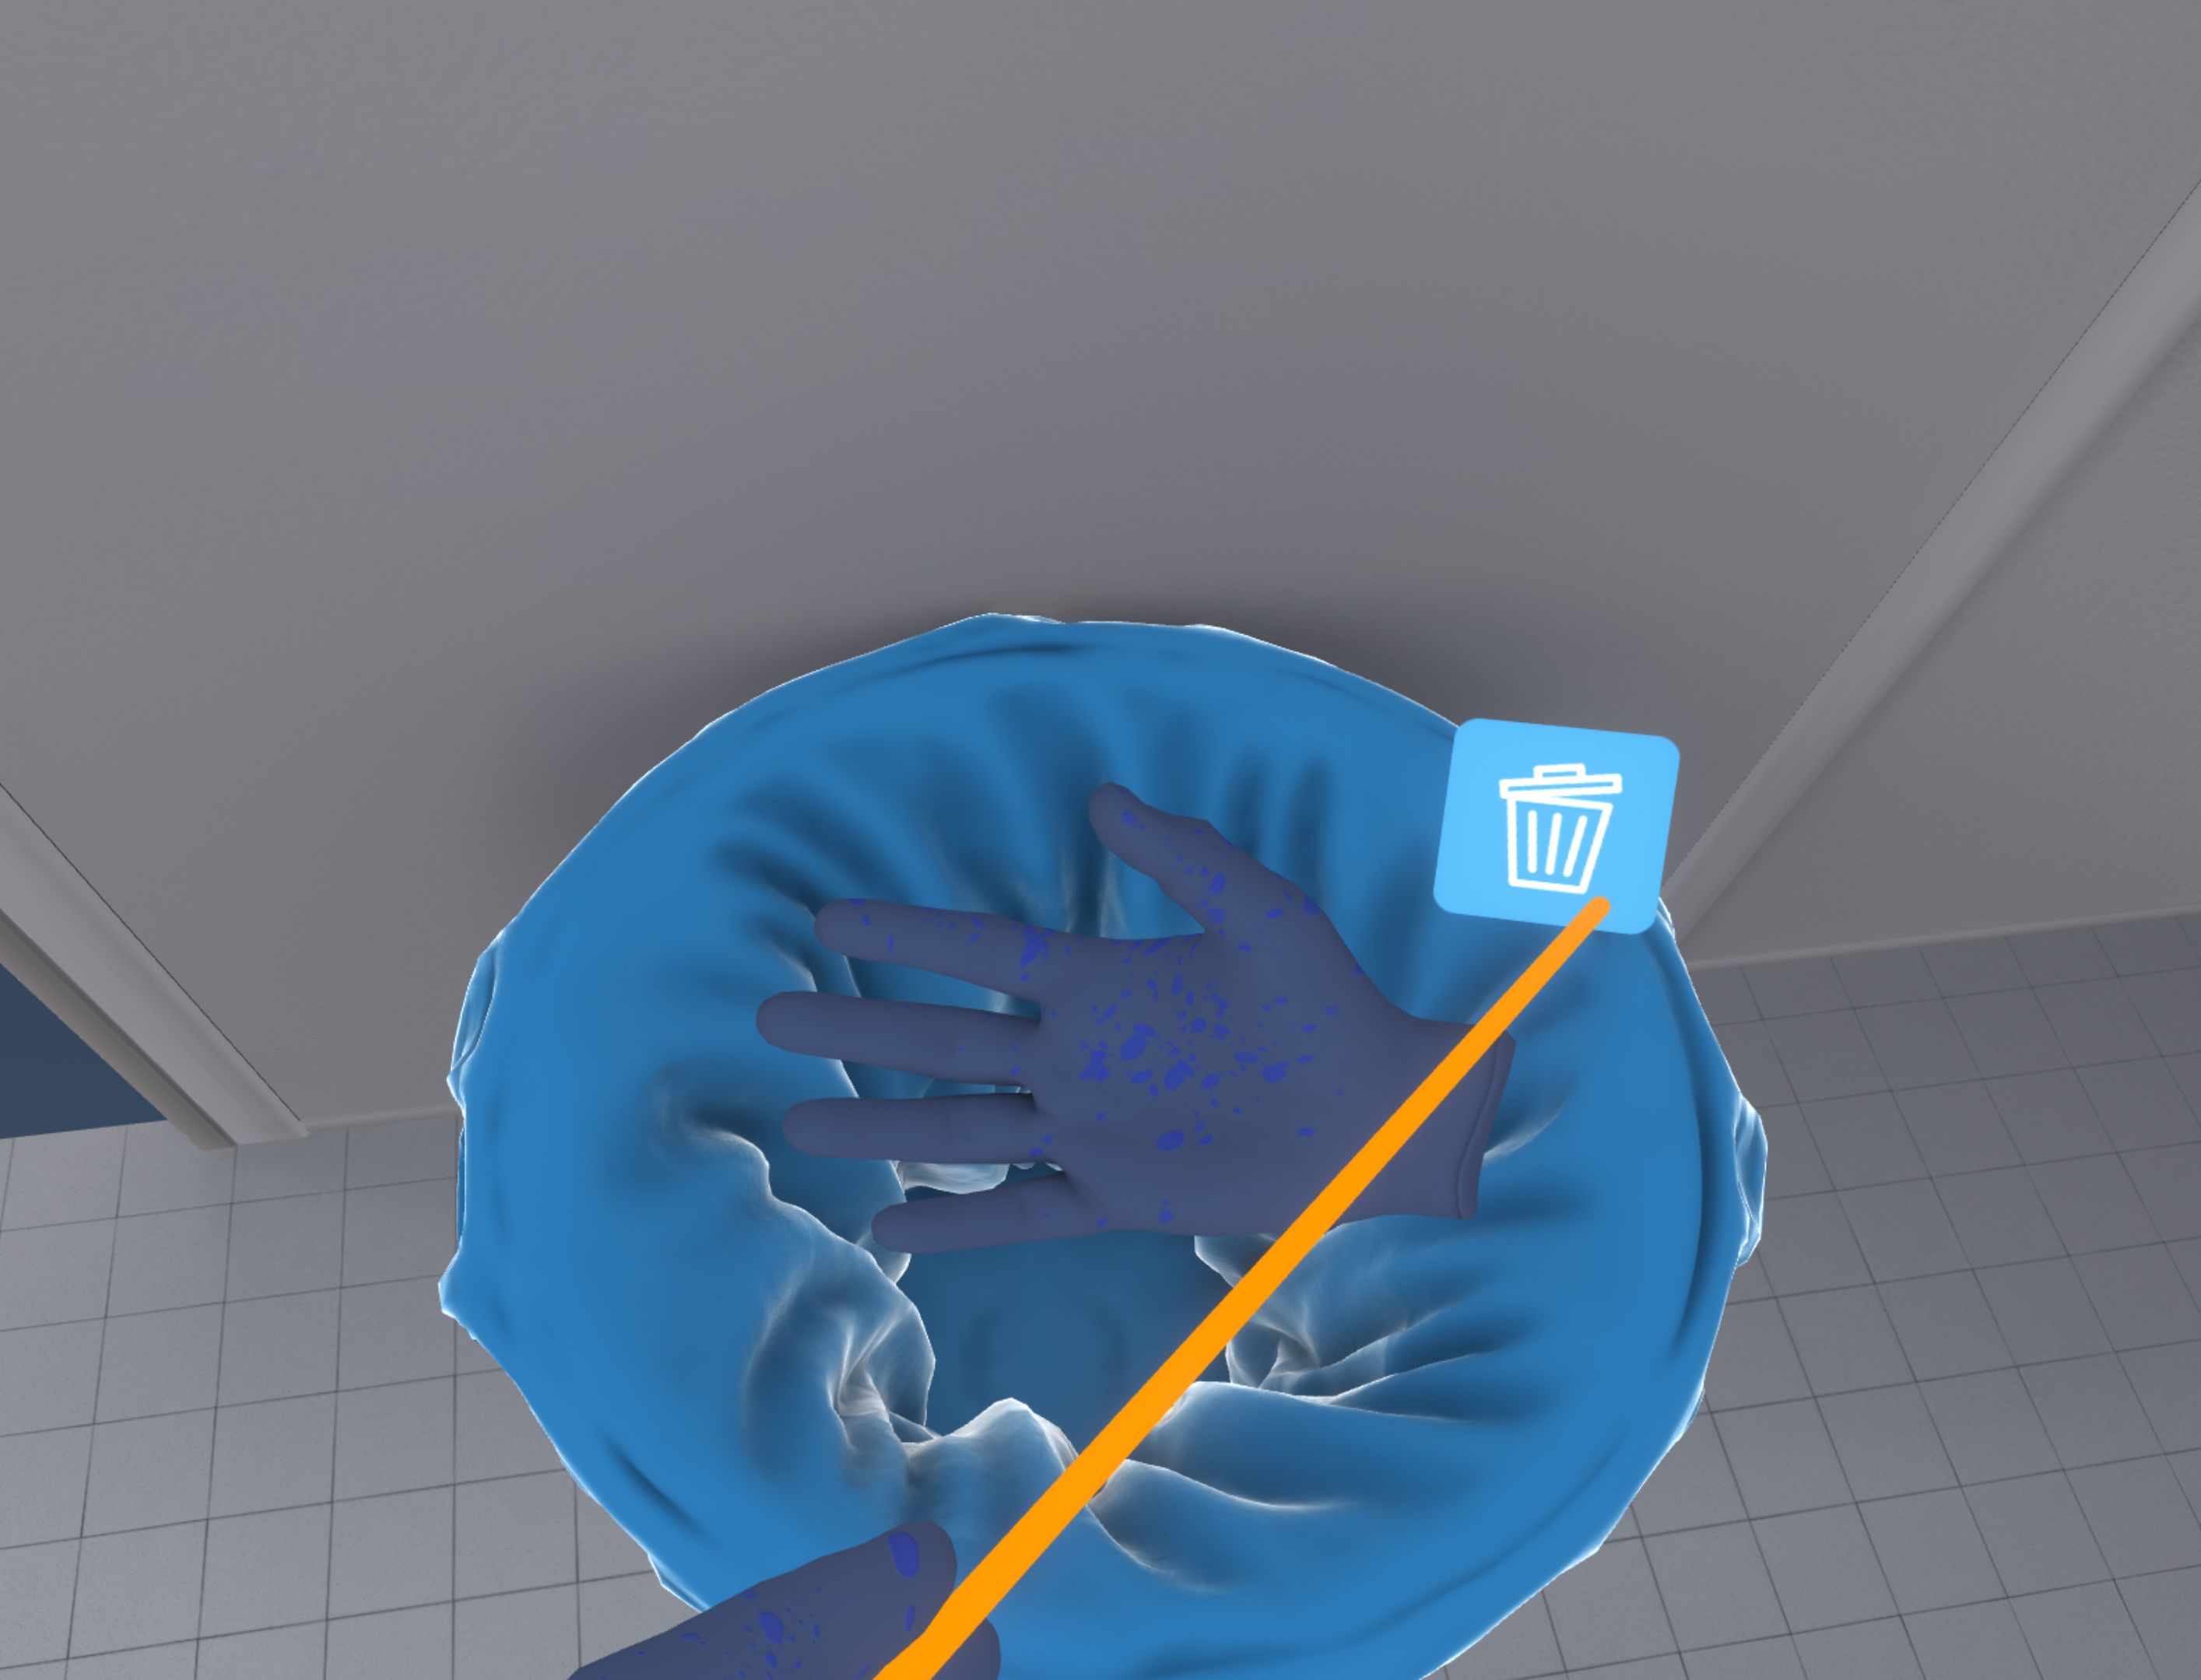
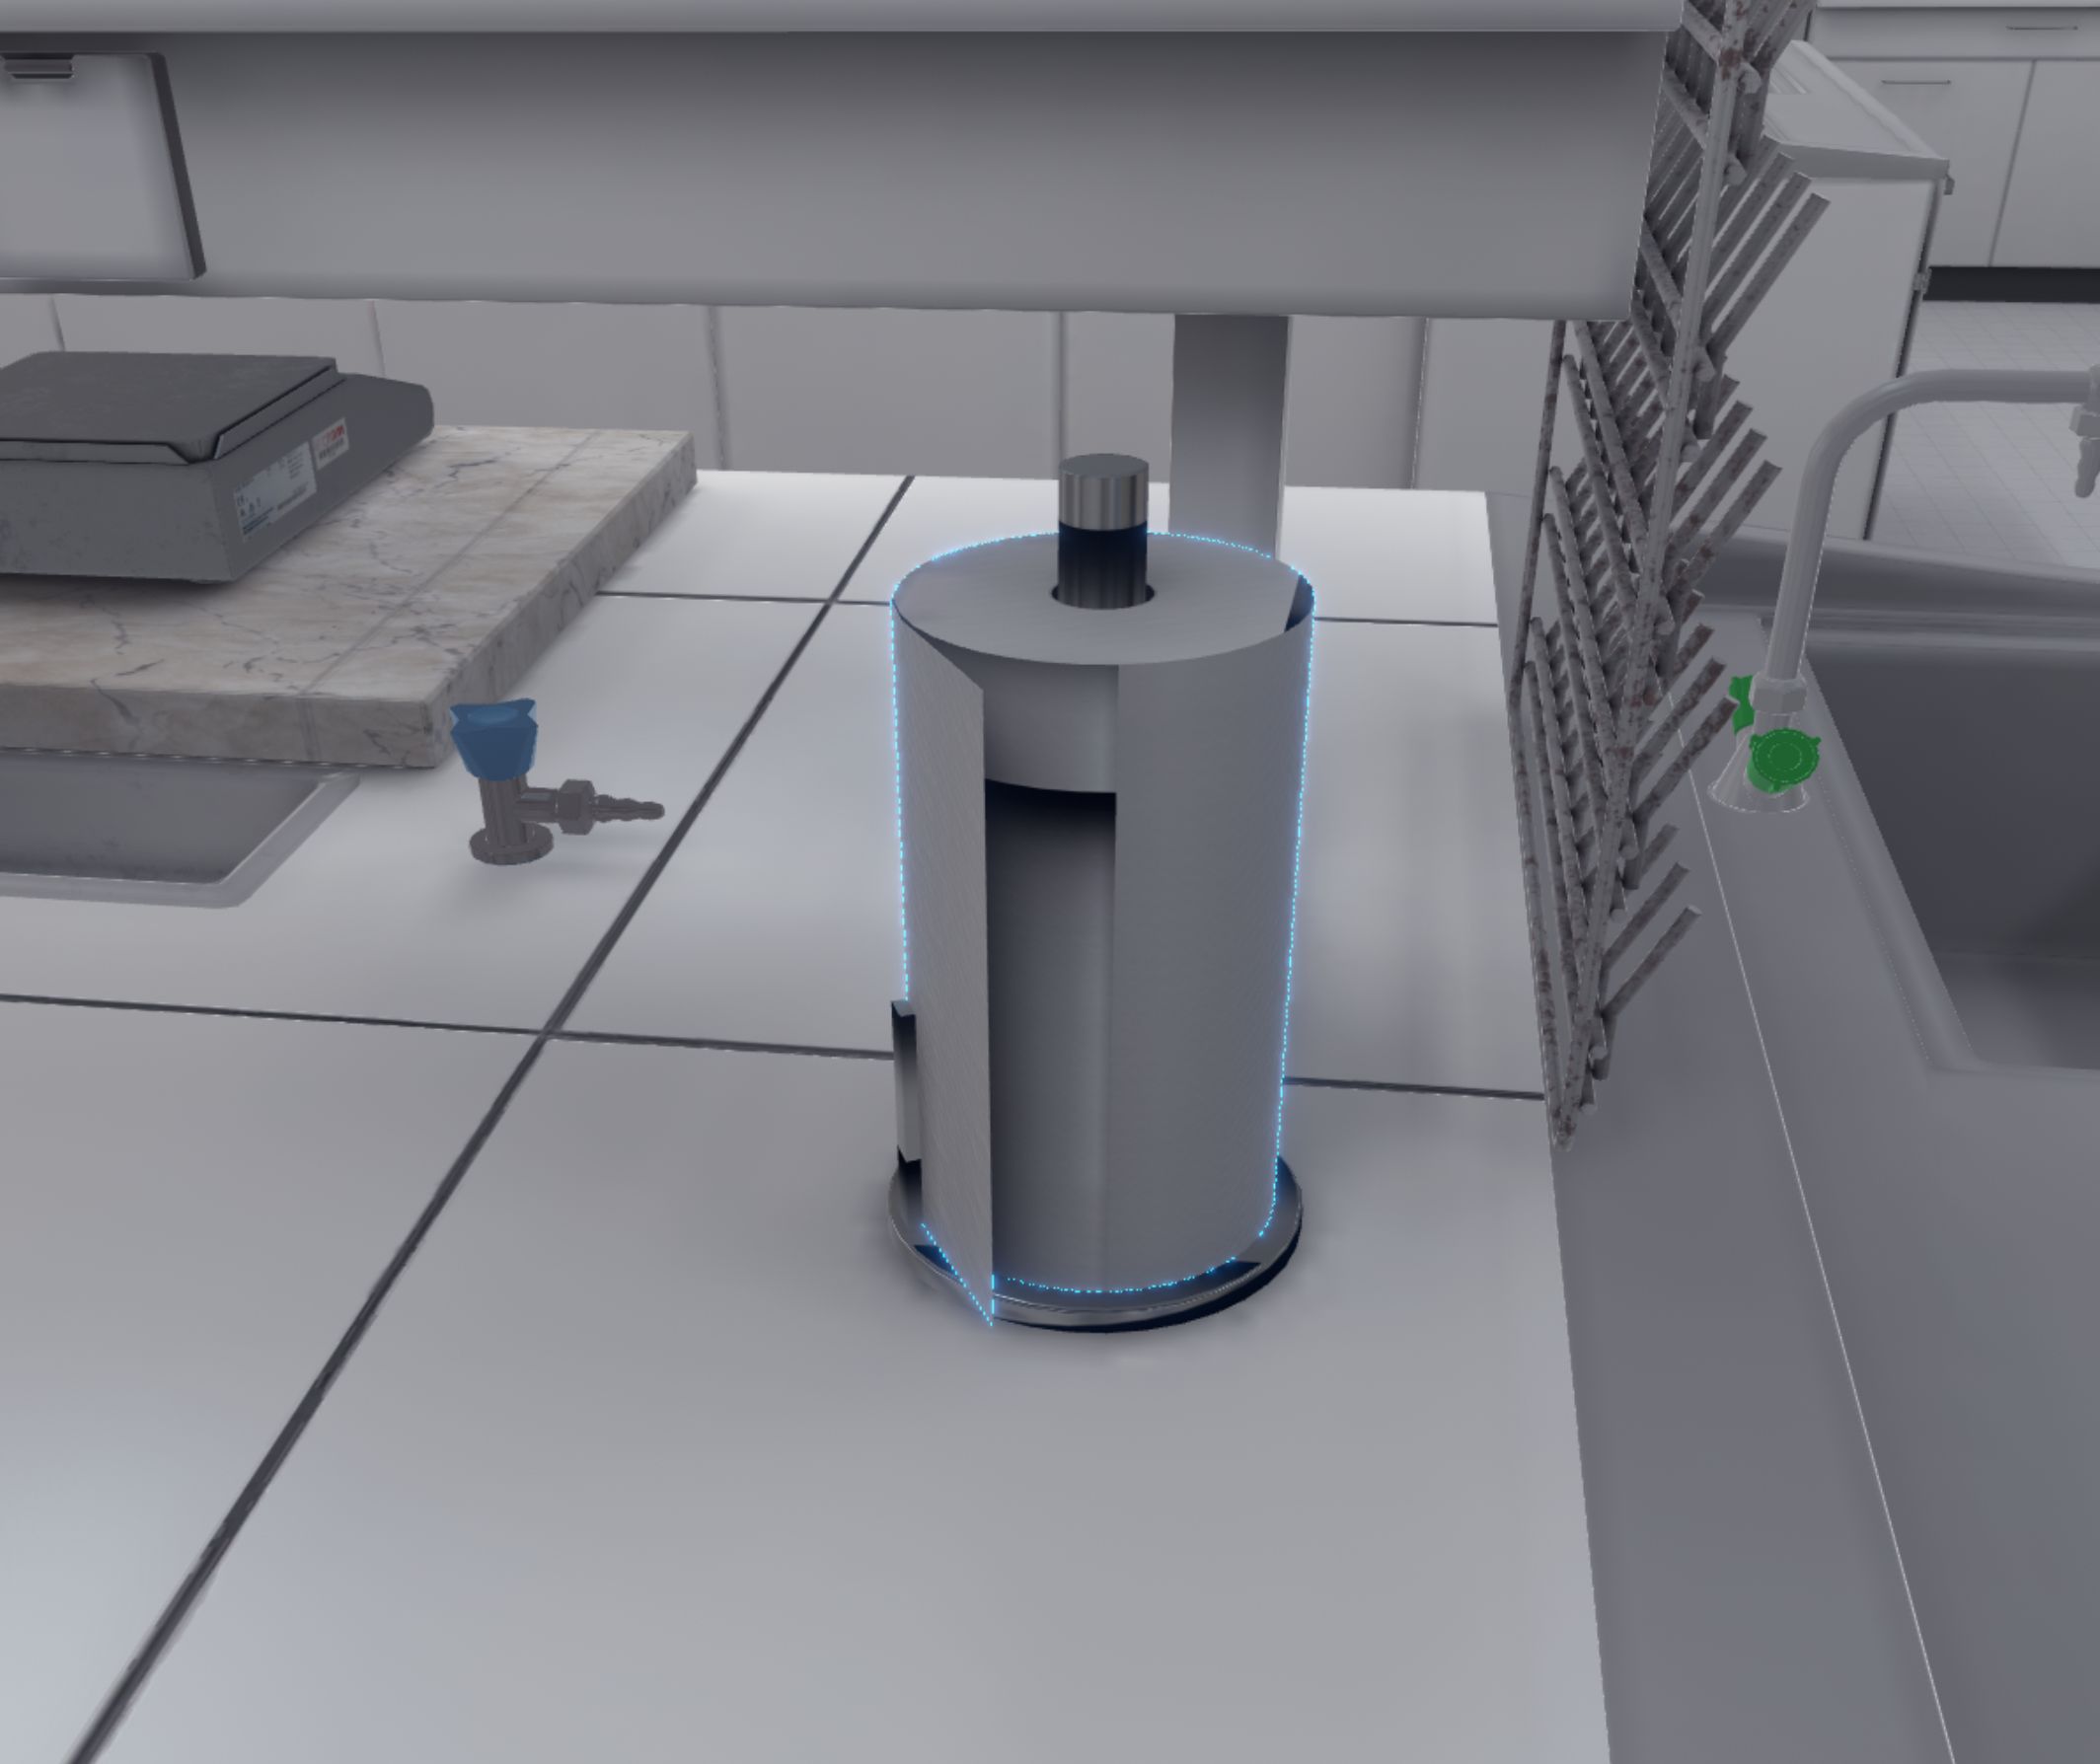
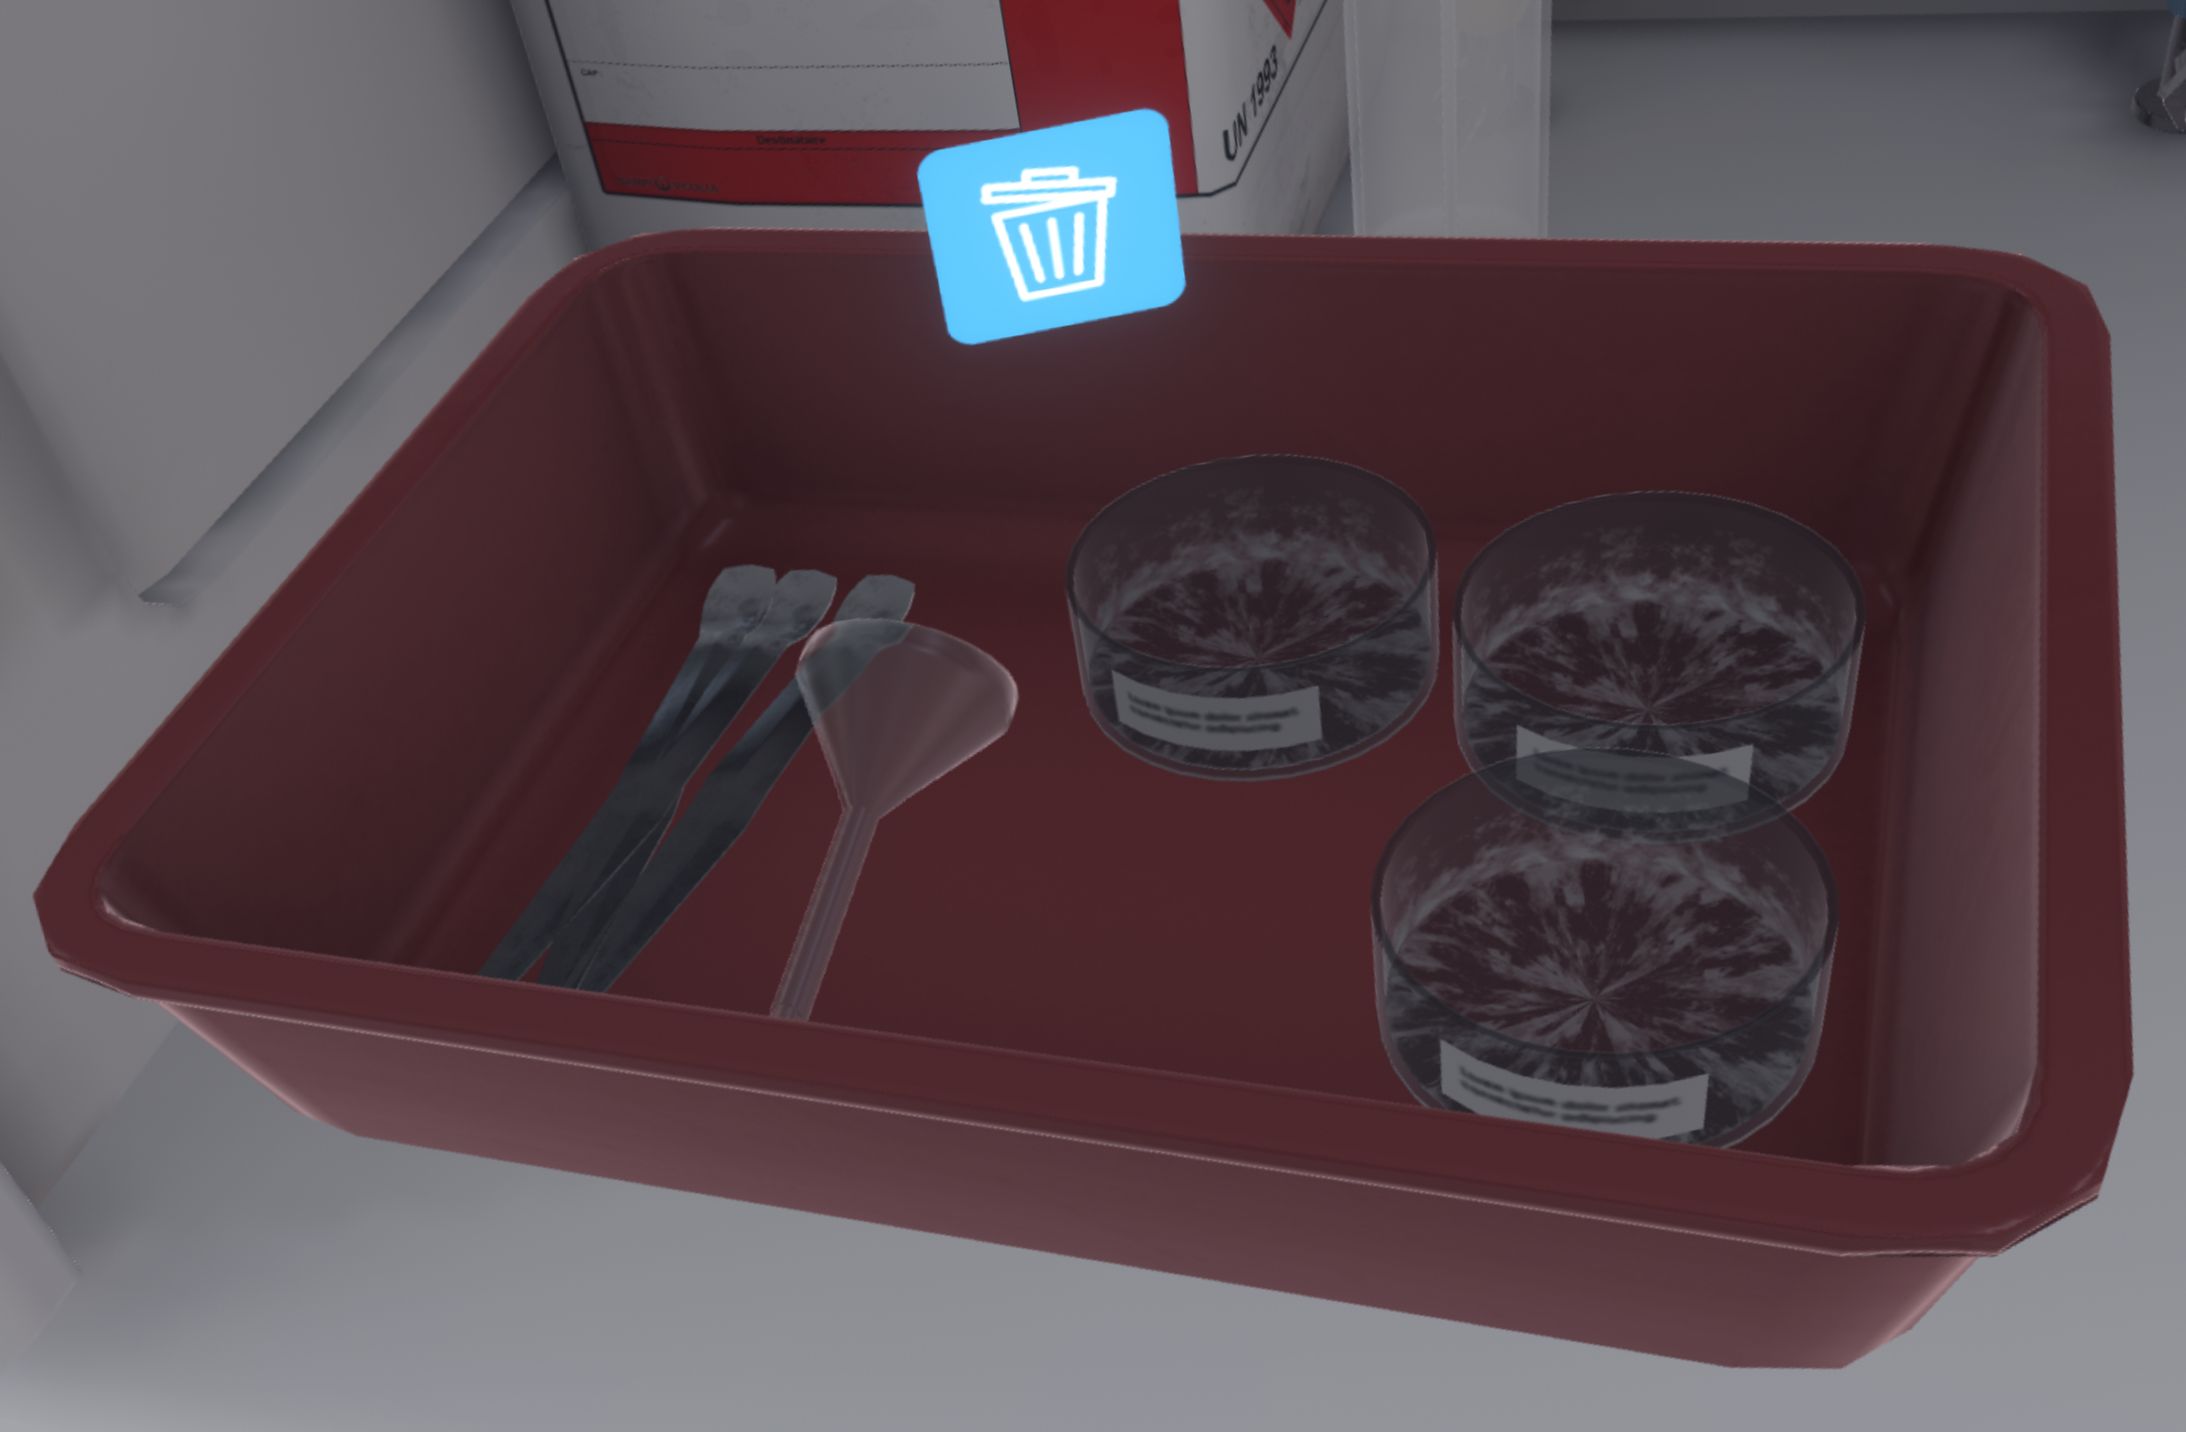
The user must remove their gloves, if they are wearing them. They must throw them away, and then approach the trash can and click on the "trash can" icon.
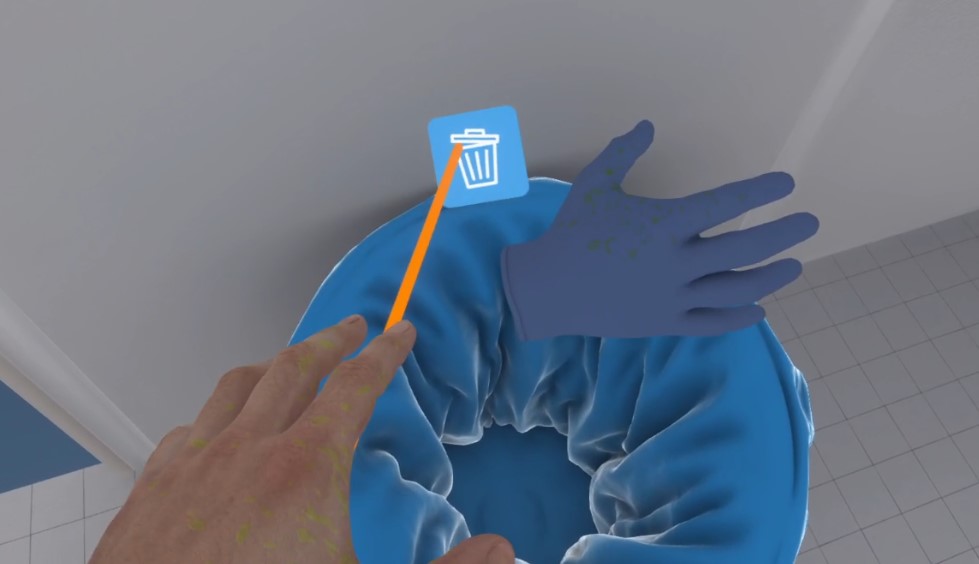 Figure 69. The user throws the gloves in the trash
Then they must use the first aid kit to treat themselves and use the phone to call the safety station (Using the phone).
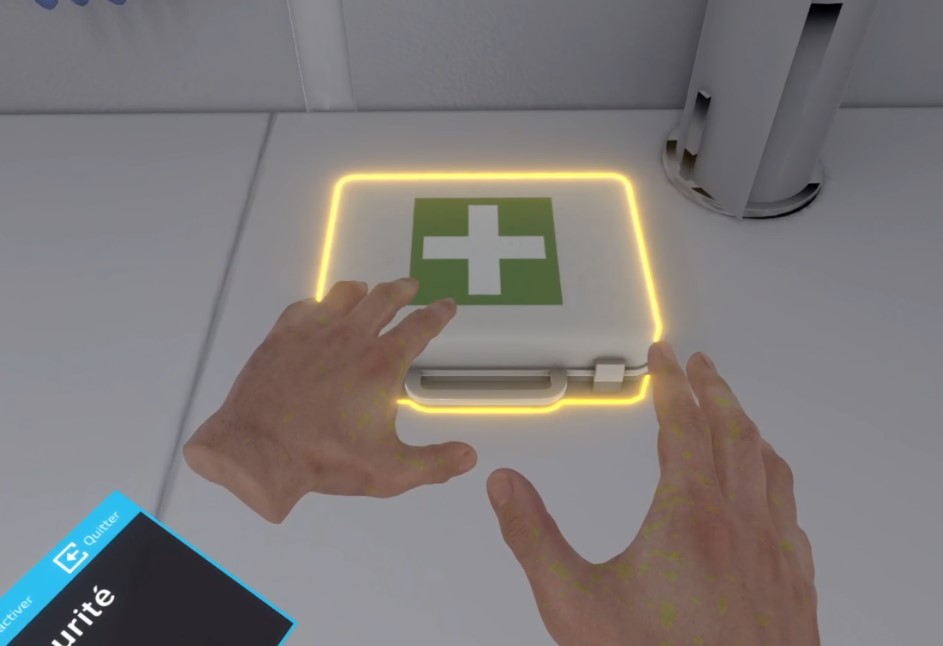 Figure 70. First aid kit
 -
Burning Oil Splash
First, the user must take a shower to extinguish the flames on their hands. They must turn on the shower faucet and run their hands through the water.
 Figure 71. Using the shower
Then they must follow the same procedure as if they had been splashed with boiling oil.
Once the steps are completed, the user will be teleported to the lobby in front of the score screen.
4.5.3. Exercise Evaluation Criteria
![]() Duration: Time taken by the user to complete the exercise.
Duration: Time taken by the user to complete the exercise.
![]() Protection: Proper use of PPE equipment.
Protection: Proper use of PPE equipment.
![]() Analysis: Completes the result of the experiment.
Analysis: Completes the result of the experiment.
![]() Procedure: Follows the correct sequence of actions.
Procedure: Follows the correct sequence of actions.
![]() Autonomy: The score decreases depending on the number of times assistance was requested. Only in Advanced Mode.
Autonomy: The score decreases depending on the number of times assistance was requested. Only in Advanced Mode.
5. Manipulations
The exercises in this module allow several manipulations necessary for the synthesis of tartrazine to be carried out by the user.
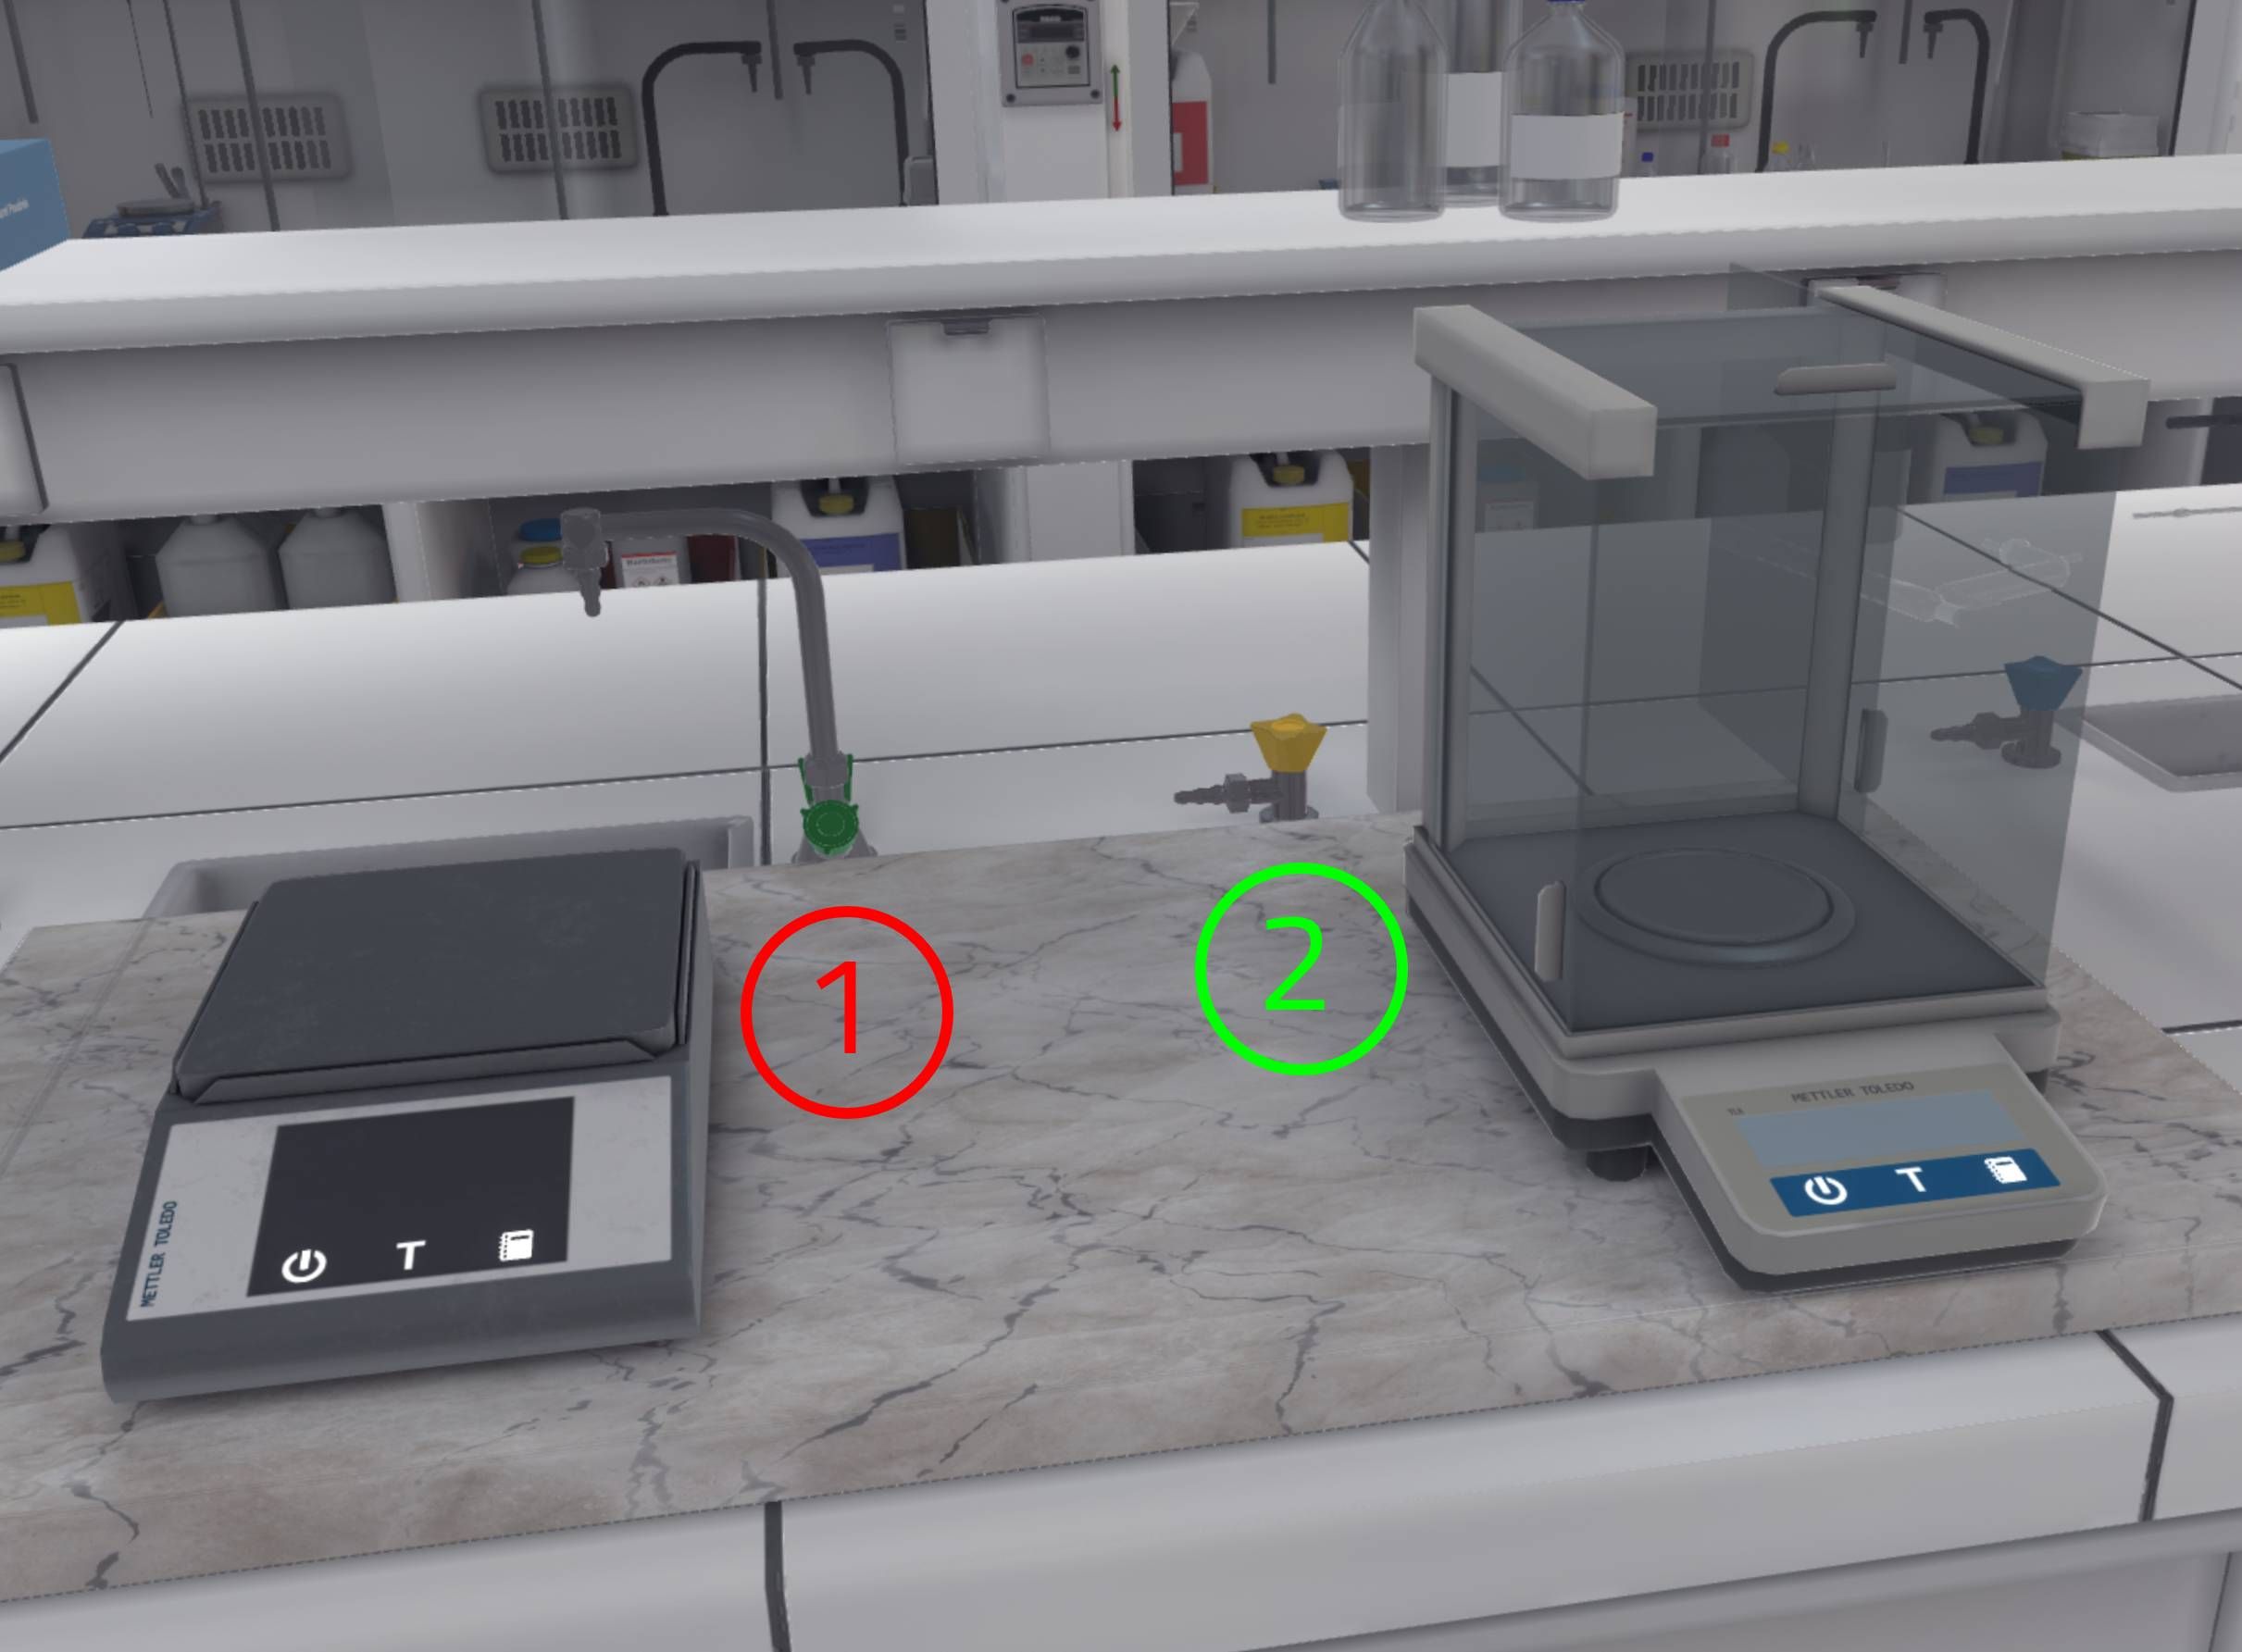
5.1. Weighing
In this exercise, the user will perform two weighings of different acids with an analytical scale. Depending on the level of difficulty chosen, the objectives and aids differ.
5.1.1. Instructions
To complete the exercise, the user must follow the following instructions:
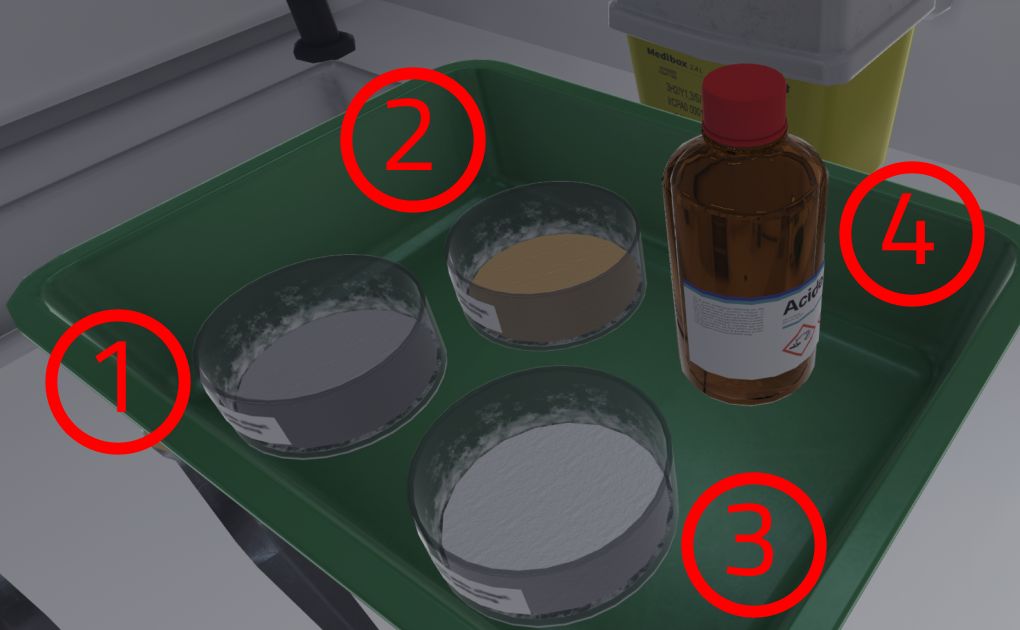
Beginner
-
Once you have equipped yourself with Personal Protective Equipment, enter the laboratory to start the exercise. To complete the exercise, exit the laboratory.
-
You must weigh 188 mg of 4-hydrazino benzenesulfonic acid, with a tolerance of 5%. To begin, switch on the analytical scale by pressing the first button.
-
Open the analytical scale airlock by pulling the door.
-
Take a clean, empty container suitable for the chemical and place it on the scale pan.
-
Close the analytical scale airlock. Press the second button to tare.
-
Open the airlock and remove the container.
-
Using a clean spatula, transfer 188 mg of 4-hydrazino benzenesulphonic acid into the container. Weigh the filled container after closing the airlock of the scale for optimum accuracy. If you are satisfied, record the measurement in your laboratory notebook by clicking on the third button.
-
You should weigh 218 mg of 2,2,3,3-tetrahydroxysuccinic acid, with a tolerance of 5%. Take a clean, empty container suitable for the chemical and tare as before.
-
Using a clean spatula, transfer 218 mg of 2,2,3,3-tetrahydroxysuccinic acid into the container. Weigh the filled container after closing the airlock of the scale for optimum accuracy. If you are satisfied, record the measurement in your laboratory notebook by clicking on the 3rd button.
-
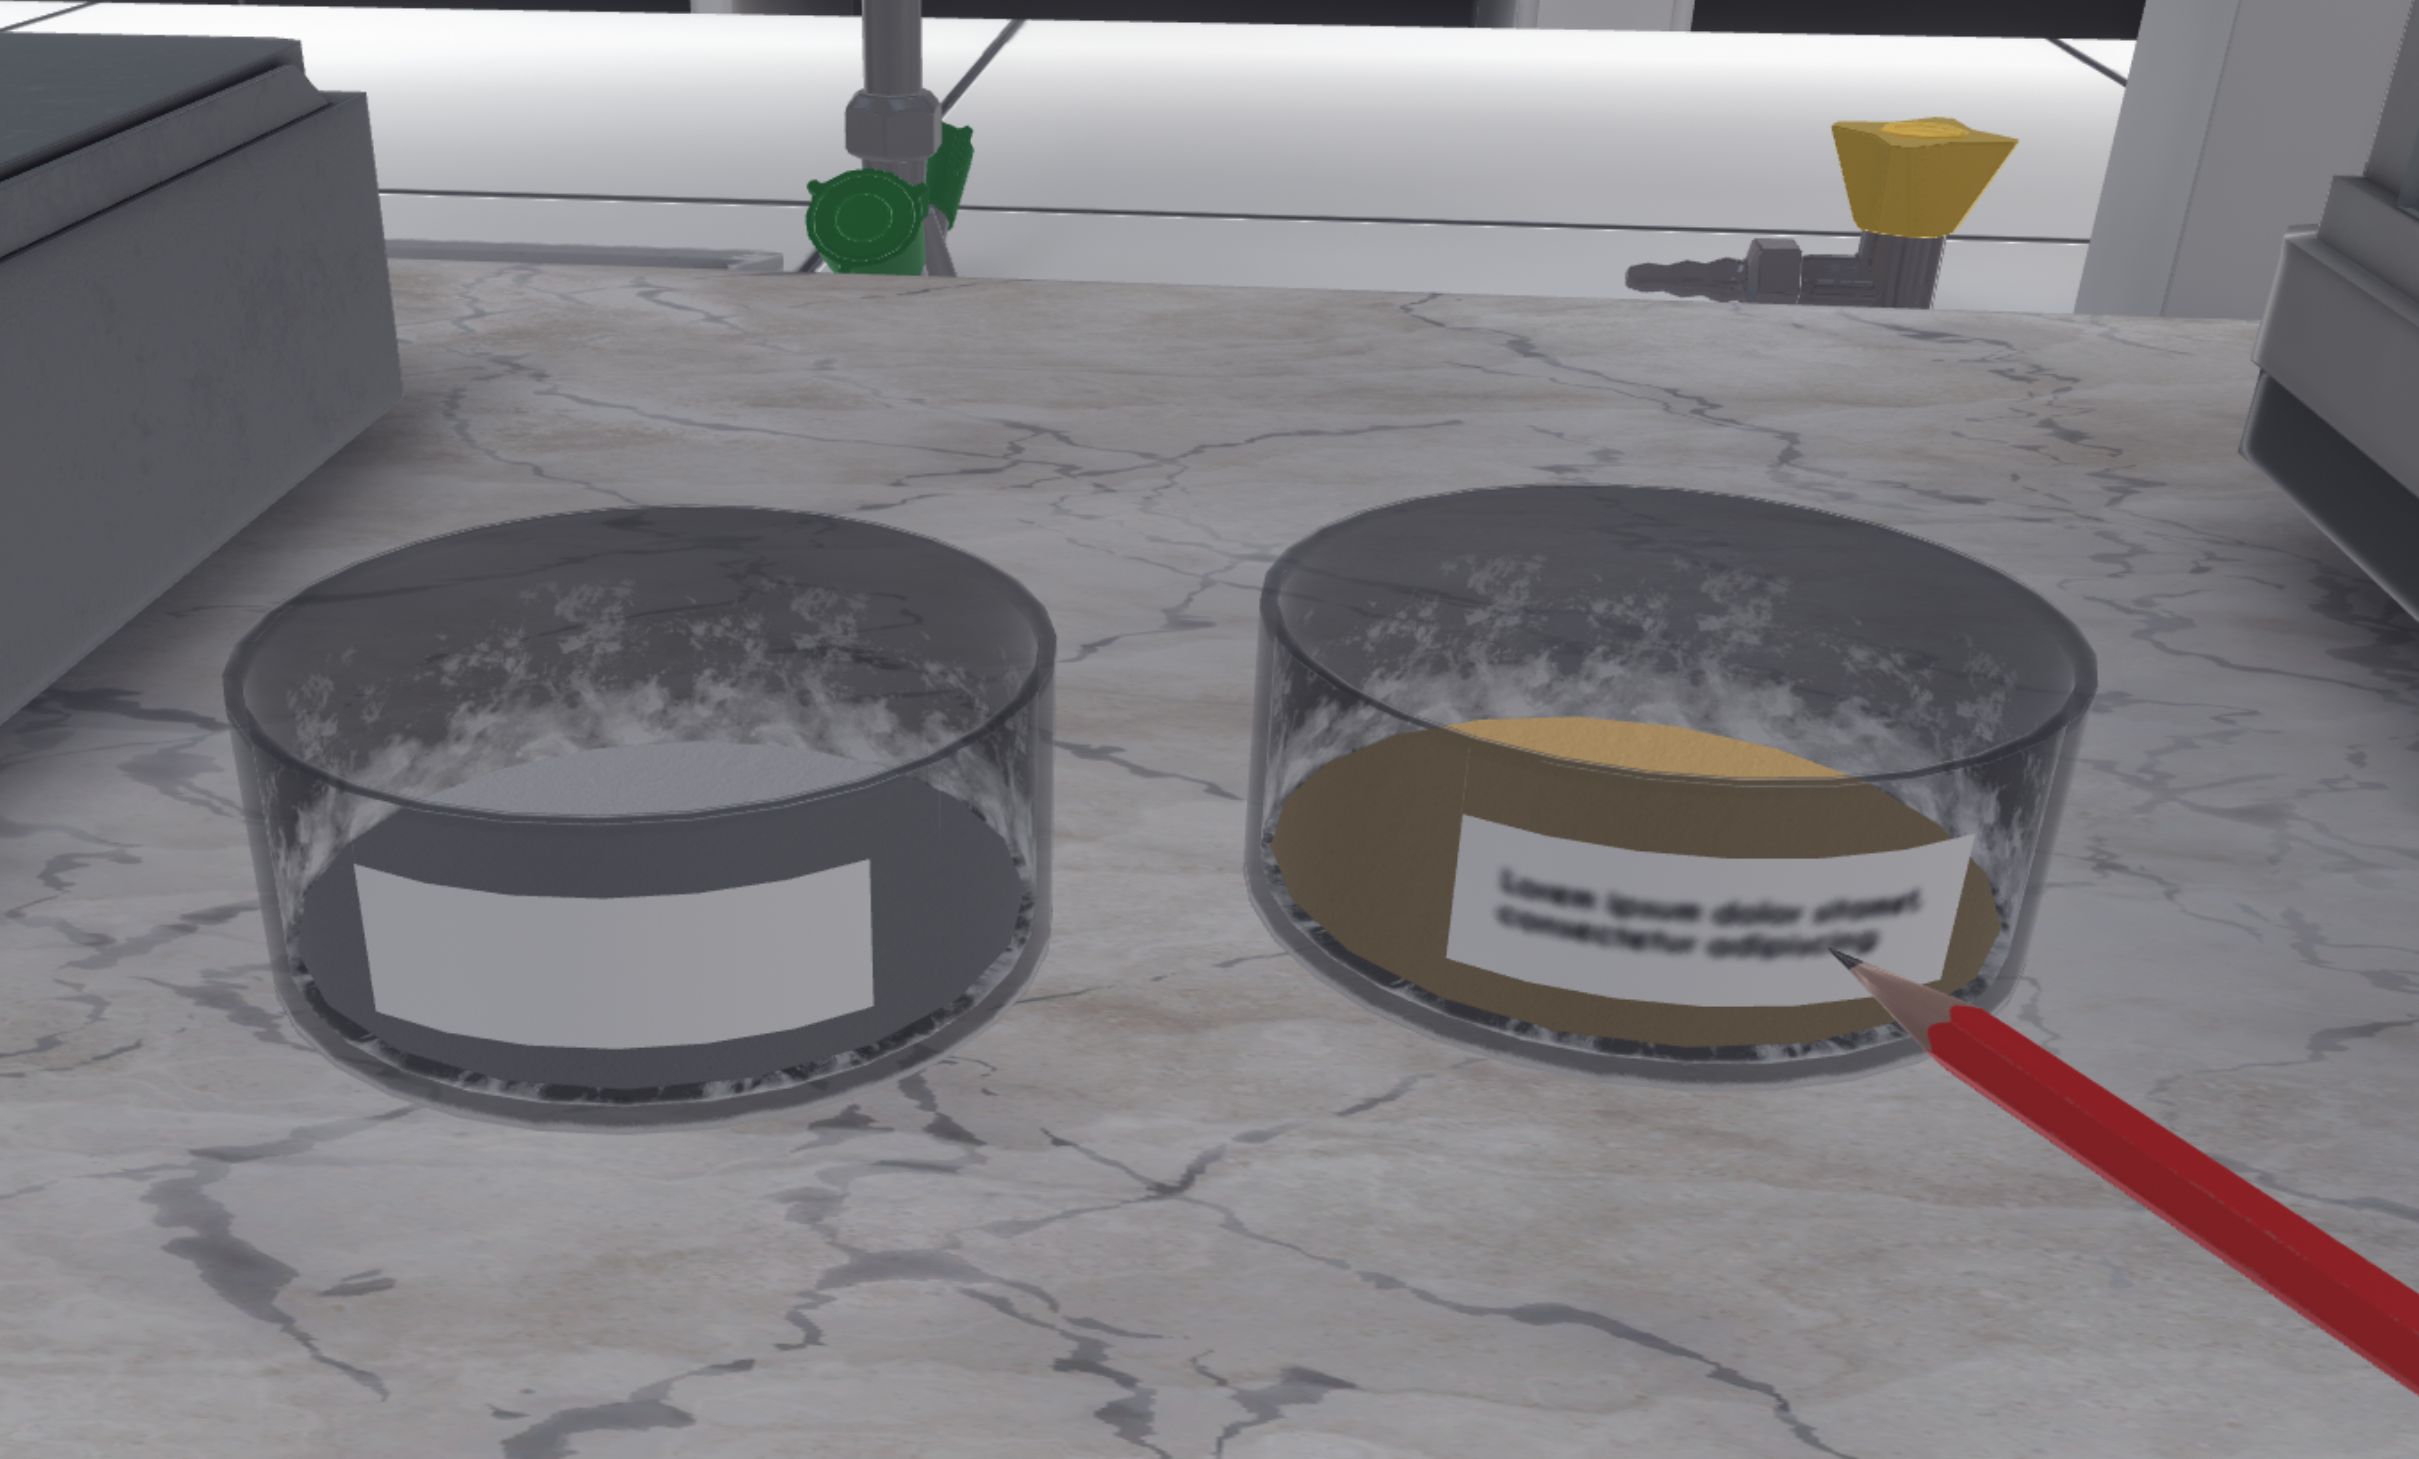
Write the names of the weighed products on the containers with the pencil. Place the containers in the fume cupboard.
-
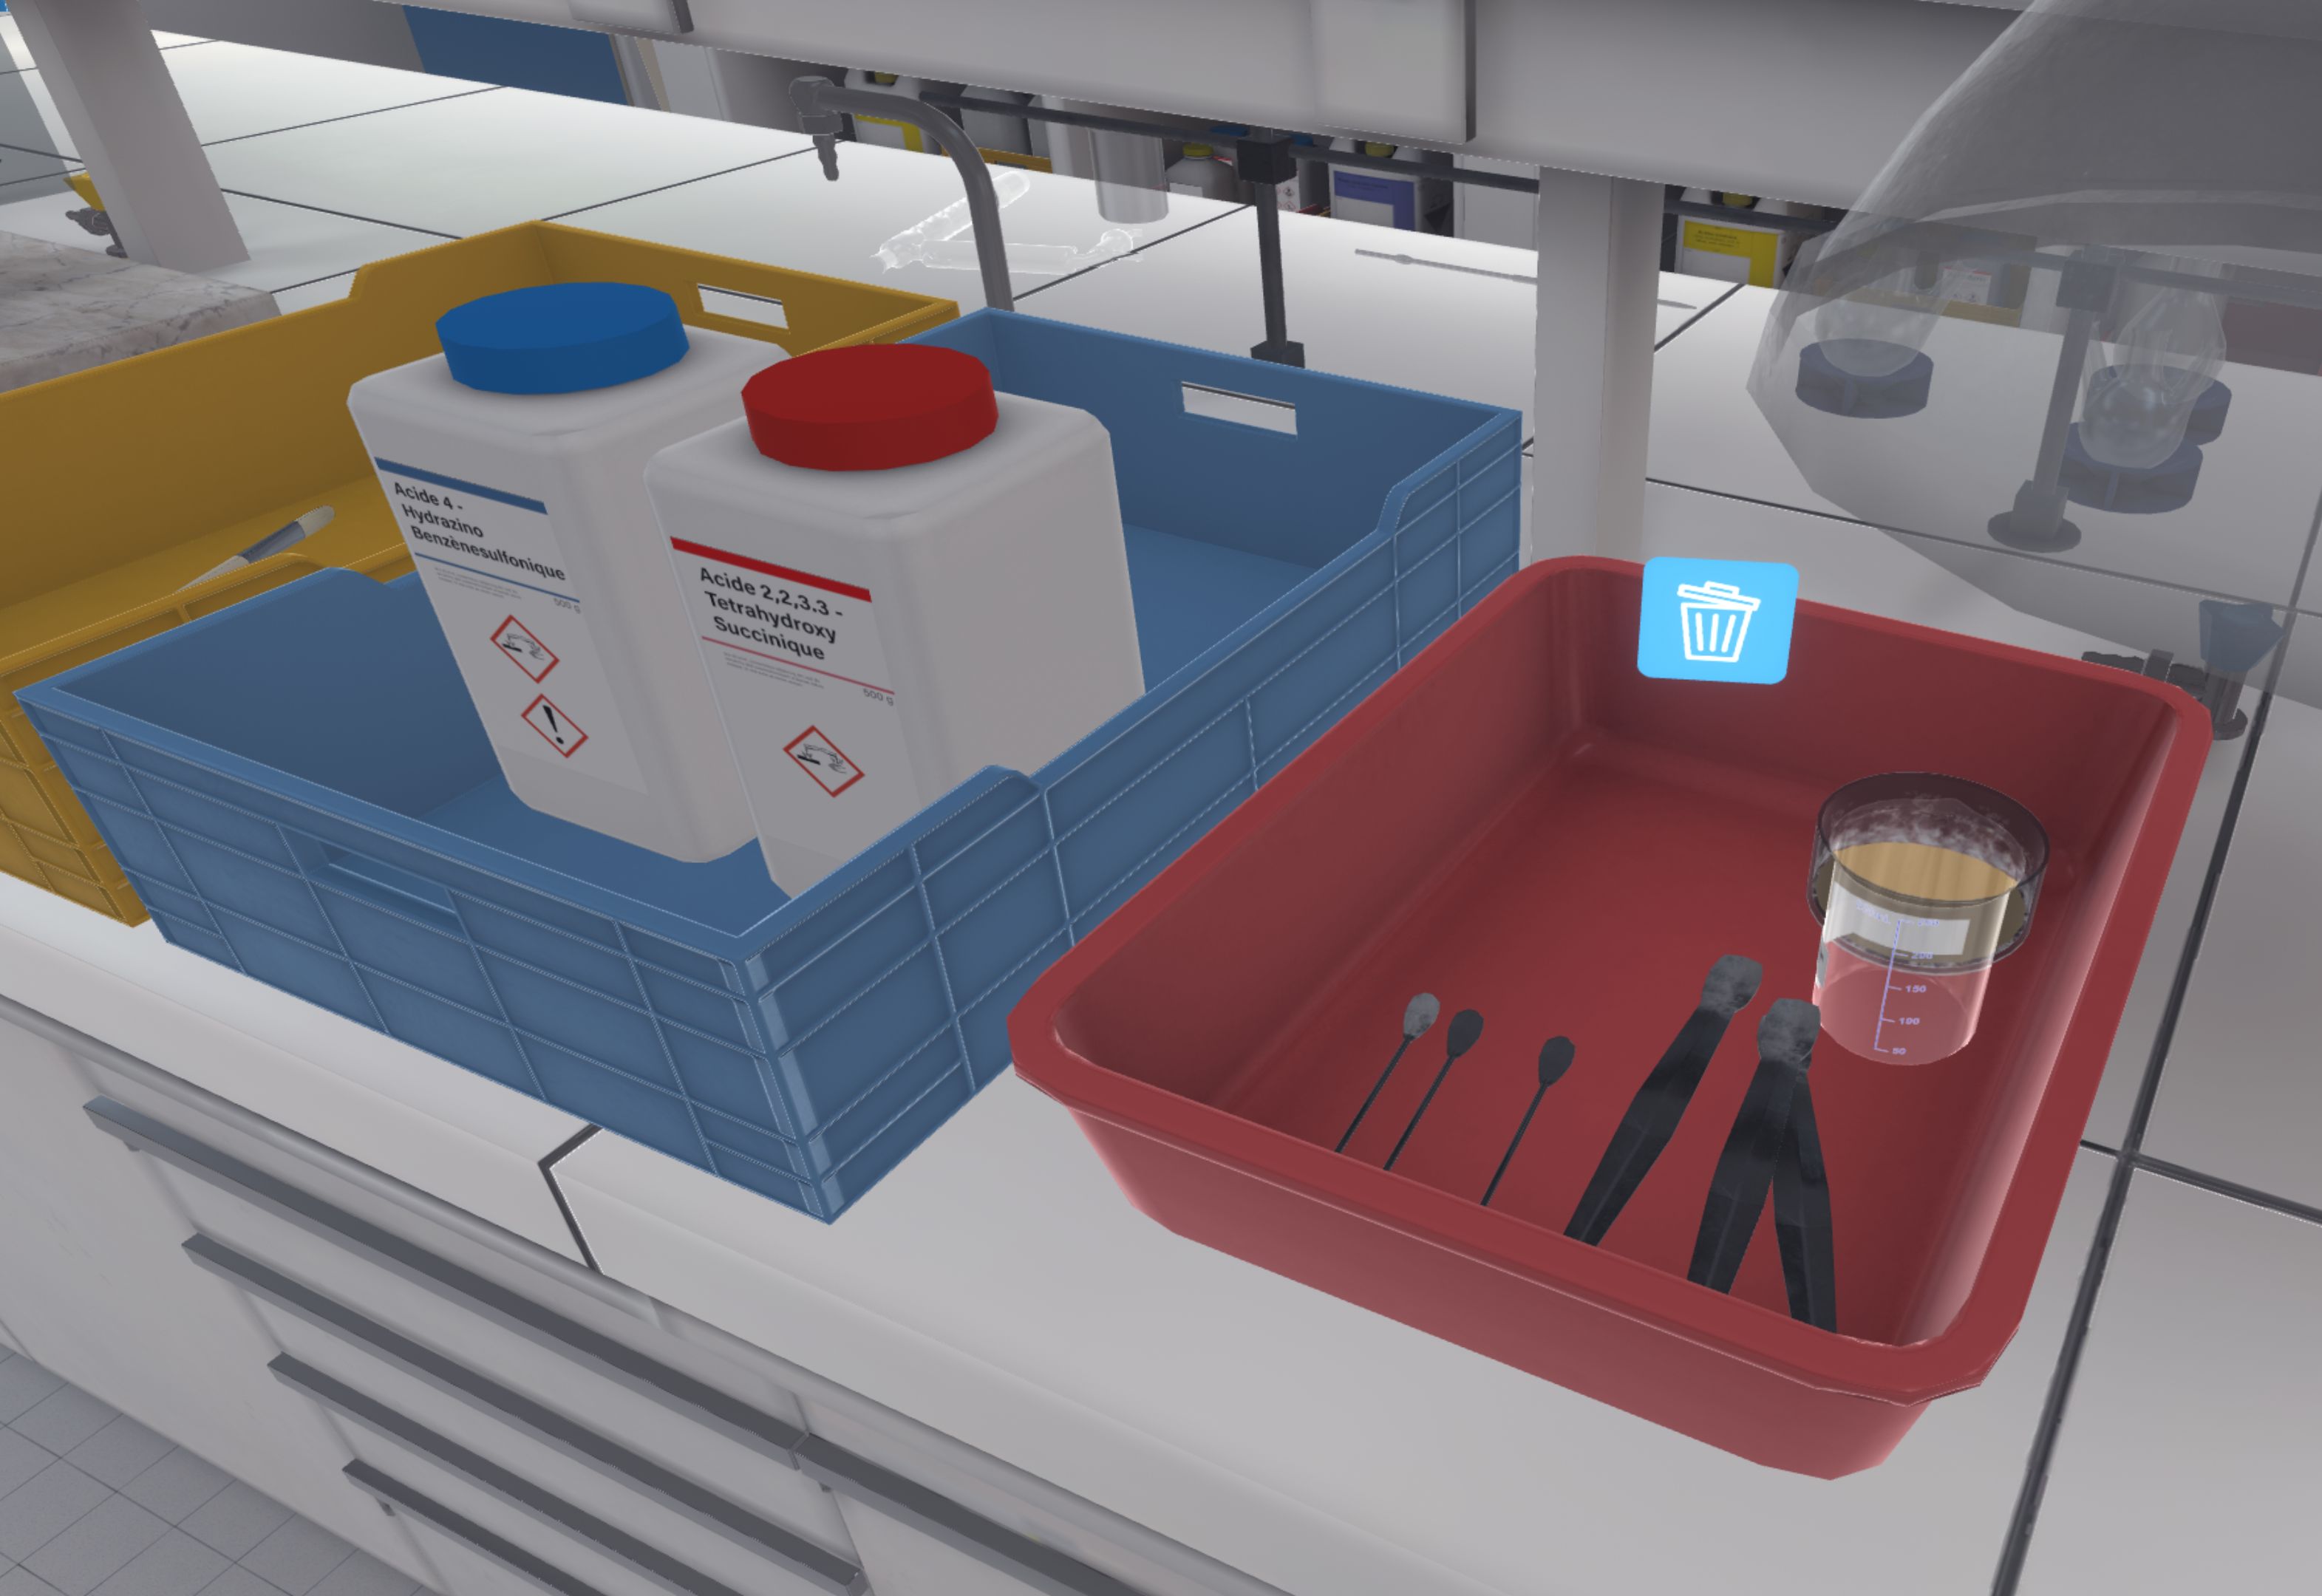
Store the chemicals in the bin. Remember to close the caps on the bottles.
-
Take the soiled equipment and put it in the bin for dirty containers on the right.
-
Turn off the scales. Leave the laboratory to complete the exercise.
Advanced
-
Once you have donned the Personal Protective Equipment, enter the laboratory to begin the exercise. To complete the exercise, exit the laboratory.
-
You must weigh 188 mg of 4-hydrazino benzenesulfonic acid, with a tolerance of 5%. Tare an empty container.
-
Transfer 188 mg of 4-hydrazino-benzenesulphonic acid to the container, weigh it and record the measurement in your laboratory notebook.
-
You must weigh 218mg of 2,2,3,3-tetrahydroxysuccinic acid, with a tolerance of 5%. Tare an empty container.
-
Transfer 218mg of 2,2,3,3-tetrahydroxysuccinic acid to the container, weigh it and record the measurement in your laboratory notebook.
-
Place the weighed products in the fume cupboard. Put your work surface away and leave the laboratory as soon as you have finished.
Expert
-
Enter the laboratory to begin the exercise.
-
Make two weighings to obtain 188 mg of 4-hydrazino benzenesulfonic acid and 218 mg of 2,2,3,3-tetrahydroxysuccinic acid. Place the weighed products in the fume cupboard. Leave the laboratory when you have finished to complete the exercise.
5.1.2. Scenario sequence
The user starts the scenario with the following briefing:
You are going to synthesise tartrazine. You will have to perform 2 weighings to recover 188 mg of 4-hydrazino benzenesulphonic acid and 218 mg of 2,2,3,3-tetrahydroxysuccinic acid.
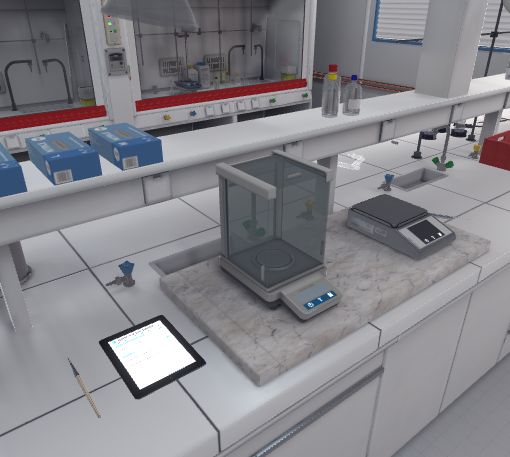
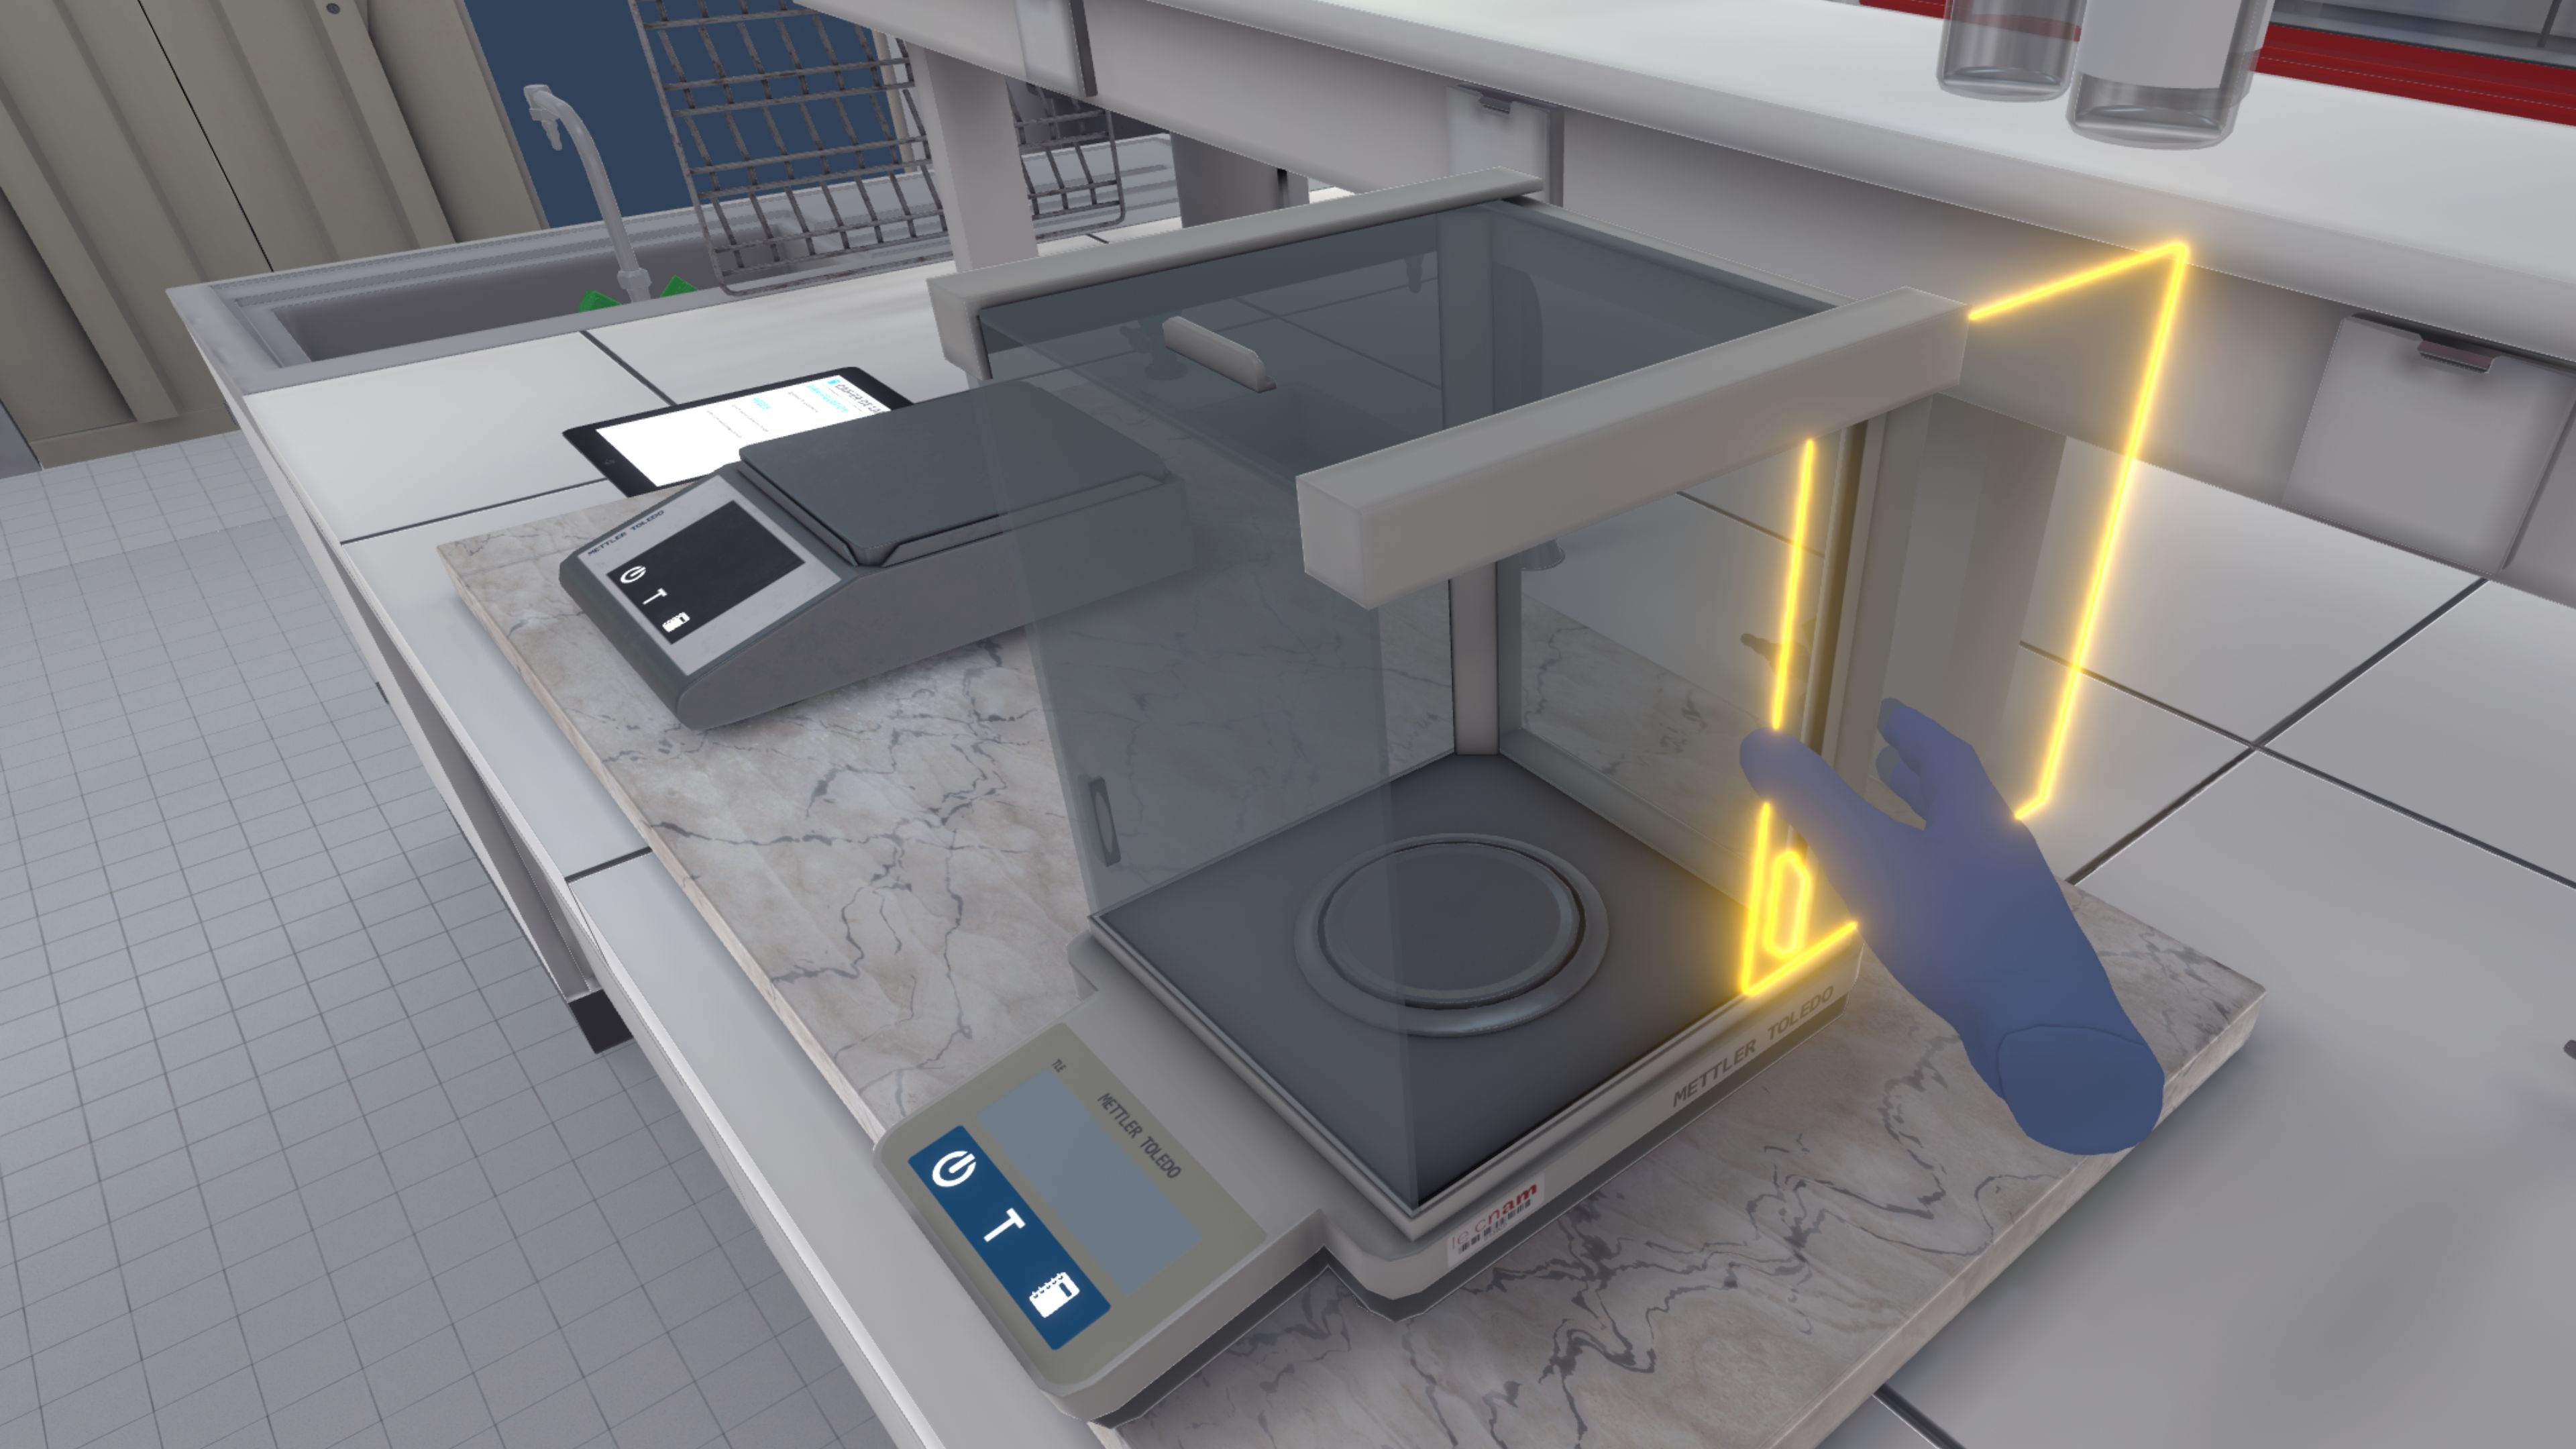
The user must equip their PPE (Equipping PPE), then enter the laboratory. They will approach the scales and switch on the analytical scale. Then, they will open the analytical scale airlock by pulling the door, and place an empty and clean ramekin in it. They will close the door and perform the tare.
-
Simple scale: Do not use: it is not precise enough for this manipulation
-
Analytical scale: To be used for this exercise
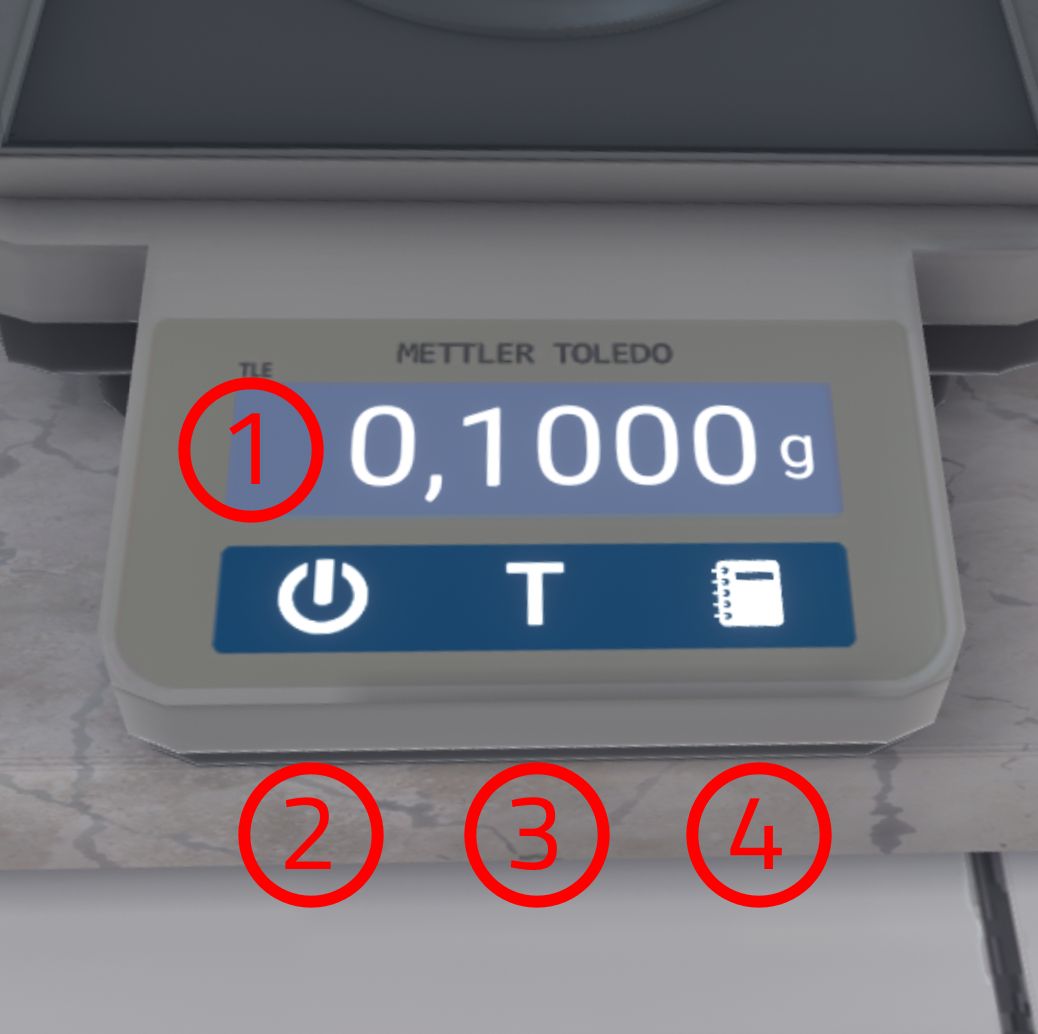
-
Display of the weight measured by the scale, in grams (1g = 1000mg)
-
Button to turn on/off the scale
-
Button to tare the scale
-
Button to send the weighed result to the laboratory notebook
-
The door opens/closes the airlock of the analytical scale, avoiding air flows that may affect the weighing result.
Next, the user must transfer 188 mg of 4-hydrazino benzenesulphonic acid into the ramekin that they have just tared. When opening the bottle, care should be taken to place the cap the correct way up on the work surface.
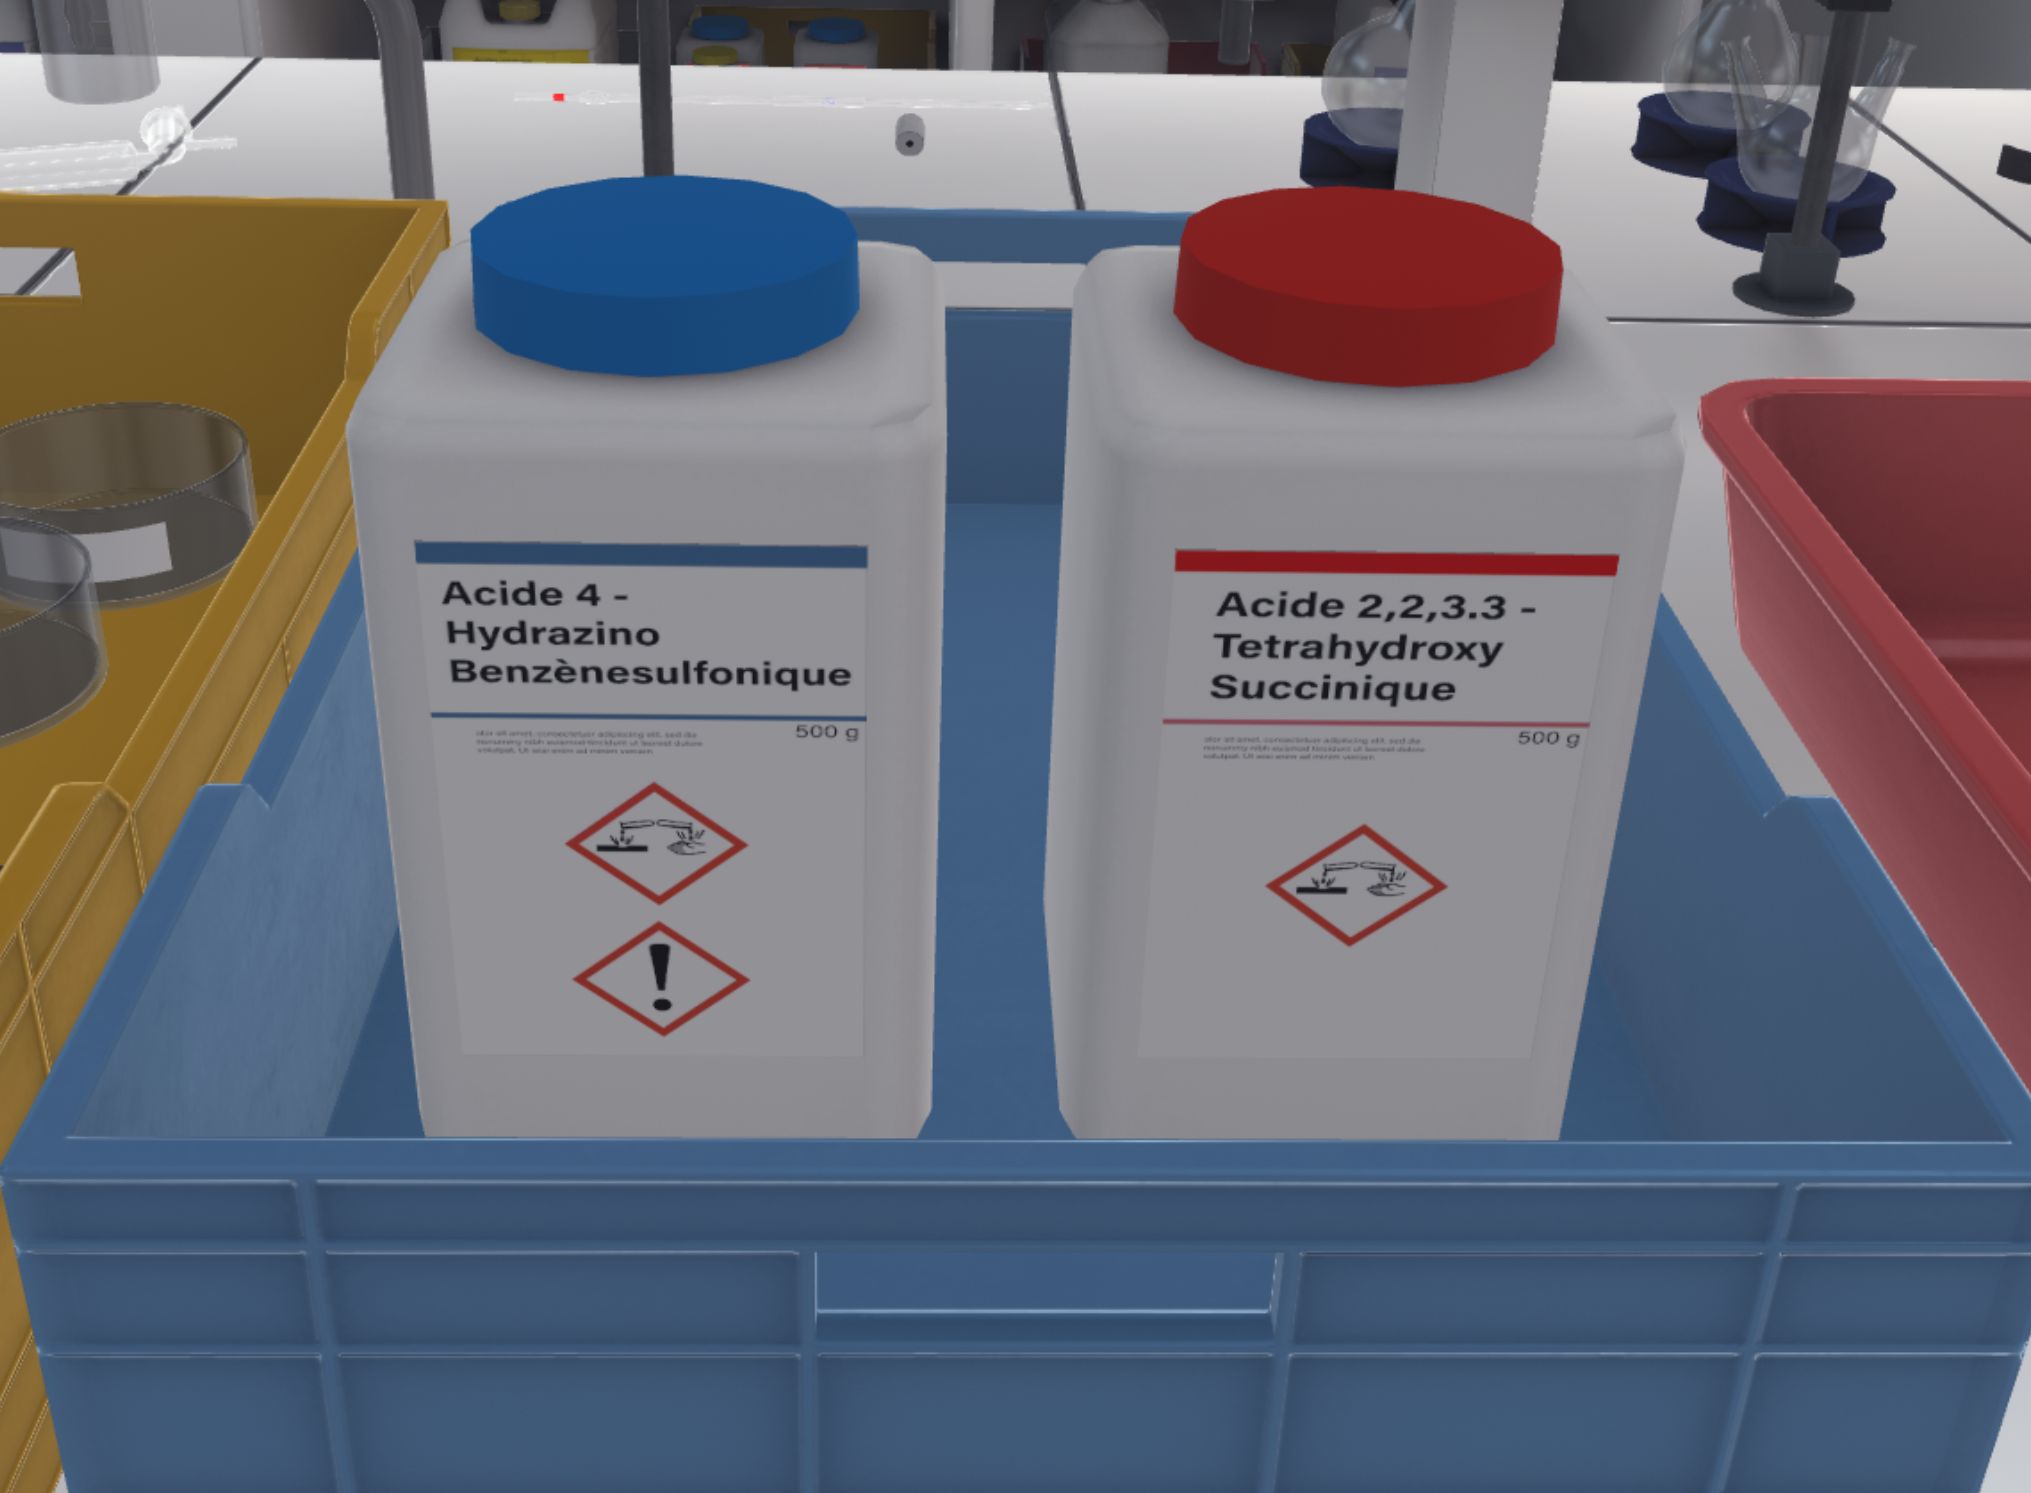
-
Wrong way: An error will occur
-
Right way
They must use the spatulas to transfer the product (Spatula and syringe).
They must not put a sampled product back into its original container. If too much product has been taken, the powder must be put into the waste beaker.

The user must transfer product into the ramekin outside the scale, otherwise powder may fall onto the scale pan, which will distort the weight. At this point, they should take the brush to clean it.
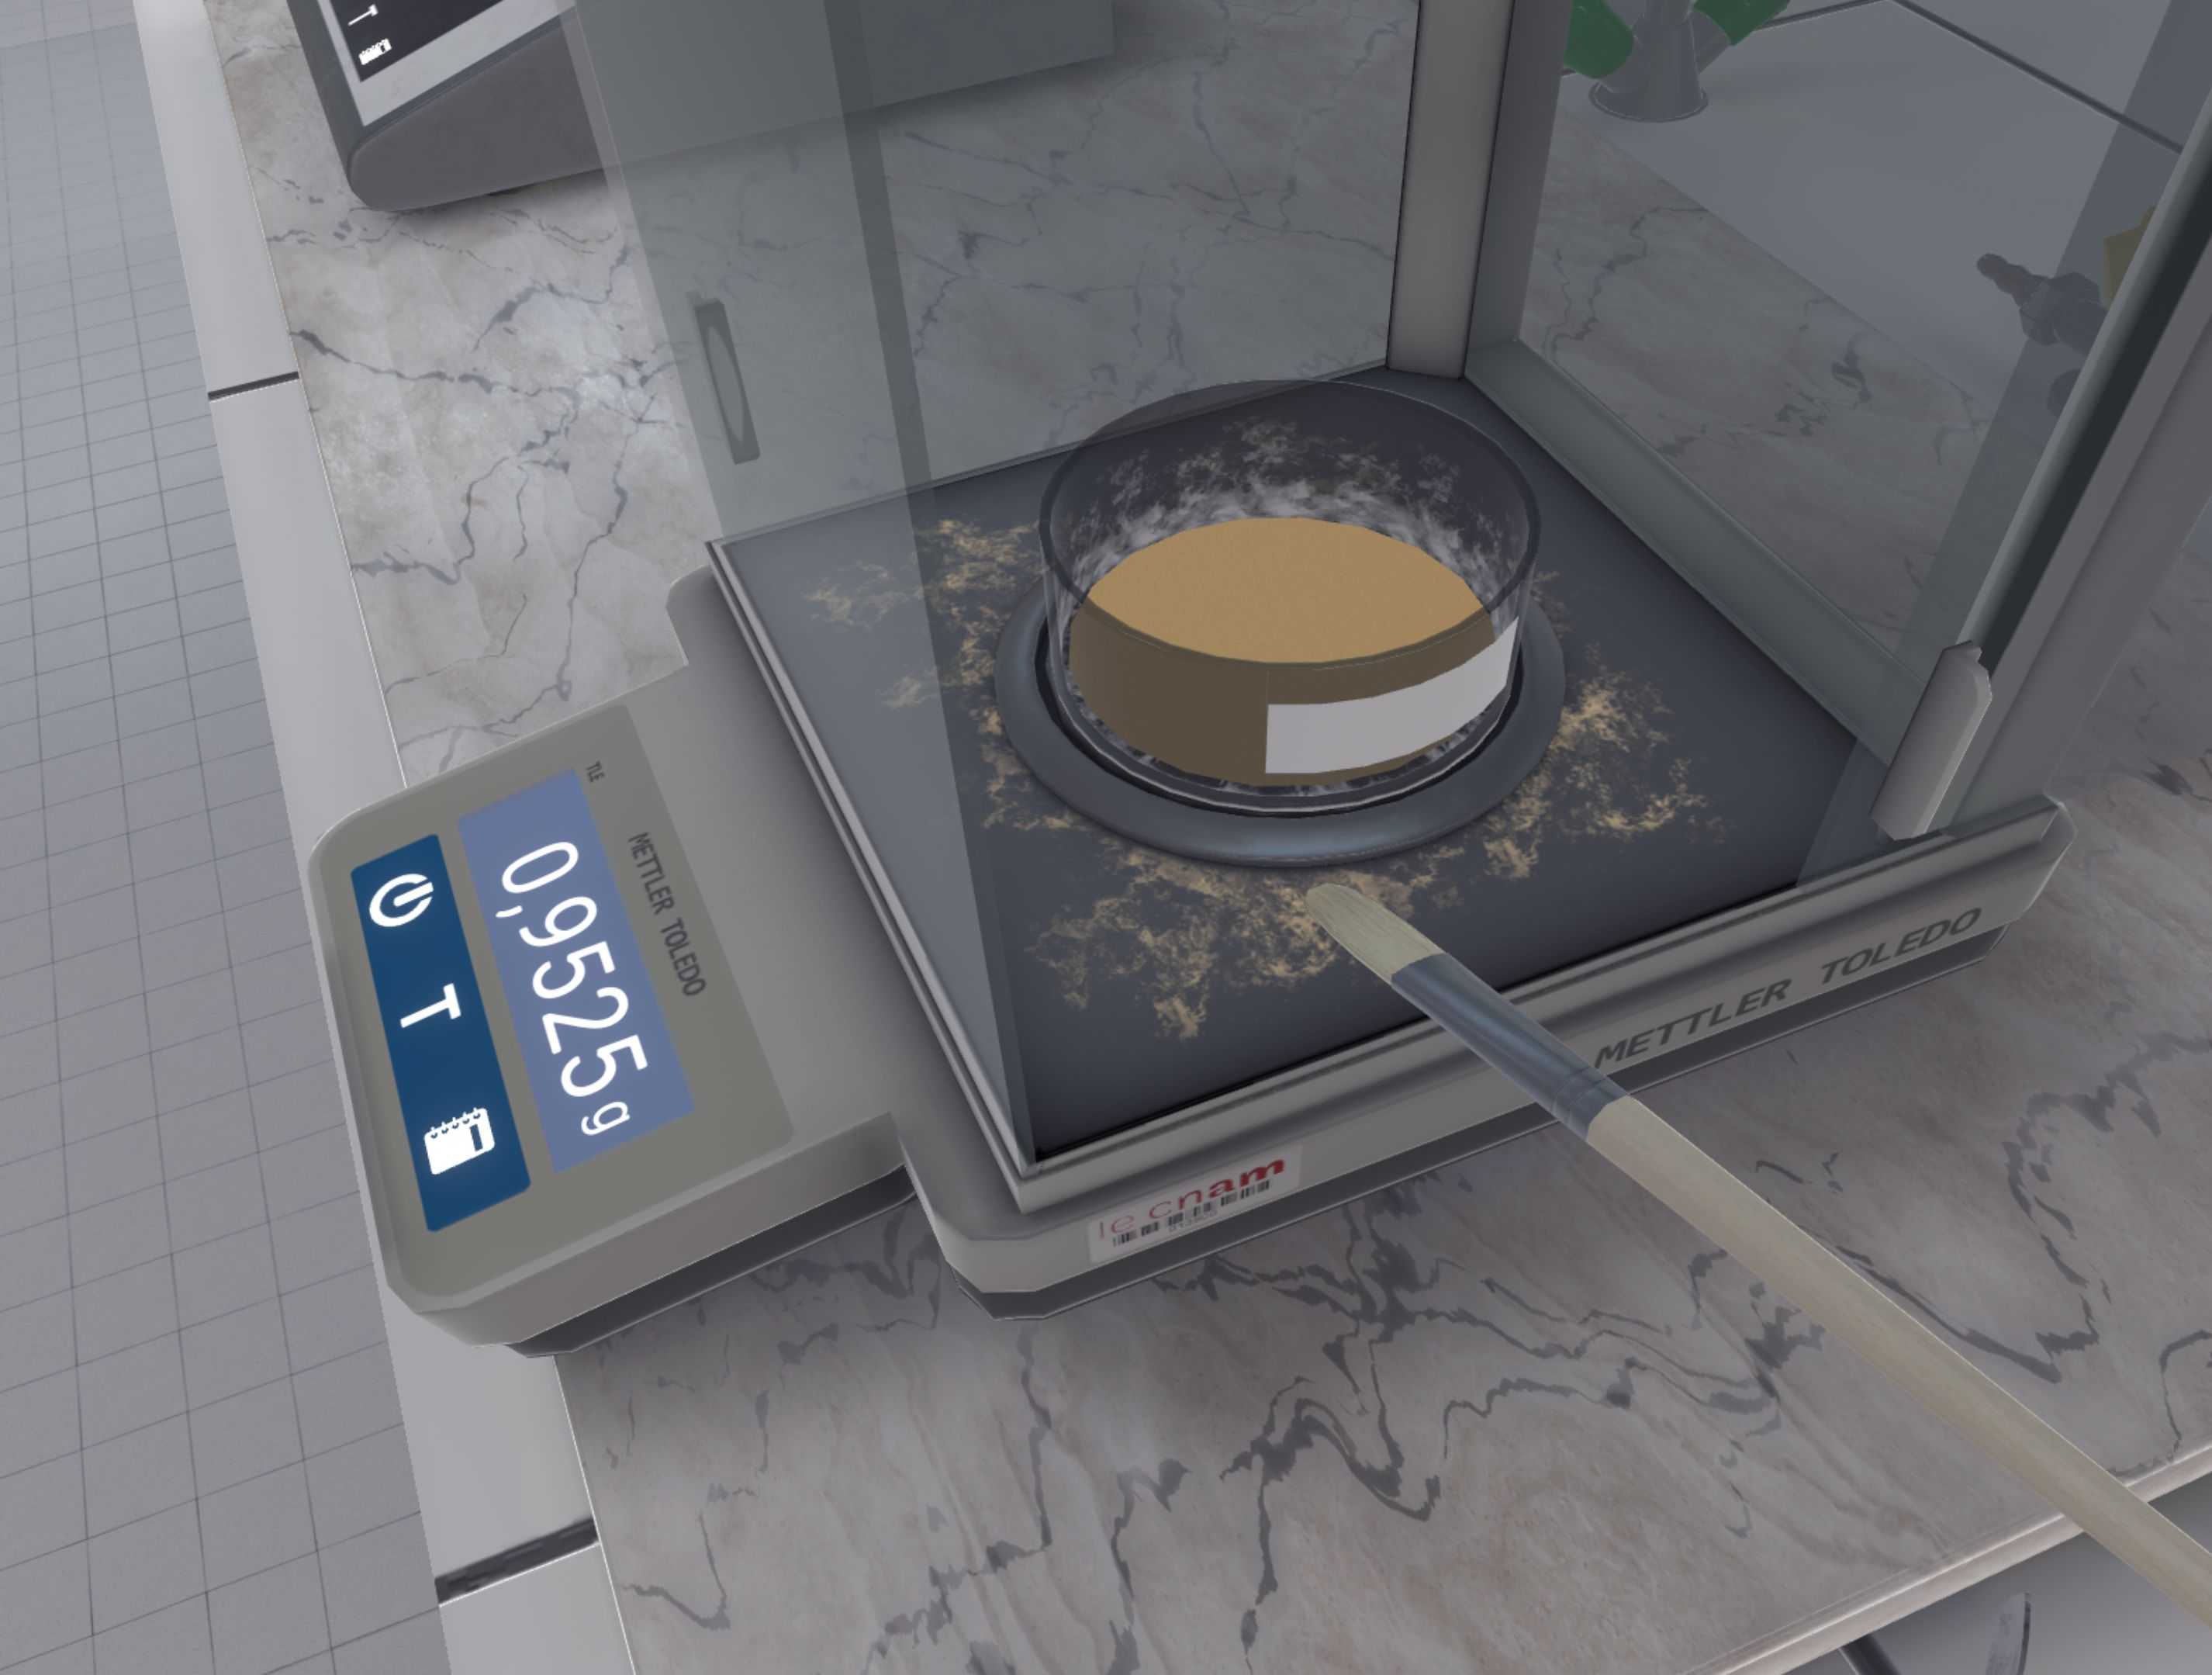
When the user is sure of the quantity of product weighed, they will confirm by pressing the 3rd button (which will write the result in their laboratory notebook), then put the container aside.
|
Note
|
In advanced difficulty, to validate the weighing, the user must look at the instructions on their left hand and click on the button "I have finished, go to the next weighing". 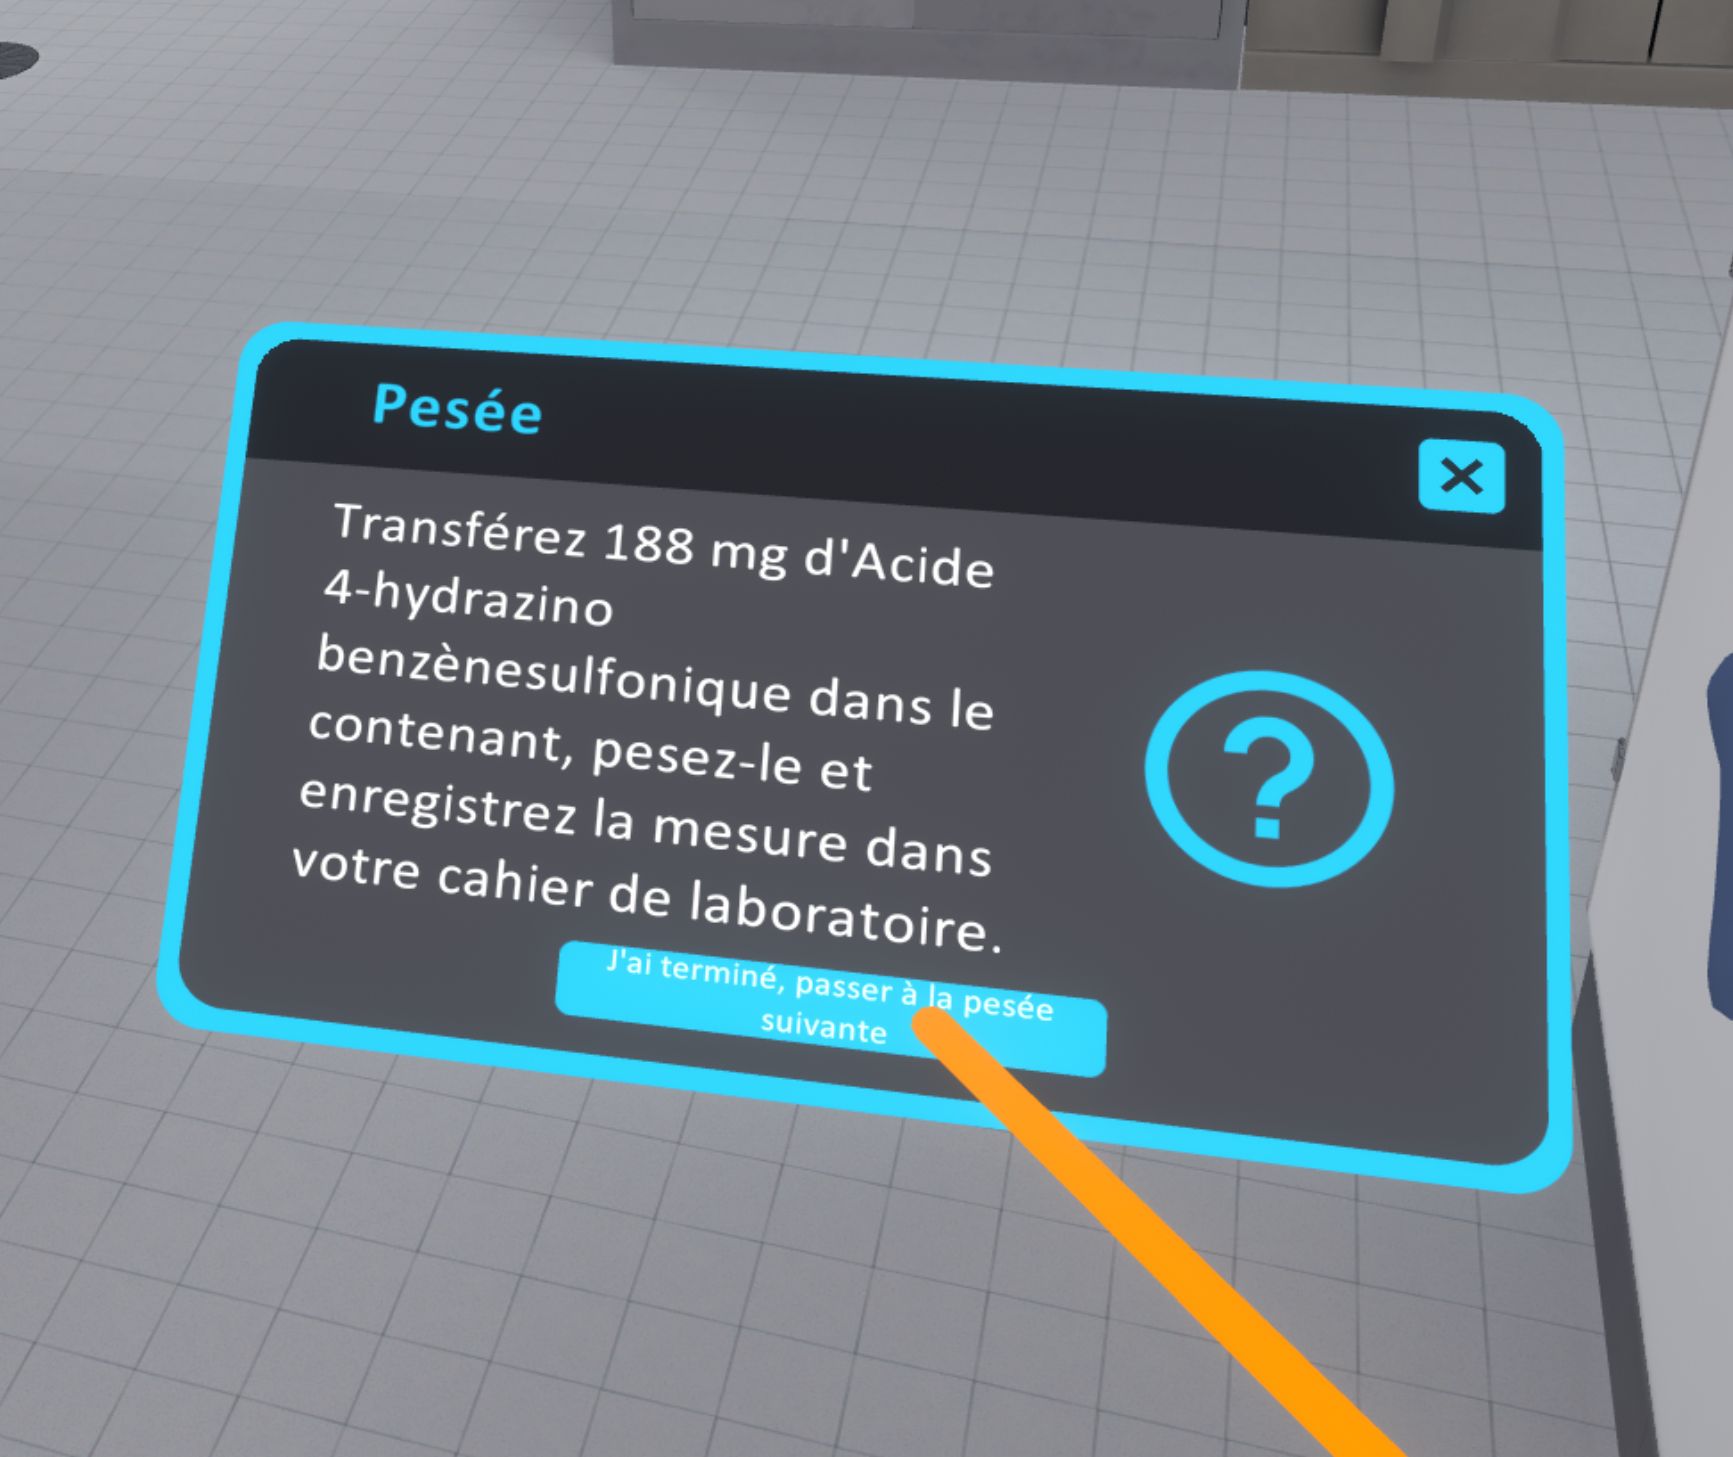
If they forgot to press the 3rd button on the scale, they will lose points on their score, as their laboratory book will not be filled. |
The user will perform the same manipulation to weigh 218mg of 2,2,3,3-tetrahydroxysuccinic acid with a second clean ramekin.
|
Important
|
The spatulas and ramekins used in the first weighing are contaminated with the first acid. The user must not use them with the second acid, as this could lead to a fatal error. |
When the user has confirmed the two weighings, they must use the pencil to identify the weighed products by writing on the sticker of the ramekins. The user must place both ramekins in the fume cupboard (Using the Fume Hood) in preparation for the next exercise.
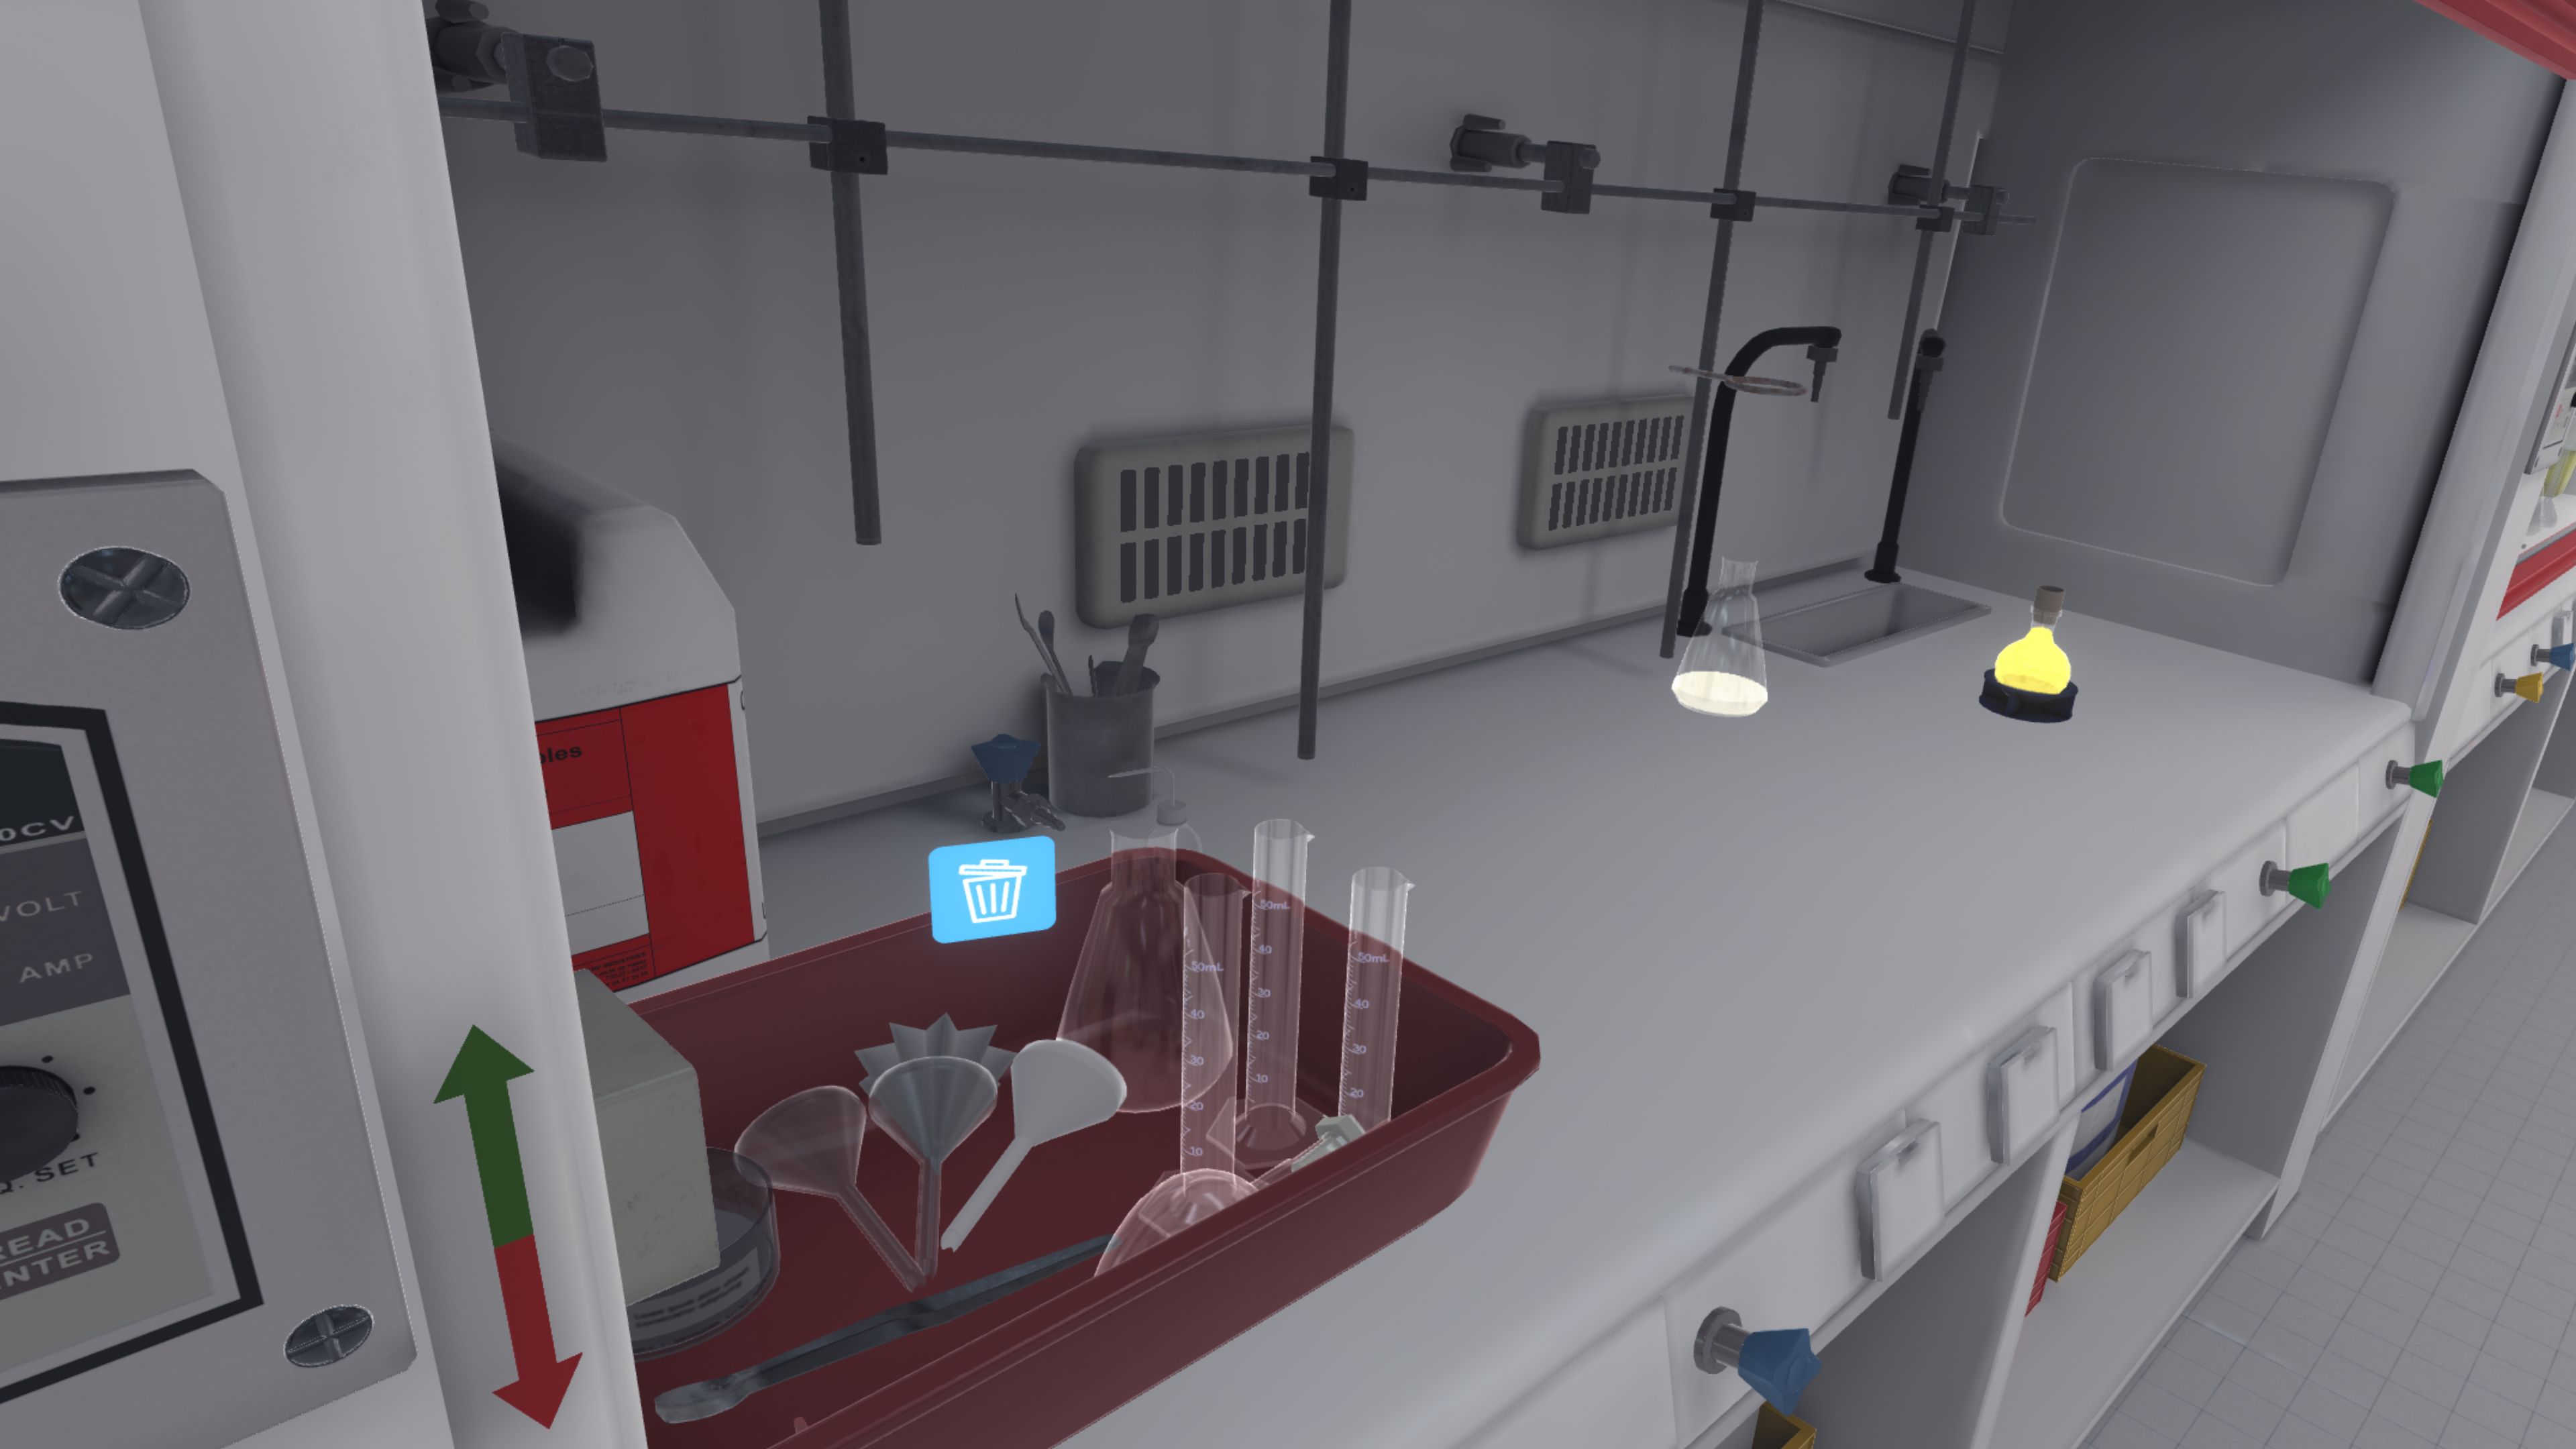
They should then tidy up their work area. The product containers should be closed and put away, the soiled material should be put in the bin for dirty containers on the right, and the scales should be switched off.
To complete the exercise, the user must exit the laboratory. They will be teleported to the reception area in front of the assessment screen.
5.1.3. Evaluation criteria for the exercise
![]() Duration: Time taken by the user to finish the exercise.
Duration: Time taken by the user to finish the exercise.
![]() Protection: Wearing the correct PPE equipment.
Protection: Wearing the correct PPE equipment.
![]() Analysis: Obtains the correct result for the experiment.
Analysis: Obtains the correct result for the experiment.
![]() Procedure: Follows the correct sequence of actions.
Procedure: Follows the correct sequence of actions.
![]() Autonomy: The score decreases with the number of times help is requested. Only in advanced.
Autonomy: The score decreases with the number of times help is requested. Only in advanced.
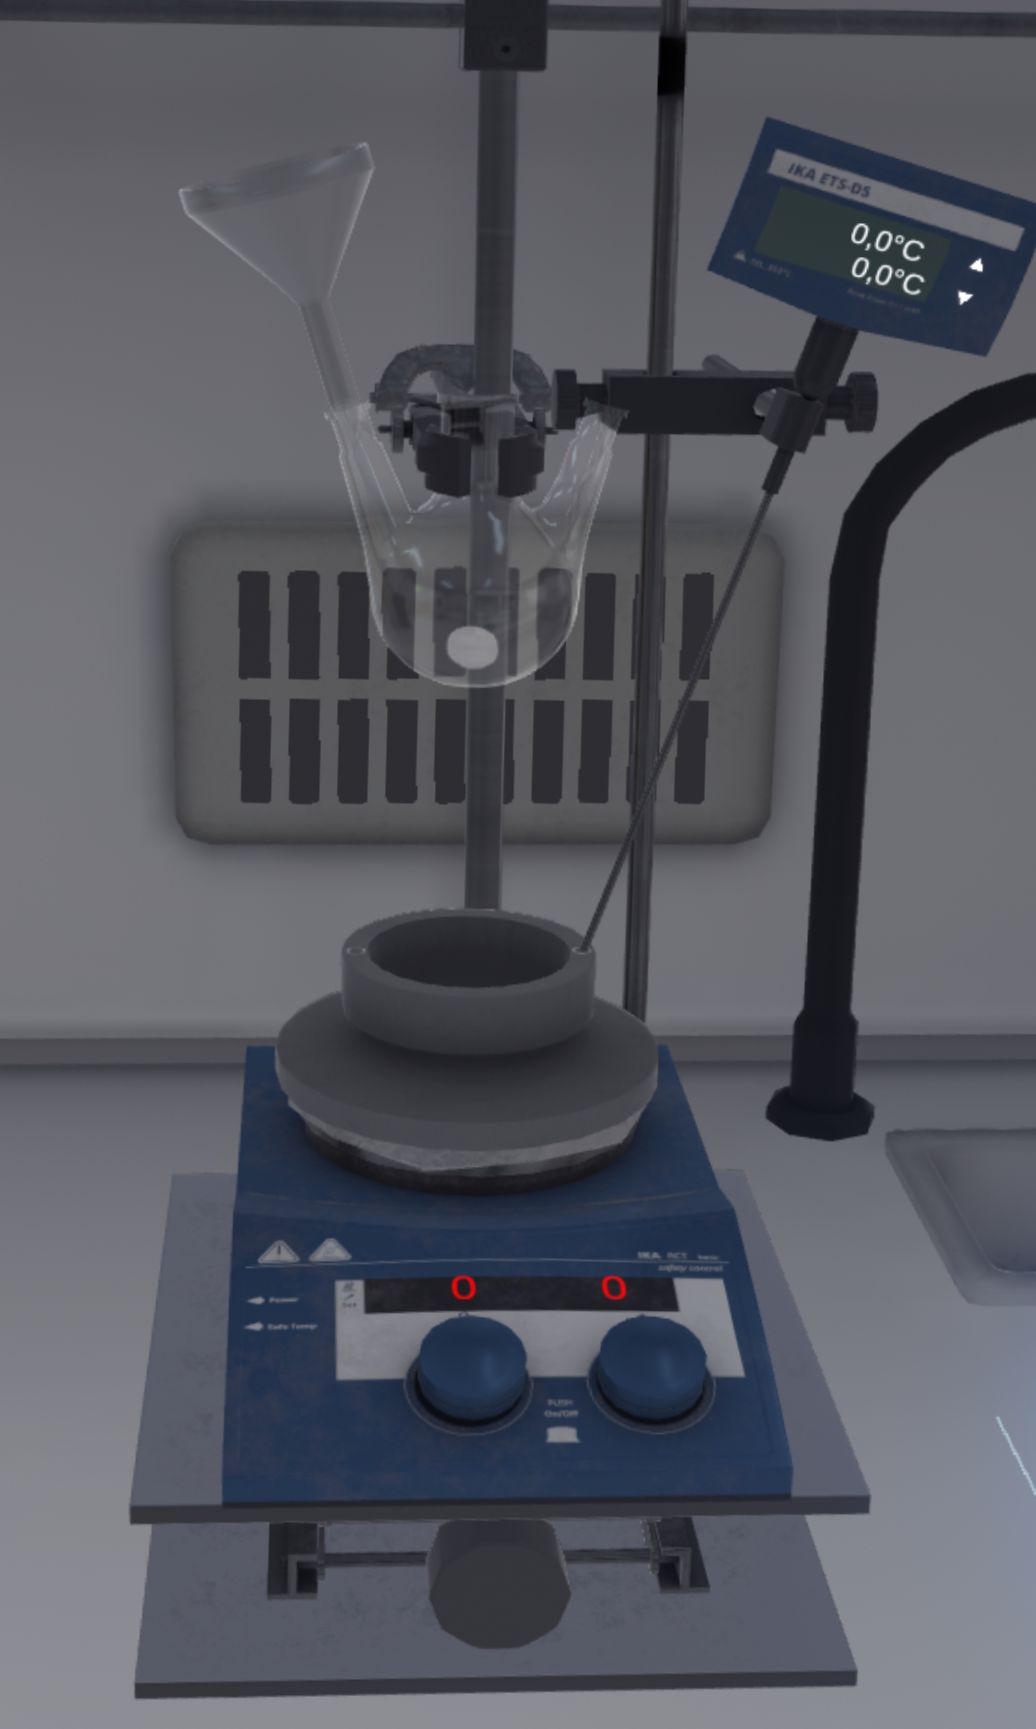
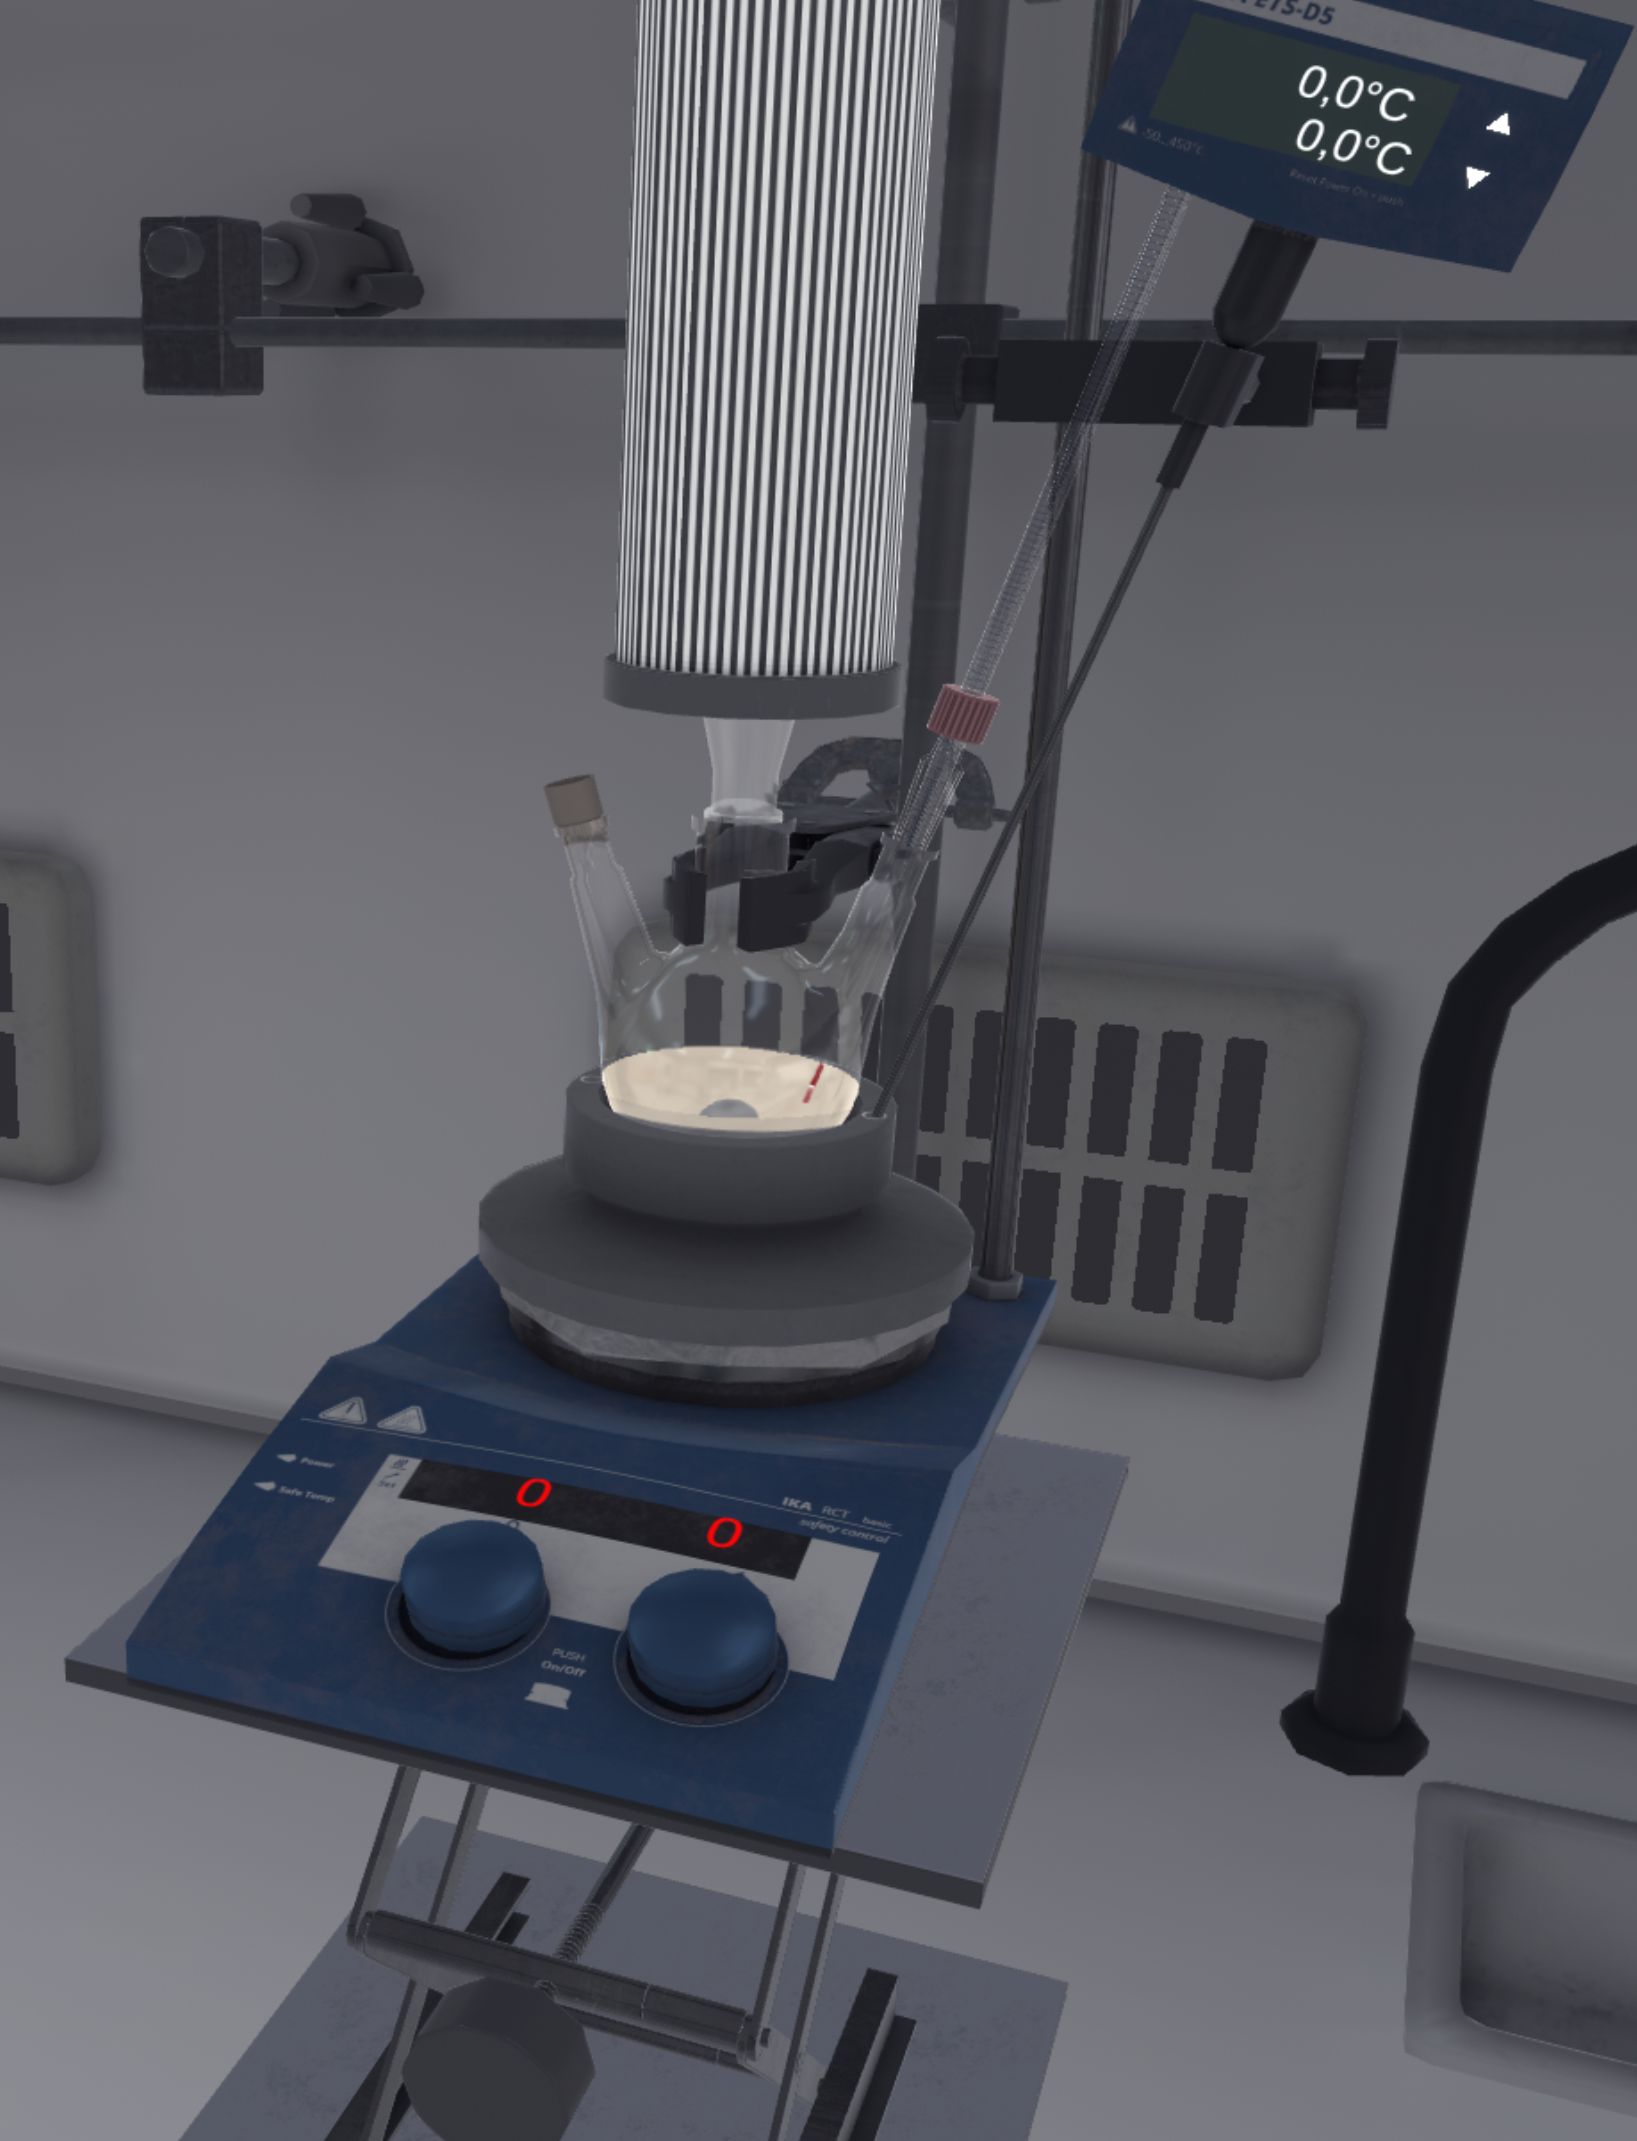
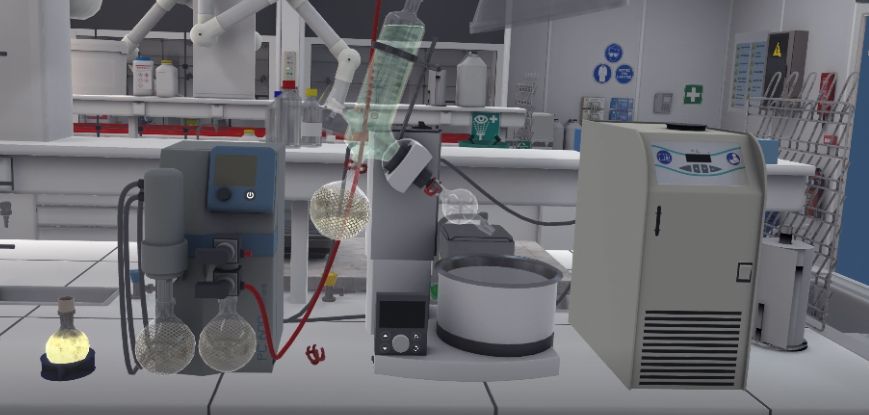
5.2. Reflux heating
In this exercise, the user will mix and heat different products in a triple-neck flask in order to combine them using a reflux heater with a magnetic stirrer. Depending on the level of difficulty chosen, the objectives and aids differ.
5.2.1. Instructions
To complete the exercise, the user must follow the following instructions:
Beginner and Advanced
-
Once the user has equipped themselves with Personal Protective Equipment, enter the laboratory to begin the exercise. To complete the exercise, exit the laboratory.
-
Stand in front of the fume cupboard and open it halfway.
-
Position the lab lift on the work surface.
-
Place the magnetic stirrer on the laboratory lift.
-
Position the Heat-On on the stirrer.
-
Position the probe correctly on the Heat-On.
-
Place the appropriate stirring rod in the body of the triple-neck flask.
-
Attach the triple-neck flask to the wire mesh.
-
Place the funnel over the left-hand mouth of the triple-neck flask.
-
Transfer all the powders weighed in the previous exercise into the triple-neck flask using spatulas and the funnel.
-
Remove the funnel.
-
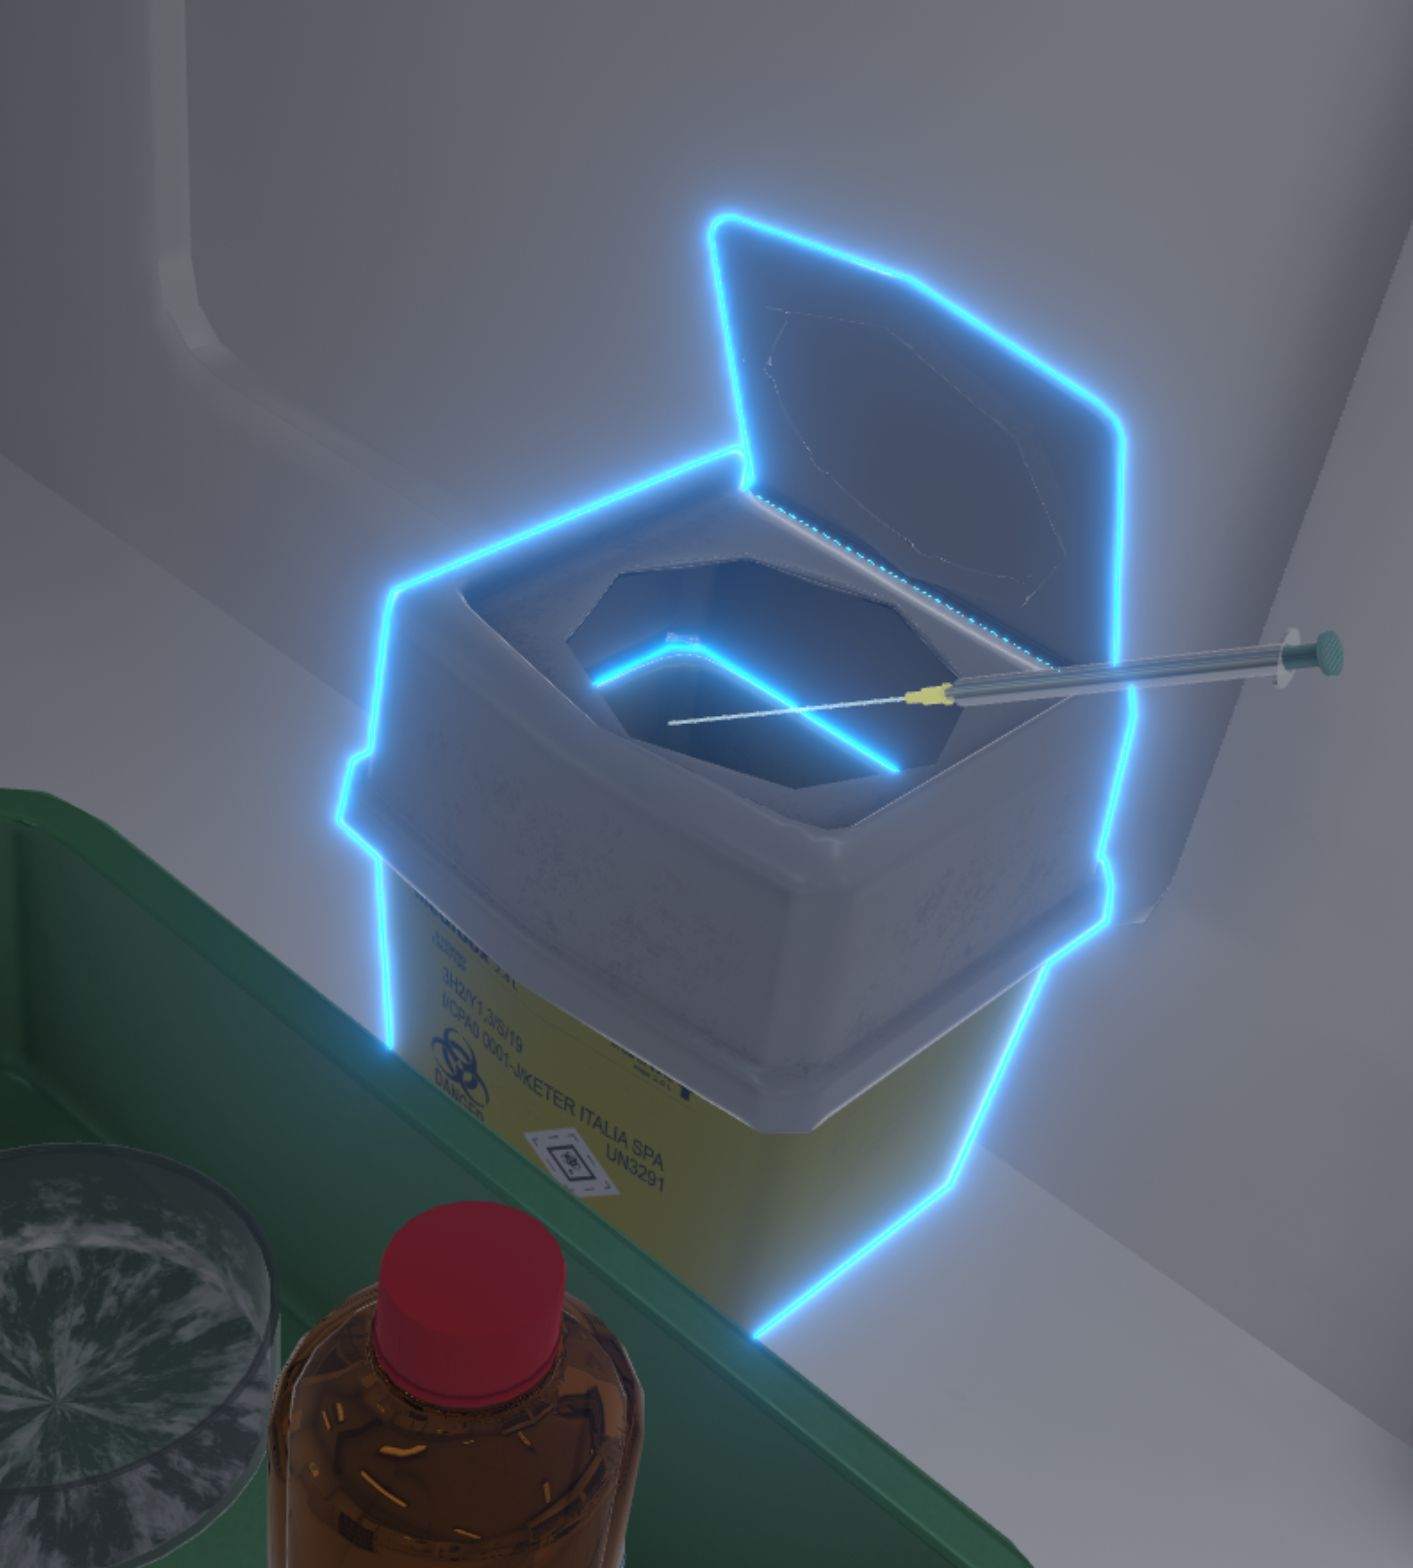
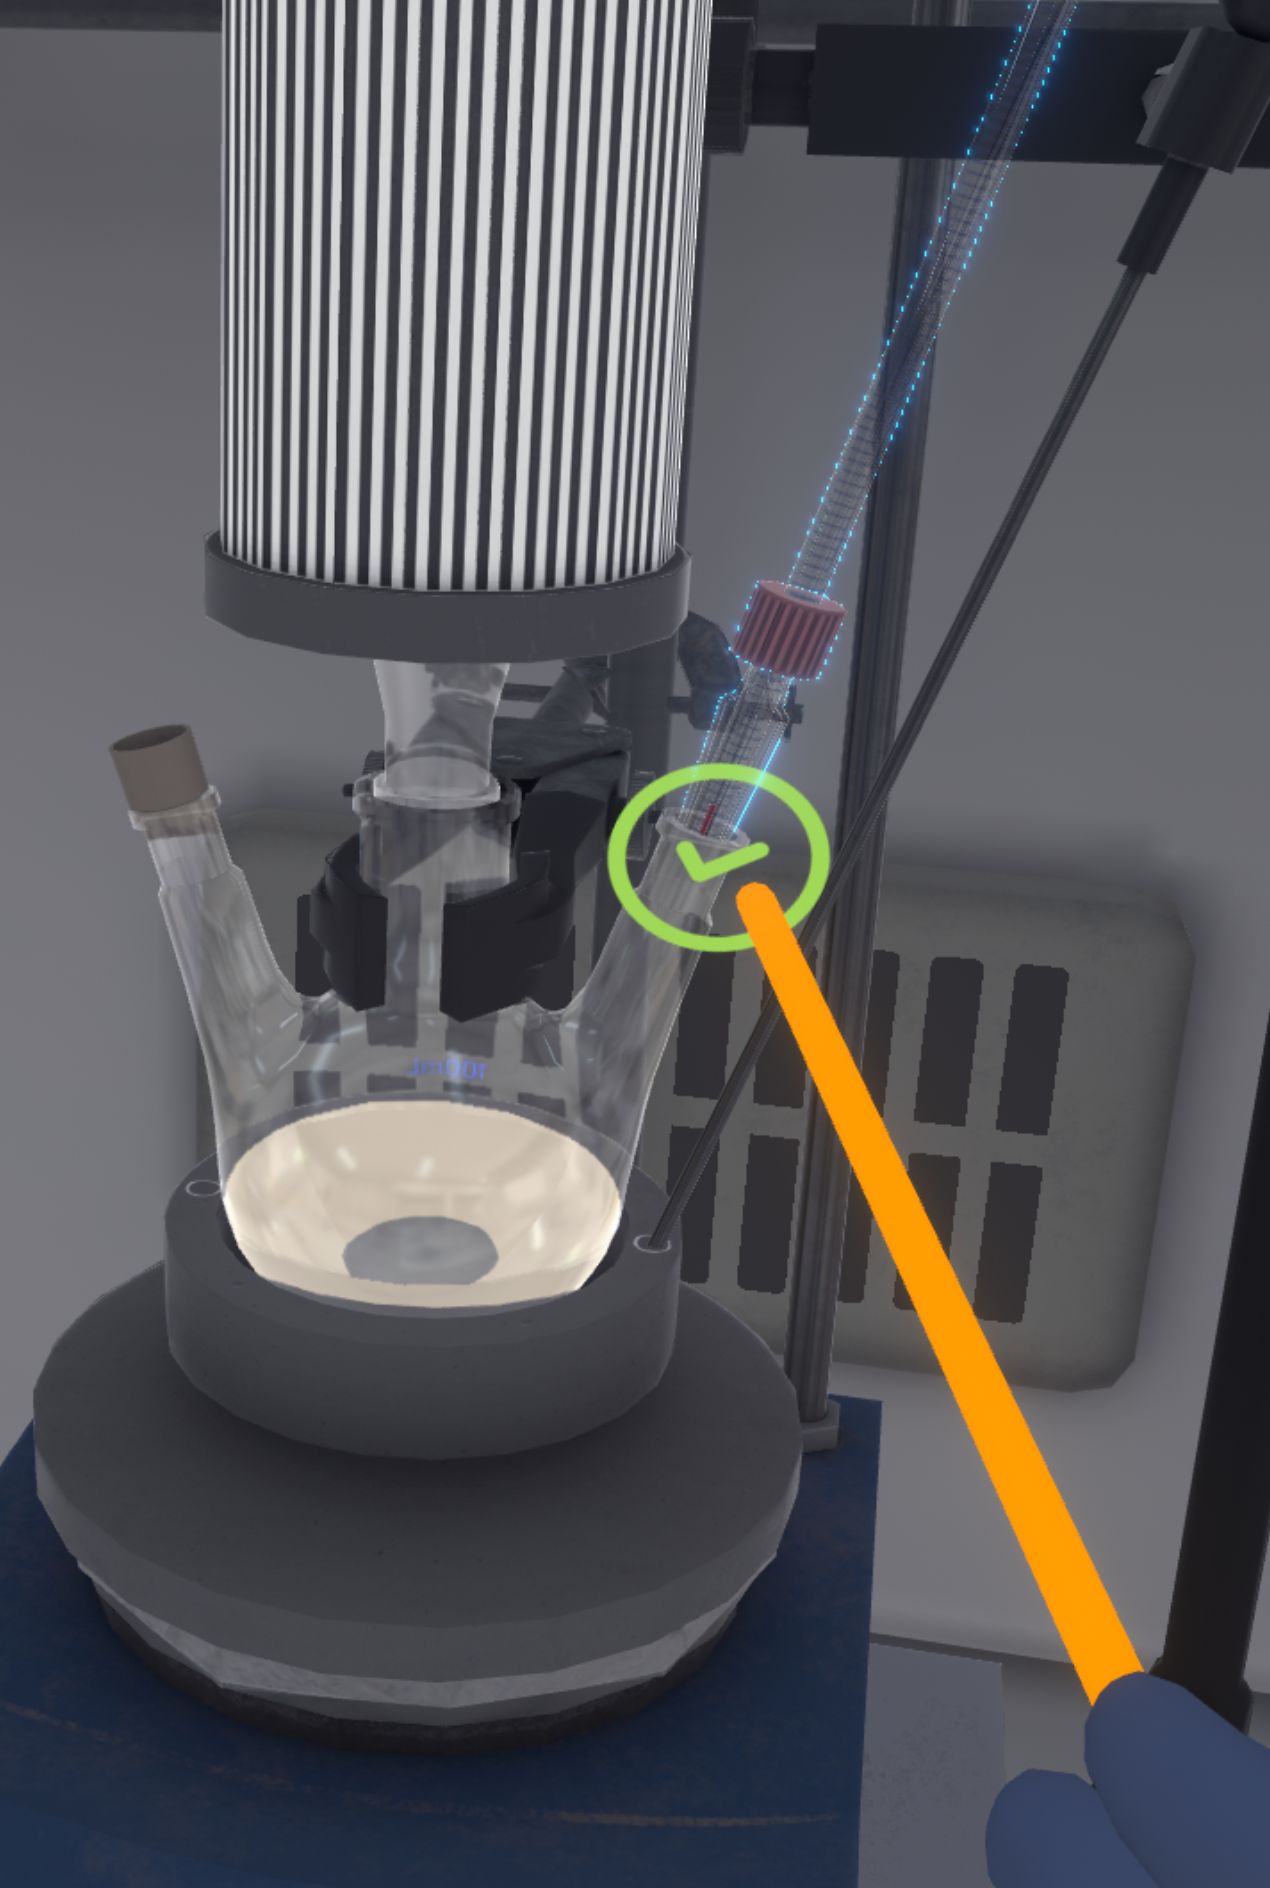
Transfer 0.56 ml of H₂SO₄ into the triple-neck flask using the glass syringe. Dispose of the syringe in the syringe bin on the right. Close the bottle.
-
Place the cap of the triple-neck flask on the left-hand mouth of the triple-neck flask.
-
Adjust the height of the stirrer.
-
Position the reflux column over the center mouth of the triple-neck flask.
-
Position the guard on the reflux column.
-
Position the thermometer on the right-hand mouth of the triple-neck flask.
-
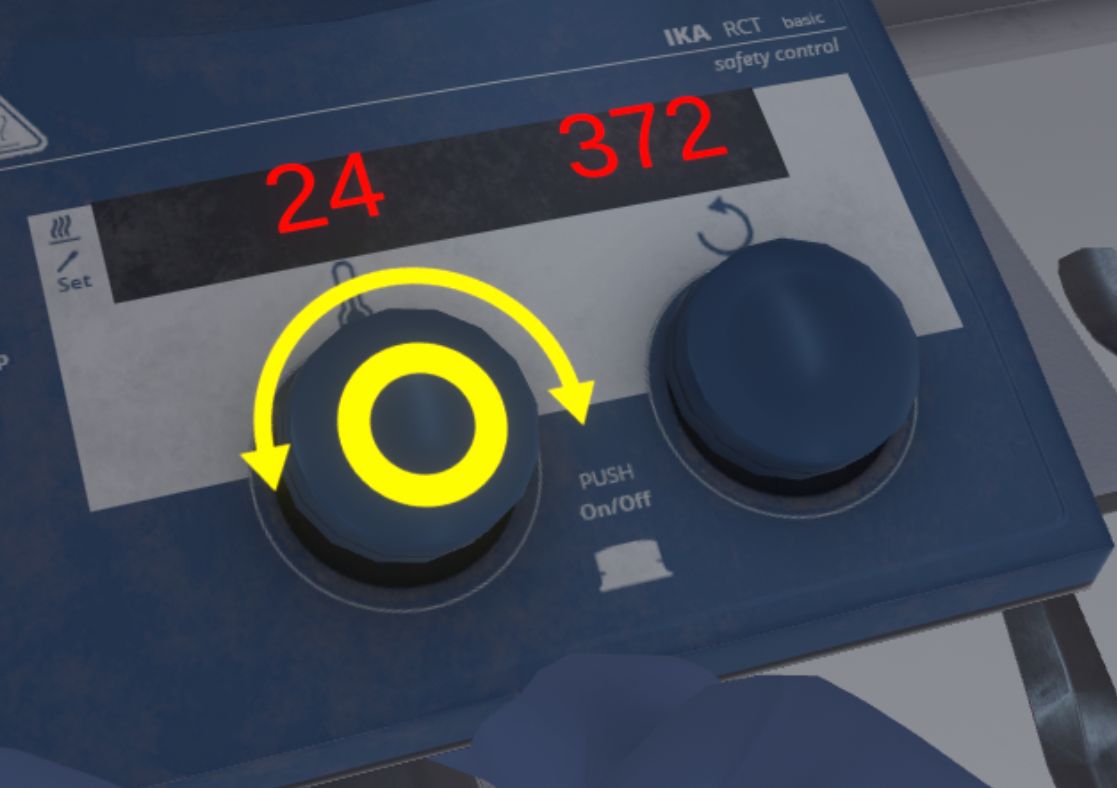
Set the expected temperature on the blue probe to 65 °C.
-
Set the stirrer to 350-500 rpm.
-
Set the heating temperature on the shaker to 60 °C.
-
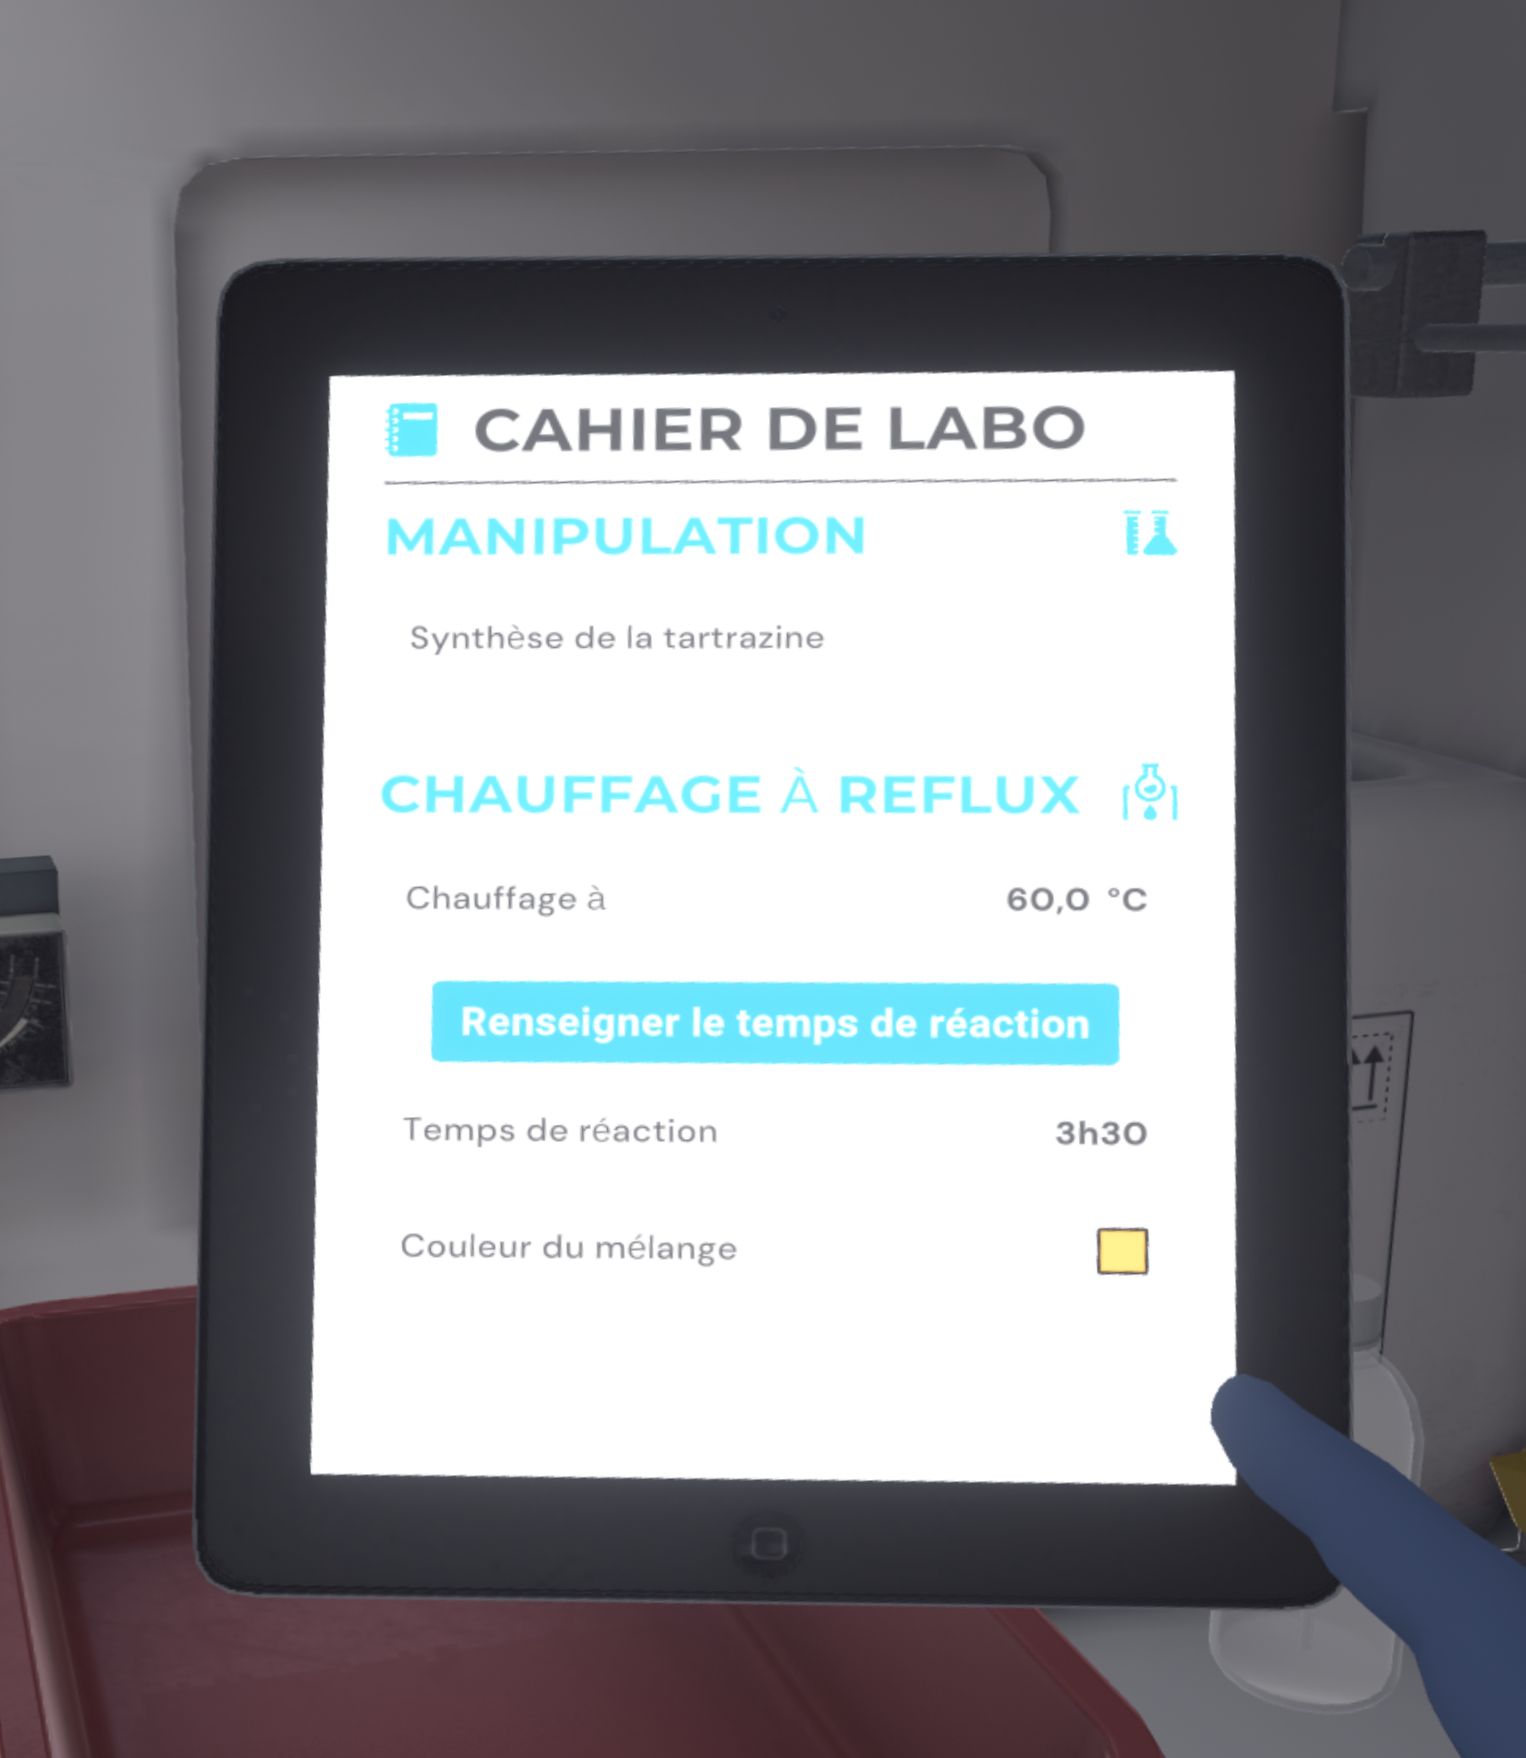
Record the temperature of the solution in the laboratory notebook by clicking on the icon next to the thermometer.
Two hour wait time
-
Remove the stopper from the triple-neck flask.
-
Place the funnel over the left-hand mouth of the triple-neck flask.
-
Transfer 60 mg of soda to the triple-neck flask with a spatula.
-
Remove the funnel.
-
Place a on the left-hand mouth of the triple-neck flask.
-
Enter the reaction time by clicking on the button in the laboratory notebook.
90 minute waiting time
-
Lower the stirrer.
-
Turn the knobs to stop the heating and stirring. Remove the thermometer.
-
Put all empty glassware and used utensils in the bin on the left and leave the laboratory to complete the exercise.
Expert
-
Enter the laboratory to begin the exercise.
-
Stand in front of the fume cupboard and open it halfway.
-
Position the laboratory lift, magnetic stirrer and Heat-On.
-
Attach the triple-neck flask to the wire mesh.
-
Transfer 0.56 ml of H₂SO₄ and all the powders weighed in the previous exercise to the triple-neck flask.
-
Set up the reflux column, the guard, and the thermometer.
-
Set the expected temperature on the blue probe to 65 °C.
-
Set the stirrer to 350 to 500 rpm.
-
Set the heating temperature on the stirrer to 60 °C.
-
If you are satisfied with your set-up, confirm on the tablet on your arm to wait 2 hours.
Two hour waiting time
-
Transfer 60 mg of soda to the triple-neck flask. Then, validate on the tablet on your arm to wait 1h30.
90 minute waiting time
-
Clean up your work surface and leave the laboratory to complete the exercise.
5.2.2. Scenario flow
The user starts the scenario with the following briefing:
Using the reflux heater with magnetic stirrer, you will mix and heat different products in order to combine them and synthesise tartrazine.
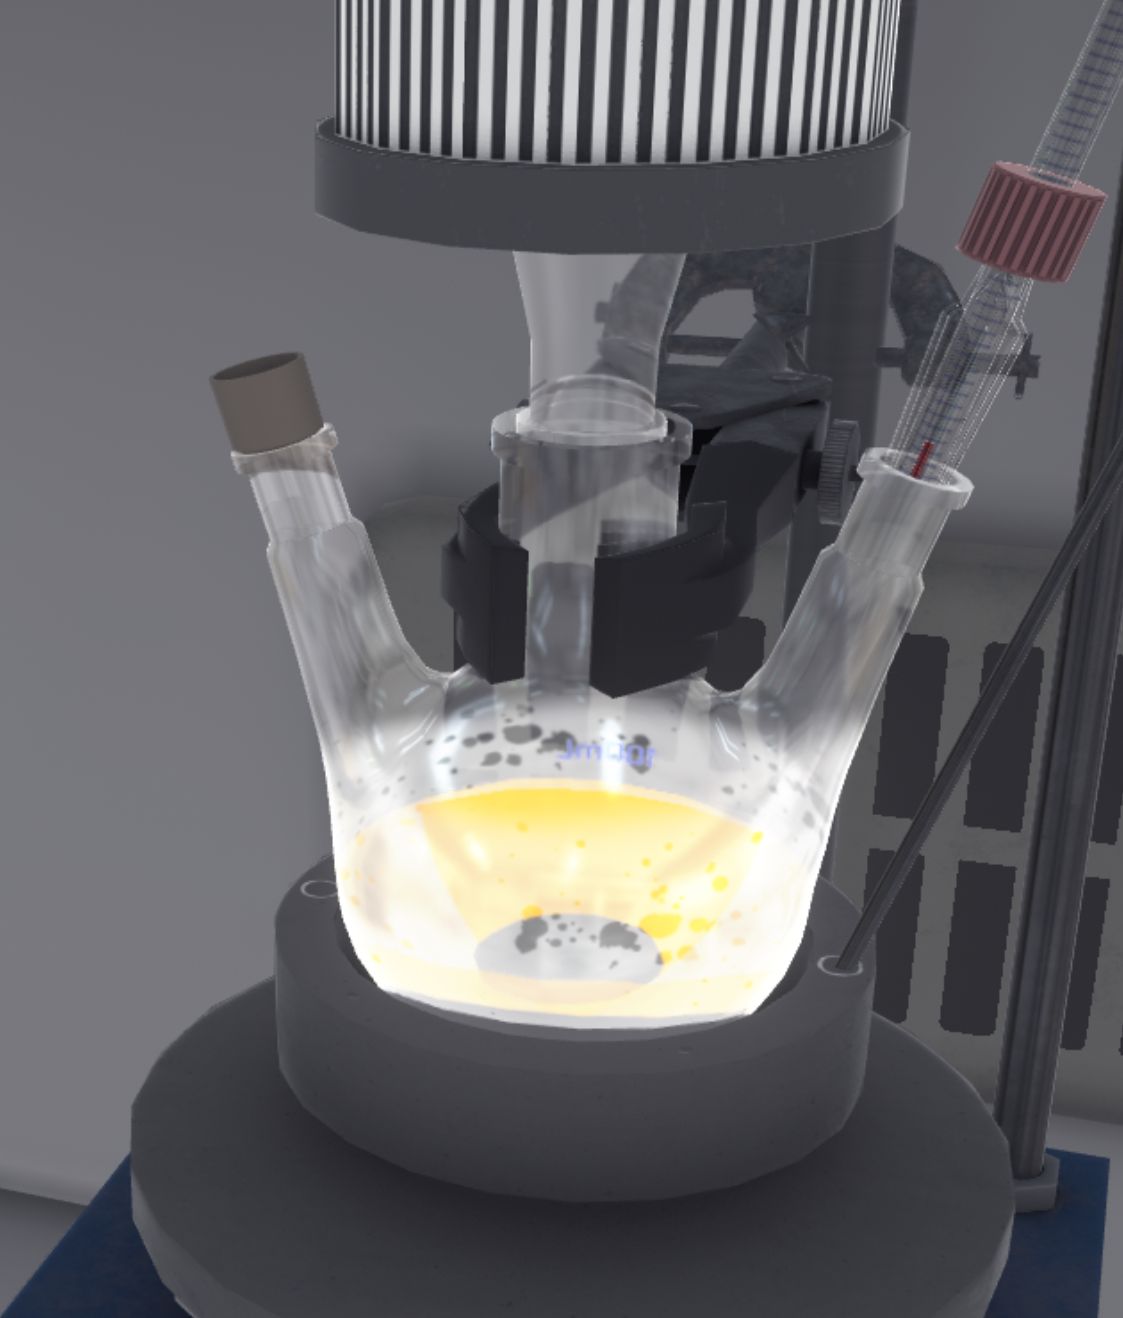
The user must equip their PPE (Equipping PPE), then enter the laboratory. They will have to approach the fume cupboard, open it halfway (Using the Fume Hood) and position the laboratory lift, magnetic stirrer and Heat-On on the work surface. They must position the probe correctly on the Heat-On, put the appropriate stirring rod in the body of the triple-neck flask and fix the latter to the wire mesh. Then place the funnel on the left-hand mouth of the triple-neck flask.

They must transfer all the powders weighed in the previous exercise into the triple-neck flask using spatulas: 188 mg of 4-hydrazino benzenesulphonic acid and 218 mg of 2,2,3,3-tetrahydroxysuccinic acid (Spatula and syringe).
-
Ramequin containing 218mg of 4-hydrazino benzenesulphonic acid
-
Ramequin containing 188mg of 2,2,3,3-tetrahydroxysuccinic acid
-
Ramequin containing 60mg of soda
-
Bottle containing H₂SO₄
Next, the user should remove the funnel and transfer 0.56 ml of H₂SO₄ using the glass syringe into the triple-neck flask (Spatula and syringe). When this is done, they must throw the syringe into the syringe bin on the right and remember to close the bottle. They must place the cap on the left-hand mouth of the triple-neck flask.
|
Important
|
If the user transfers too much H₂SO₄ into the triple-neck flask, they risk a fatal error. |
The user must interact with the laboratory lift to adjust the height of the stirrer until the Heat-On touches the triple-neck flask.
The user will continue with the set-up: the reflux column should be positioned on the center mouth of the triple-neck flask, the guard on the reflux column and the thermometer on the right mouth of the triple-neck flask.
The user will set the parameters of the set-up: they will adjust the control temperature on the blue probe to 65°C by clicking on the arrows. The longer they press the arrows, the faster the control temperature will change.

The magnetic stirrer should be set to a speed of 350-500 rpm and a heating temperature of 60°C. To do this, the user must select the interaction button near the knobs and rotate their wrist to change the values.
Next, the user should record the temperature of the solution in the laboratory notebook by clicking on the icon next to the thermometer. A fade to black and a timer appear to simulates the user waiting 2 hours.
At the end of the timelapse, the user can observe steam forming on the walls of the triple-neck flask if the instructions have been followed correctly.
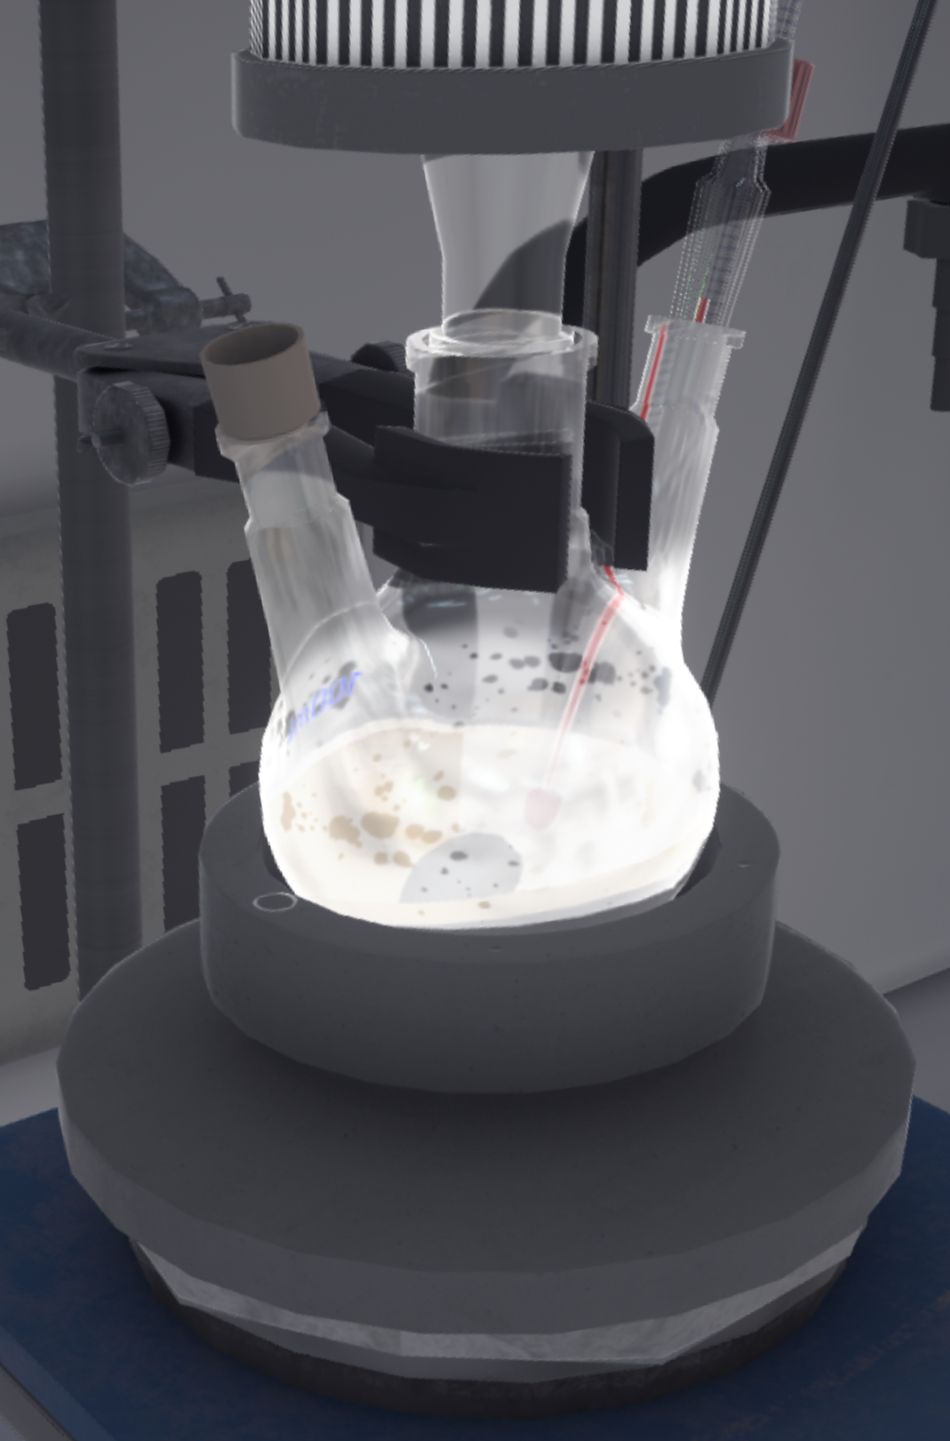
The experiment continues: the user swaps the cap of the triple-neck flask with the funnel and then transfers 60 mg of soda (the entire contents of the last ramekin) into the triple-neck flask using a spatula. When this is done, they put the cap back on the funnel.
The user enters the reaction time by clicking on the button in the laboratory book. A new fade to black appears to simulate the 90 minute waiting time. The user can see that the solution has changed colour if they have followed the instructions.
Before leaving the laboratory to complete the exercise, the user should tidy up the work surface. The laboratory lift should be lowered, the stirrer wheels turned to stop the heating and stirring, the thermometer removed and all empty glassware and used utensils put away in the bin on the left.
Once in the corridor, the user will be teleported to the reception area in front of the assessment screen.
5.2.3. Evaluation criteria for the exercise
![]() Duration: Time taken by the user to finish the exercise.
Duration: Time taken by the user to finish the exercise.
![]() Protection: Wearing the correct PPE equipment.
Protection: Wearing the correct PPE equipment.
![]() Analysis: Obtains the correct result for the experiment.
Analysis: Obtains the correct result for the experiment.
![]() Procedure: Follows the correct sequence of actions.
Procedure: Follows the correct sequence of actions.
![]() Autonomy: The score decreases with the number of helpers required. Only in advanced.
Autonomy: The score decreases with the number of helpers required. Only in advanced.
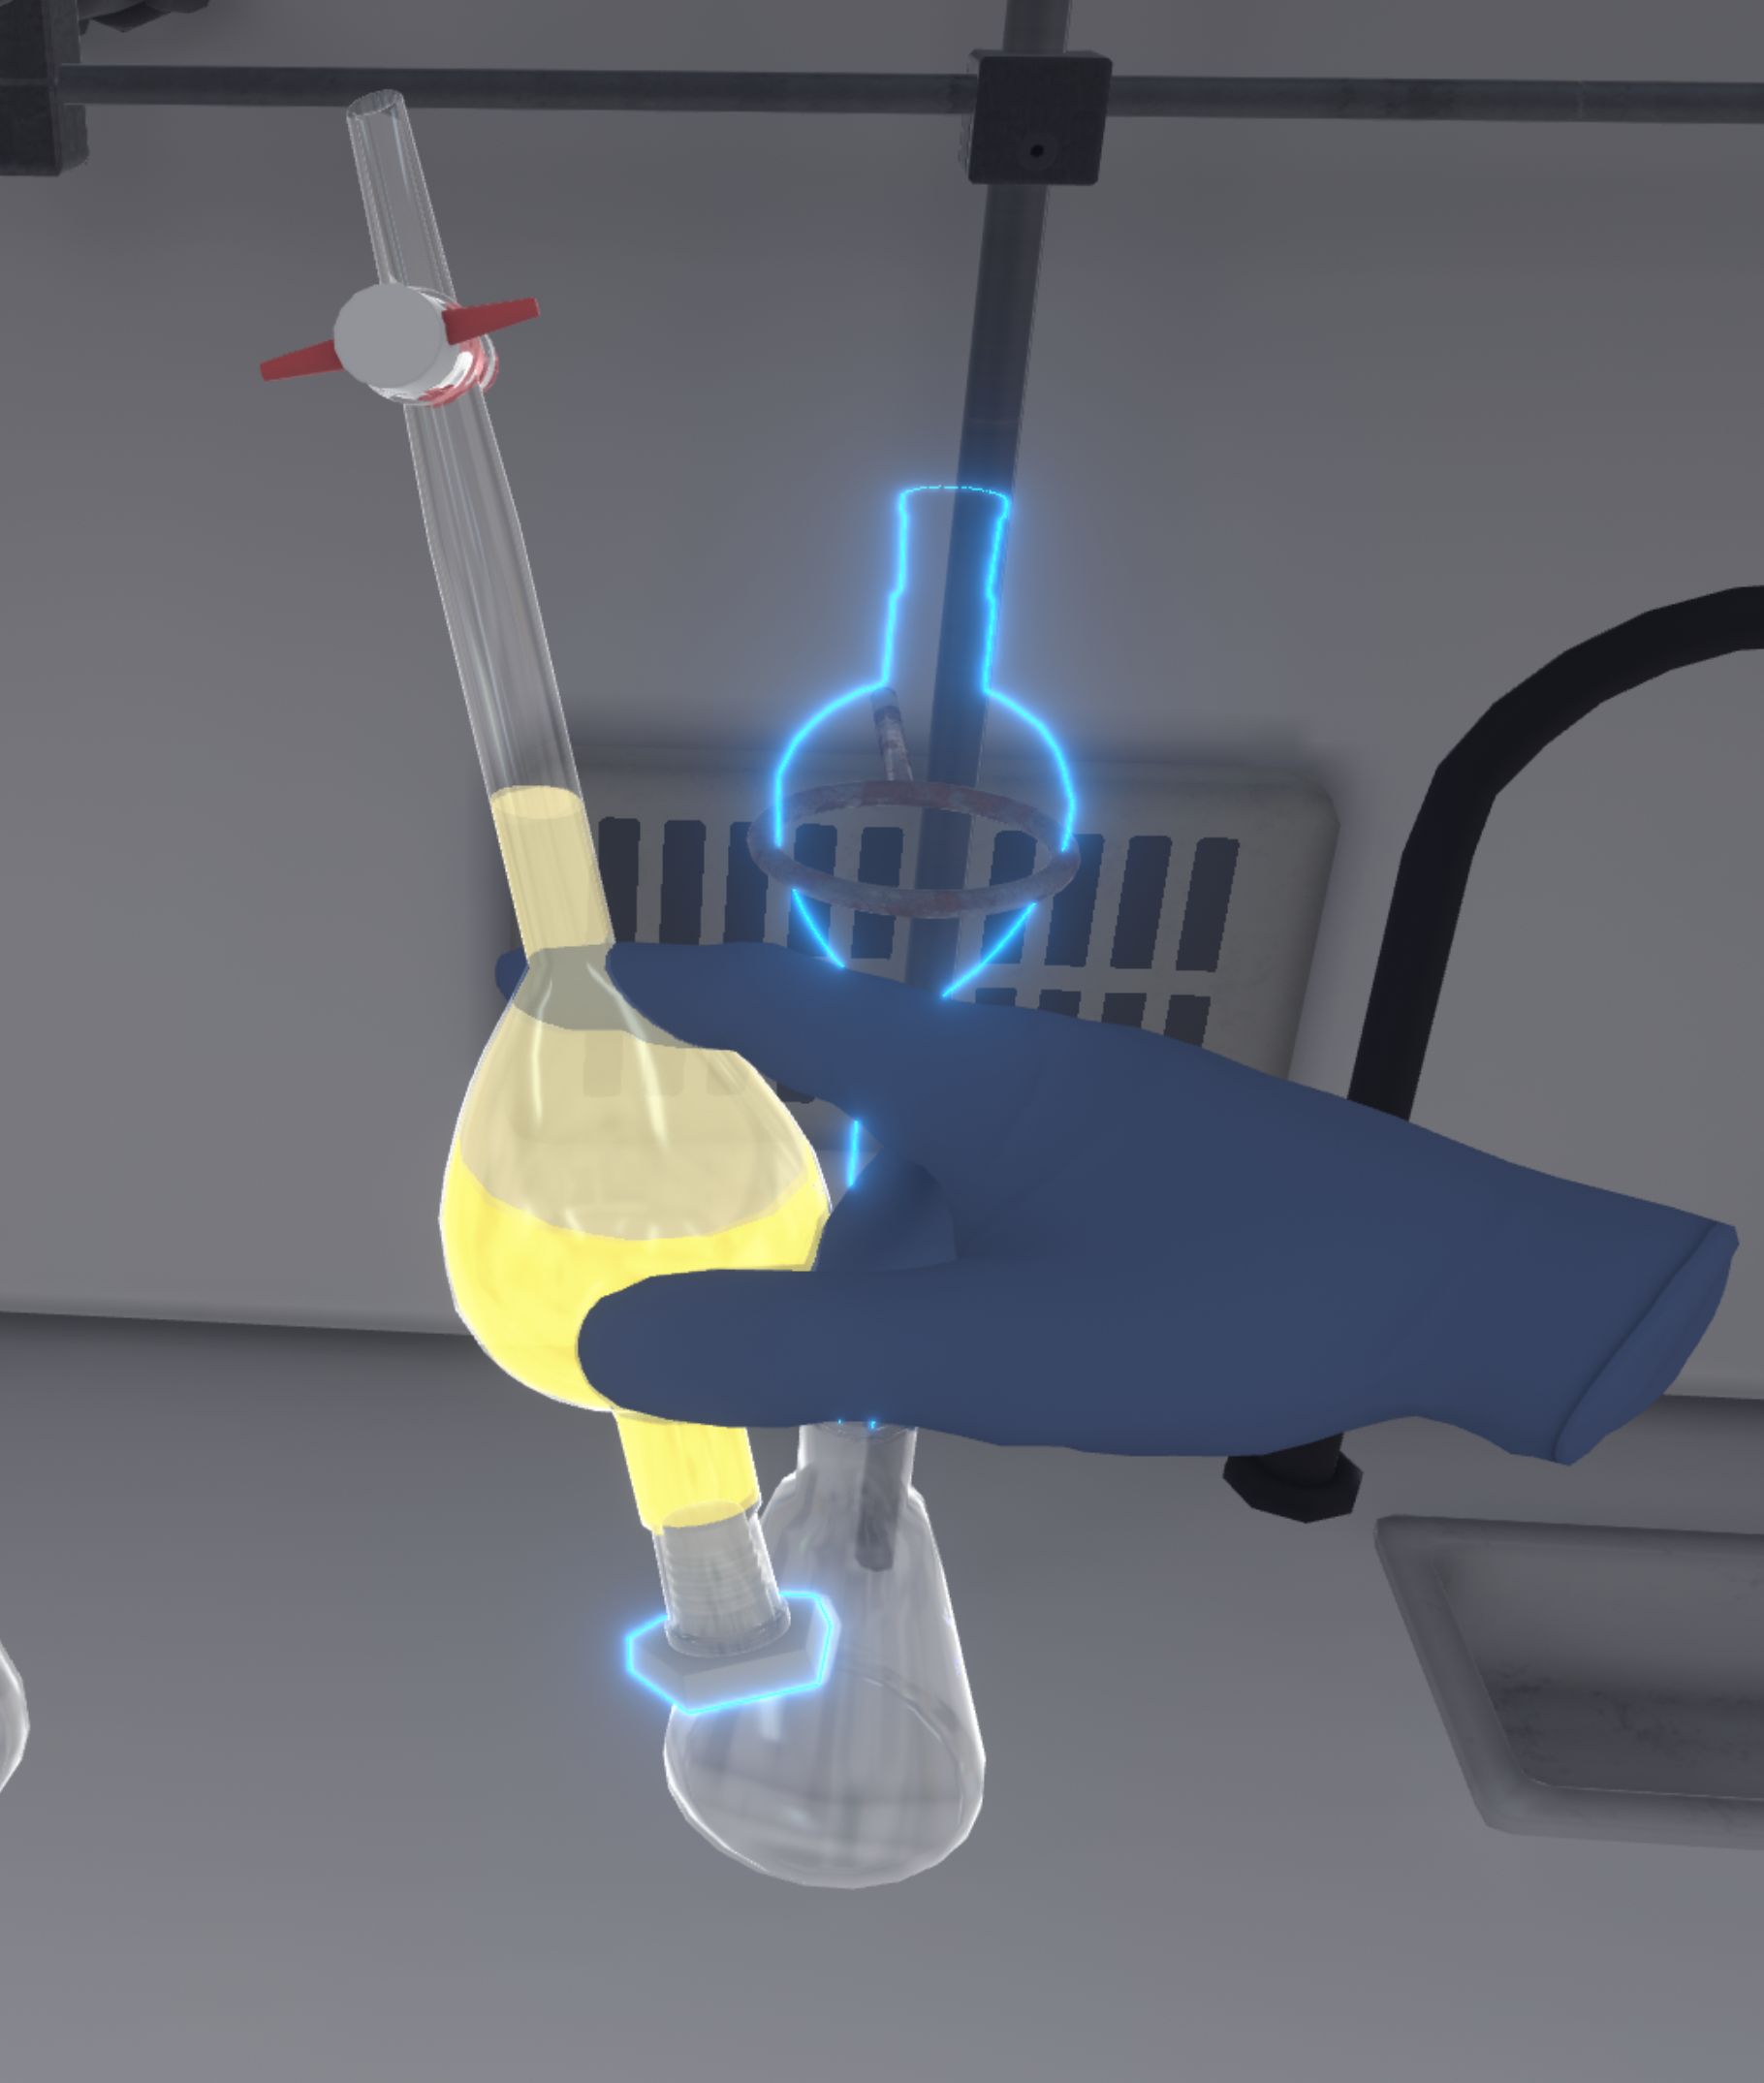
5.3. Liquid/liquid extraction
In this exercise, the user will carry out an extraction-division of the solution recovered in the previous exercise to obtain one of its components, using a separating funnel. They will also carry out a filtration with filter paper. Depending on the level of difficulty chosen, the objectives and aids differ.

5.3.1. Instructions
To complete the exercise, the user must follow the following instructions:
Beginner and Advanced
-
Once you have equipped yourself with Personal Protective Equipment, enter the laboratory to begin the exercise. To complete the exercise, exit the laboratory.
-
Stand in front of the fume cupboard and open it halfway.
-
Place the glass funnel over the separating funnel. Pour the dye into the funnel. Check that the tap is closed.
-
Transfer the dichloromethane from a graduated cylinder into the funnel.
-
Remove the glass funnel from the ampoule.
-
Place the stopper on the ampoule.
-
Take the ampoule and shake it upside down. Make sure the tap is closed during this process.
-
Degas the ampoule by opening and closing the tap once.
Repeat the procedure 3 times, until no more gas is released.
-
Put the ampoule back on its stand and remove the stopper.
-
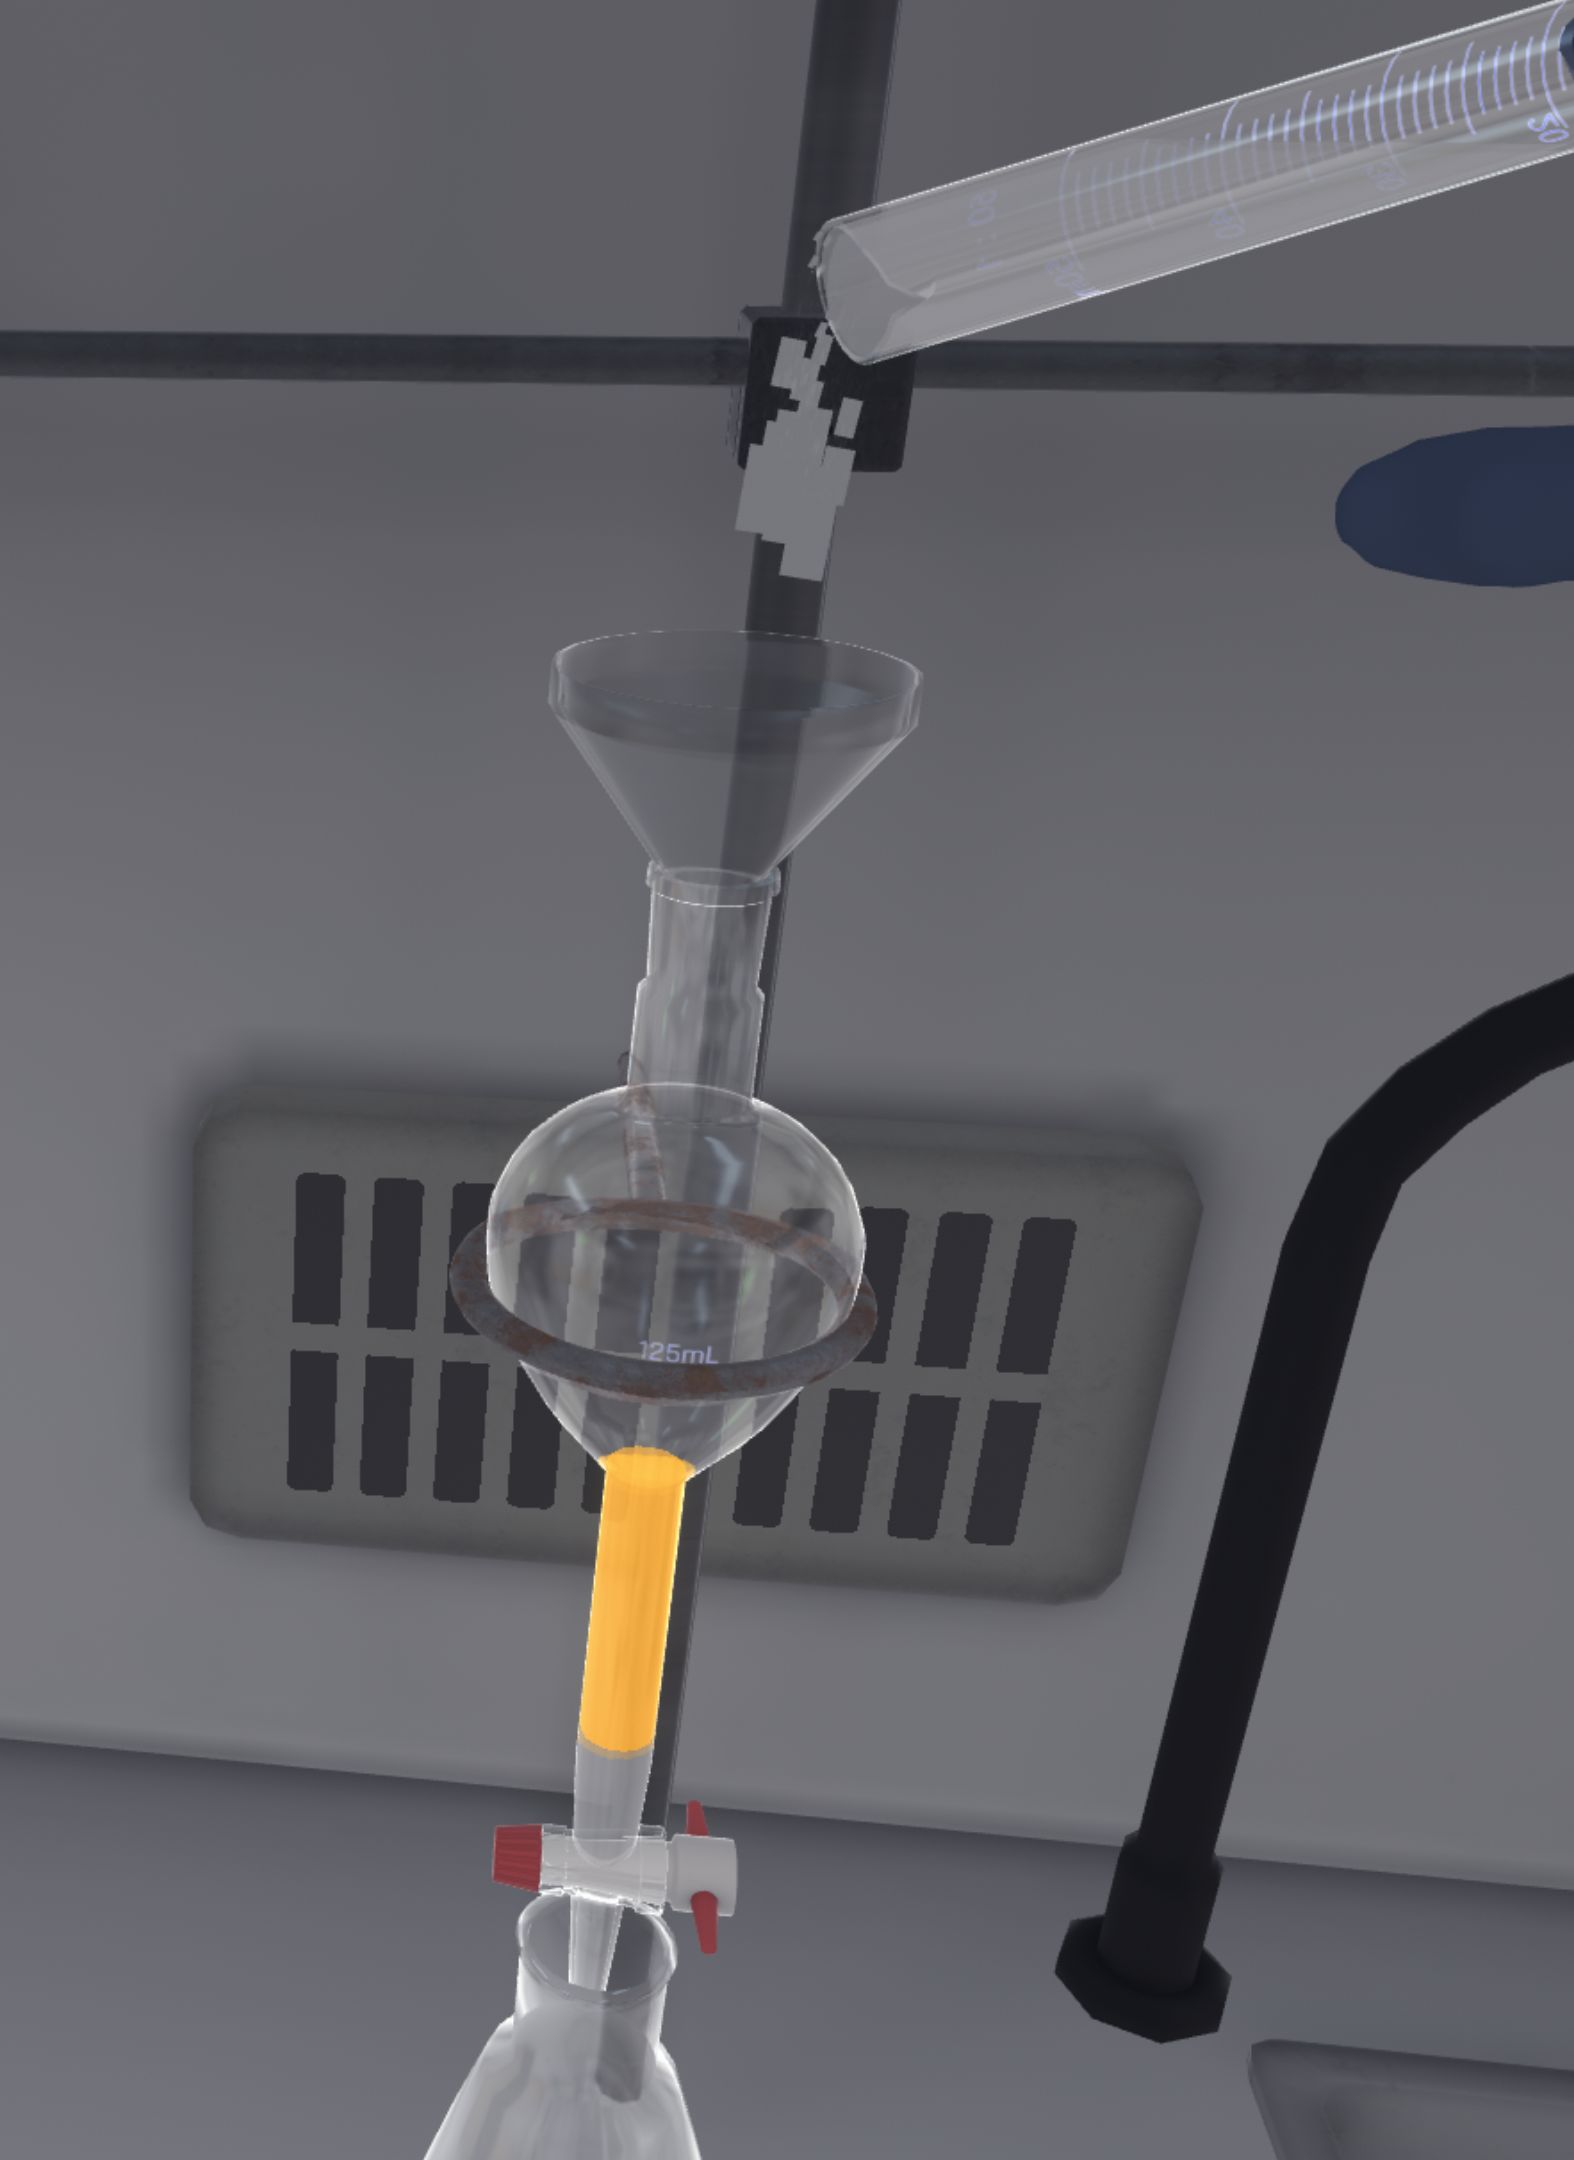
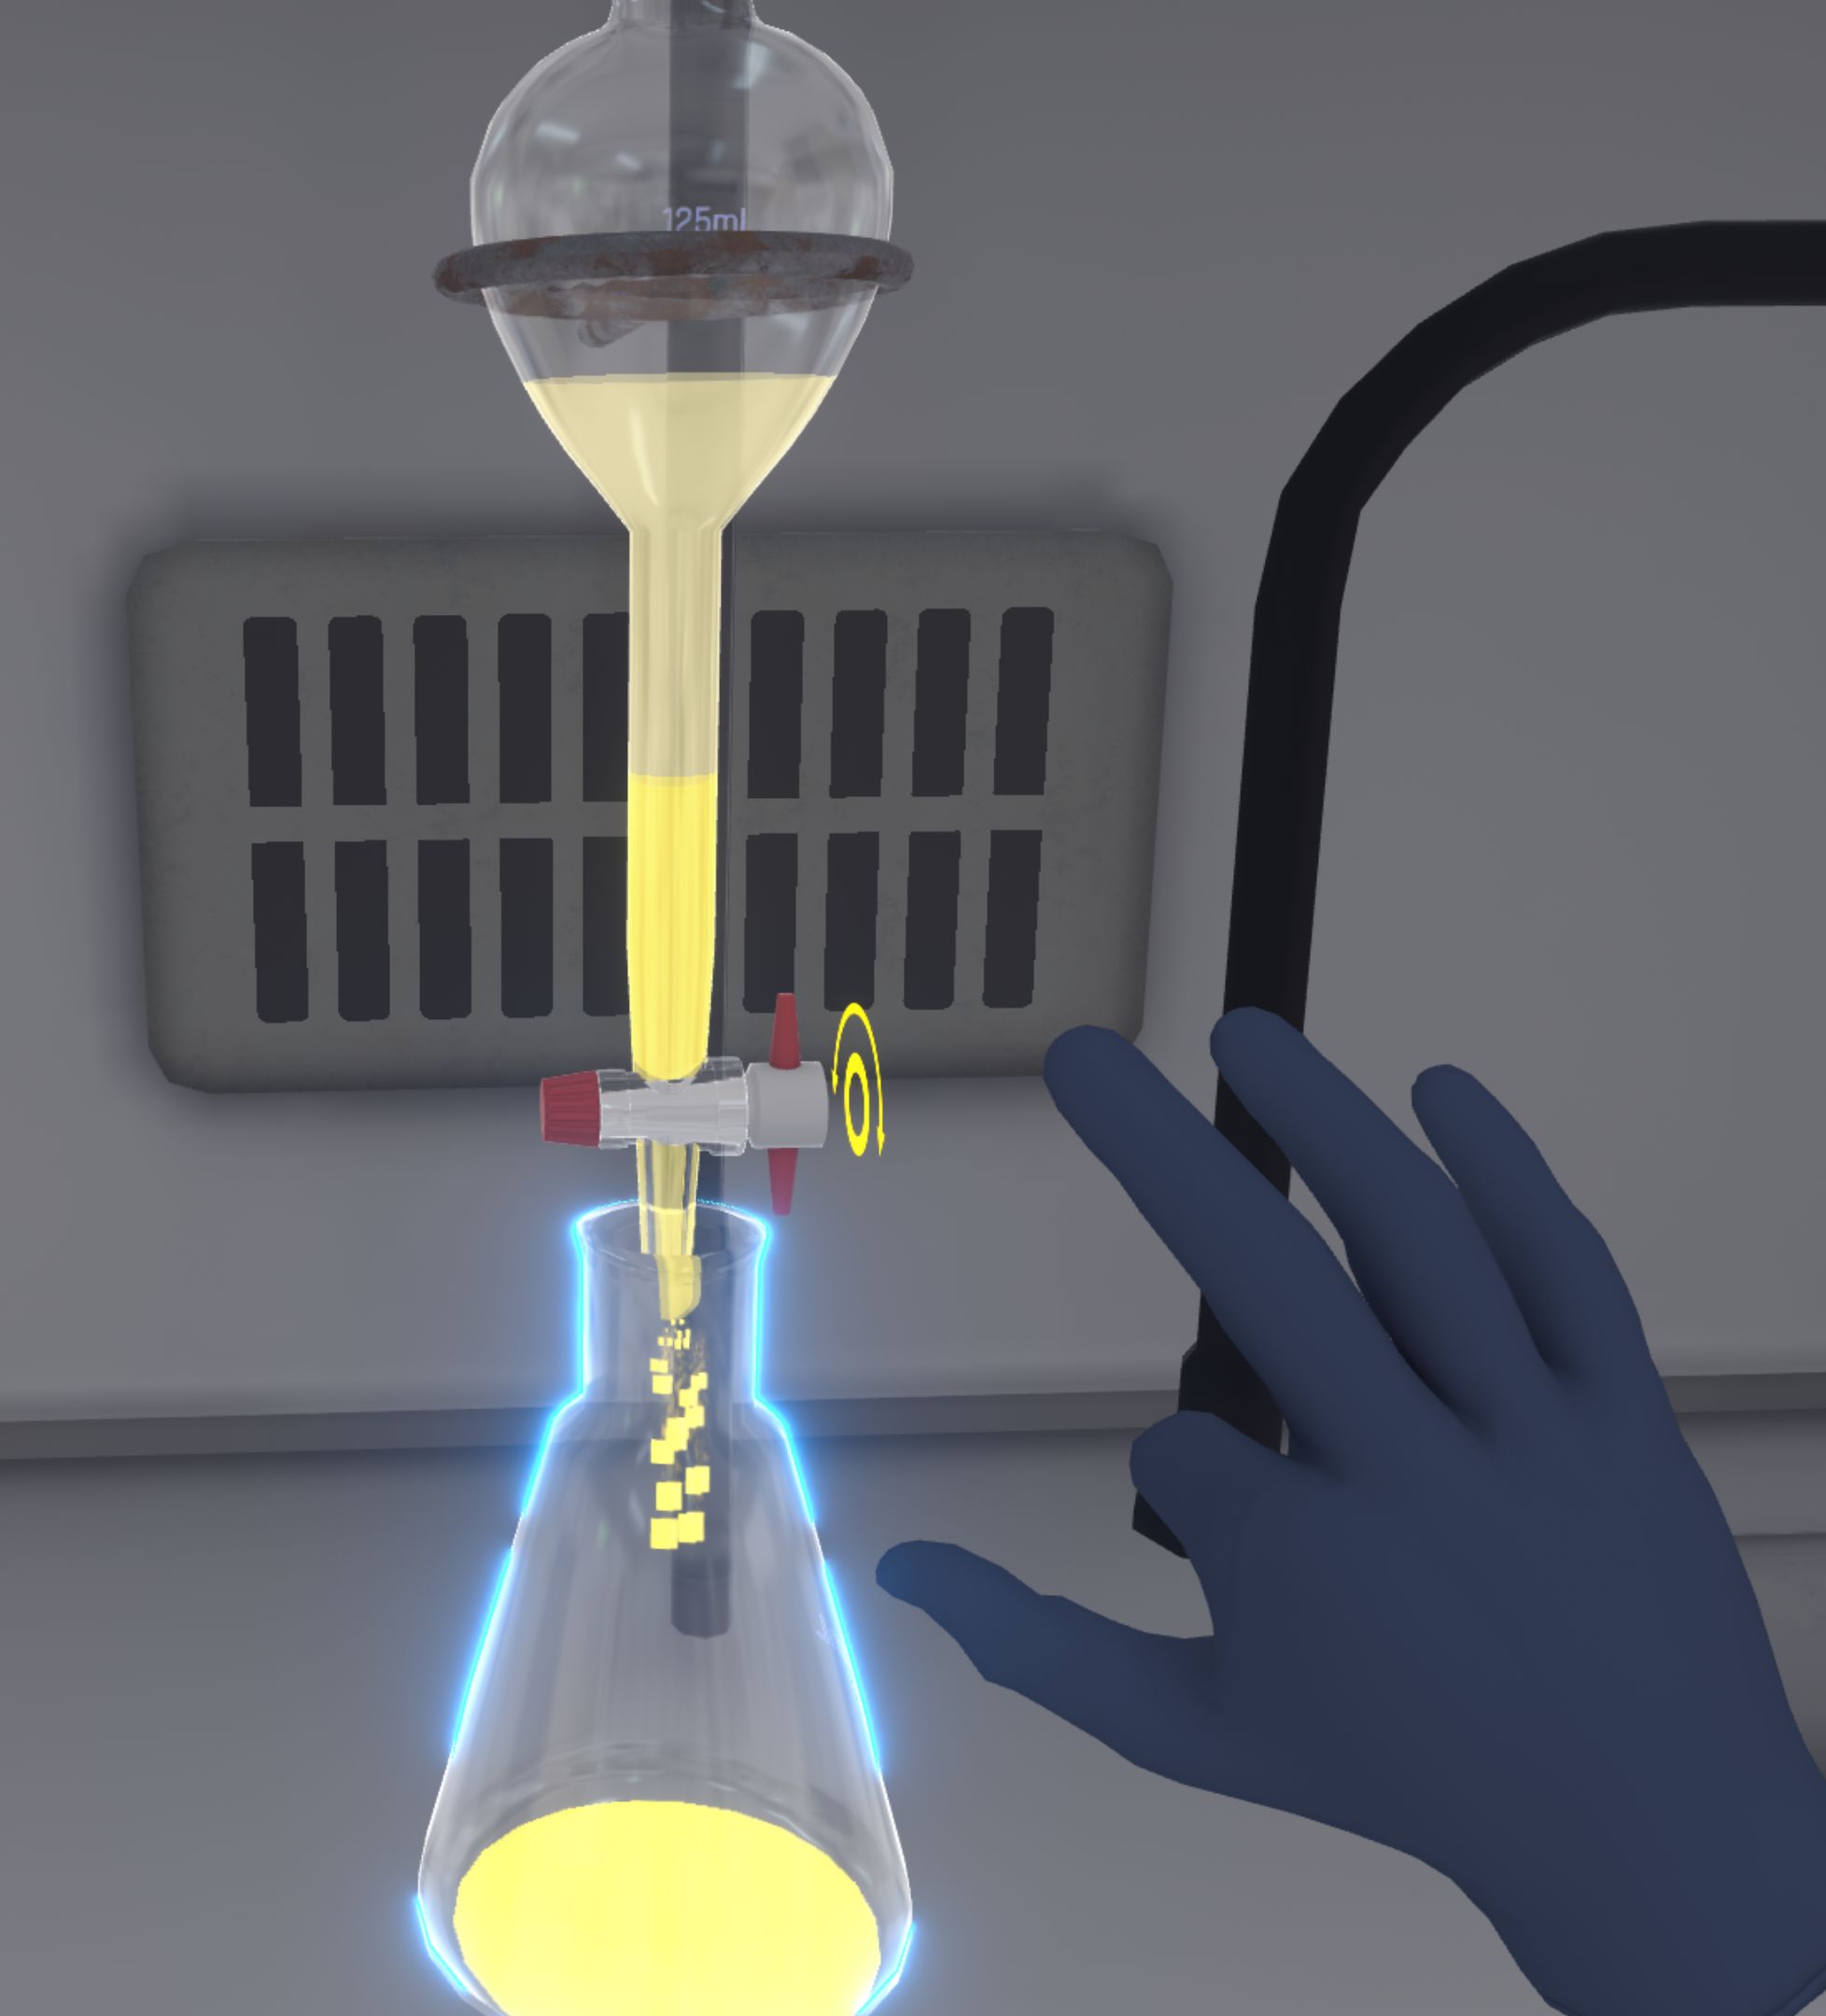
Collect the dichloromethane phase from the ampoule in the Erlenmeyer flask by opening the tap. Close the tap when you have finished.
The extraction is repeated twice automatically. The quantities have been adjusted.
-
Place an empty Erlenmeyer flask under the ampoule. Collect the aqueous phase from the ampoule into the Erlenmeyer flask.
-
Place the plastic funnel over the Erlenmeyer flask containing the dichloromethane phase.
-
Transfer a spoonful of magnesium sulphate into the Erlenmeyer flask.
-
Remove the plastic funnel from the Erlenmeyer flask.
-
Take the Erlenmeyer flask and shake it gently in a circular motion.
-
Remove the stopper from the flask and place the funnel with the filter paper on it.
-
Use the wash bottle containing dichloromethane to rinse the filter paper.
-
Filter the contents of the Erlenmeyer flask into the flask.
-
Remove the funnel and seal the flask with a stopper.
-
Put all the empty glassware and used utensils in the bin and leave the laboratory to complete the exercise.
Expert
-
Enter the laboratory to begin the exercise.
-
Stand in front of the fume cupboard and open it halfway.
-
Transfer the dye from the Erlenmeyer flask and the dichloromethane from the graduated cylinder into the separating funnel.
-
Degas the separating funnel.
-
Recover the dichloromethane phase from the funnel into the Erlenmeyer flask by opening the tap. Close the tap when you have finished.
The extraction is repeated twice automatically. The quantities have been adjusted.
-
Transfer a spoonful of magnesium sulphate into the Erlenmeyer flask.
-
Take the Erlenmeyer flask and shake it gently in a circular motion.
-
Filter the contents of the Erlenmeyer flask into the flask.
-
Clean up your work surface and leave the laboratory to complete the exercise.
5.3.2. Scenario flow
The user starts the scenario with the following briefing:
You will perform an extraction-division of the recovered solution to obtain one of its components (organic solvent dichloromethane). The extraction will be done with a non-miscible solution.
The user must equip their PPE (Equipping PPE), then enter the laboratory. They will have to approach the fume cupboard, open it halfway (Using the Fume Hood) and position the glass funnel on the separating funnel.
The user must check that the tap is closed, otherwise they will lose product and therefore points.
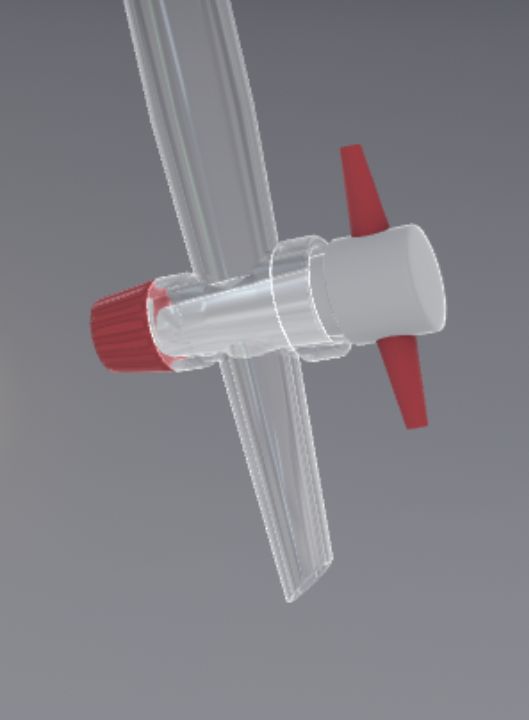
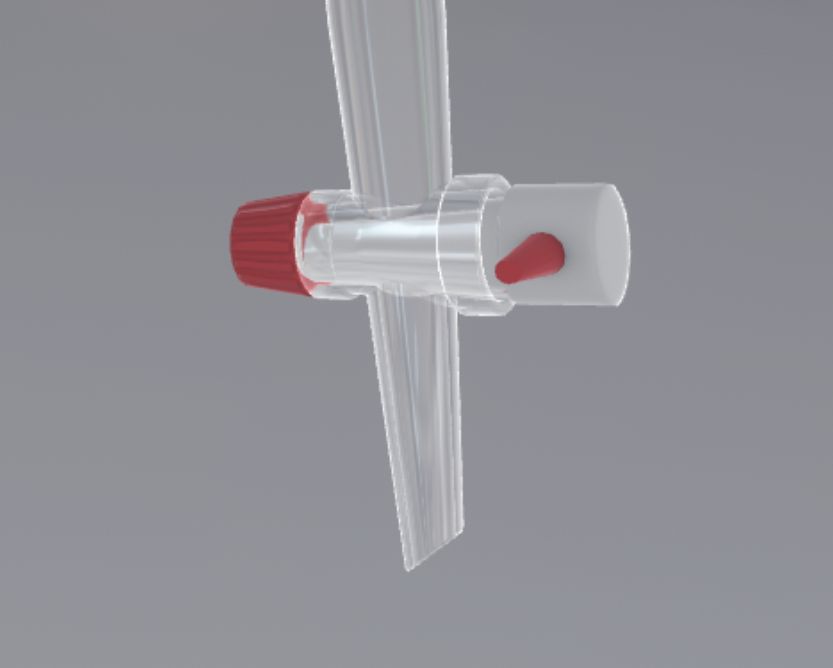
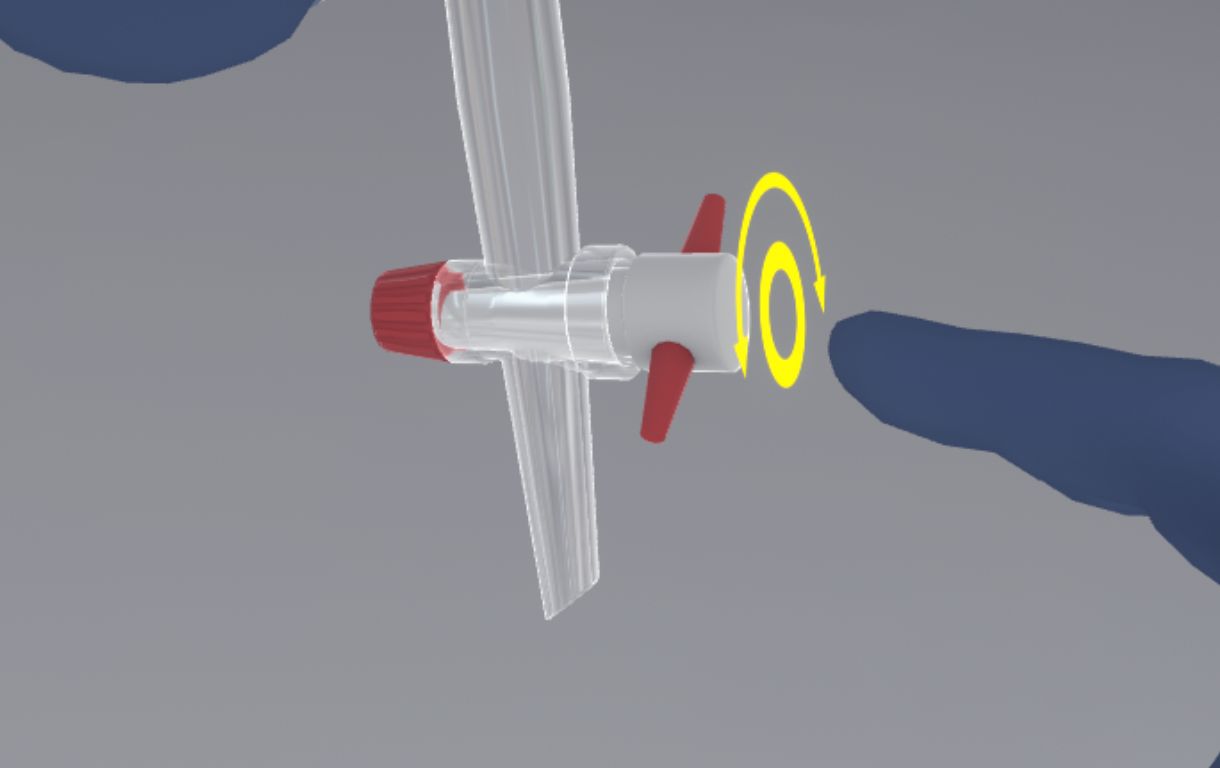
The user must use the interaction button on the tap and turn the wrist clockwise/counter-clockwise to open/close the tap. An icon appears when the tap is used.
They must transfer the dye from the Erlenmeyer flask into the ampoule, and then do the same for the dichloromethane from the graduated cylinder (Liquid transfer).

They should replace the funnel with the stopper of the ampoule. They then have to pick it up and shake it upside down for a few seconds. Still upside down, they must open and close the tap to degas the ampoule (a gas noise can be heard at this point).
|
Important
|
The user must take care to ensure that the ampoule cap is in the correct position and that the tap is closed when shaking, otherwise product (and points) may be lost. |
They must repeat the operation approximately 3 times until there is no more gas in the ampoule. To make it easier to understand, you can hear that there is no more gas noise when you open the tap, and the products inside the ampoule have changed color.
The user has to put the ampoule back on its stand and remove its cap. They must collect the dichloromethane phase from the ampoule in the Erlenmeyer flask by opening the tap. The liquid flows out more or less quickly depending on how far the tap is opened. Care must be taken to ensure that only the required phase is recovered, so it is better to go slowly for greater accuracy. The user must close the tap and release it to complete this step.
A fade to black and a timer appear to simulate the fact that the extraction is repeated twice automatically, with the other two graduated cylinders containing dichloromethane.
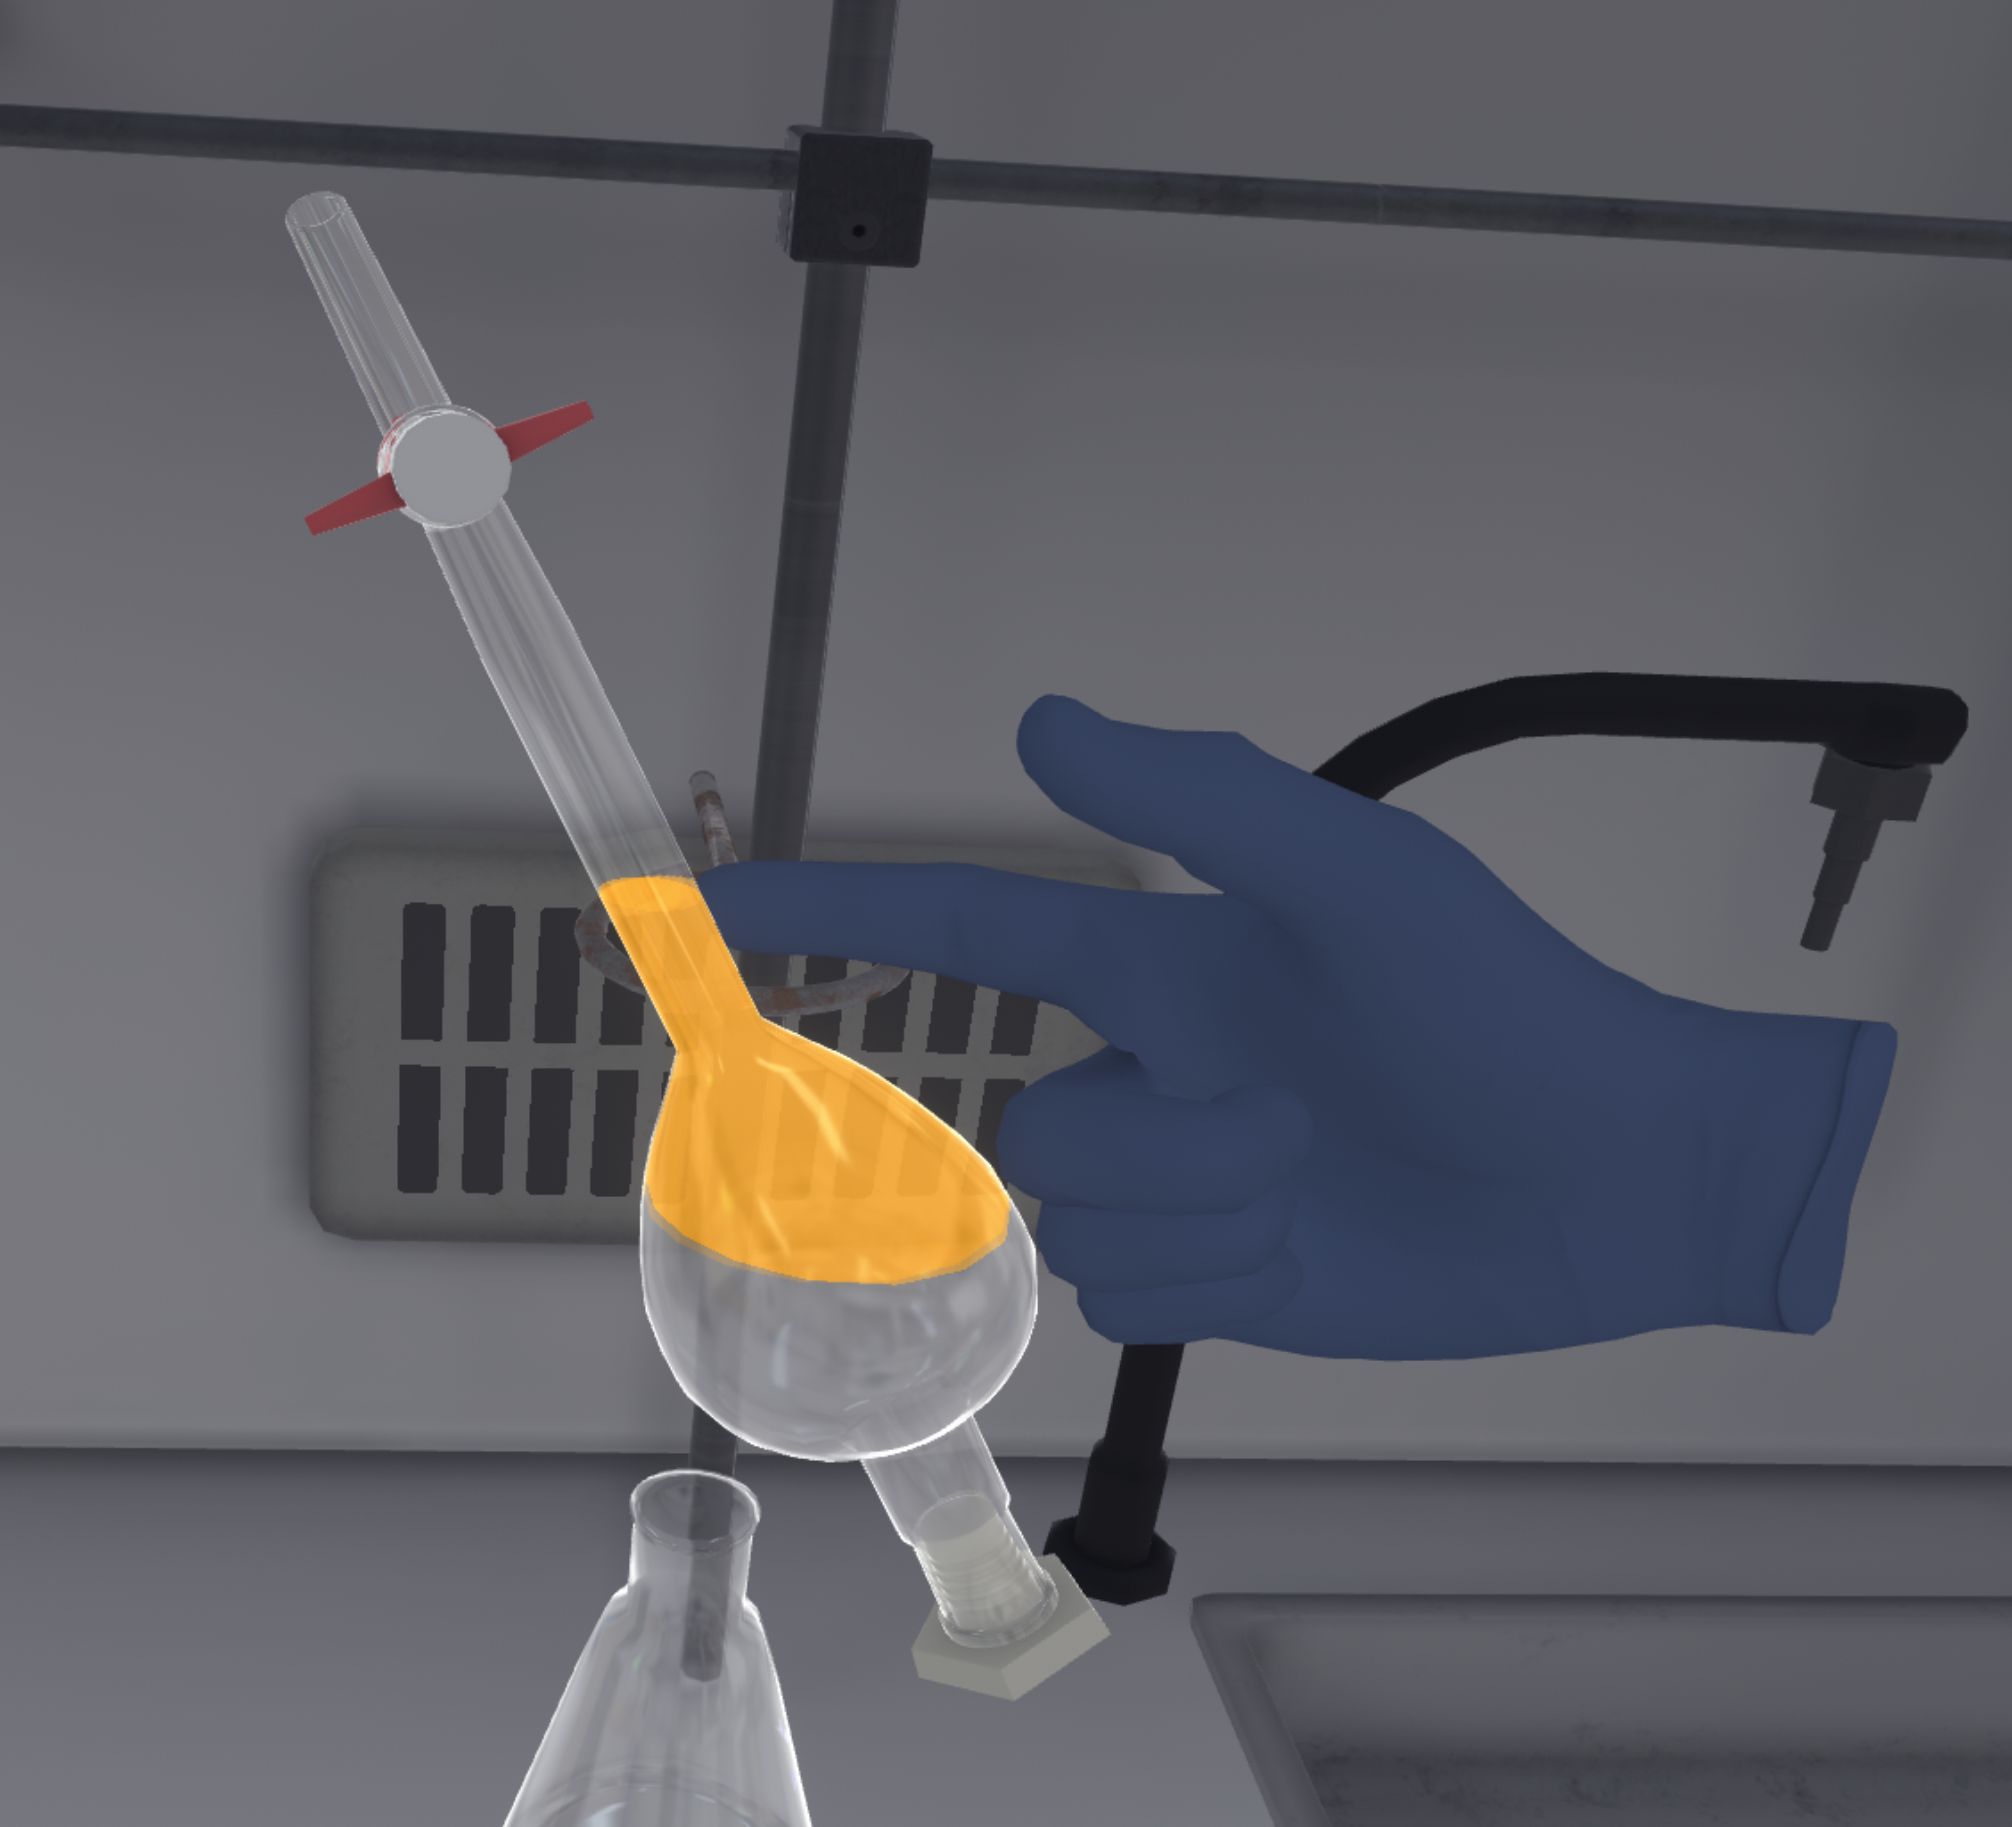
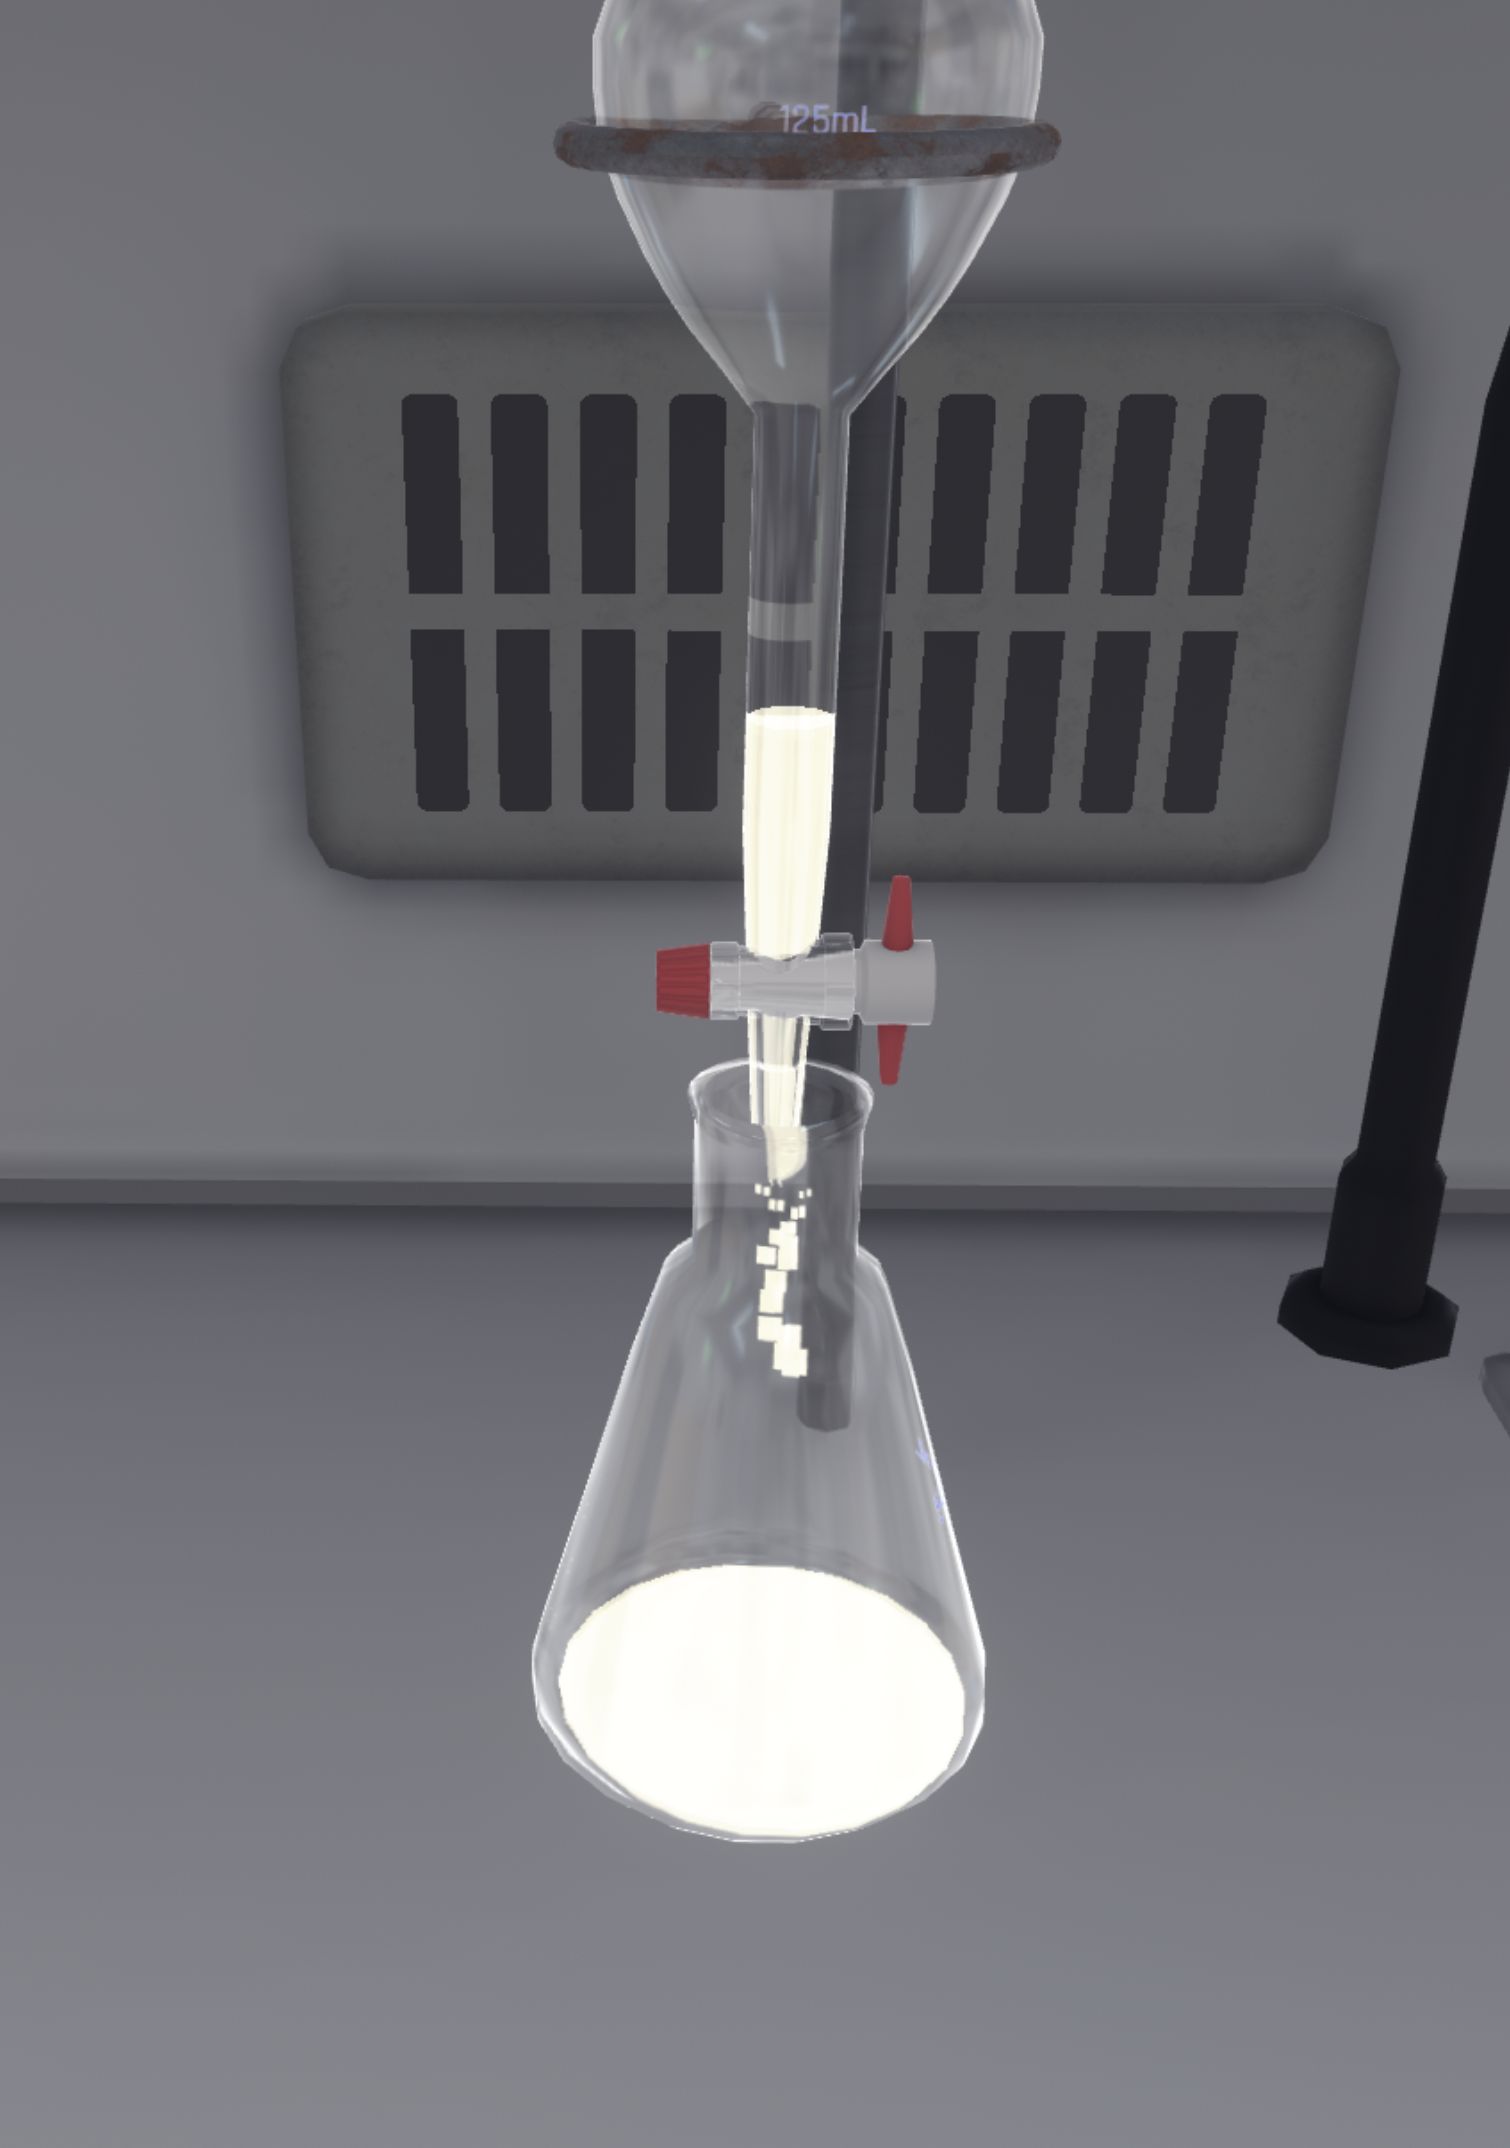
At the end of the timelapse, the quantities are adjusted. All the dichloromethane phase (yellow colour) is in the Erlenmeyer flask and the aqueous phase (white colour) remains in the separating funnel
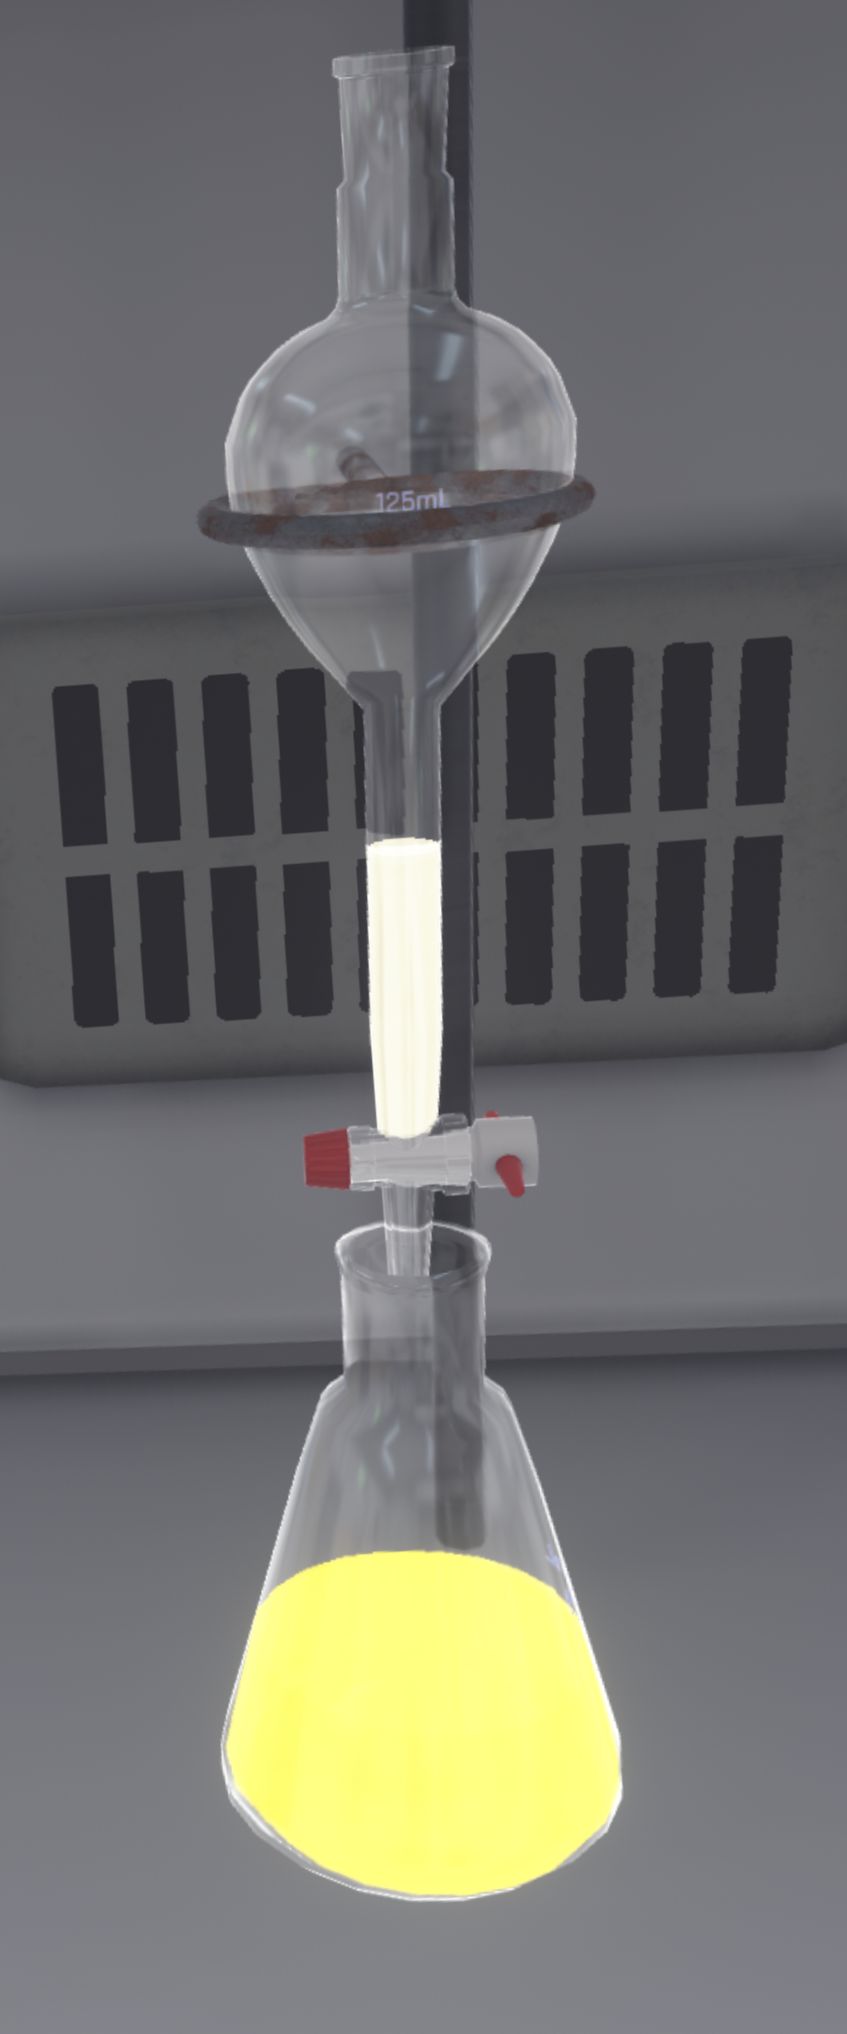
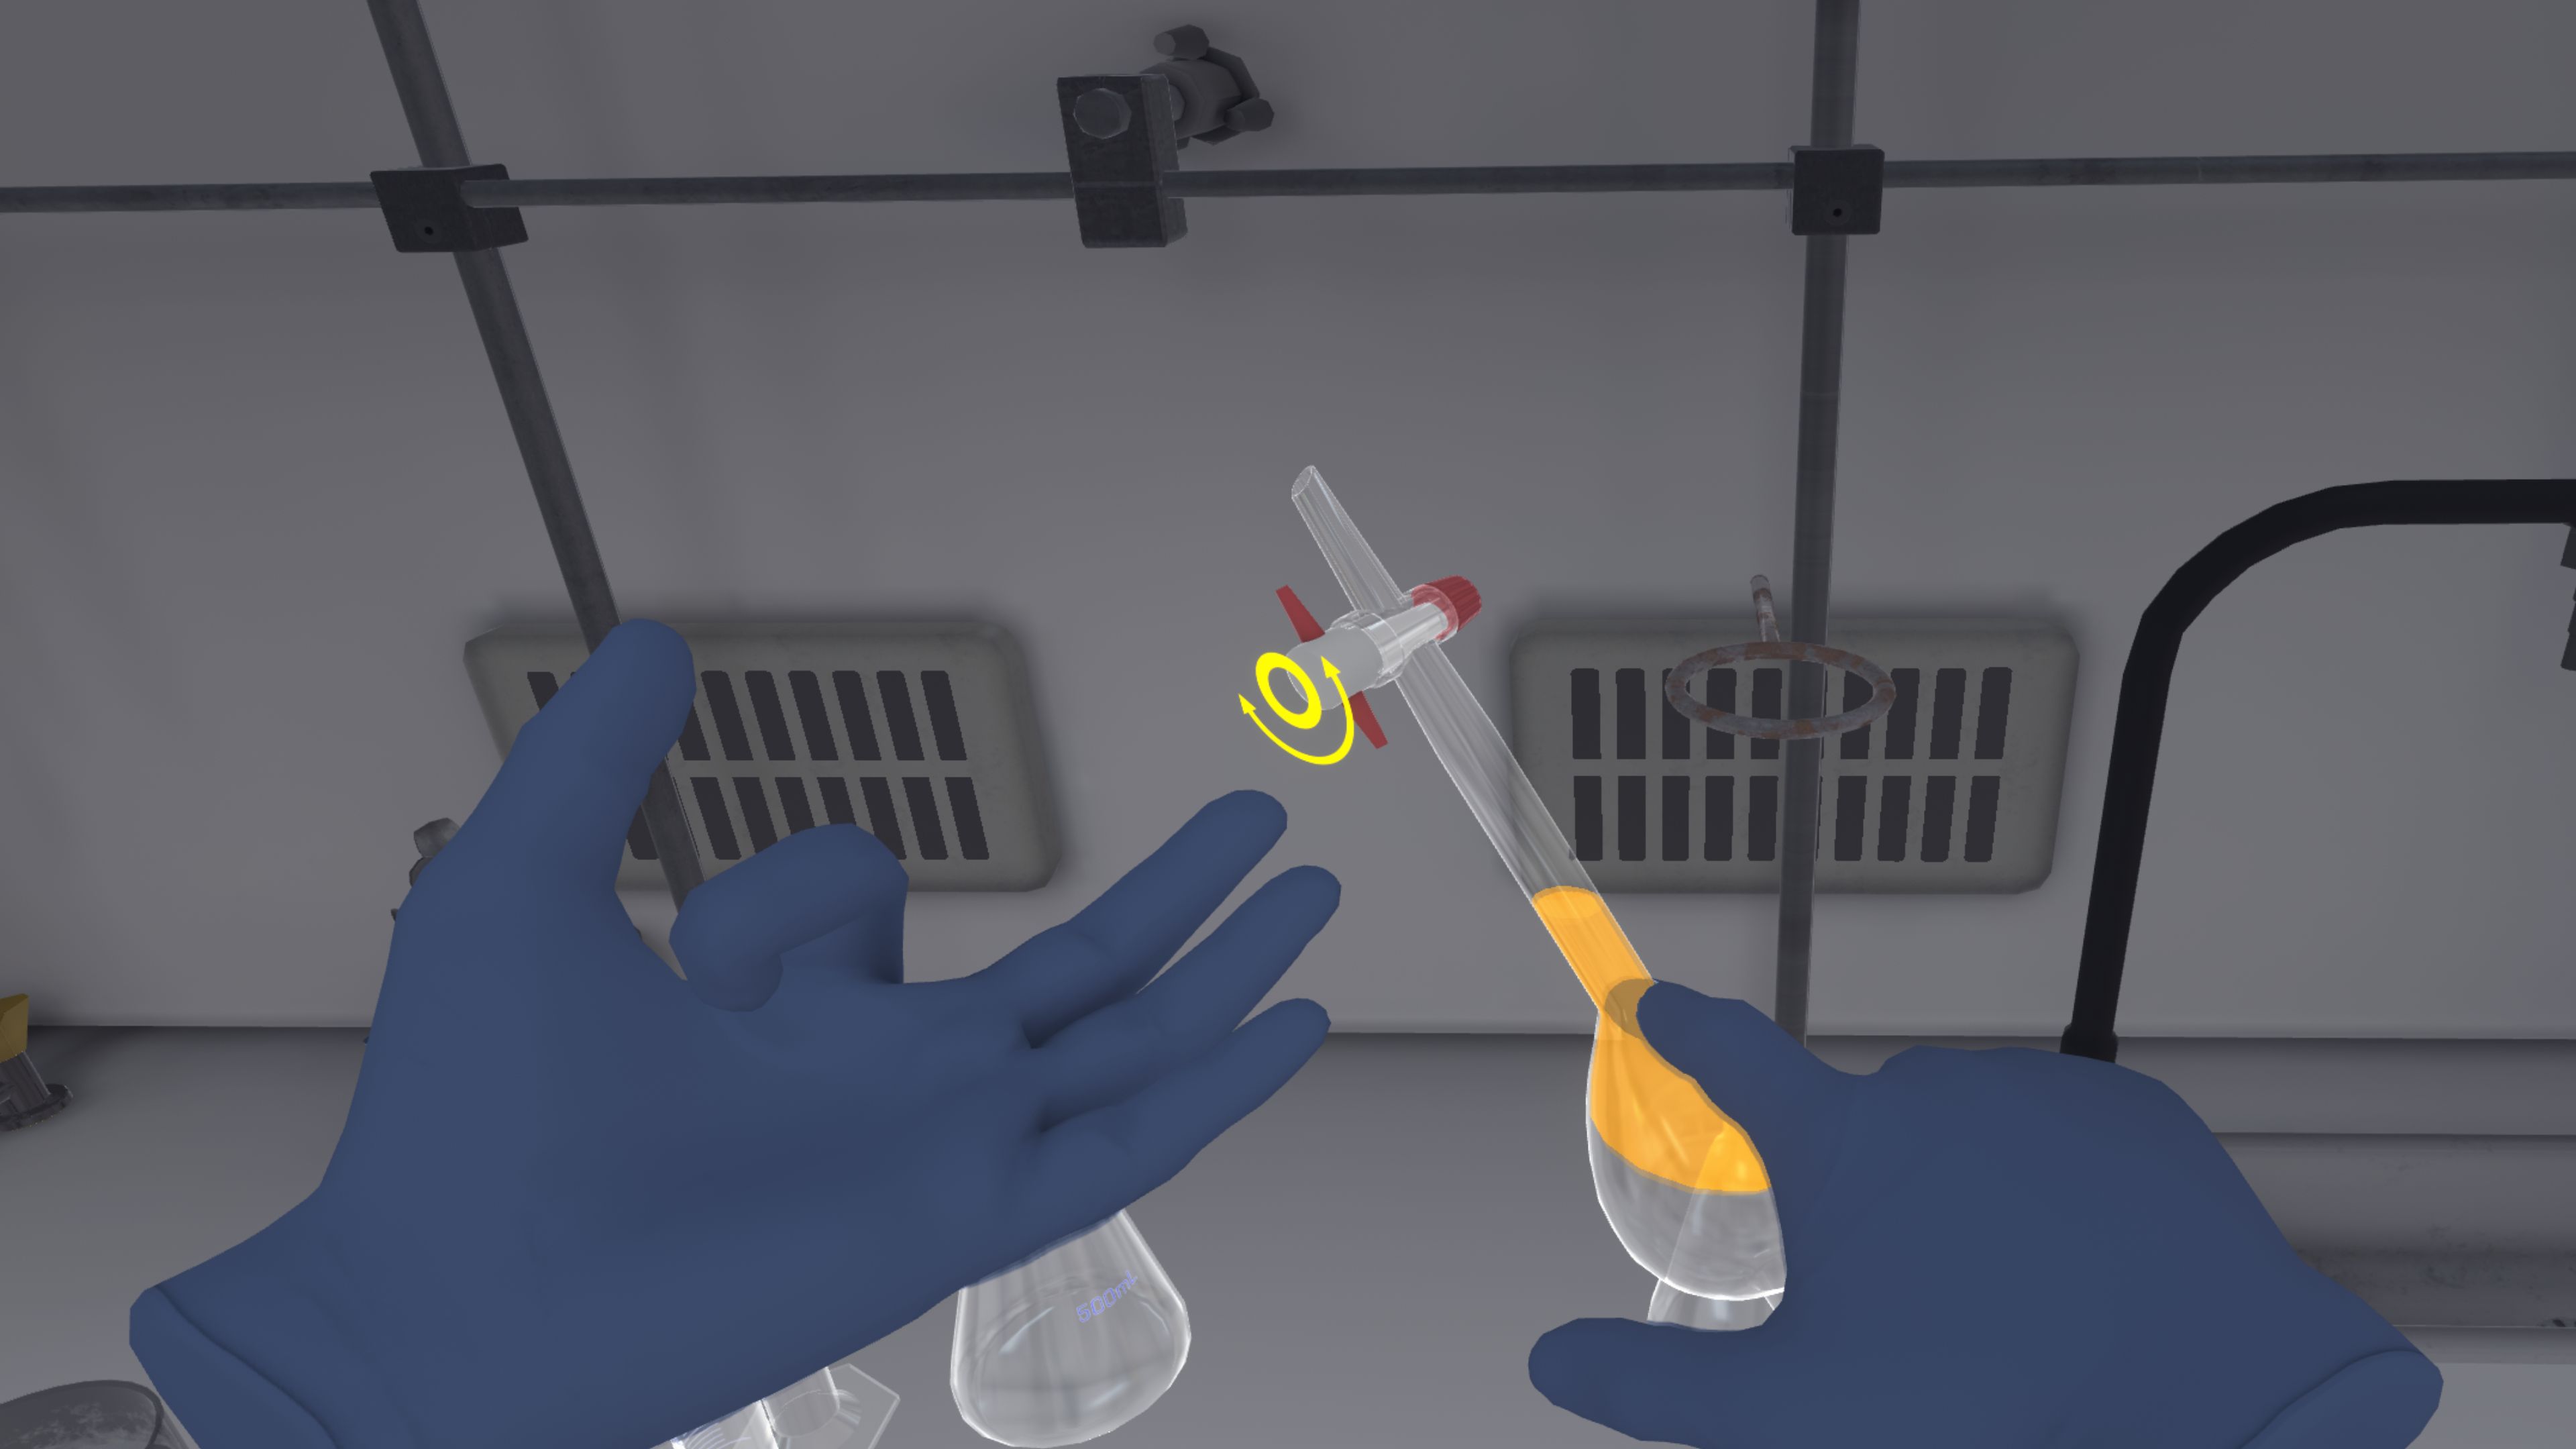
The user must recover the aqueous phase from the funnel into the second Erlenmeyer flask (which is empty). The ampoule must be completely empty.
Place the plastic funnel on the first Erlenmeyer flask (containing the dichloromethane phase) and transfer a spoonful of magnesium sulphate (Spatula and syringe).
The plastic funnel should be removed from the Erlenmeyer flask and then picked up and shaken gently in a circular motion to mix the magnesium sulphate thoroughly.

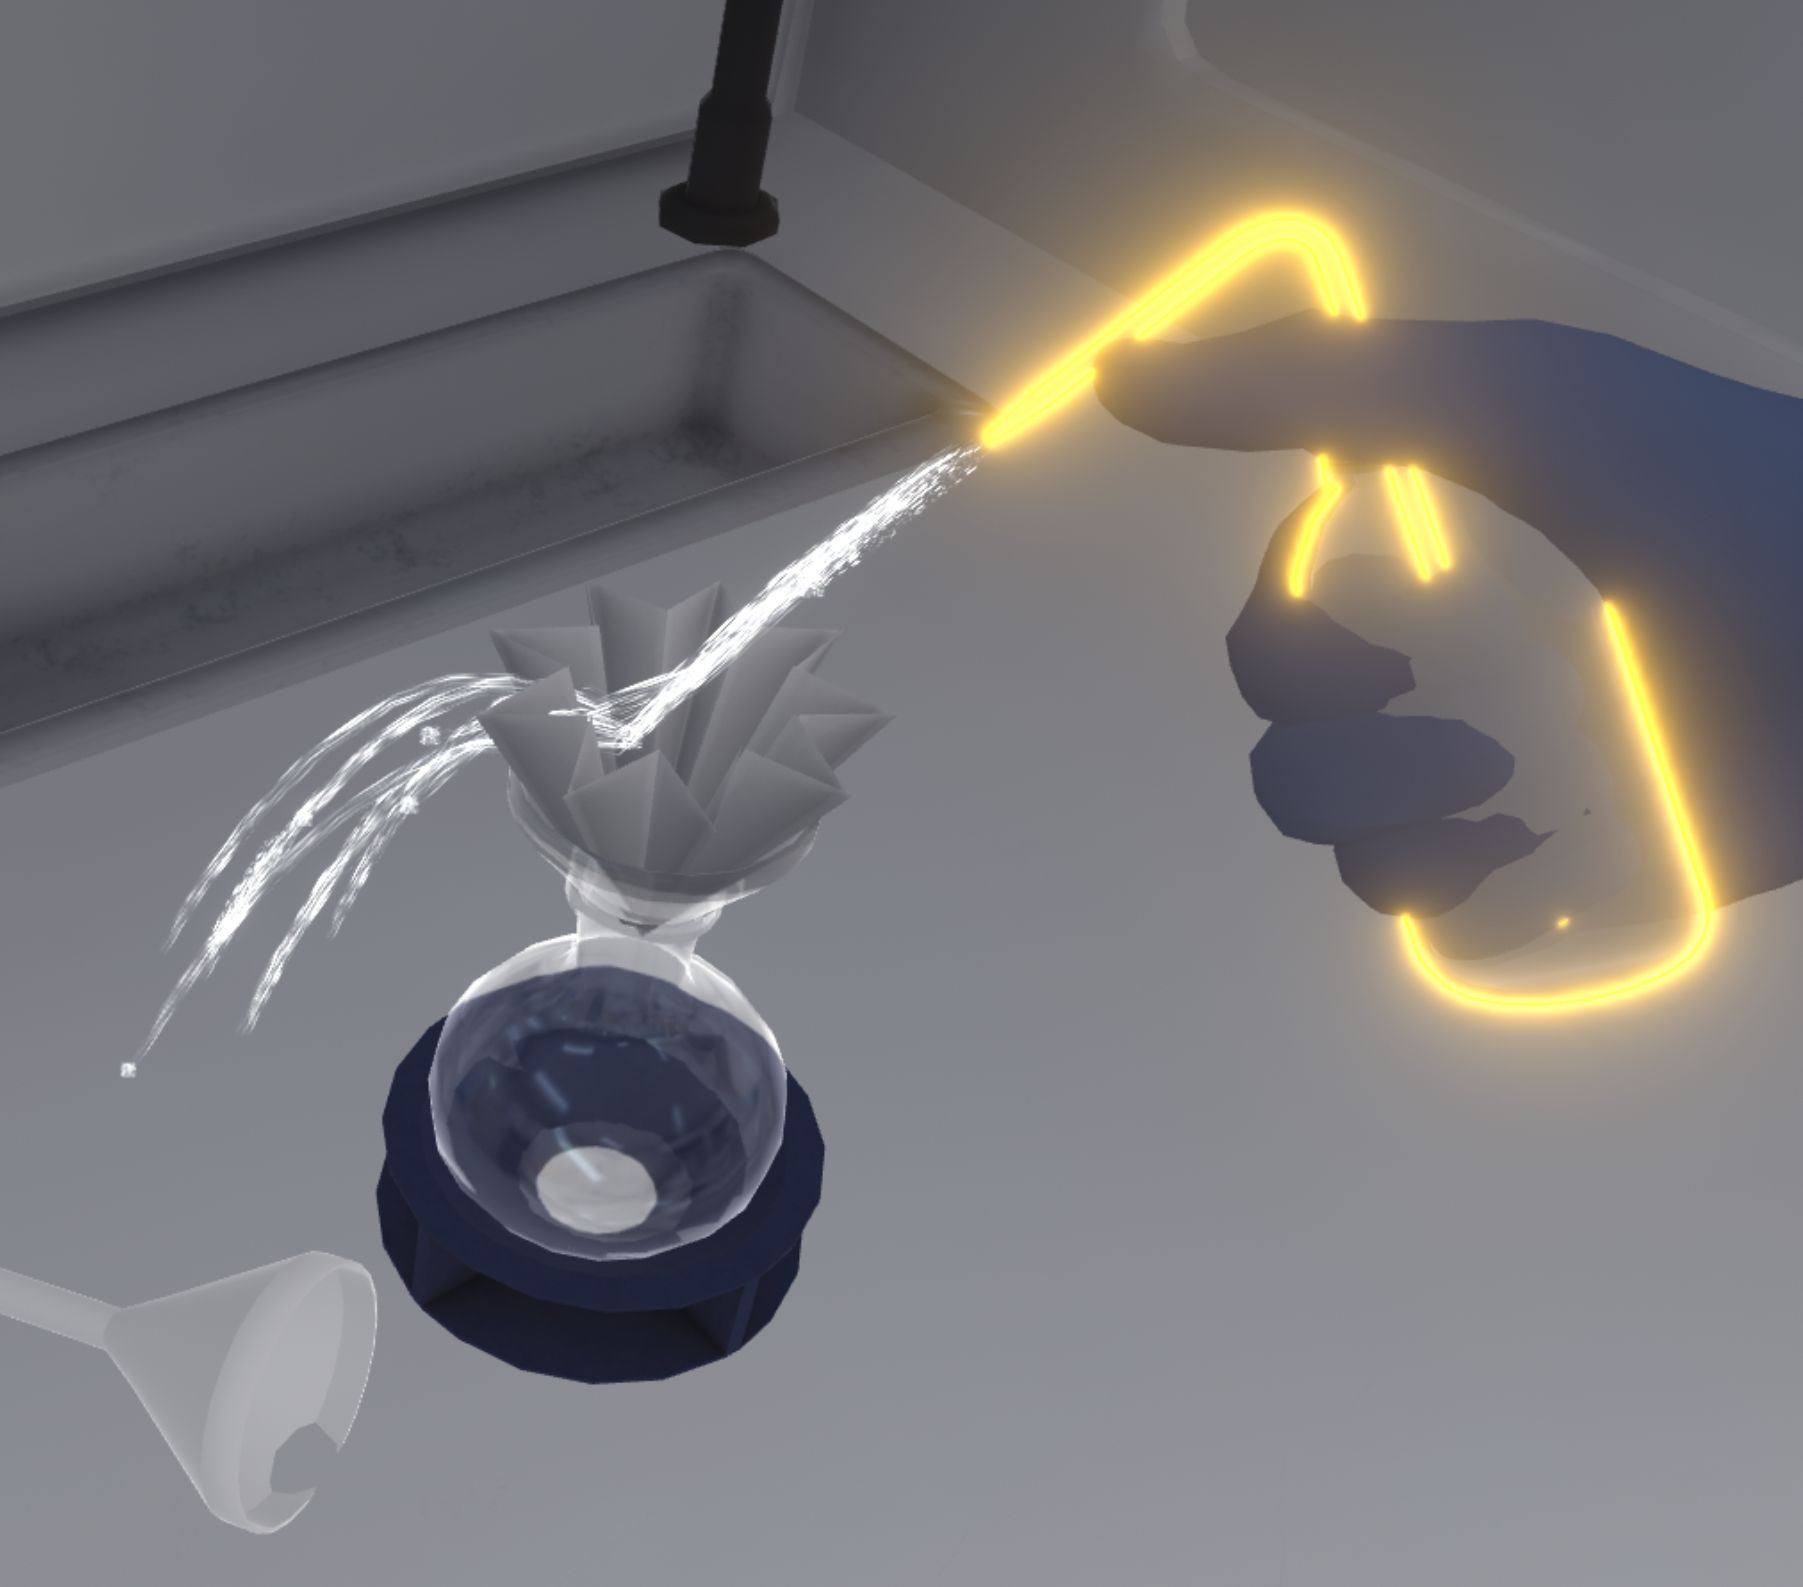
On the right is a closed flask. The user should open the flask and place the funnel with the filter paper on it. They must use the wash bottle containing dichloromethane to rinse the filter paper. To do this, the user must grab the wash bottle and press the interaction button to spray a jet of dichloromethane, and aim it at the filter paper.
The user must filter the contents of the first Erlenmeyer flask into the flask. In the flask will be the filtrate, and the residue will be in the filter paper.
The user should remove the funnel and seal the flask with a stopper, then store all the empty glassware (including the separating funnel and its stopper) and used utensils in the dirty container bin on the left-hand side of the fume cupboard.
When they have finished, they must go into the corridor. The user will find themselves teleported to the reception area in front of the assessment screen.
5.3.3. Evaluation criteria for the exercise
![]() Duration: Time taken by the user to finish the exercise.
Duration: Time taken by the user to finish the exercise.
![]() Protection: Wearing the correct PPE equipment.
Protection: Wearing the correct PPE equipment.
![]() Analysis: Obtains the correct result for the experiment.
Analysis: Obtains the correct result for the experiment.
![]() Procedure: Follows the correct sequence of actions.
Procedure: Follows the correct sequence of actions.
![]() Autonomy: The score decreases according to the number of times help was requested. Only in advanced.
Autonomy: The score decreases according to the number of times help was requested. Only in advanced.
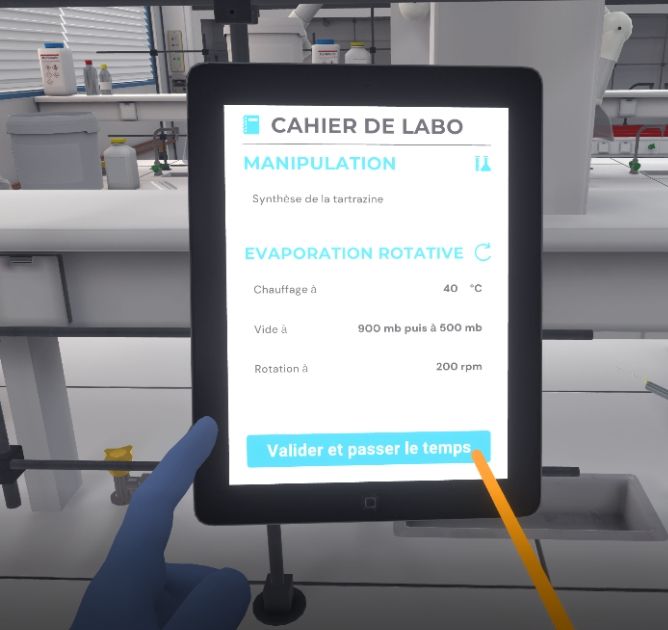
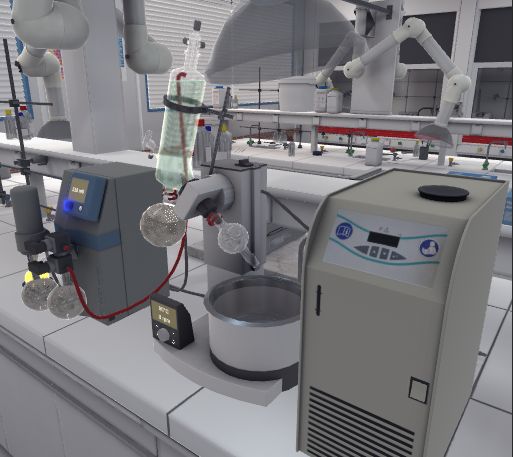
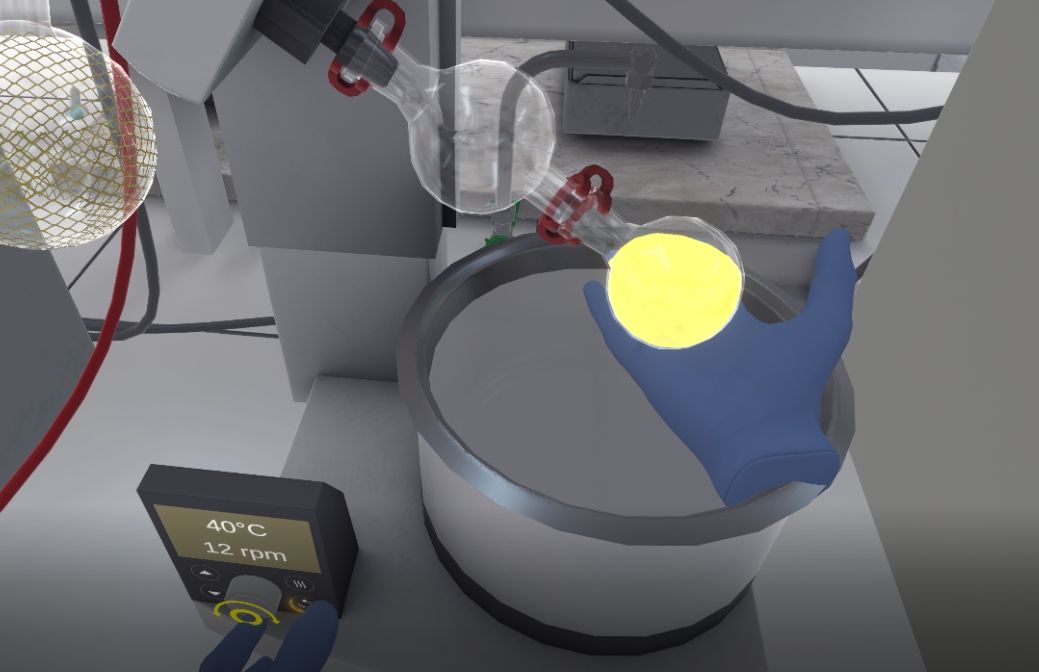
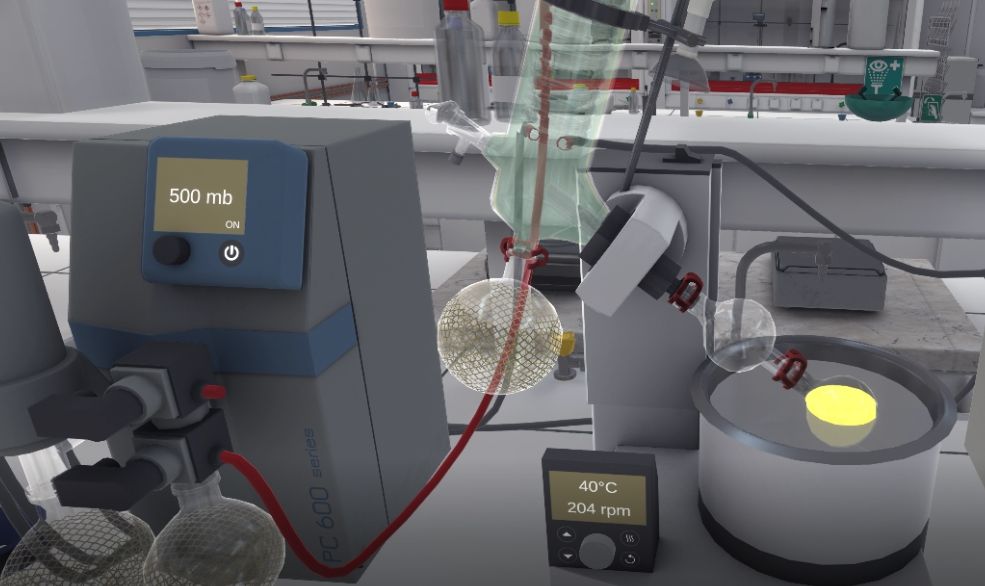
5.4. Rotary Evaporation
In this exercise, the user will use a rotary evaporator to rapidly remove a volatile solvent by evaporation. Depending on the level of difficulty chosen, the objectives and aids differ.
5.4.1. Instructions
To complete the exercise, the user should follow the following instructions:
Beginner and Advanced
-
Once you have equipped yourself with Personal Protective Equipment, enter the laboratory to begin the exercise. To complete the exercise, exit the laboratory.
-
Switch on the the rotary evaporator by first turning on the cooling bath.
-
Then switch on the pump and the thermostatic bath.
-
Set the heating temperature to 40 °C. To do this, click on the temperature button and turn the knob.
-
Set the initial pressure by turning the knob to set the vacuum to 900 mb.
-
Hang the backflow preventer on the motor and use a clip to hold it.
-
Open the round bottom flask. Then, bring it close to the non-return valve. Simultaneously, connect the flask with a secure clamp using your other hand.
-
While keeping your right hand under the ball, set the rotation to 200 rpm. To do this, click on the rotation button and turn the knob.
-
Turn on the pumping system by pressing the start button and close the valve to put the assembly under reduced pressure. Remove your hand from under the balloon.
-
Lower the flask into the thermostatic bath by pressing the arrows.
-
Gradually lower the pressure by turning the knob to set the vacuum to 500 mb.
-
If your installation seems correct, confirm on your laboratory notebook to begin a timelapse.
Wait a few minutes for the solvent to evaporate
-
Stop the pumping system by pressing the start button.
-
Open the valve very gently to break the vacuum.
-
Reassemble the thermostatic bath tank. Stop the rotation.
-
Remove the clip connecting the flask to the guard. Retrieve the round bottom flask.
-
Place the flask on the valve and close it.
-
Switch off the rotary evaporator by switching off the cooling bath, the pump and the thermostatic bath.
-
Leave the laboratory to complete the exercise.
Expert
-
Enter the laboratory to start the exercise.
-
Prepare the rotary evaporator according to the information written in your laboratory notebook. If your setup seems to be correct, confirm it in your notebook to begin a timelapse.
Wait a few minutes for the solvent to evaporate
-
Place the flask on the jack. Tidy up your work area and leave the laboratory to finish the exercise.
5.4.2. Scenario flow
The user starts the scenario with the following briefing:
You are going to use a rotary evaporator to rapidly remove a volatile solvent by evaporation. Go to your workstation to continue the manipulation.
The user must equip their PPE (Equipping PPE), then enter the laboratory and approach the rotary evaporator. The user should switch on the cooling bath, then the pump and the thermostat bath by pressing the buttons.

-
Left: Pump button. Right: thermostat bath button image::MimbusChemistry/Evaporator/mc-manipulation-evaporator-button-2.jpg[250,250]
The user must then set the heating temperature to 40°C. On the display, the user can see a flashing text depending on the selected parameter (temperature or speed). By default, the temperature is selected. If they want to select the other parameter, they have to click on the corresponding button to change. When the correct parameter is active, they have to press the interaction button near the knobs and rotate their wrist to change the values.
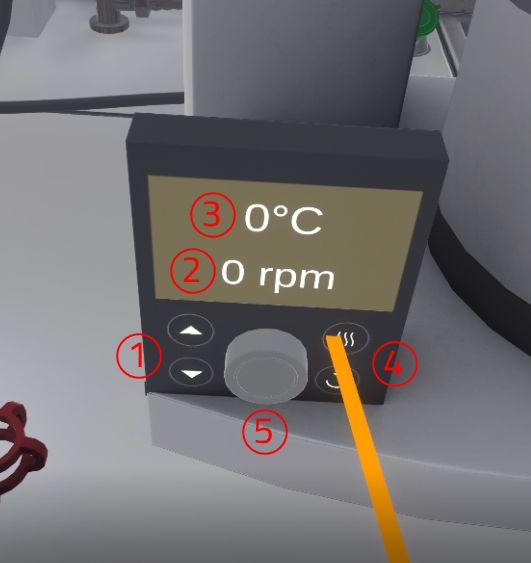
-
Arrows for raising/lowering the round bottom flask in the thermostatic bath
-
Text indicating the current rotation, in revolutions per minute (rpm)
-
Text indicating the current temperature, in degrees Celsius (°C)
-
Buttons for selecting temperature (top button) or rotation (bottom button) as a parameter
-
Knob to adjust the selected parameter
The user must update the initial pressure by turning the knob to set the vacuum to 900 mb. The value changes from 100 to 100.
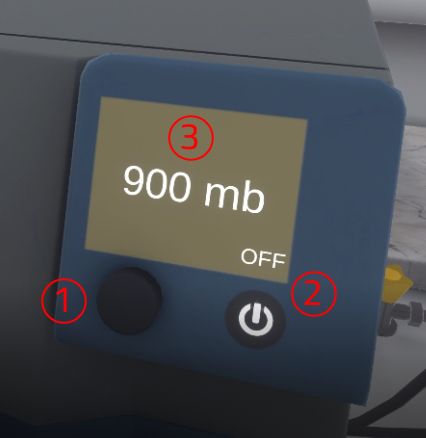
-
Knob to set the pressure (from 100 to 100)
-
Button to turn on/off the pumping system (ON/OFF indicator shows its status)
-
Text indicating the current pressure, in millibar (mb)
The user will then hook the non-return valve onto the motor. Then they take a clamp and attach it to the guard so that it attaches and holds it in place.
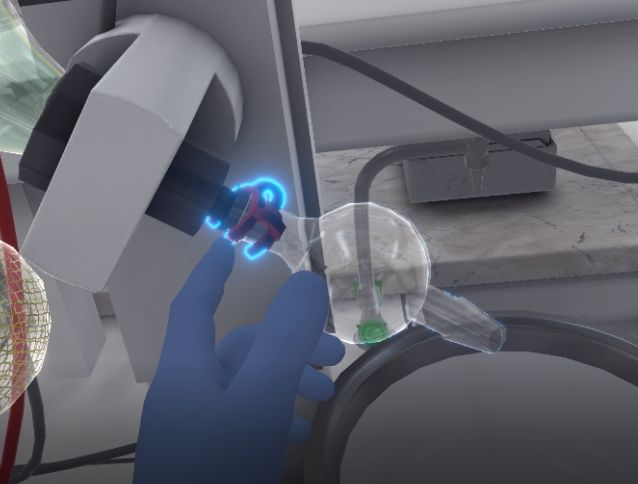
The user opens the round bottom flask. With their left hand they must grab an unused clamp, with their right hand the round bottom flask and bring it close to the guard. The flask will automatically attach to the guard when the user is close to it. While holding down the button that allows the user to grasp objects with their right hand, the user must release the clamp between the round bottom flask and the guard to hold the round bottom flask in place.
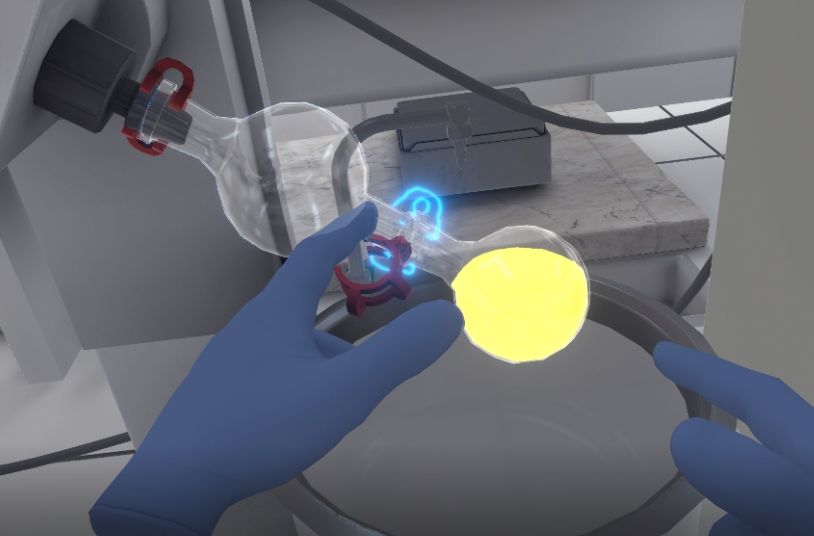
While keeping their right hand under the ball, the rotation must be set to 200 rpm with the left hand. This is done by clicking on the rotation button and turning the knob (similar to the step where the user had to set the temperature).
|
Important
|
As long as the user has not set the rotation, they must keep one hand under the round bottom flask. If the round bottom flask is not held by the hand for more than 9 seconds, it will fall into the tank and trigger a fatal error. |
The user will switch on the pumping system by pressing the start button on the pump control panel, then close the valve (by pressing the interaction button) to put the set-up under reduced pressure.
The flask must be lowered into the thermostat bath by pressing the arrows on the thermostat bath control panel.
|
Note
|
There are 3 different height settings: High, middle, low. The correct setting is middle. |
The user will progressively lower the pressure by turning the knob to set the vacuum to 500 mb, then confirm on the laboratory notebook to begin a timelapse.
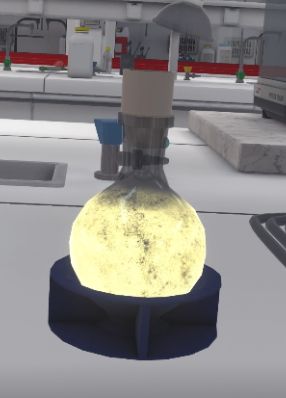
A fade to black and a timer appears to simulate the user waiting for 2 minutes for the solvent to evaporate into a receptacle flask. If the user has followed the instructions correctly, the inside of the flask is filled with powder.
Now it is time to put everything away. The pumping system must be stopped by pressing the start button on the pump control panel and the valve closed to break the vacuum. The thermostatic bath tank should be reassembled and the rotation stopped. The user must remove the clamp connecting the flask to the guard, recover the flask, place it on the jack and close it with its cap.
To complete the exercise, turn off the cooling bath, the pump and the thermostatic bath and leave the laboratory.
Once in the corridor, the user will be teleported to the reception area in front of the assessment screen.
5.4.3. Evaluation criteria for the exercise
![]() Duration: Time taken by the user to finish the exercise.
Duration: Time taken by the user to finish the exercise.
![]() Protection: wearing the correct PPE equipment.
Protection: wearing the correct PPE equipment.
![]() Analysis: Obtains the correct result for the experiment.
Analysis: Obtains the correct result for the experiment.
![]() Procedure: Follows the correct sequence of actions.
Procedure: Follows the correct sequence of actions.
![]() Autonomy: The score decreases with the number of helpers required. Only in advanced.
Autonomy: The score decreases with the number of helpers required. Only in advanced.
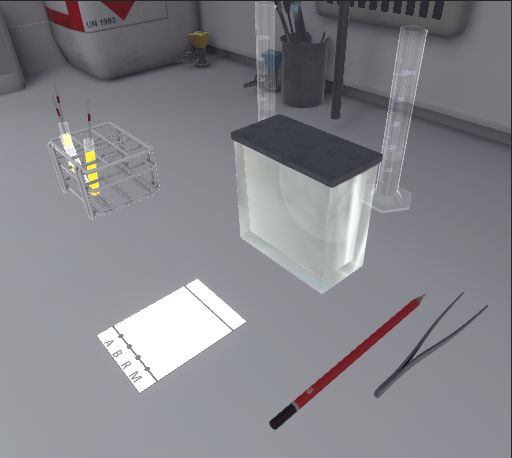
5.5. Thin Layer Chromatography
In this exercise, the user will carry out a thin layer chromatography of a reaction mixture containing tartrazine in order to check its purity. Depending on the level of difficulty chosen, the objectives and aids differ.
5.5.1. Instructions
To validate the whole exercise, the user must follow the following instructions:
Beginner and Advanced
-
Once you have equipped yourself with Personal Protective Equipment, enter the laboratory to begin the exercise. To complete the exercise, exit the laboratory.
-
Stand in front of the fume cupboard and open it halfway.
-
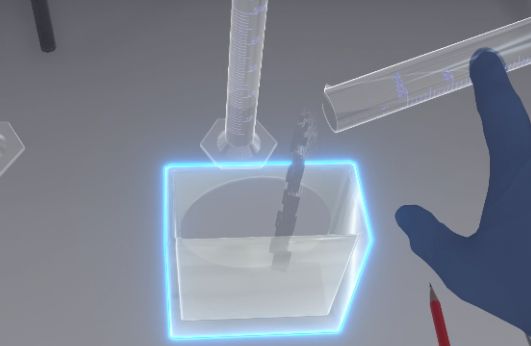
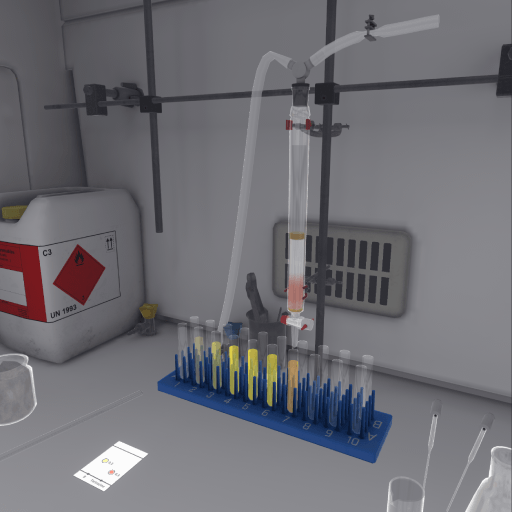
Add the eluent (cyclohexane/ethyl acetate 50:50) to a height of about 0.5 cm in the chromatography tank and close it. The eluent vapours will then saturate the tank.
-
Prepare the plate by drawing a starting line with a pencil, indicating the positions of the deposits you are going to make and a finishing line.
-
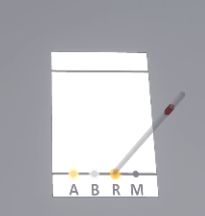
Take the capillary dipped in the first solution. Place the capillary vertically on position A to make a deposit.
-
Do the same for the second solution on spot B.
-
Do the same for the third solution on spot R. This is the mixture obtained during the liquid-liquid extraction exercise.
-
Make a co-spot on the 4th location. Place a drop of each product A, B, and R on the co-spot.
-
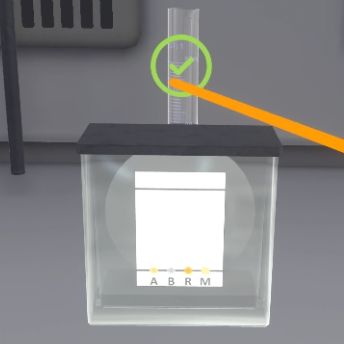
Using the forceps, take the plate from the top above the migration front, place it vertically in the tank and quickly close it. Initially, the eluent should not touch the deposits.
-
Click on the icon near the tank to begin a timelapse and observe the rise of the solvent front.
Without moving the tank, wait for the eluent to reach the finish line
-
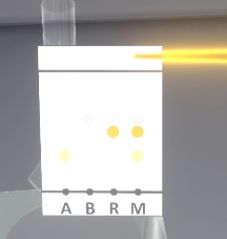
Take the forceps to retrieve the plate and gently shake it.
-
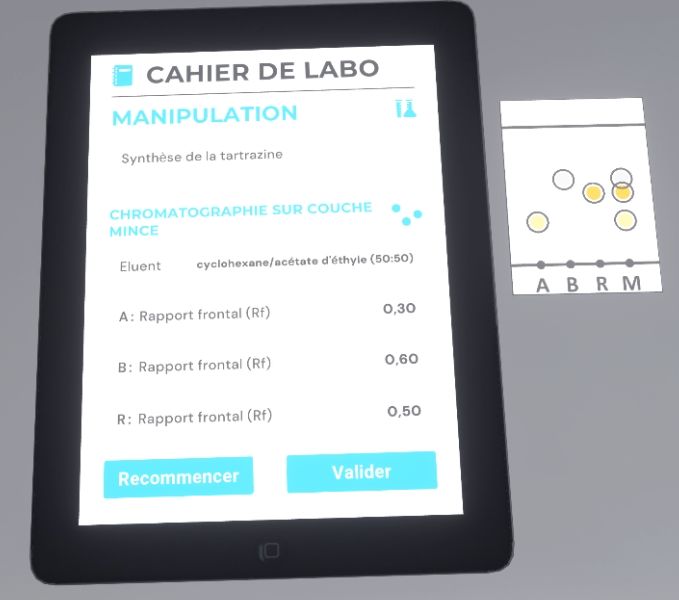
Circle the spots with a pencil. The front report of each migration is written on your tablet.
-
Look at your lab notebook. If you are satisfied with the result, complete the exercise by leaving the lab. If not, start again.
Expert
-
Enter the laboratory to start the exercise.
-
Stand in front of the fume cupboard and open it halfway.
-
Prepare the chromatography plate and place it in the tank. Click on the icon next to the tank to begin a timelapse and watch the solvent front rise.
Without moving the tank, wait for the eluent to reach the finish line
-
Calculate the front ratio of each migration. Look at your laboratory notebook. If you are satisfied with the result, complete the exercise by leaving the lab. If not, start again.
5.5.2. Scenario flow
The user starts the scenario with the following briefing:
You are going to perform a thin layer chromatography of a reaction mixture containing tartrazine in order to check its purity. Go to your workstation to perform the manipulation.
The user must equip their PPE (Equipping PPE), then enter the laboratory. You will need to approach the fume cupboard, open it halfway (Using the Fume Hood) and observe the three graduated cylinders behind the chromatography tank.
These graduated cylinders each contain a different eluent, and the user must choose which one to use to perform the chromatography. If the user chooses the wrong eluent, the migration results will be different. To identify which cylinder contains which eluent, the user can see the name of the product by moving their hand towards it.
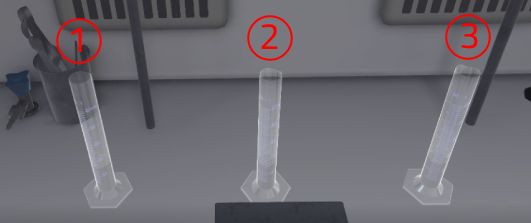
-
Cyclohexane: Wrong answer
-
Ethyl acetate: Wrong answer
-
Mixture of cyclohexane and ethyl acetate (50:50): Correct answer
The chosen eluent should be emptied into the chromatography tank (Liquid transfer) and the tank closed so that the vapours saturate the tank.
Next, the user must grab the pencil and move it towards the chromatography plate to draw several features on it.
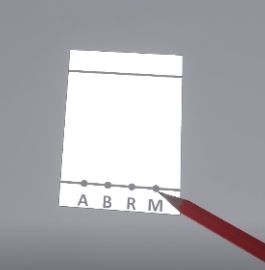
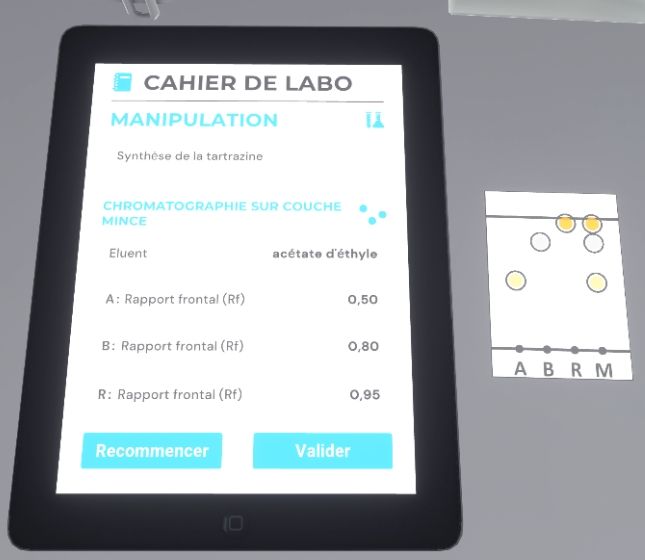
The user should draw in order: . The start line (the bottom one) . The finish line = migration front (the top one) . The positions of the deposits (A, B, R and M)
The user can see 3 test tubes on the left. These vials contain the products to be tested on the chromatography plate.
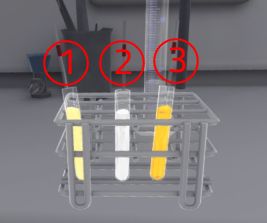
-
A: 4-hydrazino benzenesulphonic acid
-
B: 2,2,3,3-tetrahydroxysuccinic acid
-
A: Crude product tartrazine
The user will pick up the pipette dipped in the first solution and place it on position A to make a deposit. They will do the same for the second solution on spot B and the third solution on spot R. On the fourth spot, the user must deposit a drop of each product A, B, and R (this manipulation is called co-spot).
Possible mistakes:
-
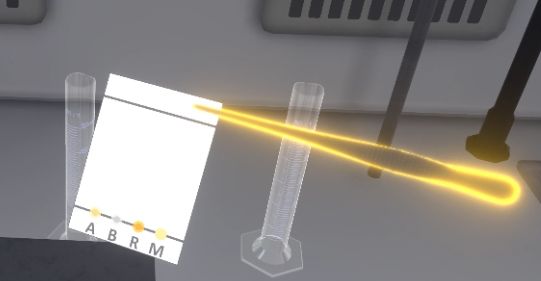
The tip of the pipette must be placed vertically on the corresponding circle. If the angle between the pipette and the plate is too small, the user will make an error.
-
Similarly, one pipette per solution should be used to make deposits.
-
Do not reverse the products on the spots (e.g. product A on spot B)
Using the forceps, the user will pick up the plate from above the migration front. You must grab the tongs, bring them close to the plate, then press the interaction button on the controller so that the forceps grab the plate. To release the plate, release the interaction button. Then place the plate vertically in the tank and close the tank.
|
Important
|
If the user grabs the plate with their hands, it is a mistake. |
The user will click on the icon next to the tank to begin the timelapse.
After a fade to black, the rise of the solvent front can be observed. The eluent has reached the finish line (the plate has turned grey) and the deposits have moved.
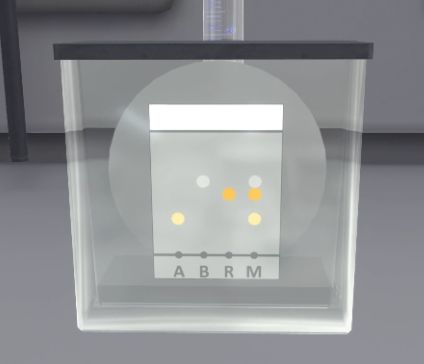
The user must retrieve the plate (with the forceps) and shake it gently until it dries (it changes color).
The user must grab the pencil and move it towards the chromatography plate to circle the spots and identify them. The front ratio of each migration is written on the tablet.
Finally, the user will look at their lab notebook. If they are satisfied with the result, they must complete the exercise by exiting the lab, otherwise click on the button to start again.
Once the steps have been completed, the user will be teleported to the reception area in front of the assessment screen.
5.5.3. Evaluation criteria for the exercise
![]() Duration: Time taken by the user to finish the exercise.
Duration: Time taken by the user to finish the exercise.
![]() Protection: Wearing the correct PPE equipment.
Protection: Wearing the correct PPE equipment.
![]() Analysis: Obtains the correct result for the experiment.
Analysis: Obtains the correct result for the experiment.
![]() Procedure: Follows the correct sequence of actions.
Procedure: Follows the correct sequence of actions.
![]() Autonomy: The score decreases with the number of helpers required. Only in advanced.
Autonomy: The score decreases with the number of helpers required. Only in advanced.
5.6. Column Chromatography
In this exercise, the user will perform column chromatography to separate a product into its unique components and then identify the collected components. Depending on the chosen difficulty level, the objectives and aids vary.
5.6.1. Instructions
The procedure to follow is the same for the user, regardless of the chosen difficulty level. Only the aids are different.
-
Beginner: Instructions are detailed, and objects are clearly highlighted at each step to facilitate understanding.
-
Advanced: Instructions remain the same, but objects are no longer automatically highlighted. However, the user can request assistance at any time to highlight the necessary objects.
-
Expert: Instructions are simplified for greater user autonomy. No help is available.
![]() In Advanced Mode, on the companion screen, the user can click this button to request help.
In Advanced Mode, on the companion screen, the user can click this button to request help.
5.6.2. Scenario Outline
The user starts the scenario with the following briefing:
You will be performing column chromatography to separate a product from the other components of a mixture. The product you are trying to recover has an Rf (Front-End Ratio) of 0.3. Go to your workstation to perform this procedure.
The user must put on their PPE (Personal Protective Equipment) (Equipping PPE), then enter the laboratory. They will have to approach the fume hood and open it halfway (Using the Fume Hood).
He must consult the thin-layer chromatography (TLC) plate of the product to be separated and choose the appropriate column to hang it on the grid. There are two columns: one thin and one thick. They must choose the thicker one. If they choose the wrong column, it is automatically replaced and the score will be affected.
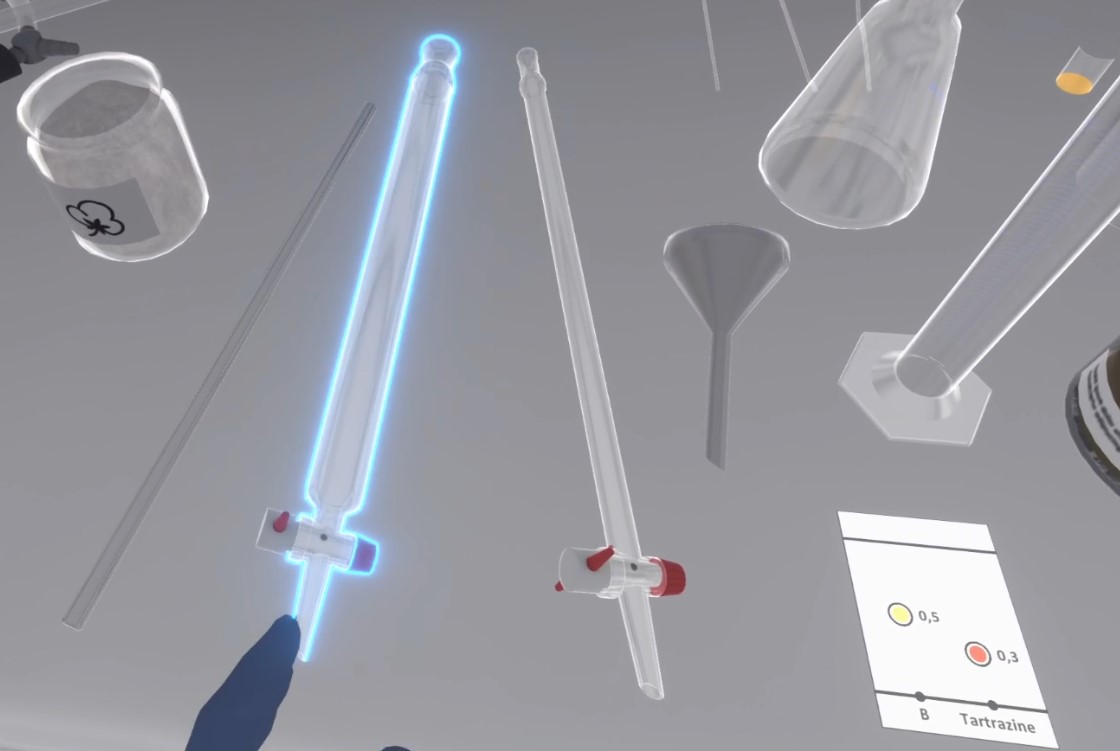
The user has a 50/50 chance that their column will not be straight when they place it on the grid, which can cause errors later. To correct this, they must bring their hand close to the column and press the action button to straighten it.
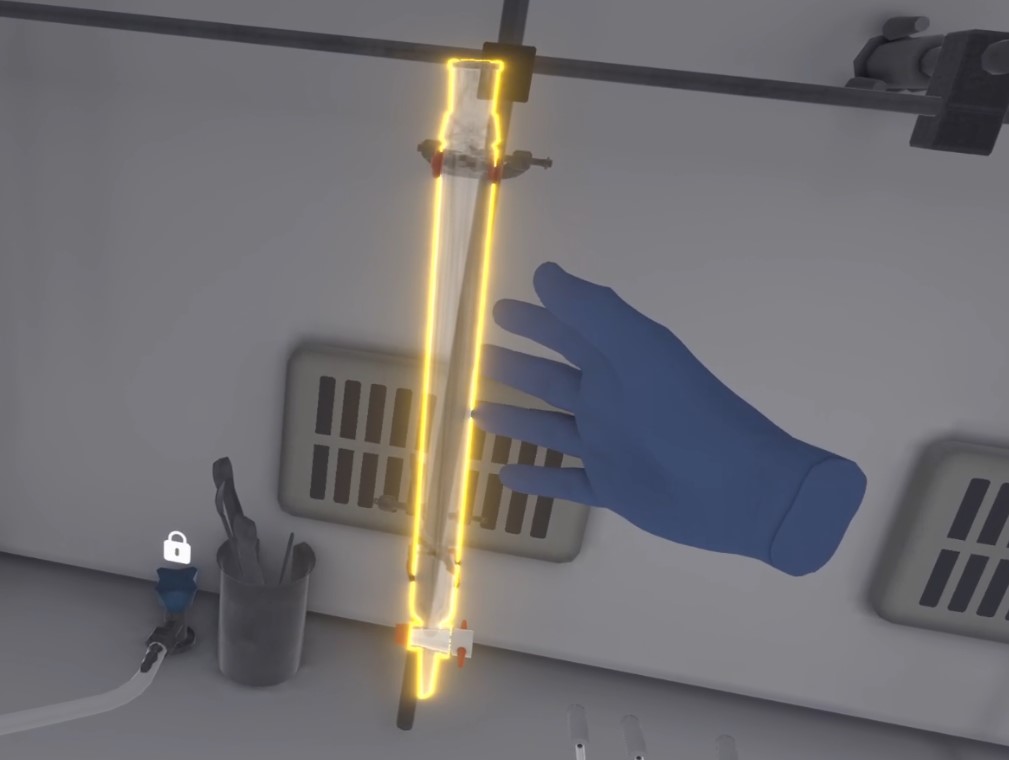

To prepare the column and prevent the stationary phase from leaking out, the user must first place a piece of cotton in the column. They can find cotton in a jar filled with it. Then, they must pack the cotton to the bottom of the column. They must then bring the glass rod close to the cotton and press the "action" button.

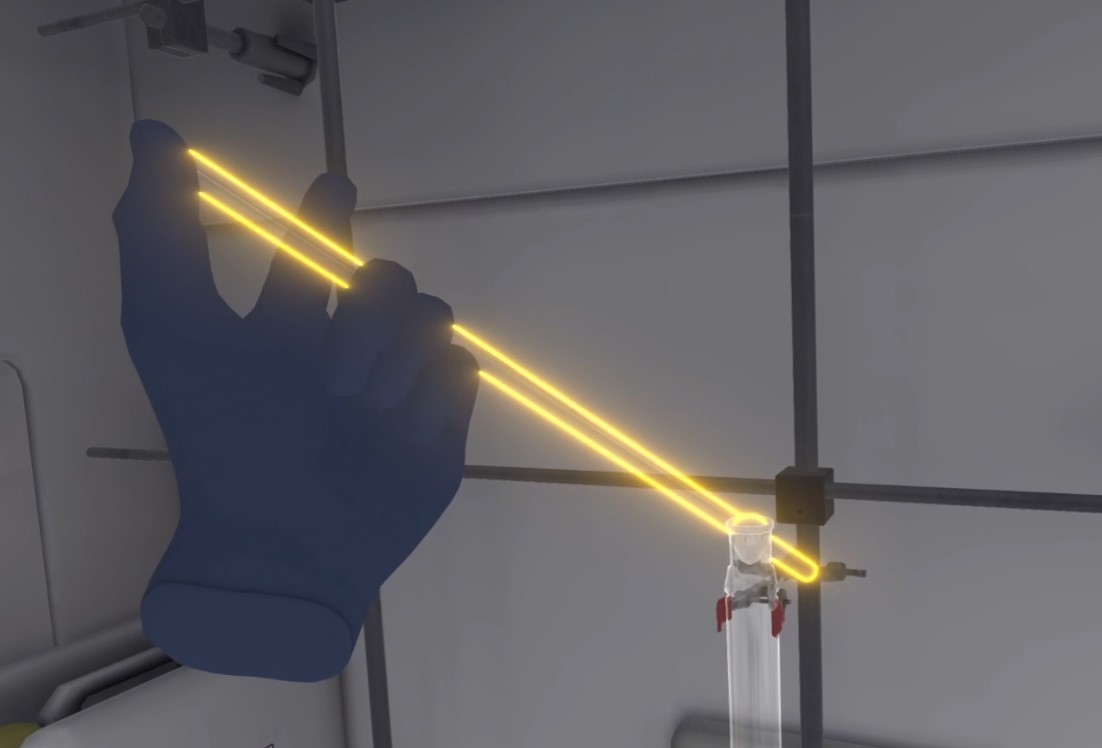
Then the user has to put either sand or eluent on the cotton (Product transfer).
If they choose sand, the user must place a plastic funnel on the column, fill a spatula with the sand, and pour it into the funnel.
If they chooses eluent, the user must take a Pasteur pipette, collect a little eluent in the graduated cylinder, and apply it to the cotton.
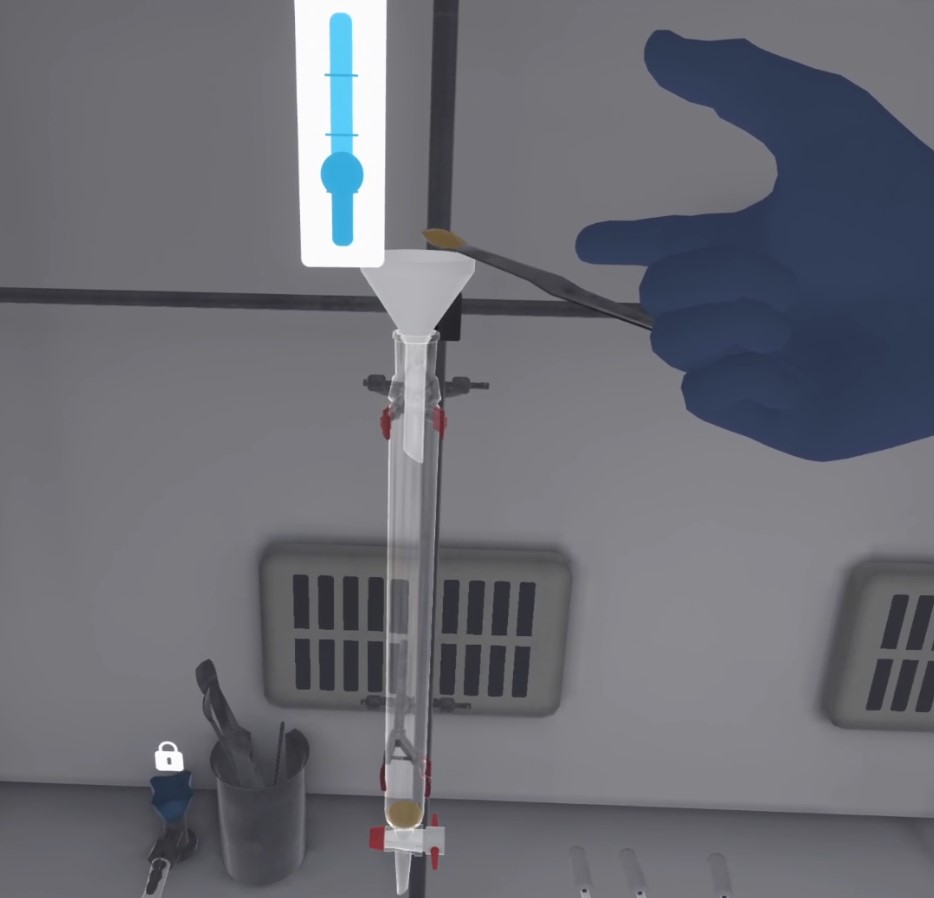

The user must then place the Erlenmeyer flask under the column to ensure that the contents of the column do not flow onto the work surface.
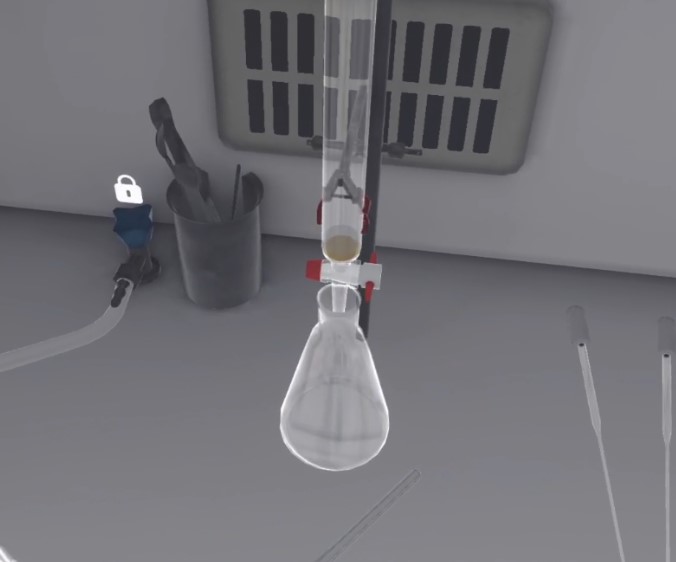
The stationary phase must be prepared by adding 25 to 35 ml of eluent (from the graduated cylinder) to the silica already in the beaker.
Then, the mixture must be mixed using a glass rod to obtain silica gel (the product changes color). Next, the user must place a glass funnel over the column and pour in the prepared silica gel.
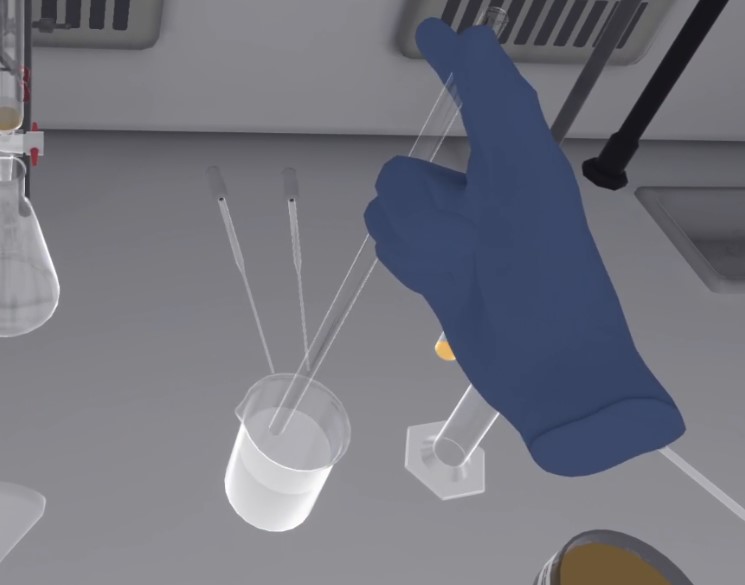
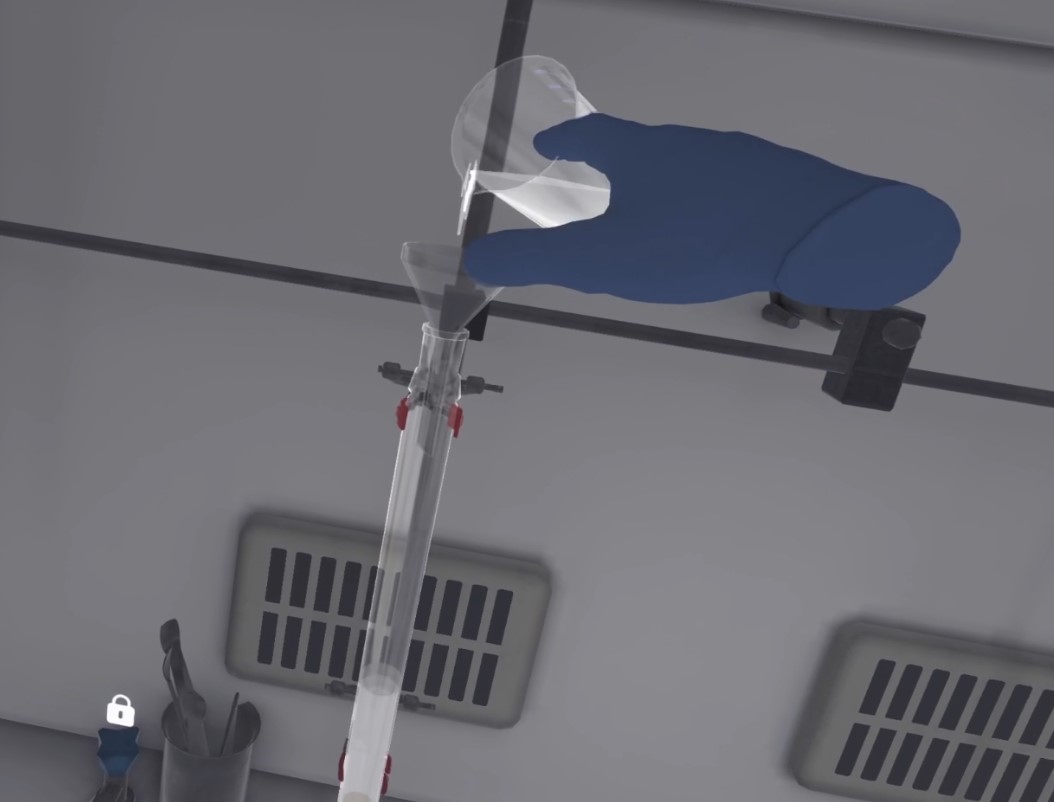
Now the user needs to pack the silica gel, removing the excess eluent.
They can then open the column’s tap; liquid flows very slowly when the tap is open.
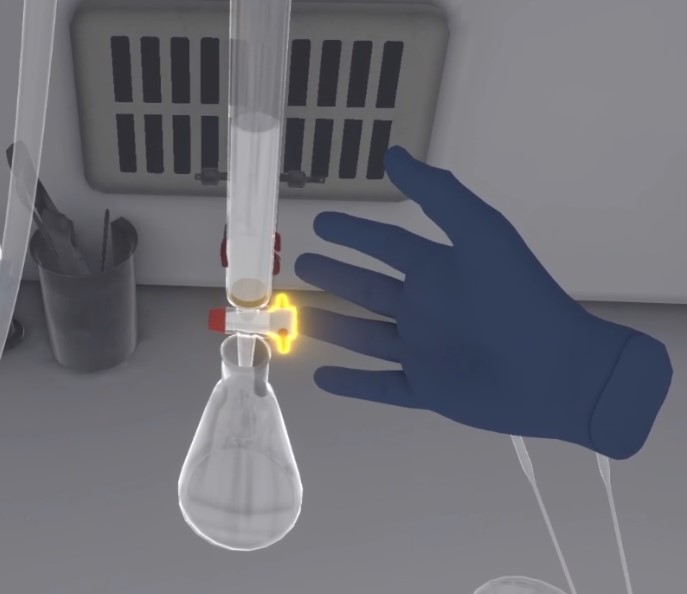
The user must always remain vigilant to avoid drying out the silica gel: there must always be eluent in the column. If the column is dried out, it is an error and the silica gel resets to avoid having to repeat the exercise.
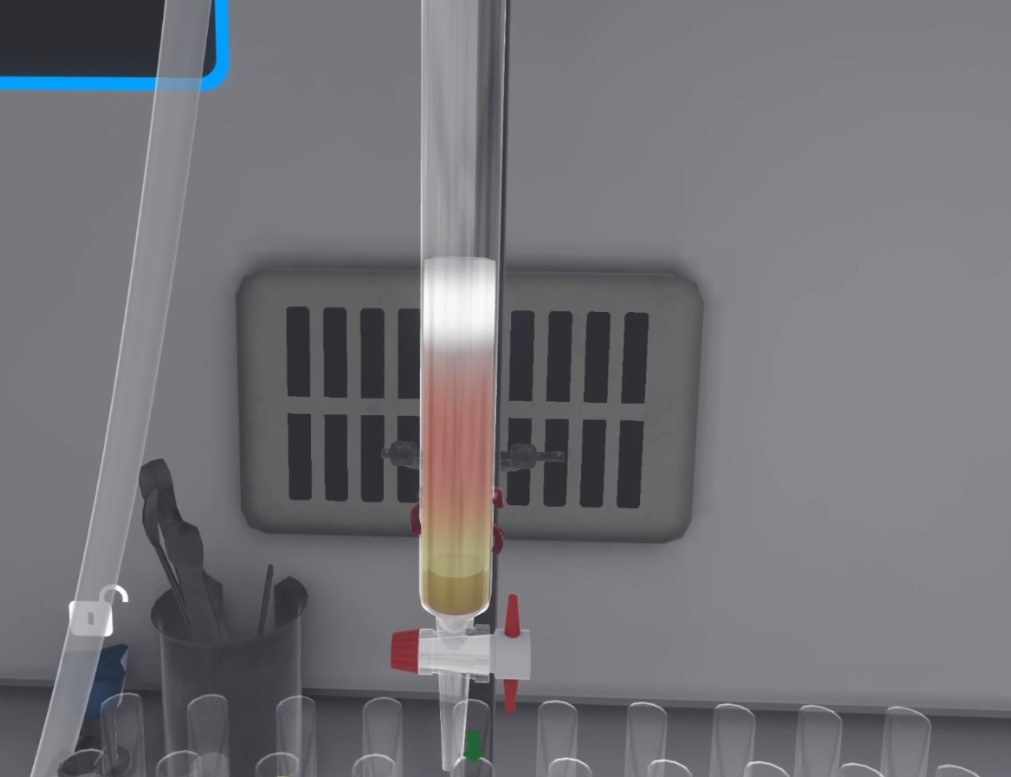
To speed up the flow, the column must be pressurized. First, the user must connect the compressed air hose to the column head and open the blue compressed air valve. Next, they must place the column head on the column, then press the "action" button on the column head to close the valve with their finger.
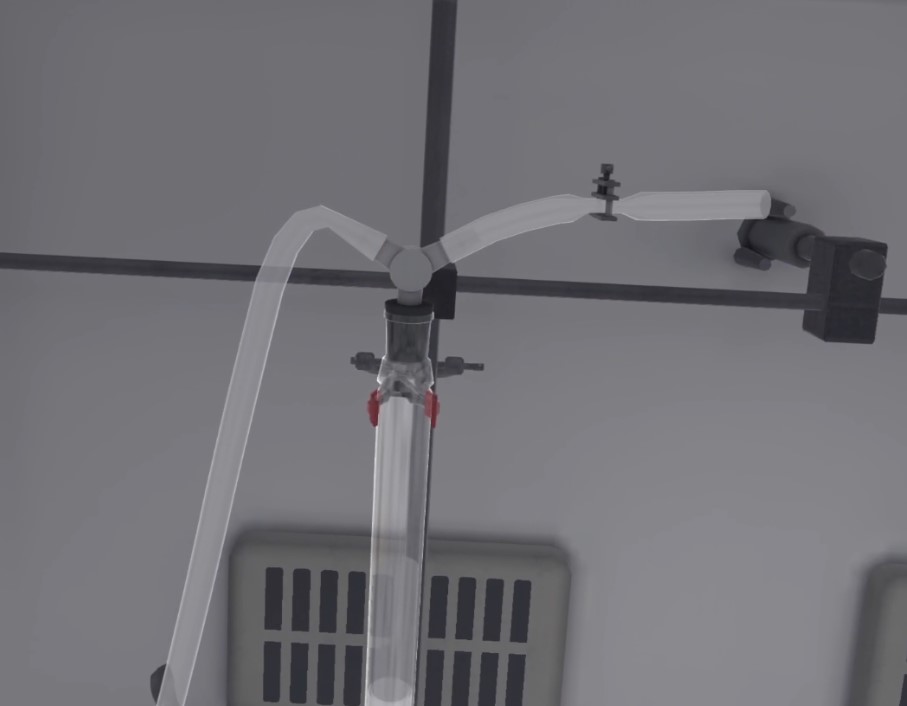
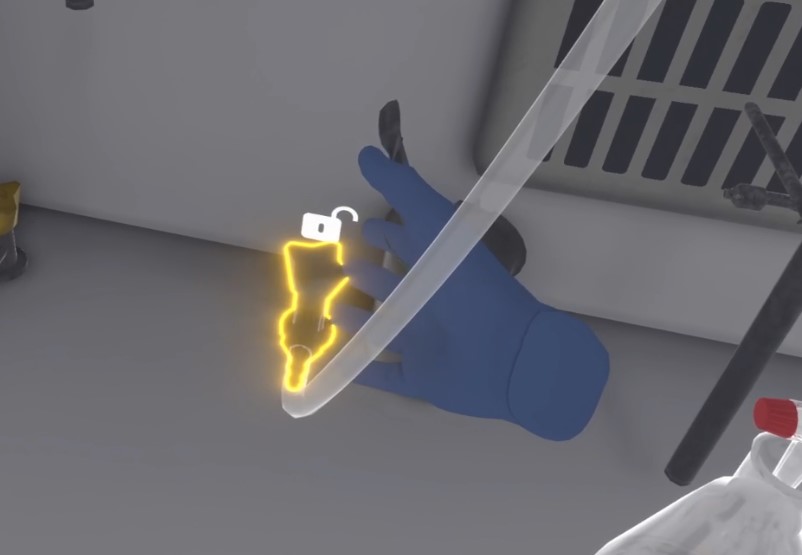
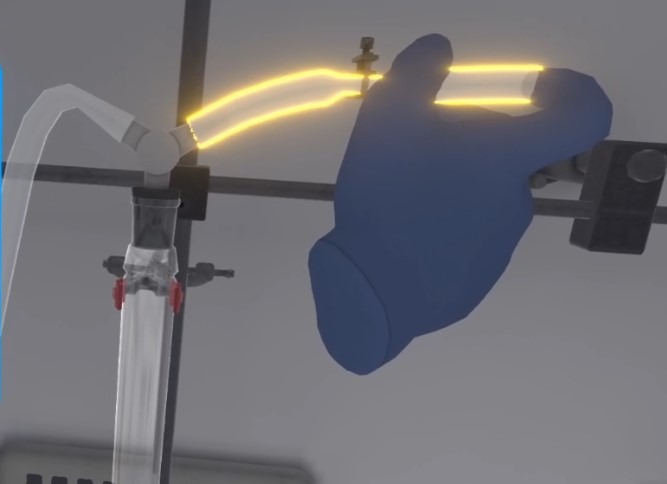
If the user forgets to open the column tap, then the column is over-pressurized and the user will see their score affected.
The user must maintain pressure on the column to compact the silica gel more quickly, leaving a little eluent (at the level of the gel), without drying out the column.

Once this is done, the user is advised to close the column stopcock to avoid inadvertently drying the column.
Now the product must be added. A clean Pasteur pipette will be used to collect all the product to be separated.
Please note that while a pipette contains liquid, it must always remain upright to prevent liquid from entering the pipette bulb.
Using the pipette, the user must delicately deposit the product to be separated in a circular motion, as close as possible to the gel.
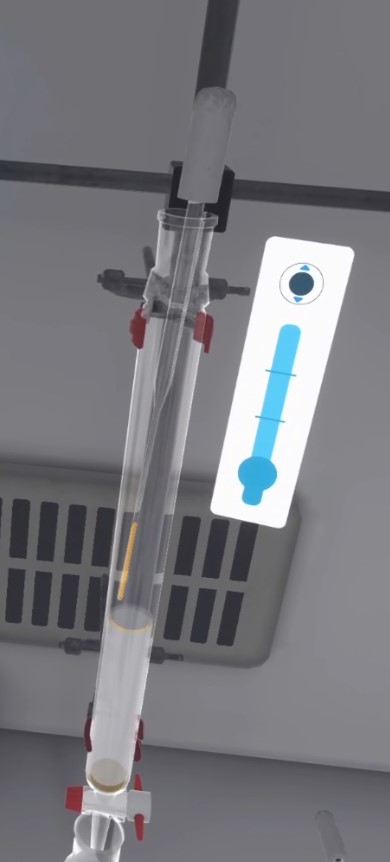
Then the user must open the tap to allow the product to penetrate 2 mm into the silica gel.
Next, the user must use another Pasteur pipette to take a large sample of eluent and gently place it on the product ring, reproducing the same circular movement. This step is repeated until there is approximately 2 cm of eluent (the equivalent of 2 full pipettes).
The valve must be opened again, then the column pressurized to allow the eluent to penetrate 0.5 cm into the silica gel.
Then, the user must place a plastic funnel on the column and pour at least 1 cm of sand using a spatula (the equivalent of two full spatulas). This step makes it easier to add eluent later by pouring with a glass funnel rather than a pipette, since the layer of sand protects the product film.
The user can now top up the eluent level to just below the column head, either using a pipette or pouring with a glass funnel.
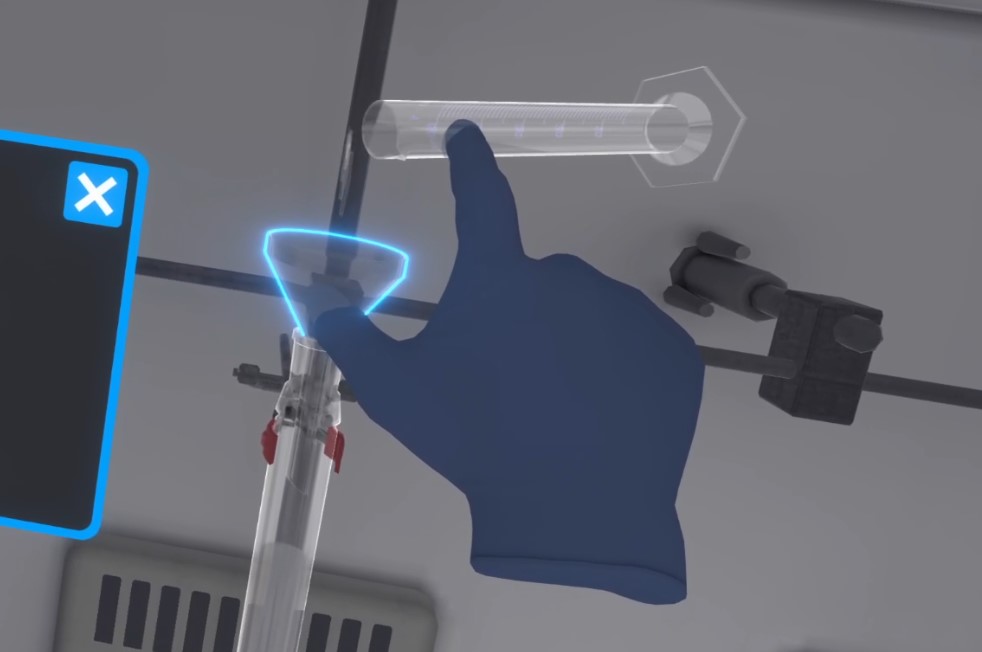
The user then moves on to the component collection stage. But before that, the user can evacuate the dead volume to avoid filling graduated tubes unnecessarily, but this is optional. If they wish to do so, they must evacuate the contents of the column into the Erlenmeyer flask, until the product components are well advanced in the silica gel.
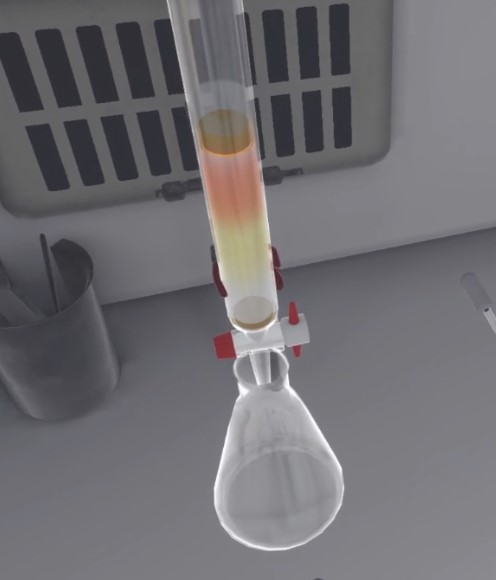
To collect the components, the user must place the test tube rack under the column and ensure that tube A1 is directly underneath (an arrow appears above the tube directly under the column). They must keep the column under pressure to fill the test tube 3/4 full. The test tubes must not be filled to the brim.
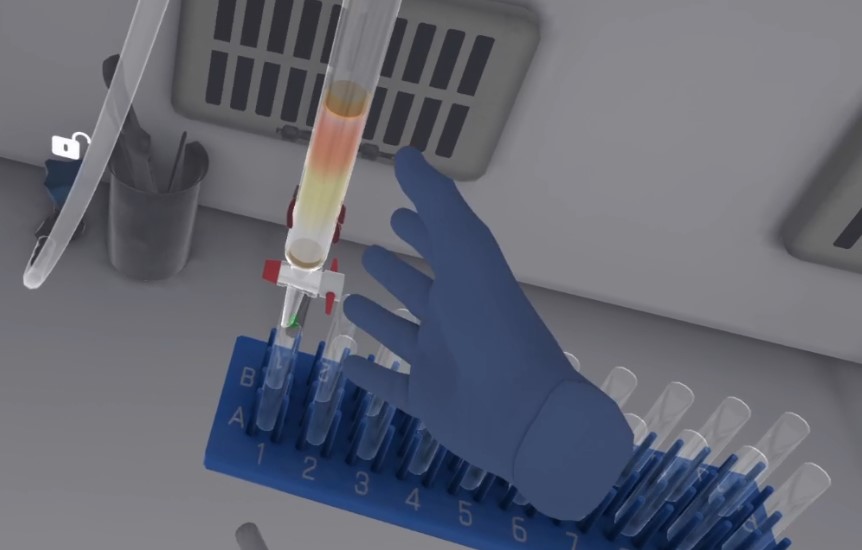
They must continue to fill the other tubes, from A2 to A10 and then from B10 to B1, until the product is completely evacuated. They will have to regularly reload the column with eluent.
|
Important
|
When refilling the column with eluent, the user must be careful and aim the column correctly. It is quite possible to accidentally fill the tubes with pure eluent, which is a mistake. |
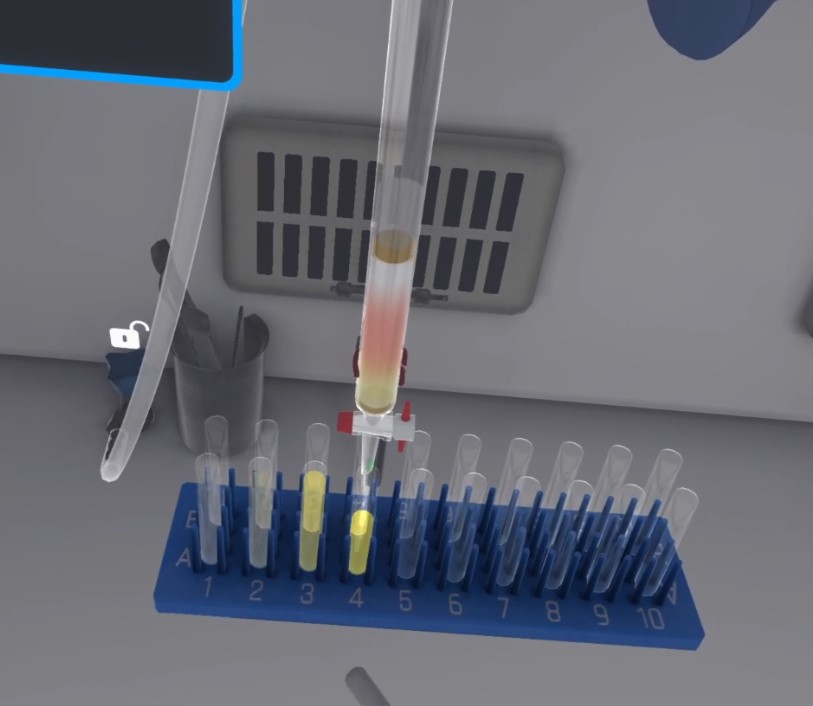
After a few tubes are three-quarters full, the user can click "wait" on the instruction screen to pass the time. The screen fades to black, the equipment is put away, and the user is presented with a properly filled test tube rack.
Using the chromatography plates, the user must place the tubes containing pure product B in rack F1 (left) and the tubes containing pure tartrazine in rack F2 (right). Tubes A3, A4, and A5 go into F1, and B8, B9, and B10 go into F2.
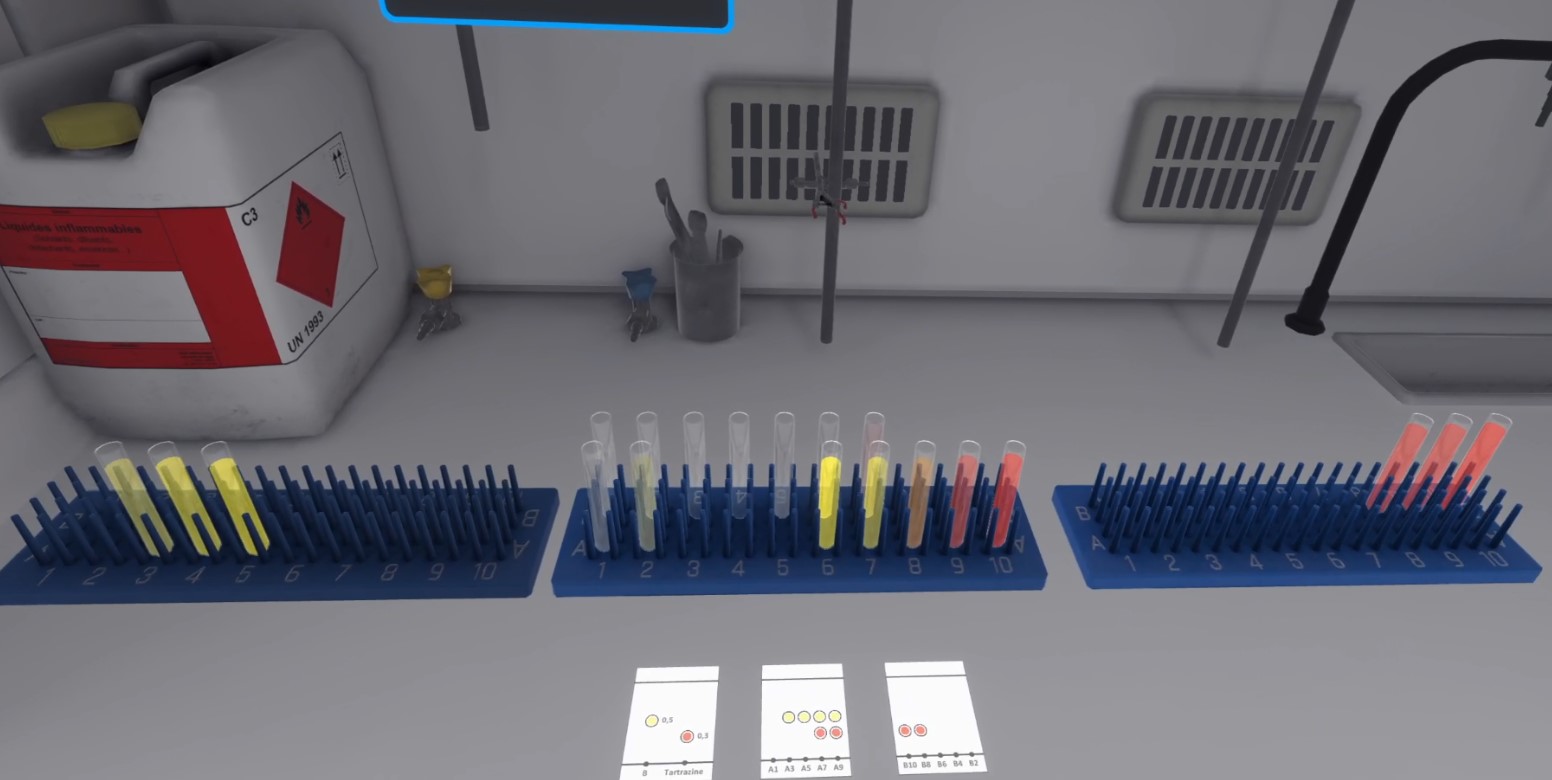
When finished, the user can click on the "validate" button to end the exercise and they will be teleported to the lobby in front of the scoring screen.
5.6.3. Exercise Evaluation Criteria
![]() Duration: Time taken by the user to complete the exercise.
Duration: Time taken by the user to complete the exercise.
![]() Protection: Correctly utilizes PPE equipment.
Protection: Correctly utilizes PPE equipment.
![]() Analysis: Obtains the correct result of the experiment.
Analysis: Obtains the correct result of the experiment.
![]() Procedure: Follows the correct sequence of actions.
Procedure: Follows the correct sequence of actions.
![]() Autonomy: The score decreases depending on the number of times help was requested. Only in Advanced Mode.
Autonomy: The score decreases depending on the number of times help was requested. Only in Advanced Mode.
5.7. Liquid/liquid extraction with pilot
This exercise requires the user to perform a countercurrent liquid-liquid extraction. Depending on the chosen difficulty level, the objectives and aids vary.
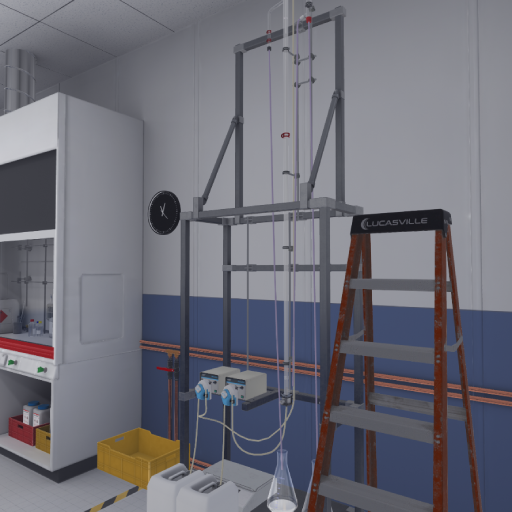
5.7.1. Instructions
The procedure is the same for the user, regardless of the difficulty level chosen. Only the help options are different.
-
Beginner: The instructions are detailed and the objects are clearly highlighted at each step to facilitate understanding.
-
Advanced: The instructions remain the same, but the objects are no longer automatically highlighted. However, the user can request assistance at any time to highlight the necessary objects.
-
Expert: The instructions are simplified for greater user autonomy. No help is available.
![]() In Advanced Mode, on the companion screen, the user can click this button to request help.
In Advanced Mode, on the companion screen, the user can click this button to request help.
5.7.2. Scenario Outline
Preparation and Entry into the Laboratory
The user starts the scenario with the following briefing:
You will perform a countercurrent liquid-liquid extraction. Acetic acid will be transferred from water to ethyl acetate.
Solution (heavy phase):
Water (diluent) 80% + Acetic acid (solute) 20%
Density: 1012 kg/m³
Solvent (light phase):
Pure ethyl acetate (solvent)
Density: 902 kg/m³
This briefing becomes less detailed as the difficulty increases.
The user must put on their PPE (Personal Protective Equipment) (Equipping PPE), then enter the "Process Engineering and Analytical Chemistry" laboratory at the end of the corridor.
Tour of the Device
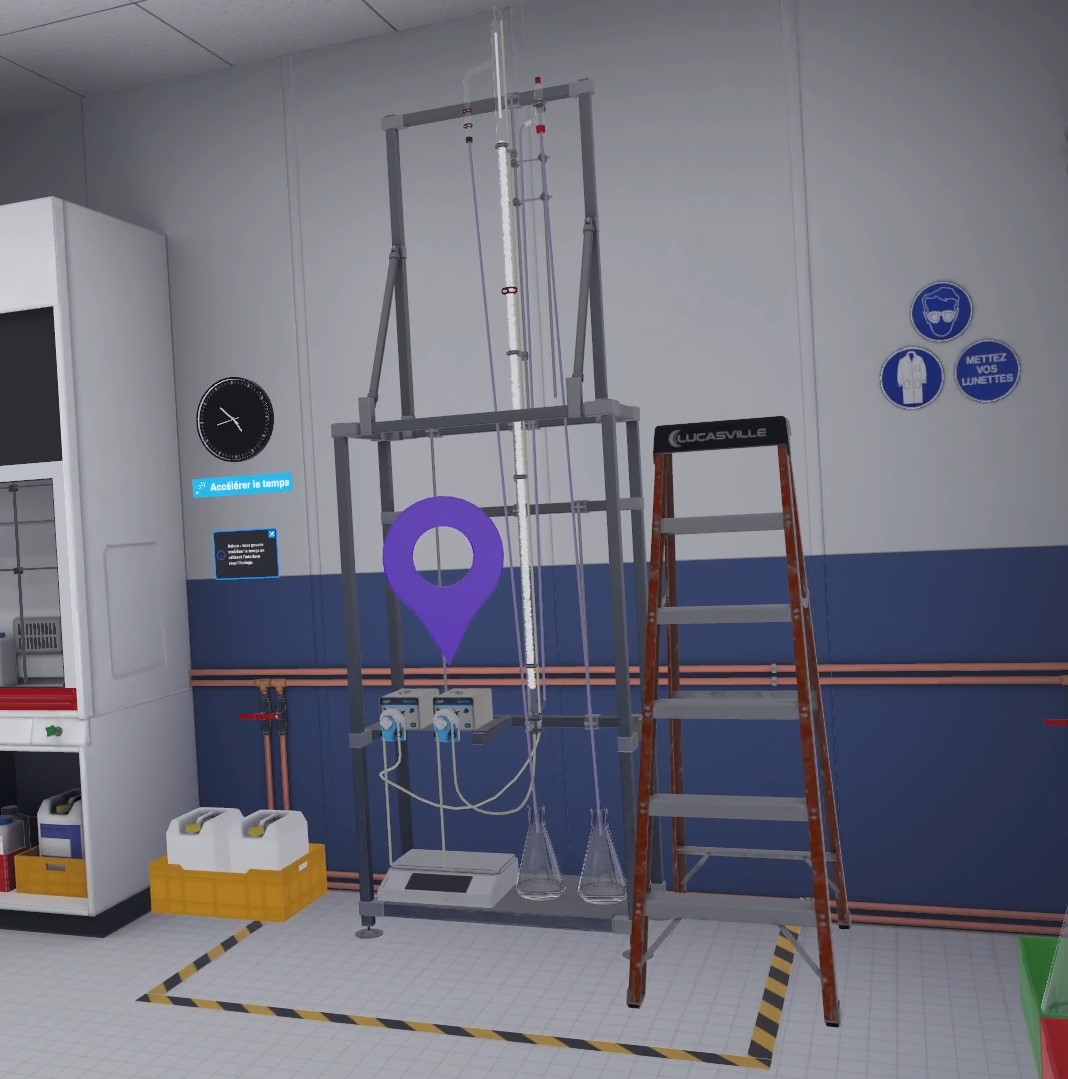
The user approaches the liquid-liquid extraction pilot. They are asked to observe the pilot and the various pipes, then click "I observed" in the interface on their arm to continue.
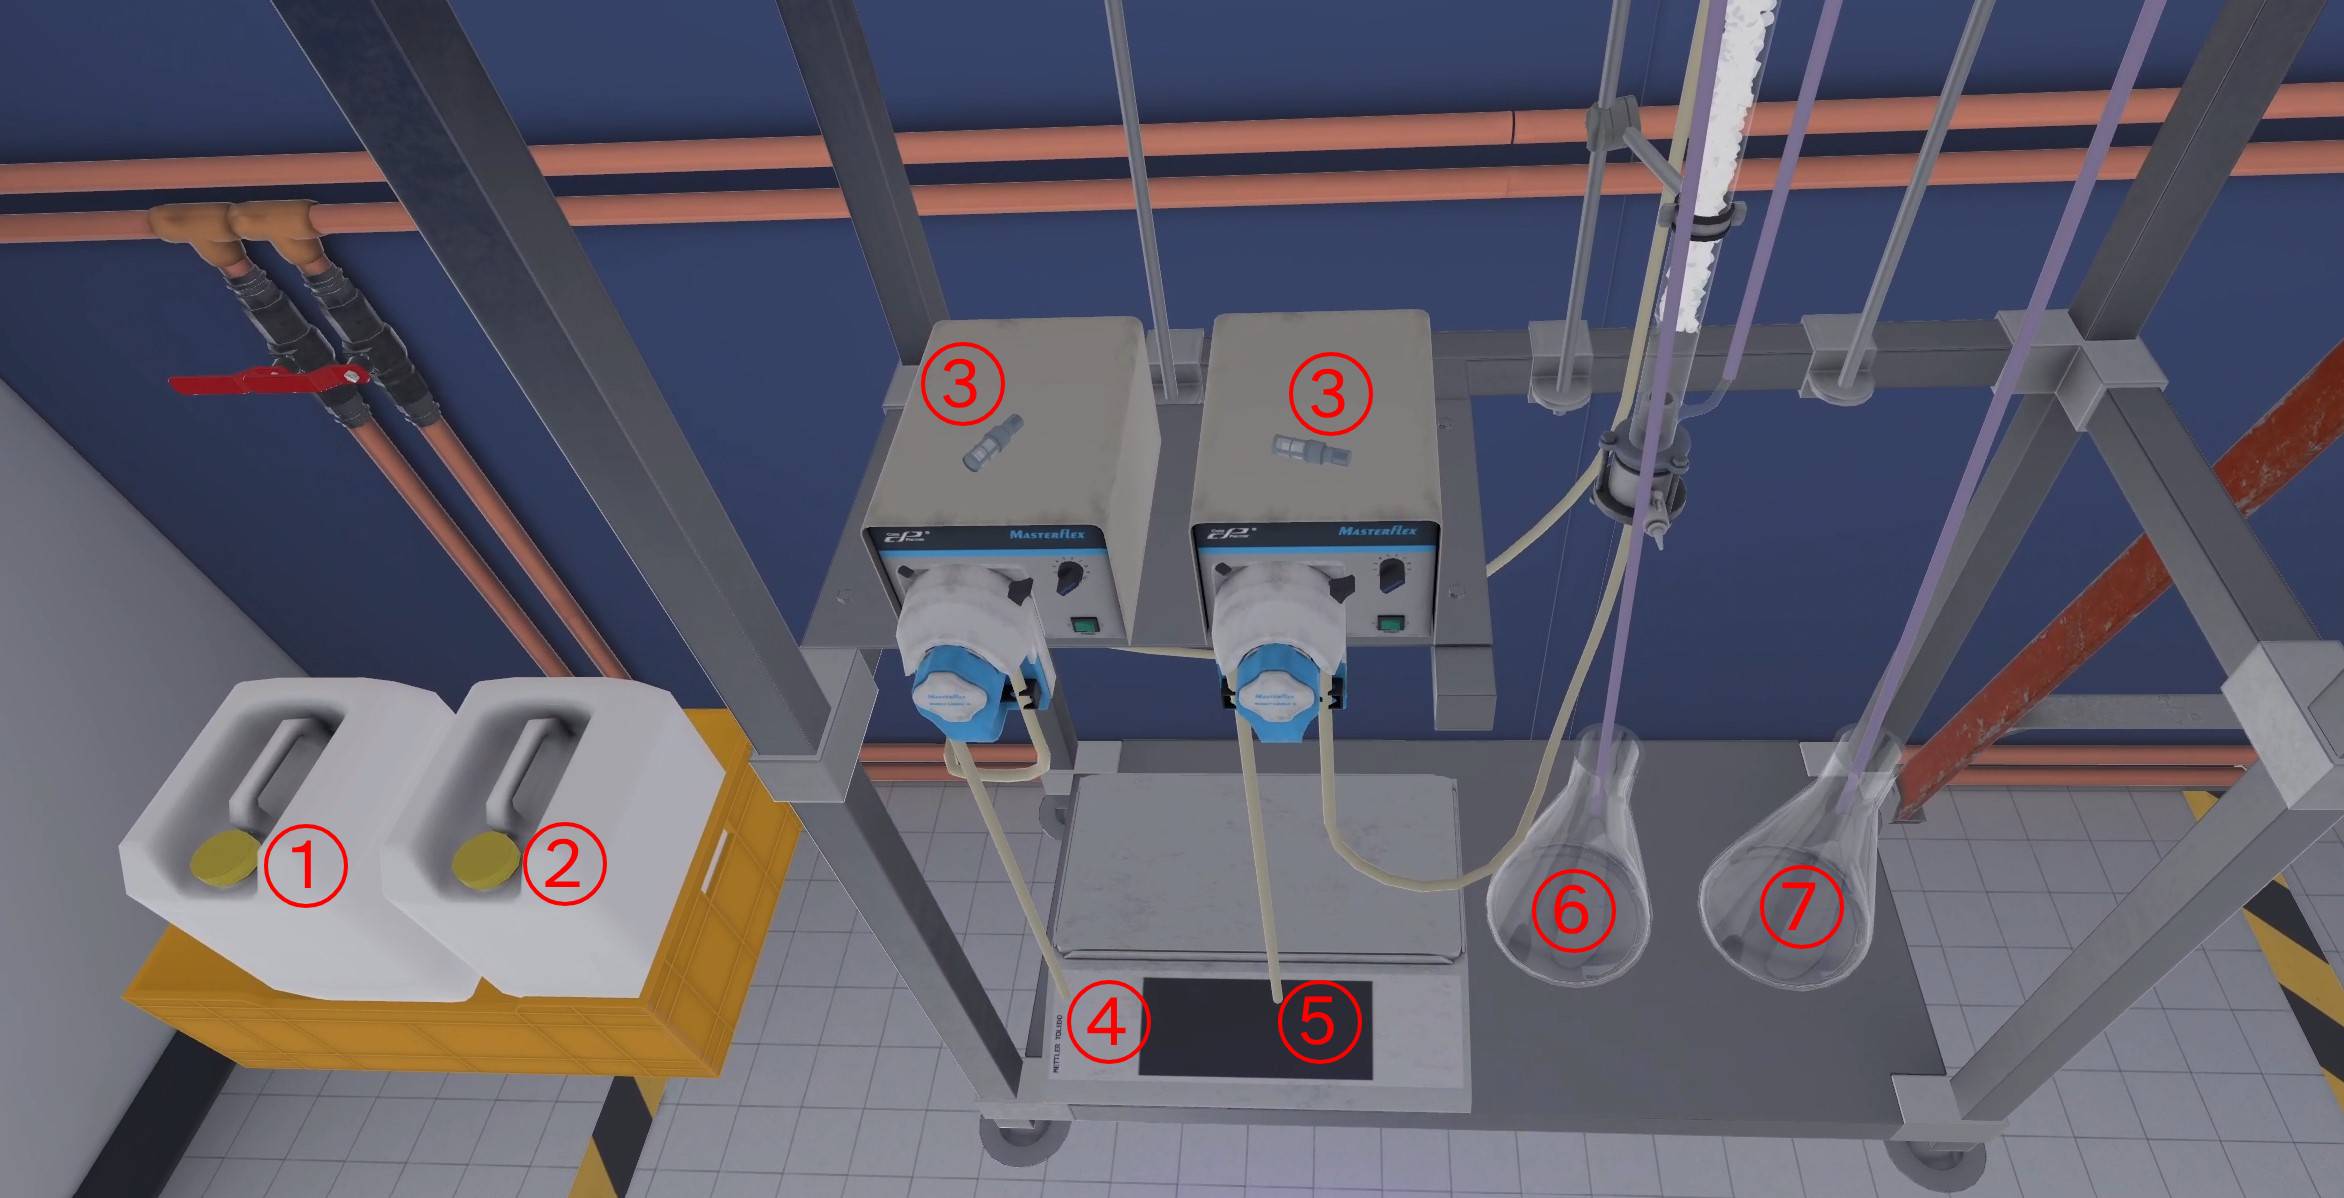
-
Container containing the mixture of water (diluent) + acetic acid (solute): Heavy phase
-
Container of pure ethyl acetate (solvent): Light phase
-
Strainers
-
Heavy phase inlet pipe
-
Light phase inlet pipe
-
Extract outlet
-
Raftine outlet
Setting up the elements
The user installs a strainer at the end of each pump supply pipe (light and heavy phases).
Then they place the container of pure ethyl acetate (solvent), which will be connected to the light phase, at the foot of the pilot. They do the same for the container containing the mixture of water (diluent) and acetic acid (solute), which will be connected to the heavy phase.
Then they open both containers.
Connecting the Supply Pipes
The user inserts the heavy phase feed tube (left) into the corresponding container. They do the same for the light phase tube (right).
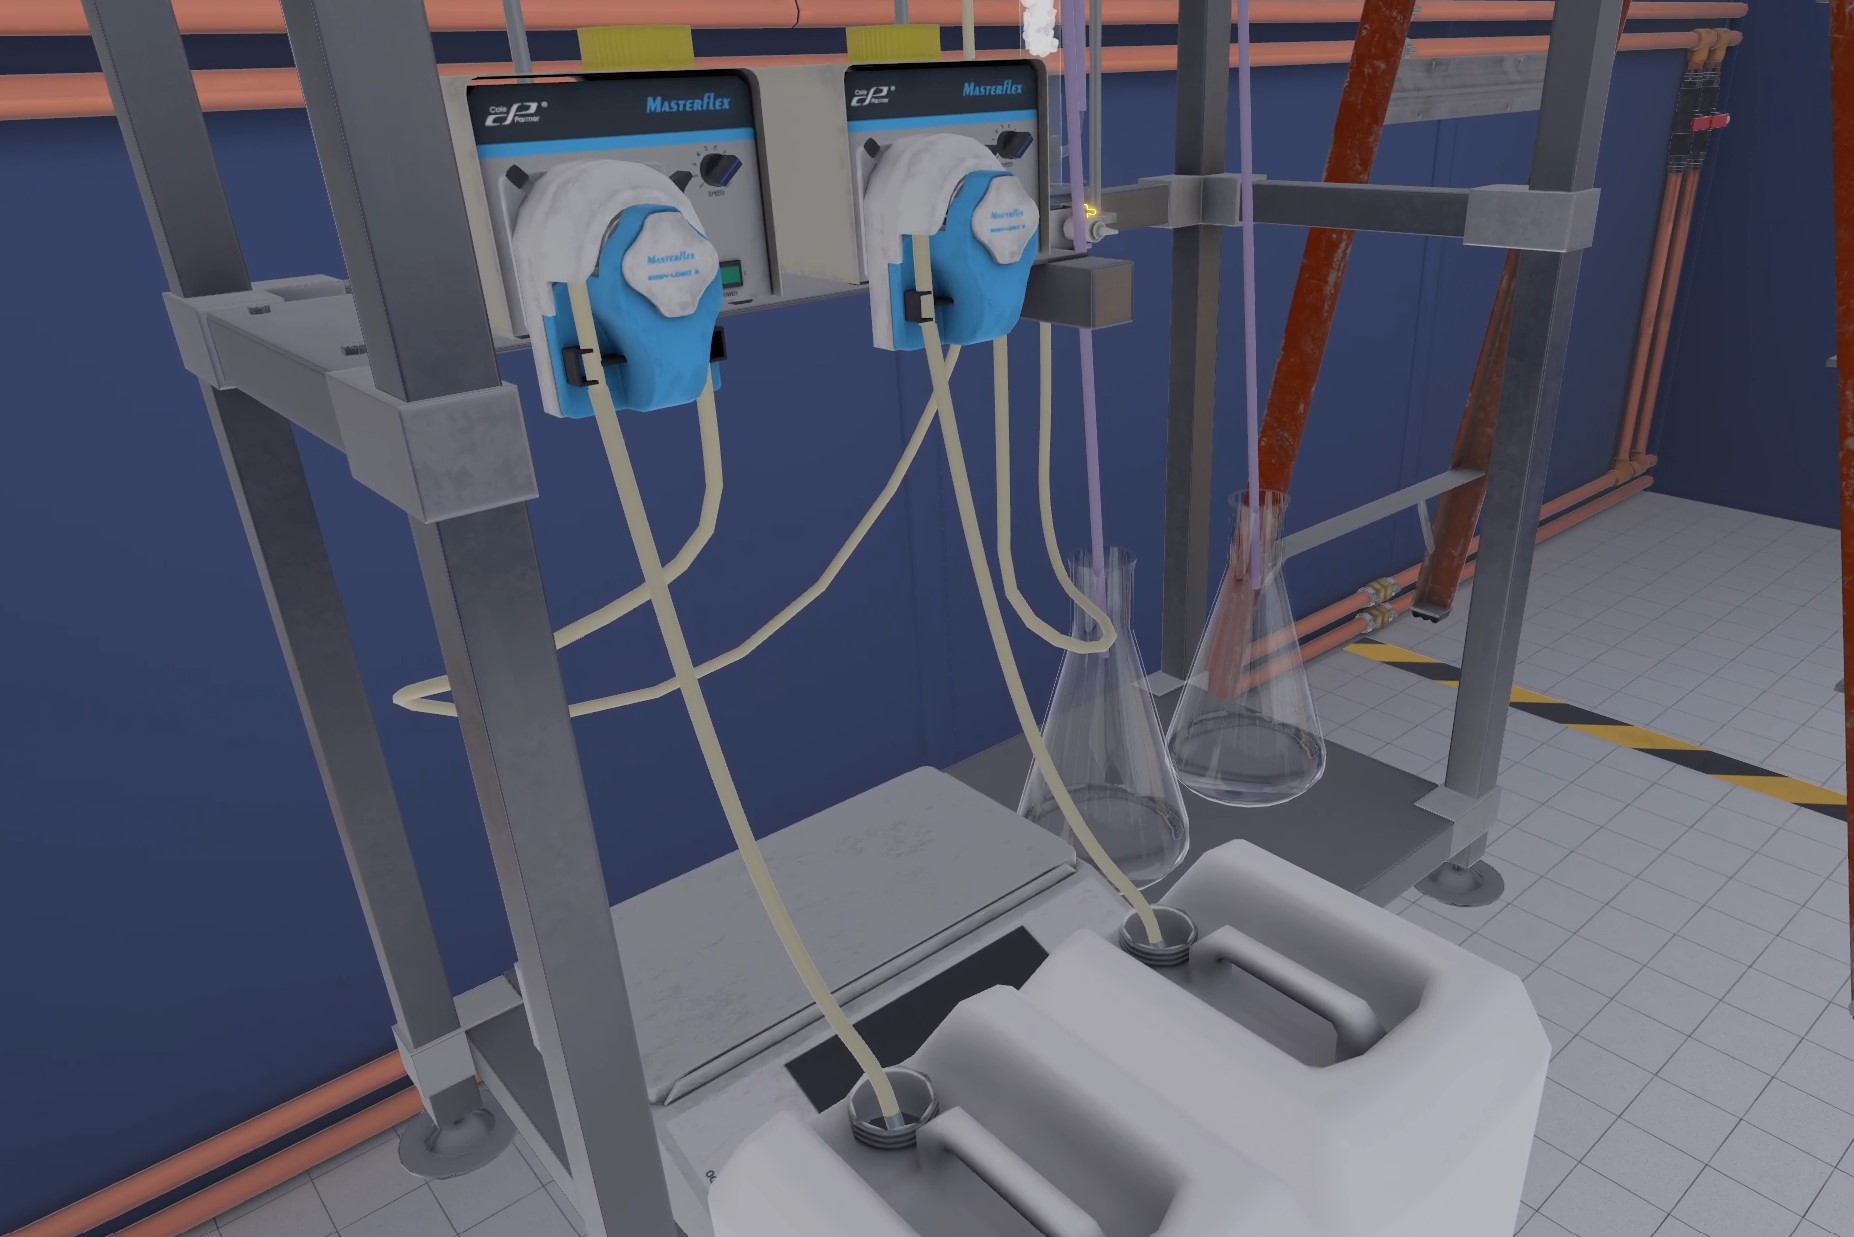
The user must also close the drain valve at the bottom of the column to prevent premature drainage.
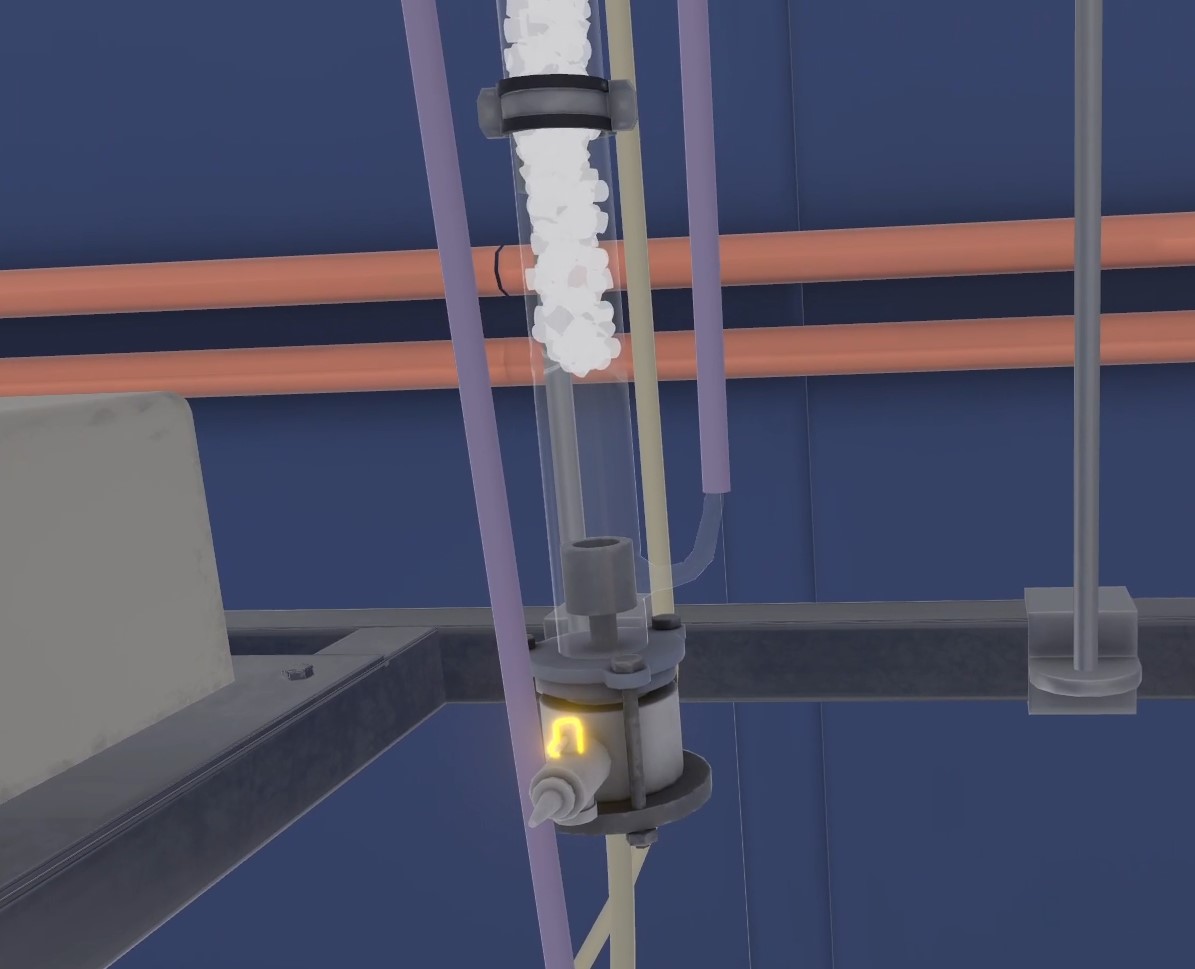
If the tap has been left open and there is liquid in the column, it will leak. First, the user must close the tap, then wipe up the puddle on the floor with paper towels. The paper towels should be disposed of in the trash.
Filling with the light phase
The user activates the light phase peristaltic pump by pressing the power button. They then set the flow rate to maximum (10) by turning the dial. To do this, they must press the interaction button next to the dial and rotate their wrist to change the values.
They wait until the column reaches a height of about 40 cm.
At any time, the user can speed up time by clicking on the “Speed Up Time” button on the clock on the wall, which is useful for limiting waiting time. Time automatically returns to normal as soon as a new instruction begins.

Once the correct level has been reached, the user reduces the flow to a minimum (to 1) and then stops the pump. It is important that they reduce the flow at this point, otherwise they risk restarting the pump later with too high a flow rate, which would be a mistake!
Filling with the heavy phase
The user starts the heavy phase peristaltic pump. They adjust the flow rate between 2 and 3 using the dial.
They wait for the column to fill to the top of the packing.
Restart of the light phase
The user restarts the light phase pump and sets the flow rate to 2 or 3. They then allow the column to fill completely.
Contact interface adjustment
The user climbs onto the ladder to visually identify the contact interface (represented by a line with bubbles) between the light phase and the heavy phase. They position the hydraulic guard under the light phase outlet and above the heavy phase supply. At the start of the exercise, the guard is positioned randomly, so it is important to check its location.
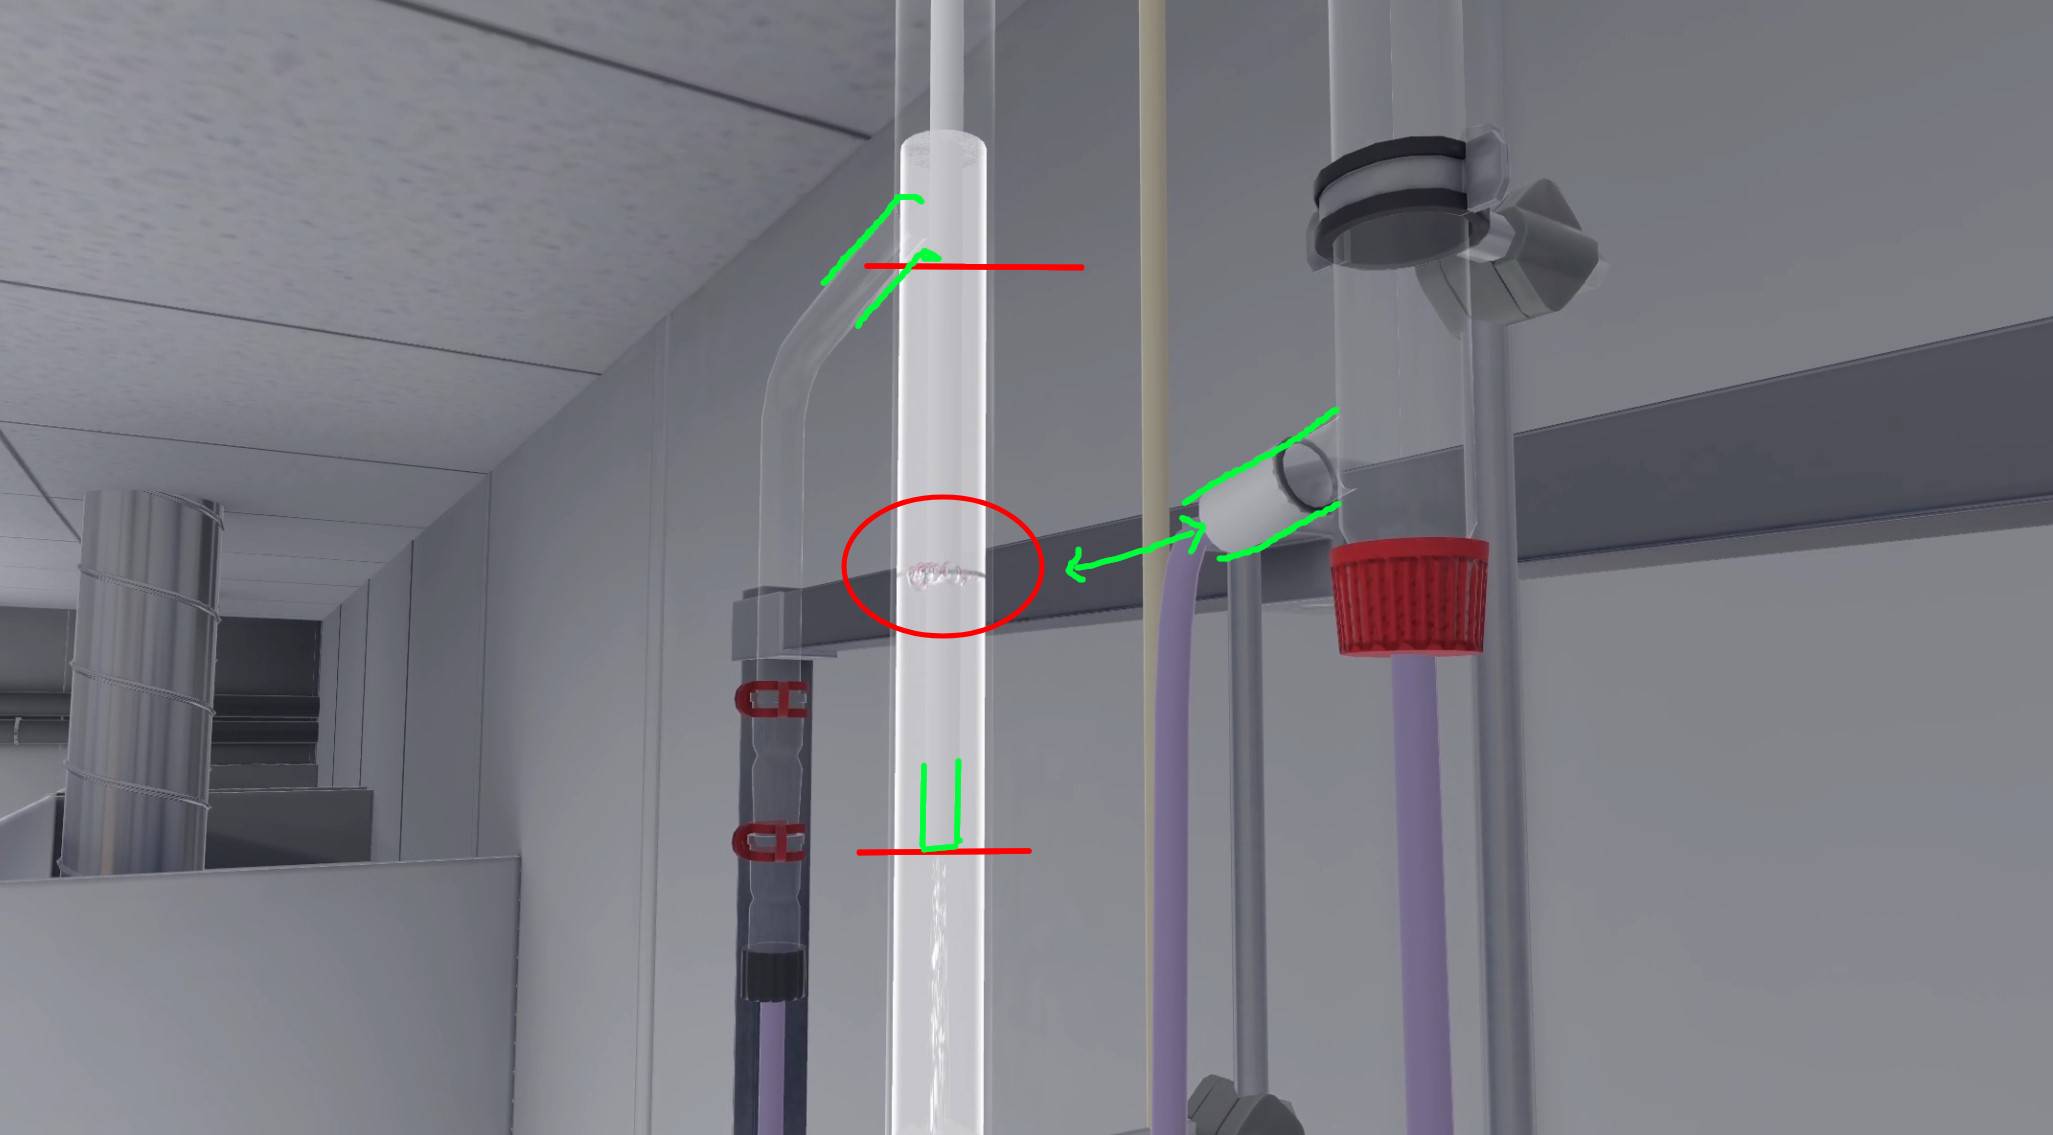
The contact interface moves to follow the entry of the pipe connected to the guard. It must be located between the two red bars (on the diagram) to achieve a good result.
If the guard is too low, the user can continue the exercise but their score will be reduced. If the guard is too high, it is a fatal error and the user is teleported to the lobby, ending the exercise.
Once correctly positioned, they confirm the action by clicking “Confirm” on the interface on their arm.
Sampling and Analysis
The user steps down from the ladder, then takes a sample of the extract and raffinate by clicking on “Take sample” via the interface that has appeared in front of the pilot.
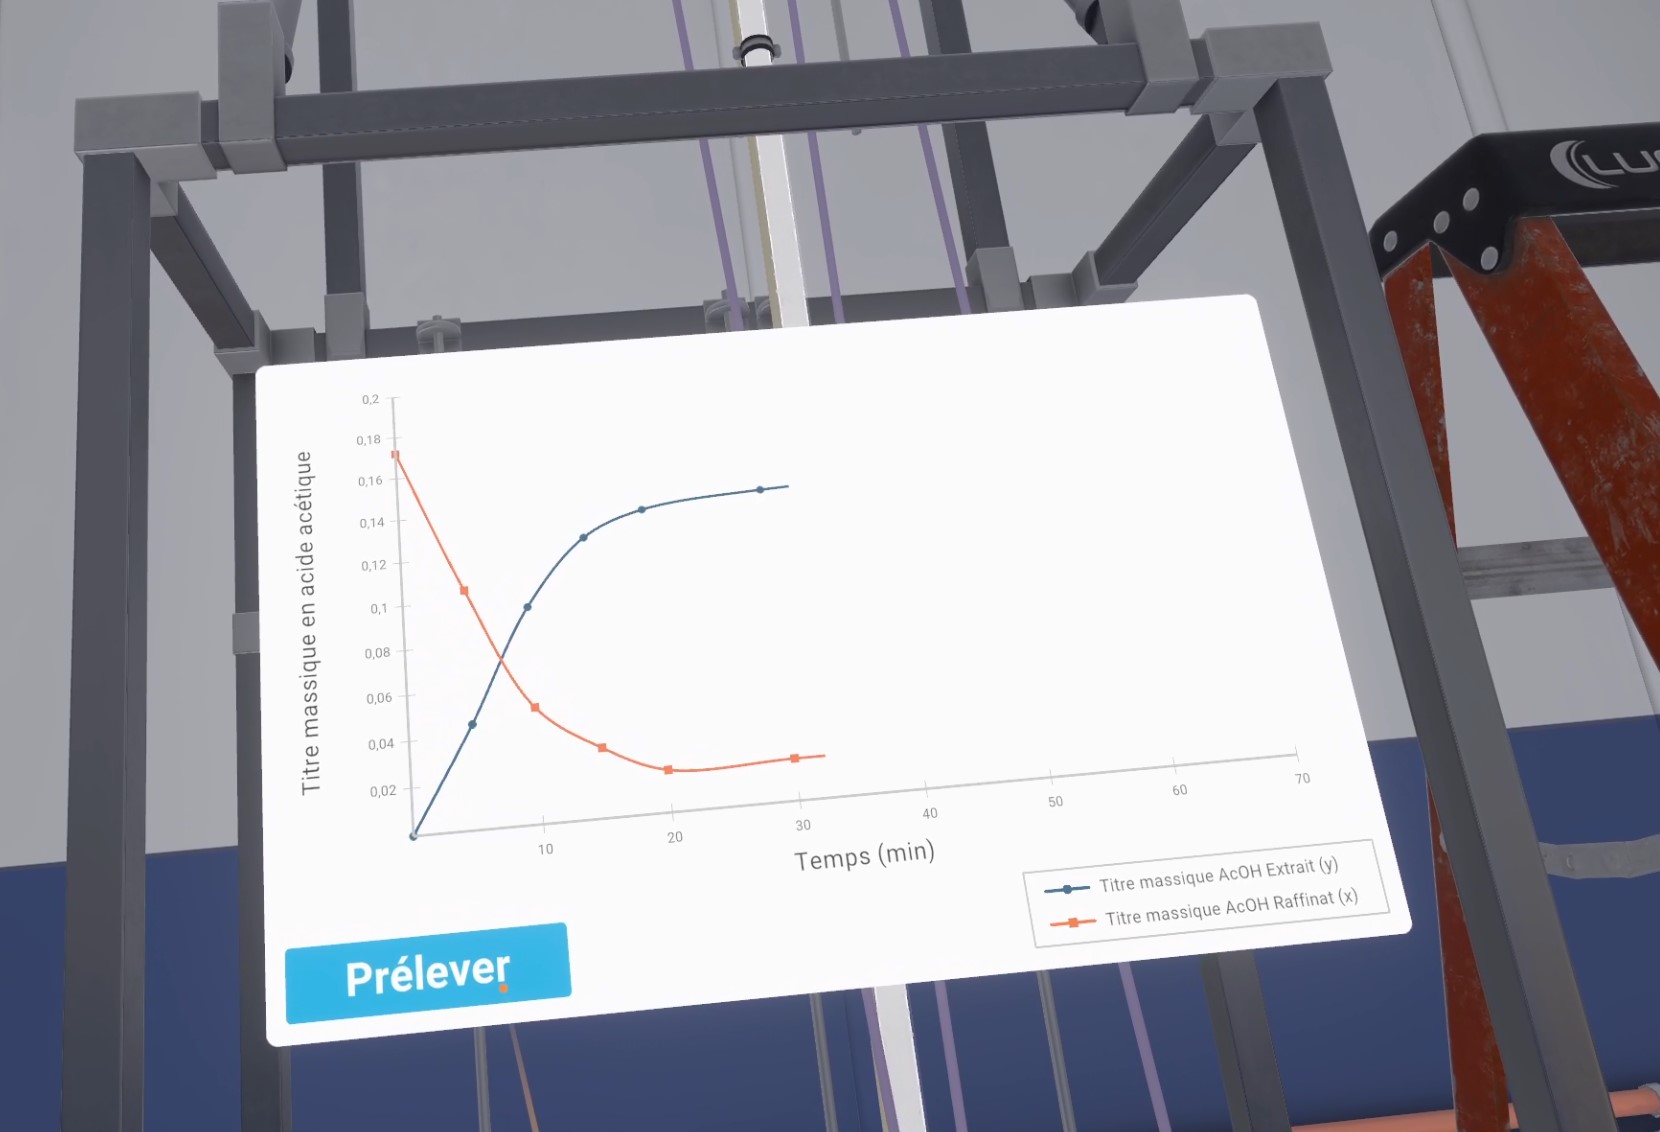
Curves representing the concentration of acetic acid in the extract and raffinate begin to be plotted. The learner must continue taking samples by clicking on “Take sample” to complete the curves.
Once the curves are finalized, they answer the questionnaire to analyze the results obtained.
Questionnaire
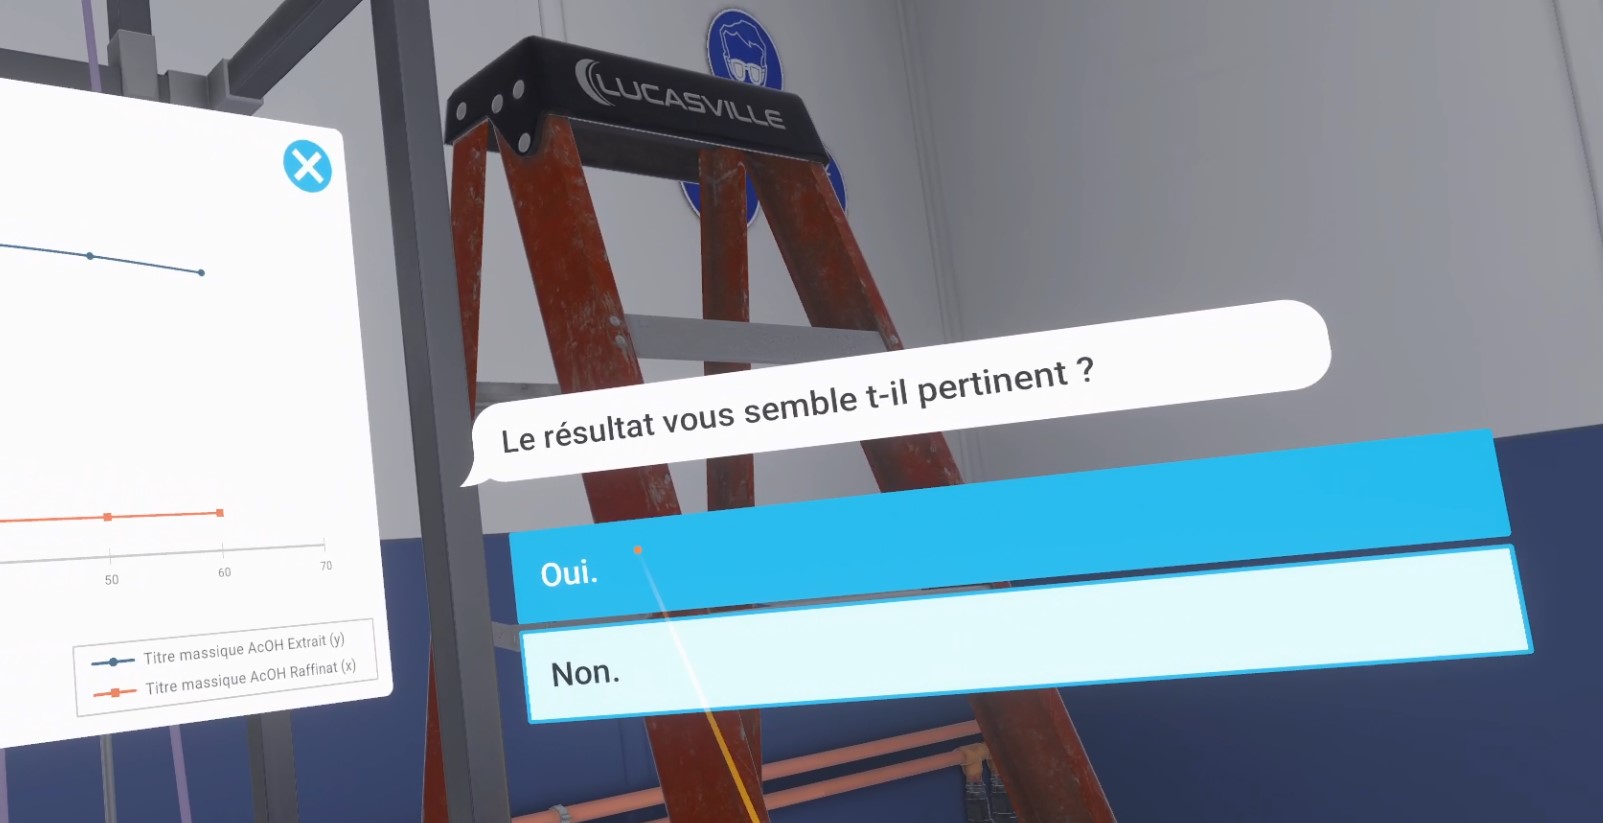
The first question is to check whether the user understands whether their curves are correct or not. If they have followed the instructions, their curves will intersect and there will be a significant difference between them.
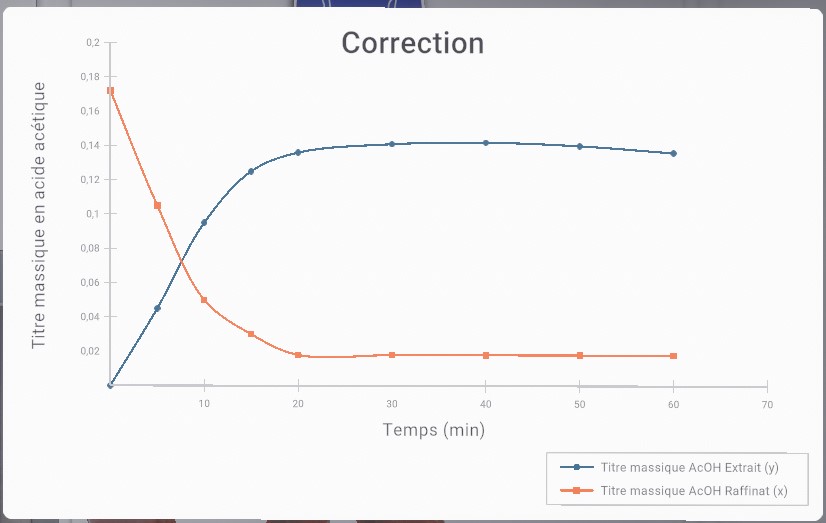
If their curves are correct, they can continue the exercise.
If their curves are incorrect, a correction is suggested. They are asked to reason about their mistakes, which may be:
-
the heavy and light phase tanks have been reversed
-
the hydraulic clearance has been set too low.

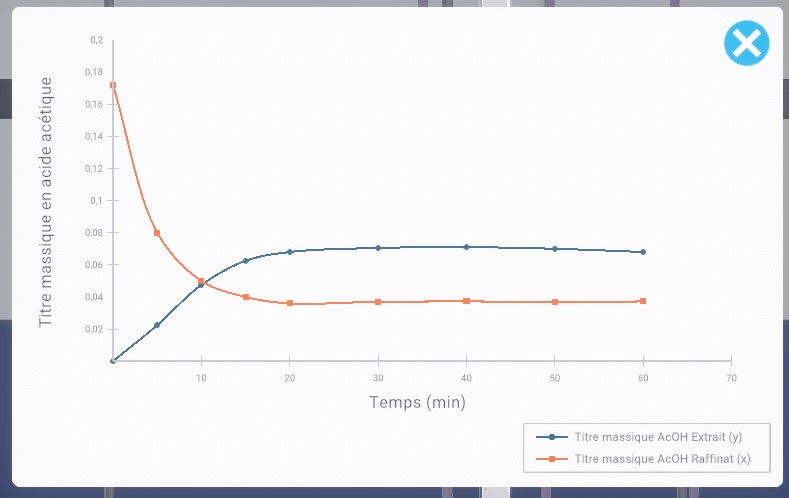
End of the experiment
The player stops both pumps using their respective power buttons.
To their right, the user can see a 5-liter Erlenmeyer flask, recycling cans, a hose, and a funnel.
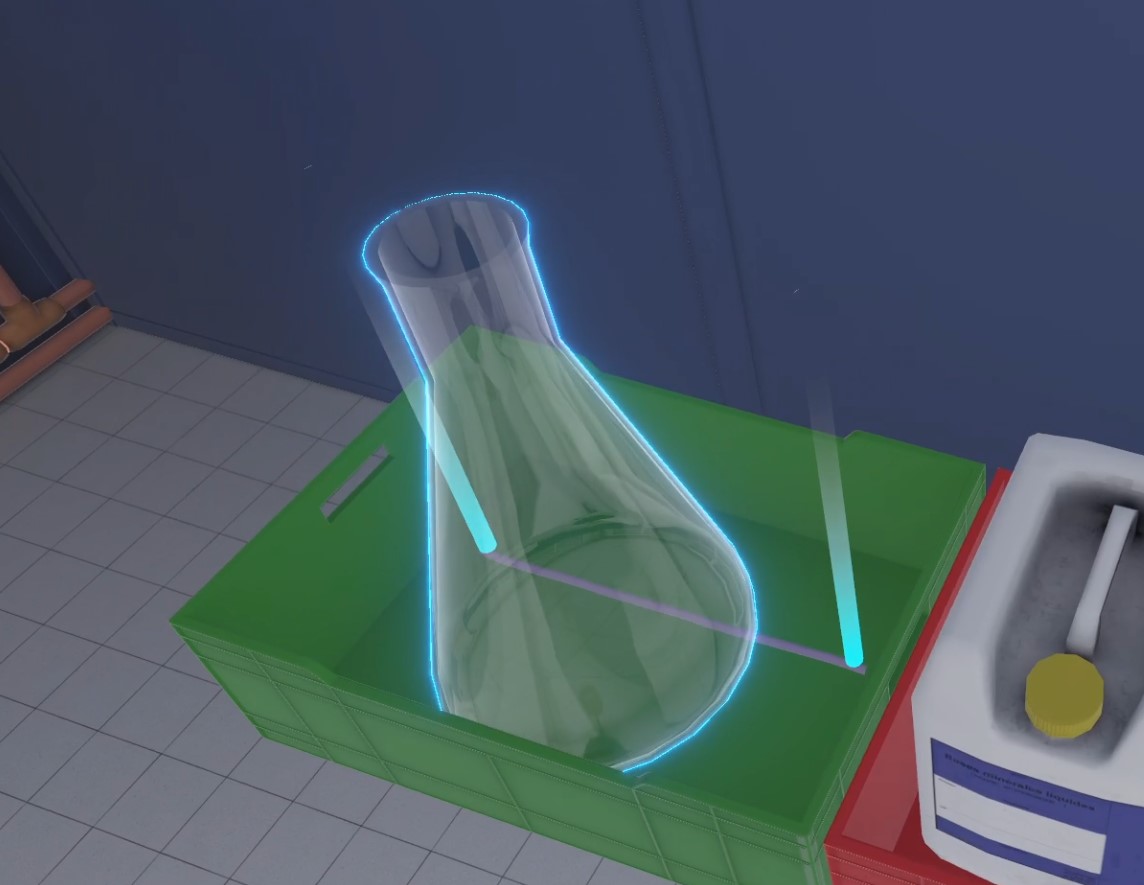
They must place the Erlenmeyer flask under the column drain valve, take the hose, and connect one end to the drain valve and the other to the Erlenmeyer flask.
They open the drain valve and wait until the column is completely empty.
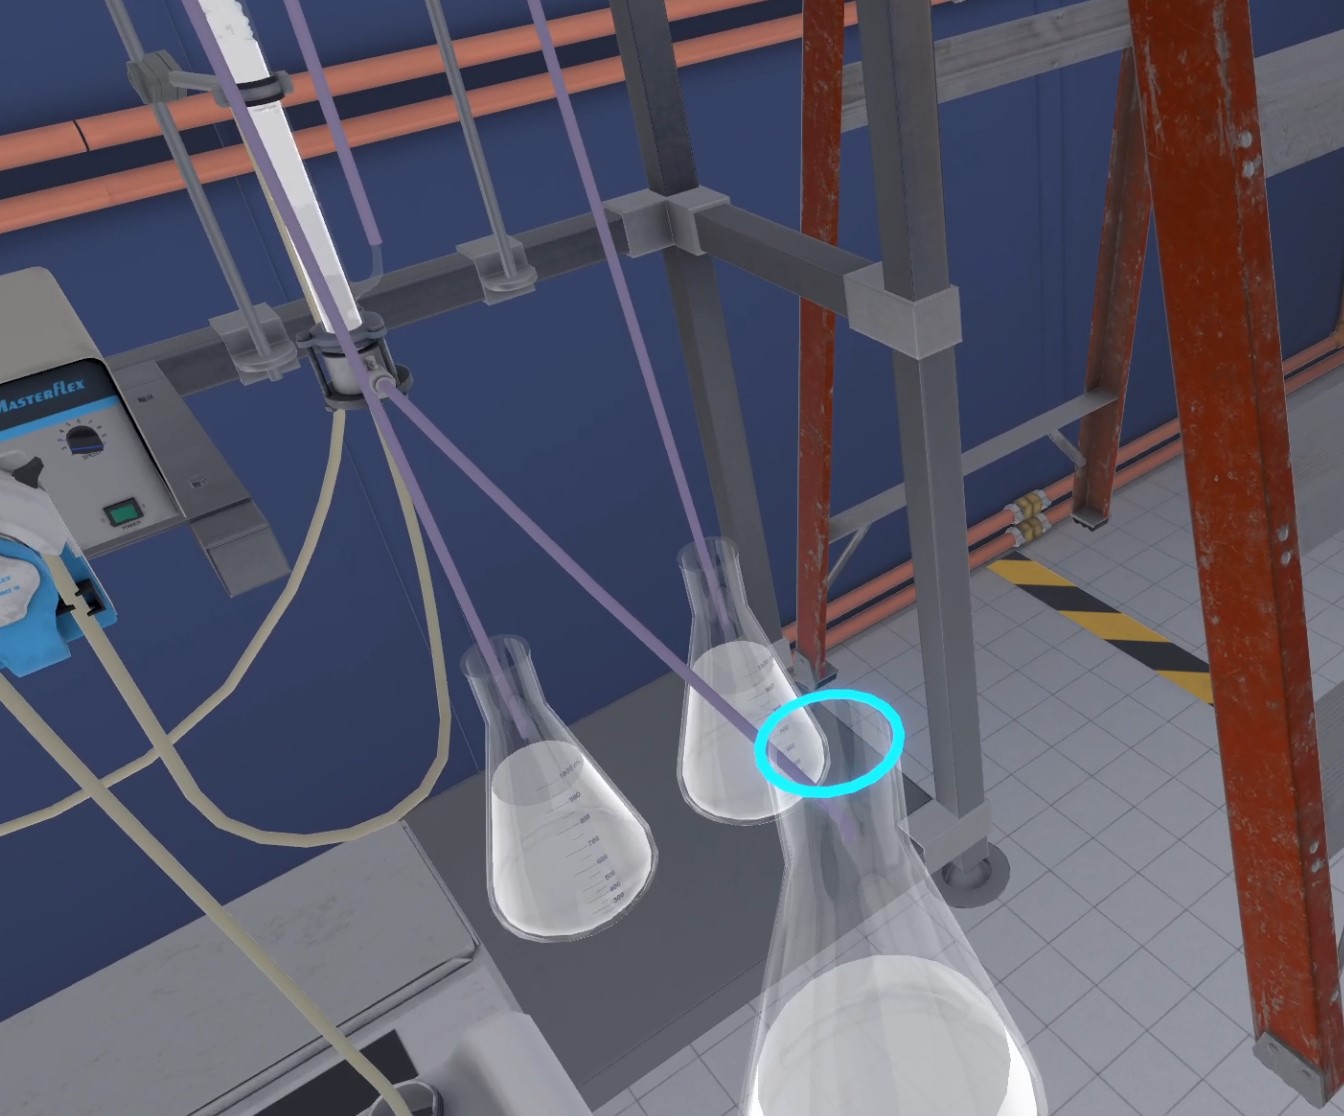
Now everything must be recycled correctly. The container to use is the one on the far right, for flammable liquids, and a plastic funnel must be used to ensure best practice.
The Erlenmeyer flask used for draining and the Erlenmeyer flask containing the raffinate (the one on the right, under the column) must be emptied into this container.
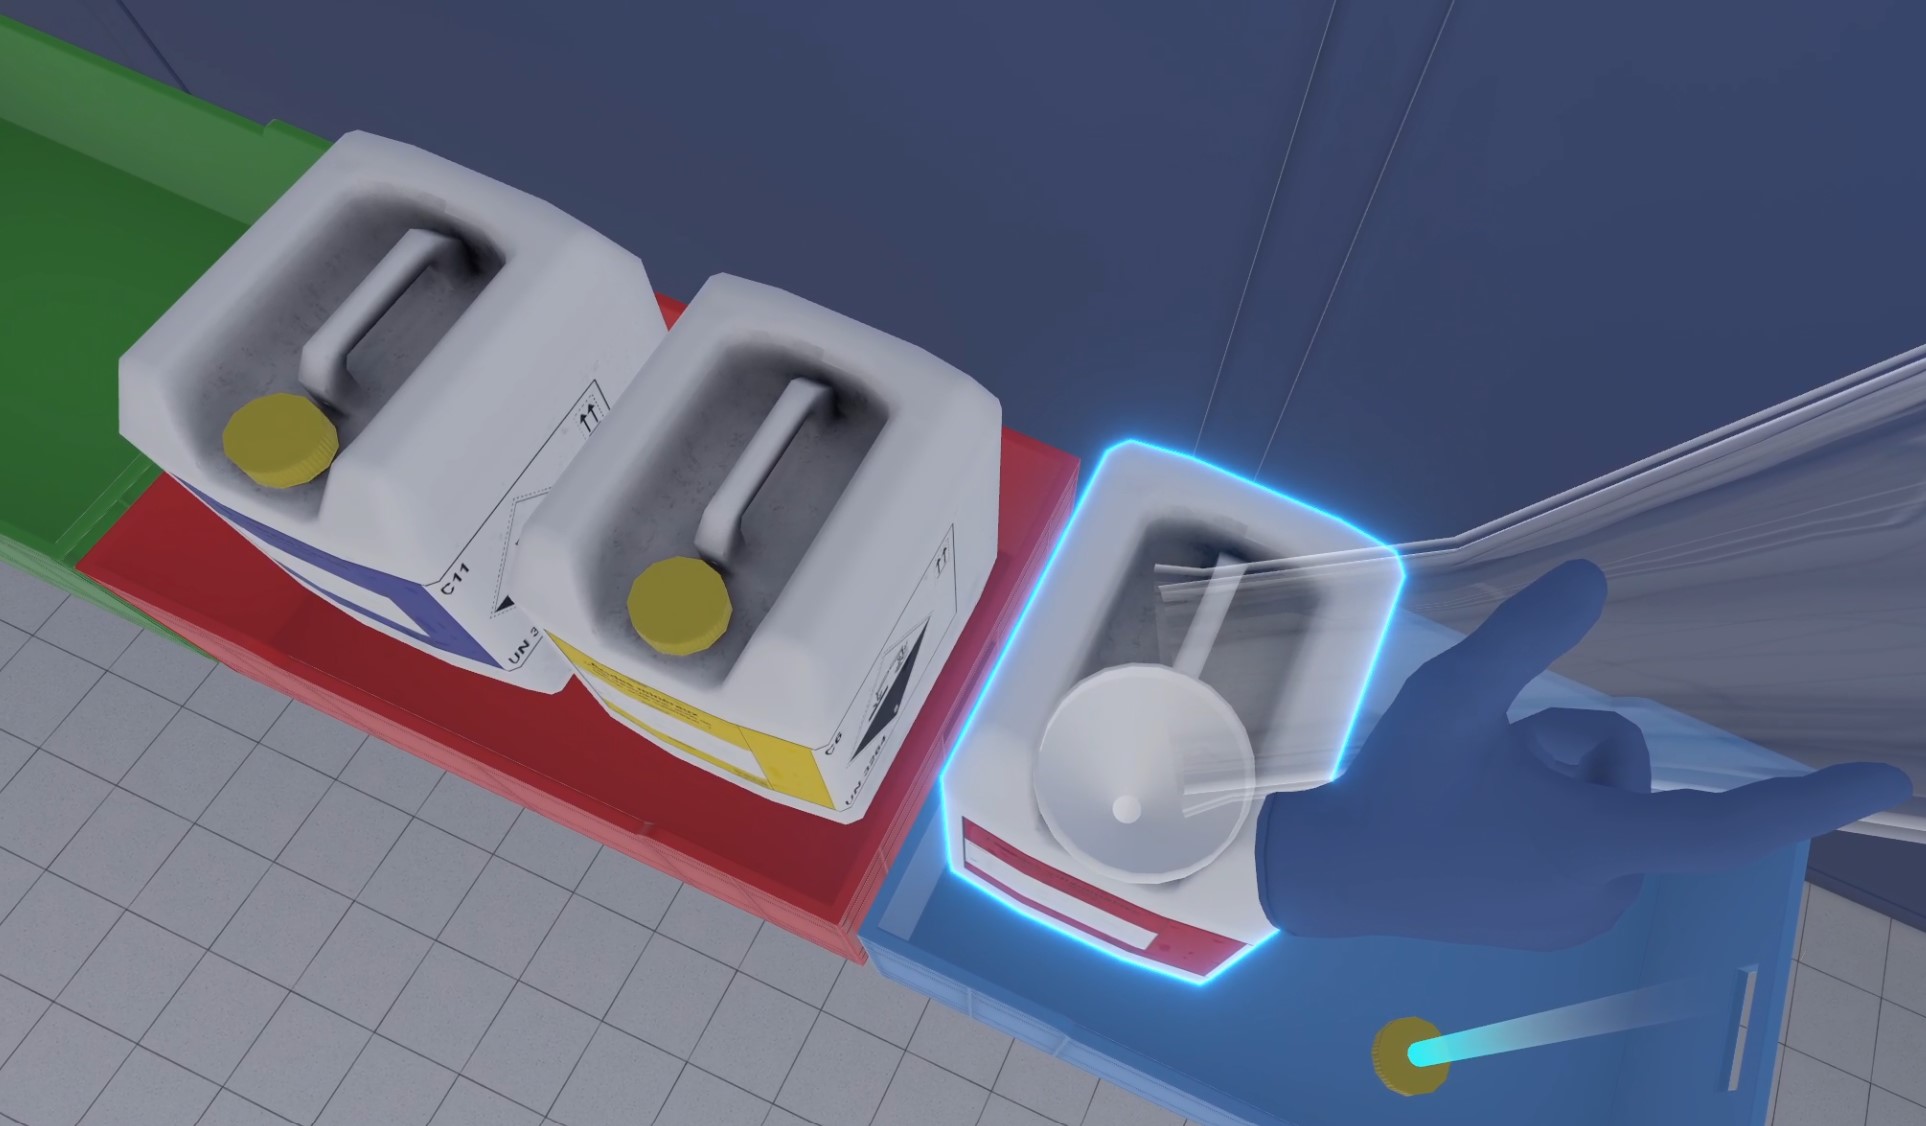
End of the Exercise.
The user is automatically teleported to the lobby in front of the results screen.
5.7.3. Criteria for Evaluating the Exercise
![]() Protection: Correct use of PPE equipment.
Protection: Correct use of PPE equipment.
![]() Analysis: Obtains the correct result of the experiment based on the user’s choices.
Analysis: Obtains the correct result of the experiment based on the user’s choices.
![]() Procedure: Follows the correct sequence of actions.
Procedure: Follows the correct sequence of actions.
![]() Autonomy: The score decreases depending on the amount of times help was requested. Only in Advanced Mode.
Autonomy: The score decreases depending on the amount of times help was requested. Only in Advanced Mode.
5.8. Bioreactor
This exercise invites users to use a bioreactor to observe the difference in oxygenation rates depending on operating conditions (stirring speed and aeration flow rate). The objectives and aids differ depending on the level of difficulty chosen.
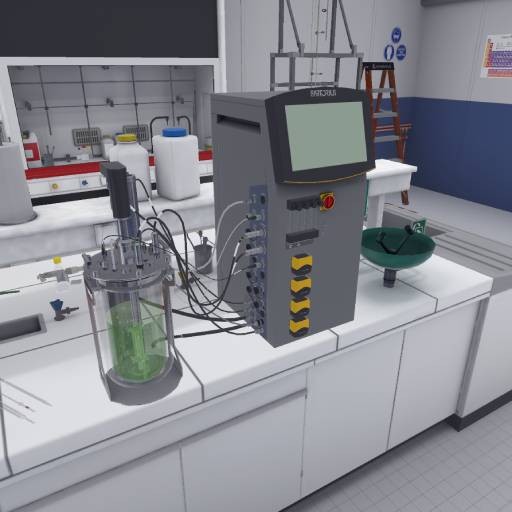
5.8.1. Instructions
The procedure to follow depends on the level of difficulty chosen.
-
Beginner: the instructions are detailed, and objects and buttons are clearly highlighted at each step to facilitate understanding. The user is asked to test the bioreactor twice with certain parameters, then listen to explanations, before being able to experiment more freely and answer the final questionnaire.
-
Advanced: The instructions are slightly simplified, and the user can experiment more quickly, but the objects and buttons are no longer automatically highlighted. However, the user can request help at any time to highlight the necessary elements.
-
Expert: The instructions are simplified to allow for greater user autonomy, and free mode is available immediately. No help is available.
![]() In Advanced Mode, on the companion screen, the user can click this button to request assistance.
In Advanced Mode, on the companion screen, the user can click this button to request assistance.
5.8.2. Scenario Sequence
Preparation
The user starts the scenario with the following briefing:
You will observe the difference in oxygenation speed depending on the operating conditions (stirring speed and aeration flow rate) and determine the kLa (gas-liquid oxygen transfer coefficient) with step-by-step guidance.
Ideally, you will have a certain number of attempts available; beyond that, small penalties will be applied to your score. Try to make fewer than X attempts.
This briefing is less detailed as the difficulty increases. The maximum number of attempts (X) is specified in the vulcan variables and influences the score of the “Number of cycles” sensor.
The user must put on their PPE (Personal Protective Equipment) (Equipping PPE), enter the “Process Engineering and Analytical Chemistry” laboratory at the end of the corridor, and then stand in front of the bioreactor.
System initialization
The user must turn on the bioreactor by interacting with the power button. The bioreactor interface will appear.
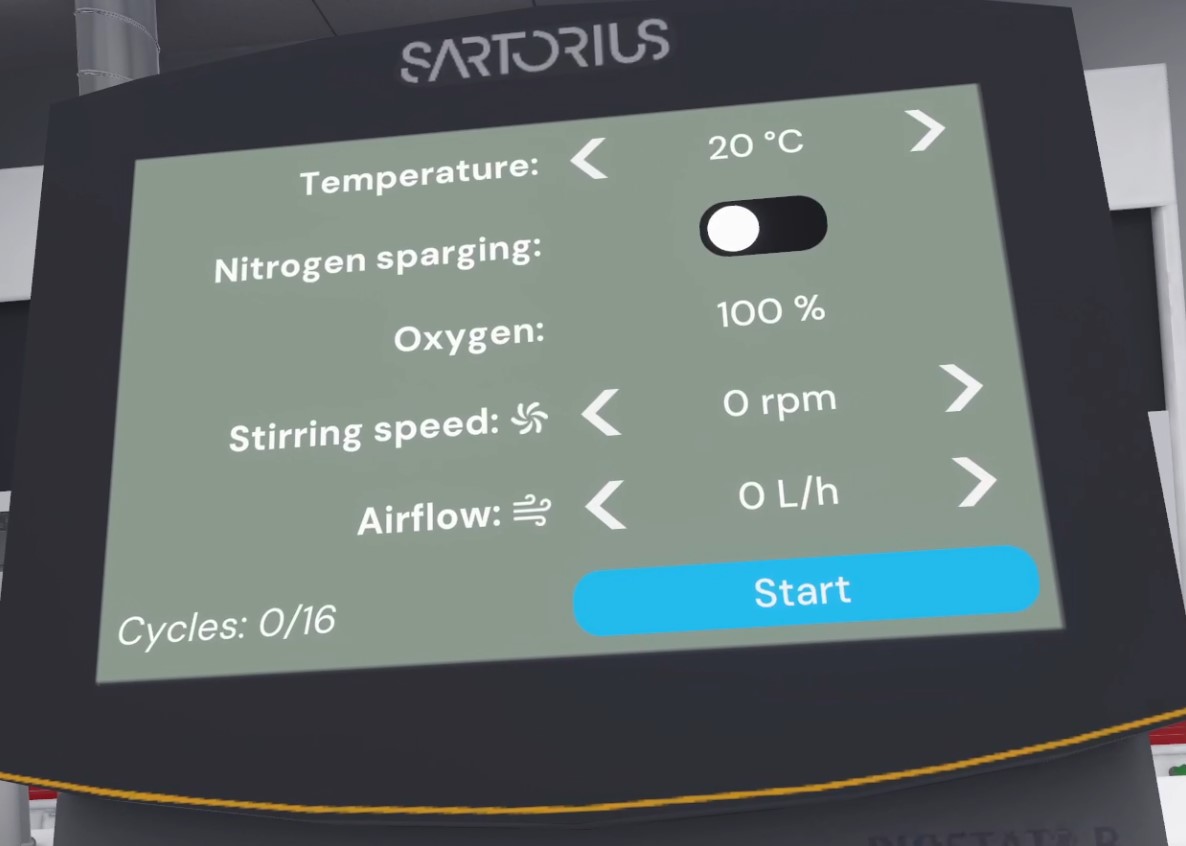
The user can configure the settings by pointing and using the interaction button when the viewfinder touches a button.
From top to bottom, left to right:.
-
Temperature: 15 to 45 °C.
-
Nitrogen bubbling: On/Off.
-
Oxygen level: 4 to 100%
-
Stirring speed: 0 to 400 rpm.
-
Air flow: 0 to 360 L/min.
-
Number of cycles: (number of cycles completed) / (maximum number of cycles).
-
Button to start the experiment
To comply with the instructions, the student sets the temperature to 30°C.
Nitrogen bubbling
The user must then activate the nitrogen bubbling and set the stirring speed to 400 rpm, with the aim of reducing the dissolved oxygen level to 4%. Once the medium has been deaerated, the nitrogen bubbling must be stopped.
Before starting an experiment, it is necessary to always deaerate the medium by bubbling nitrogen through it, and to turn off the nitrogen when the oxygen level is at its lowest. This operation must be repeated several times during the exercise.
The bubbling speed varies depending on the stirring speed. If the user sets a speed lower than the maximum (400 rpm), they will receive a small penalty on their score.
If the nitrogen is not turned off when the user clicks “Start,” their score will drop significantly.
Start of the First Experiment
The player sets the agitation speed to 100 rpm and adjusts the air flow to 120 L/h. Bubbles form and agitate in the tank. Their size, quantity, and movement depend on the speed and flow rate. A higher flow rate produces larger and more numerous bubbles. Higher agitation scatters them more widely throughout the tank.
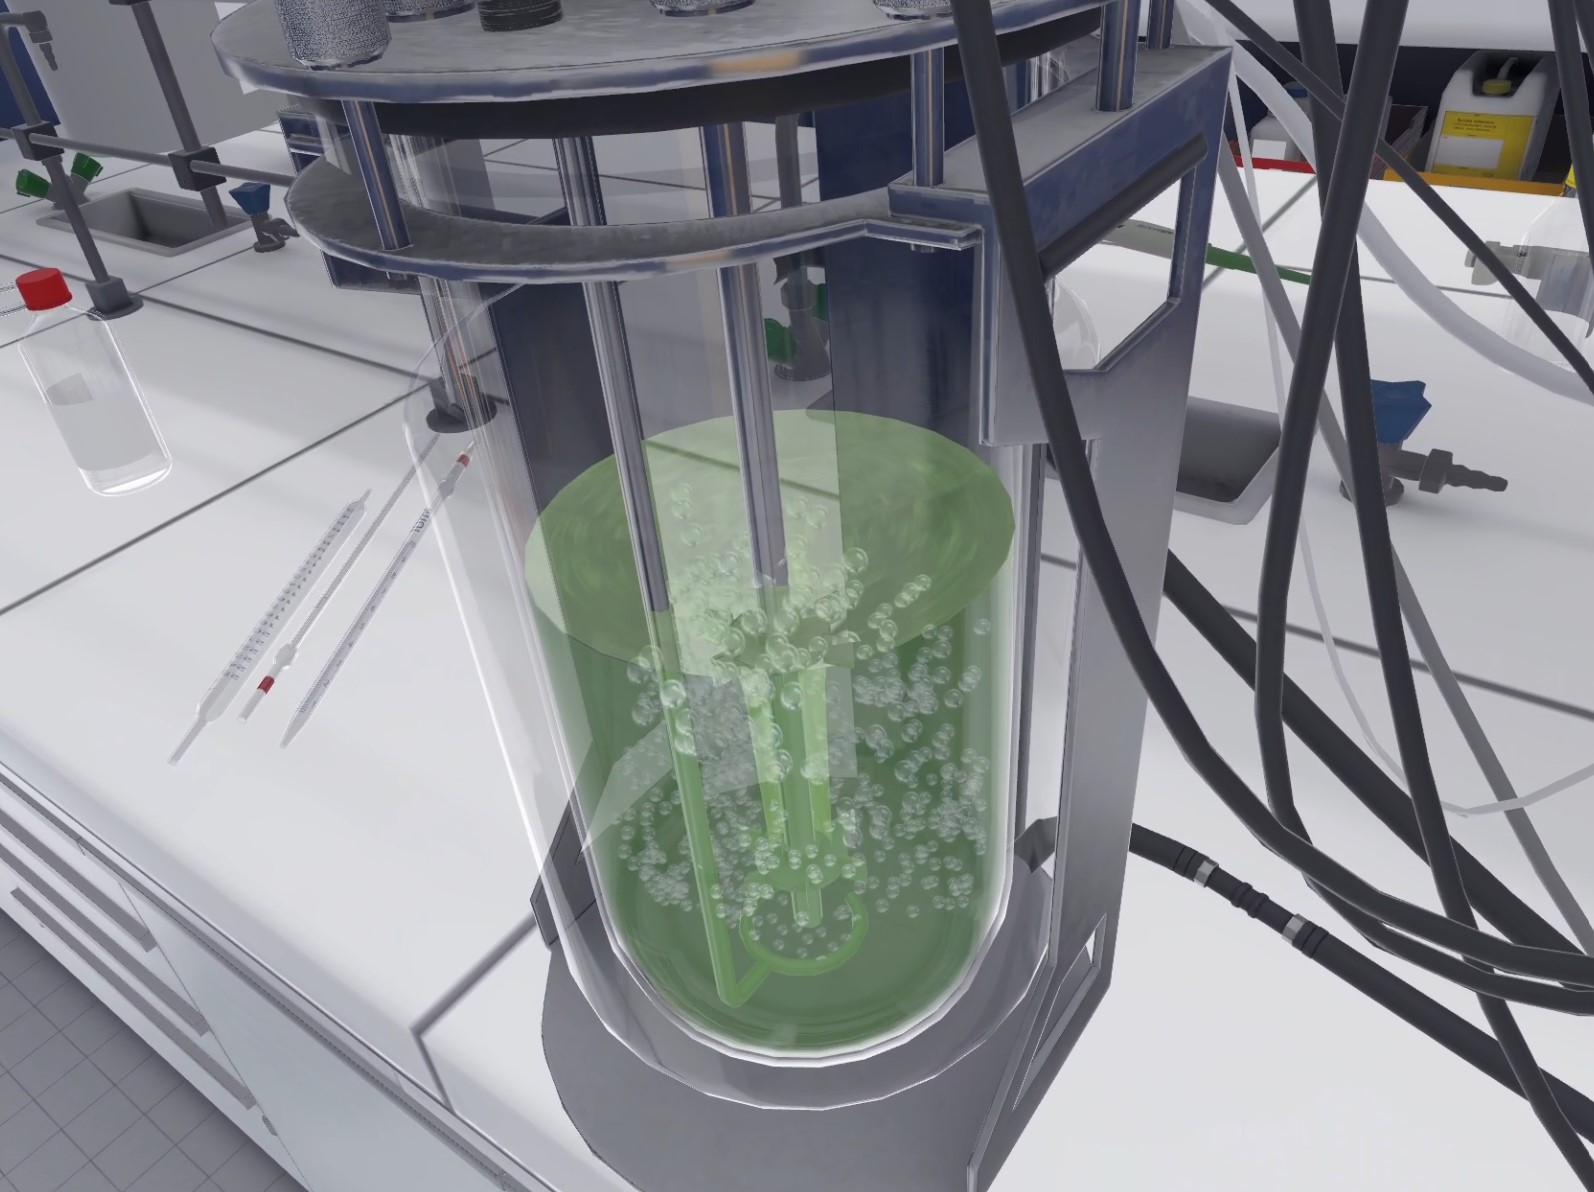
The user can click on the “Start” button to launch the experiment. An interface appears: curves are gradually plotted (time is accelerated at this point). The first curve represents the percentage of dissolved oxygen at each moment, and the second is the slope of the first.
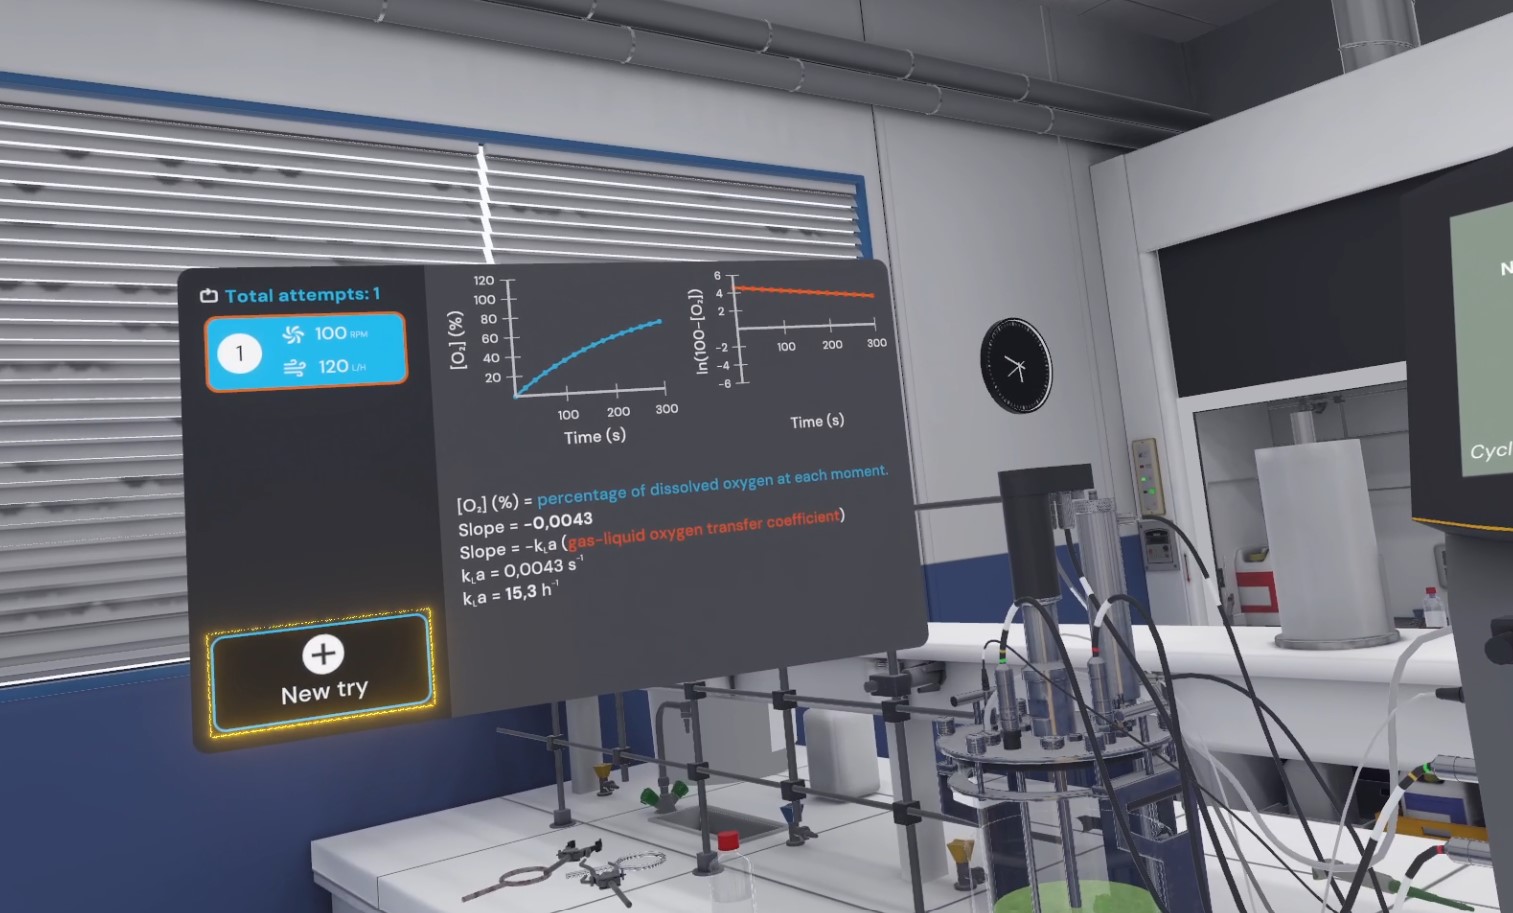
When starting out, the calculation of kLa (gas-liquid oxygen transfer coefficient) is indicated on this interface. At the advanced level, an index is given to determine it (the slope is used to calculate kLa), and at the expert level, the user must figure out the calculation method on their own.
Analysis and Readjustment
With these settings, the player will notice that the dissolved oxygen level does not change or changes very little. The problem here is insufficient stirring speed.
A new attempt must be made with new settings.
The user must click on the “New attempt” button on the interface with the curves.
New Experimental Setup
The player must follow the protocol: .
-
Turn off the air flow
-
Turn on the nitrogen.
-
Set the stirring speed to 400 rpm
-
Wait until the oxygen level reaches 4%.
-
Turn off the nitrogen.
-
Leave the stirring speed at 400 rpm.
-
Set the air flow to 60 L/h.
-
Start the experiment.
This time, the user observes a gradual increase in dissolved oxygen in the medium.
From this point on, they can perform other tests by modifying the parameters to view the differences in the curves.
They can also click on previous attempts to review the curves and experiments via a replay of the bubbles in the tank. This is useful for comparing parameters.
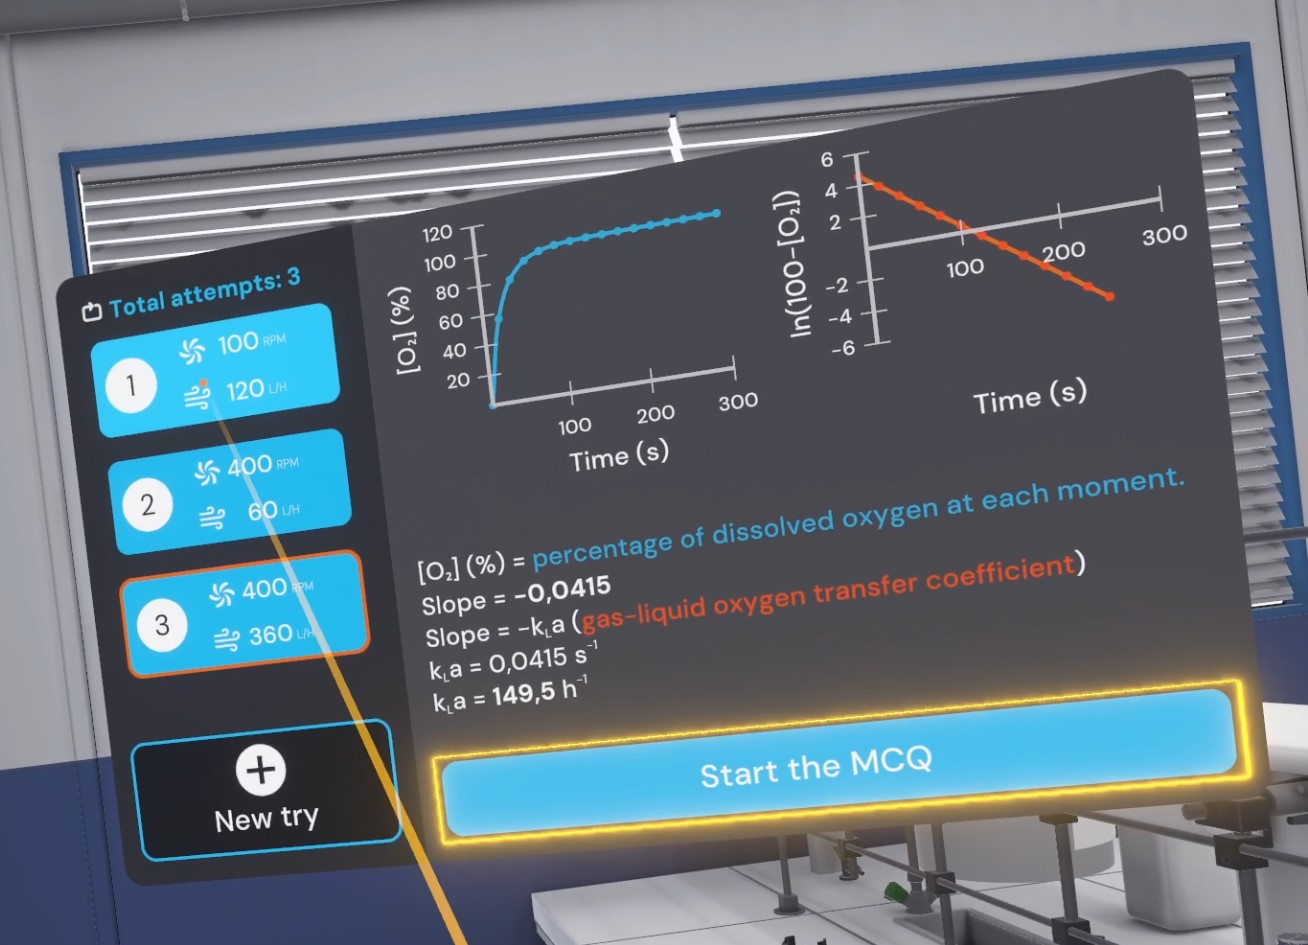
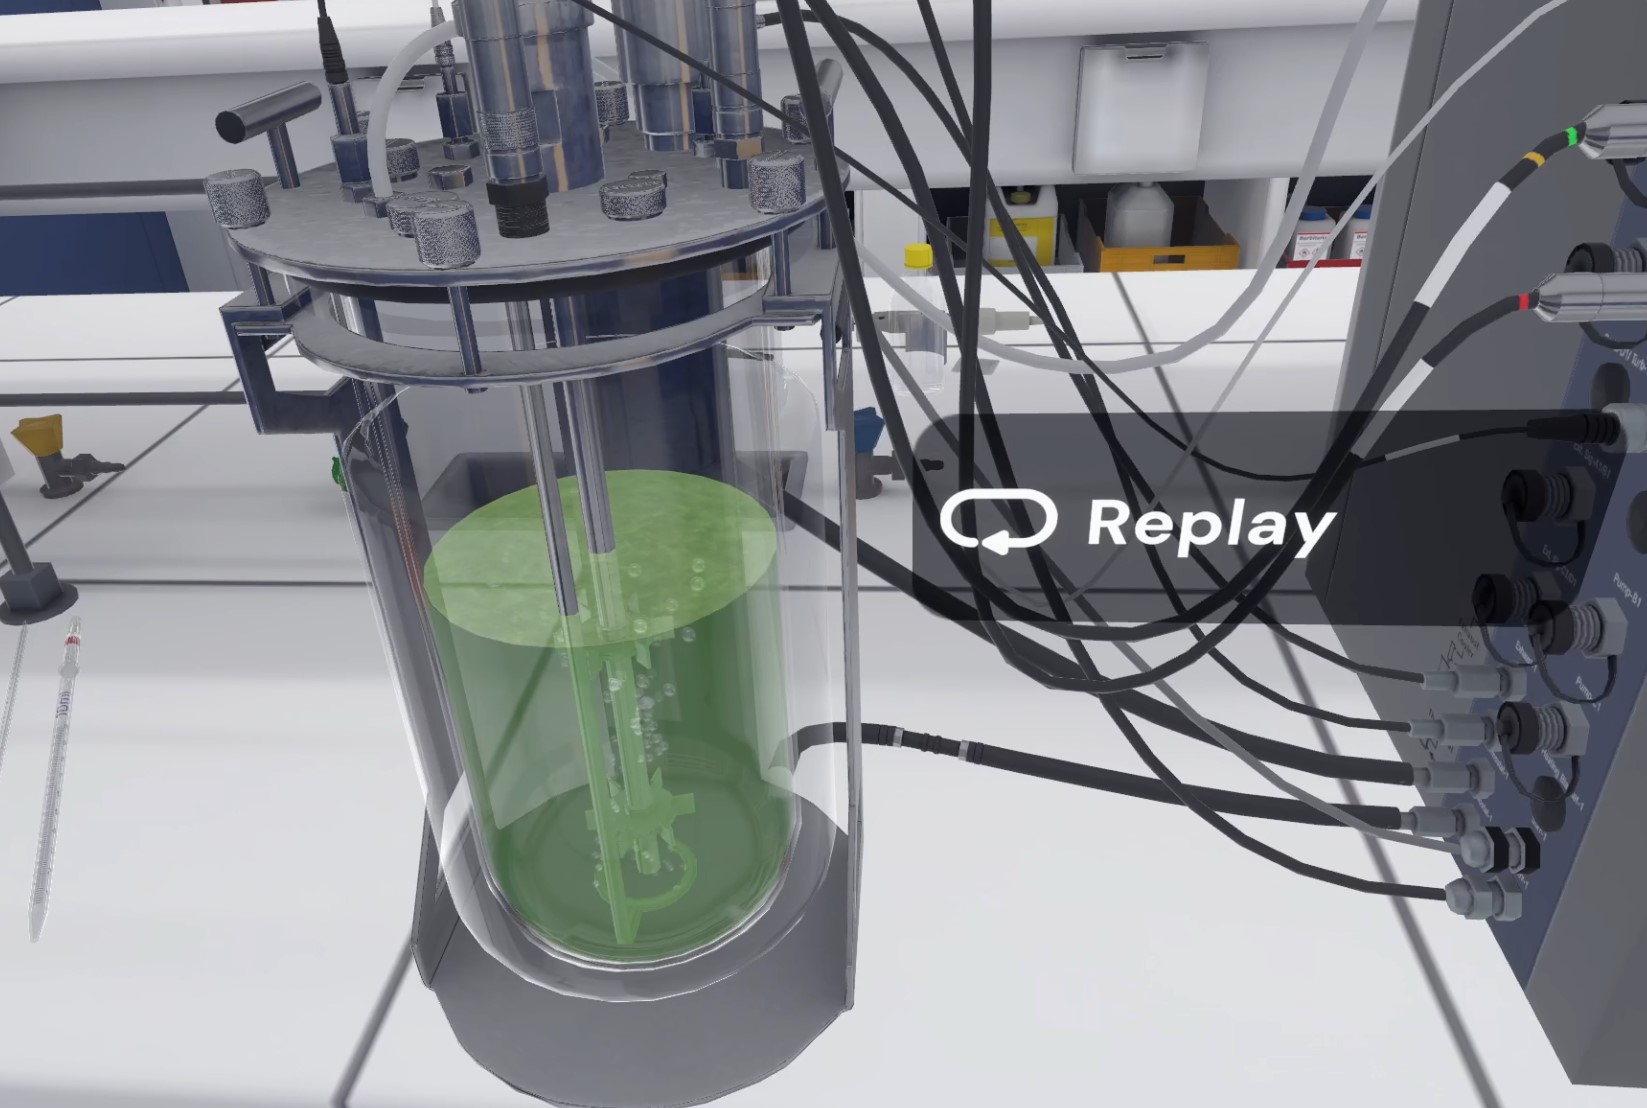
One of the score sensors depends on the number of experiments performed with the bioreactor. To achieve a score of 100%, the user must make fewer attempts than the target number of attempts. The bioreactor is also blocked if the user exceeds the maximum number of attempts.
Default settings:
-
Beginner: 16 target attempts and 16 maximum attempts
-
Advanced: 8 target attempts and 16 maximum attempts
-
Expert: 3 target attempts and 8 maximum attempts
Questionnaire
When the player feels ready, they must answer the multiple-choice questions based on the curves obtained.
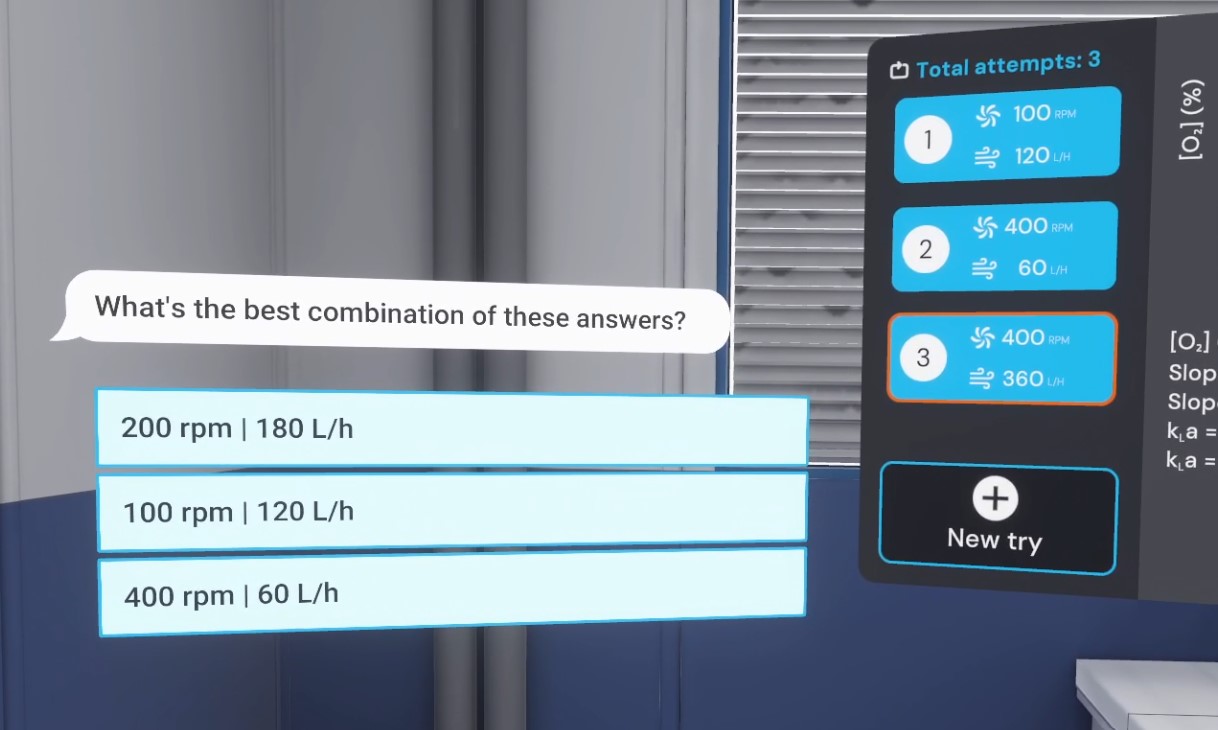
The first question asks them to choose the best combination: from the possible choices (which are in random order), they must select the one with the best agitation speed and therefore the best kLa (gas-liquid oxygen transfer coefficient):.
-
100 rpm and 120 L/h .
-
200 rpm and 180 L/h
-
400 rpm and 60 L/h (correct answer)
The second question is used to determine whether the user has understood which parameter most improves the increase in dissolved oxygen..
-
Agitation speed (correct answer).
-
Air flow rate
End of the Exercise.
The user is then automatically teleported to the lobby in front of the score screen, marking the end of the activity.
5.8.3. Criteria for evaluating the exercise
![]() Protection: Correct use of PPE equipment.
Protection: Correct use of PPE equipment.
![]() Analysis: Obtains the correct result of the experiment based on the user’s choices.
Analysis: Obtains the correct result of the experiment based on the user’s choices.
![]() Procedure: Follows the correct sequence of actions.
Procedure: Follows the correct sequence of actions.
![]() Autonomy: The score decreases depending on the amount of times help was requested. Only in Advanced Mode.
Autonomy: The score decreases depending on the amount of times help was requested. Only in Advanced Mode.
5.9. HPLC
This exercise asks the user to use a high-performance liquid chromatography (HPLC) system and optimize the elution conditions in order to separate two solutes, vanillin and ethyl vanillin, within a limited time. The objectives and aids differ depending on the level of difficulty chosen.
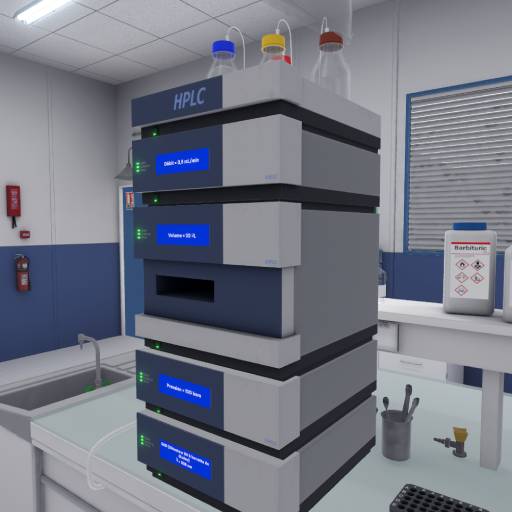
5.9.1. Instructions
The procedure depends on the chosen difficulty level.
-
Beginner: The instructions are detailed, and objects and buttons are clearly highlighted at each step to facilitate understanding. The user is asked to follow a procedure to configure the HPLC before being able to experiment more freely and answer the final questionnaire.
-
Advanced: The instructions are slightly more simplified, and the user can experiment more quickly, but objects and buttons are no longer automatically highlighted. However, the user can request help at any time on the companion screen to highlight the necessary elements.
-
Expert: The instructions are simplified for greater user autonomy, and the free mode is immediately available. No help is available.
5.9.2. Scenario Outline
Preparation
The user starts the scenario with the following briefing:
In this module, you will use a high-performance liquid chromatography (HPLC) system and optimize the elution conditions in order to separate two solutes, vanillin and ethyl vanillin, within a limited time.
A preliminary literature review has been conducted, leading you to separate these two compounds based on their polarity, using a nonpolar column (C₁₈ grafted silica) and a water/methanol mixture as the mobile phase.
The objective is to understand the influence of two main parameters on the separation of compounds in a mixture:
-
the flow rate,
-
the polarity of the mobile phase.
Ideally, you have a certain number of attempts available; beyond that, small penalties will be applied to your score. Try to make fewer than X attempts.
This briefing is less detailed as the difficulty increases. The maximum number of attempts (X) is specified in the Vulcan variables and influences the score of the “Number of cycles” sensor.
The user must put on their PPE (Personal Protective Equipment) (Equipping PPE), enter the “Process Engineering and Analytical Chemistry” laboratory at the end of the corridor, and then stand in front of the high-performance liquid chromatography (HPLC) system.
Observation
The HPLC system is already set up with the appropriate solvents and column. Users are encouraged to carefully observe the device and surrounding objects: information appears when they hover their hand over the elements.
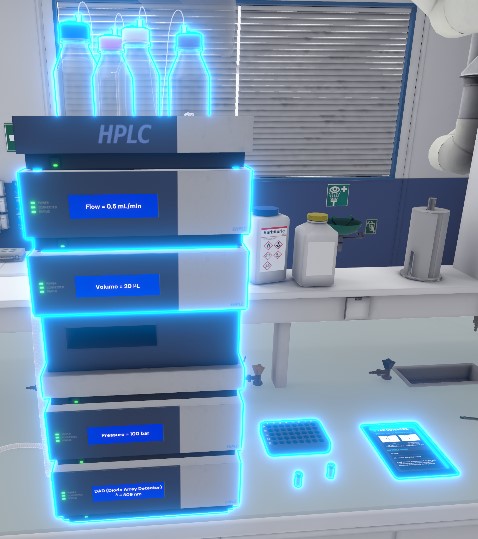
The HPLC consists of several modules, and each module provides information (from top to bottom):
-
Pump module: displays the elution flow rate (mL/min)
-
Injection module: displays the volume (μL) of the injection loop and contains the rack with the samples.
-
Column module: displays the pressure (bars) exerted by the mobile phase on the column and contains the column.
-
Detector module: displays the wavelength (nm) at which the measurement is made
The HPLC is connected to four cylinders containing:
-
Water (H₂O): blue cap.
-
Methanol (MeOH): yellow cap.
-
Acetonitrile (CH₃CN): red cap.
-
Nothing (no solvent): brown cap
To the right of the HPLC, you can see:
-
The rack where the samples are placed.
-
The KNO₃ sample.
-
The vanillin and ethylvanillin samples.
-
A laboratory notebook containing additional information and reminders
Once the observation is complete, the user clicks on “I have observed” via the interface on their wrist to continue the exercise.
Sample preparation
The player places the container holding the KNO₃ sample in position A1 on the rack and the container holding the vanillin/ethyl vanillin mixture in position A2.
They then place the rack in the injection module slot.
Two floating interfaces appear to the right of the HPLC.
One serves as a diagram to better visualize what is happening in the HPLC (it changes depending on the settings). + The other allows the user to configure it. Interactions are limited at the beginning and are unlocked as the exercise progresses.
The user can then choose to use the floating interface to interact with the HPLC.
The user can configure the settings by pointing and using the interaction button when the pointer touches a button.
From top to bottom, left to right:
-
Number of cycles: (number of cycles completed) / (maximum number of cycles)
-
Injection position: A1 or A2.
-
Flow rate: from 0.1 to 1.5 mL/min.
-
Mixing: 4 sliders that allow you to manage the proportion of use of the 4 available solvents. The total always adds up to 100%
-
Button to start balancing the system (to be done whenever there is a change in flow rate or mixing proportions).
-
Button to start the experiment
Determination of dead volume
The player must first determine the dead volume of the system under initial conditions.
Dead volume: when starting the system and each time the flow rate changes, an injection must be made from position A1 before making an injection from position A2. The time it takes for the small peak to appear indicates the dead volume, as the KNO₃ is not retained on the column.
By default, A1 is already selected (if not, click on it). Click on the “Start” button to launch the experiment.
An interface appears: the user can see a curve gradually being drawn (time is accelerated at this point). The peak retention time is also displayed below the curve.

The user must then click on “Try again” in this interface to continue.
First injection of the mixture
The player clicks on A2 to inject the sample into A2 (mixture of compounds) under the same conditions.
A new curve is plotted. The retention time of the peaks is also displayed below the curve, along with the resolution.
We can see that the peaks are well separated, but that the analysis time is too long. To improve this, we need to modify the elution flow rate to speed up the analysis and therefore launch a new attempt.
Optimisation par le débit
The player must choose a flow rate between 0.3 mL/min and 0.7 mL/min. Since we want to speed up the analysis, a faster flow rate is required, so the user should select 0.7 mL/min.
They must then click on the “Balance the system” button to allow the system to balance for 5 minutes. This action must be performed as soon as the flow rate changes.
Since the flow rate has been changed, the dead volume must be determined again by clicking on A1, then “Start.”
Next, keeping the same flow rate, the user should click on A2, then “Start.”
Interim analysis
A multiple-choice question appears to the right of the curves. This multiple-choice question asks the user if they have chosen the correct flow rate. Depending on the flow rate chosen and the answer to the multiple-choice question (yes/no), the user earns analysis points..
-
0.3 mL/min and Yes: Wrong answer.
-
0.3 mL/min and No: Correct answer
-
0.7 mL/min and Yes: Correct answer.
-
0.7 mL/min and No: Incorrect answer
If the player has selected the wrong flow rate, they must repeat the previous step with an HPLC set to 0.7 mL/min in order to continue the exercise.
Optimization via polarity
L’analyse est maintenant plus rapide, mais les pics ne sont plus assez séparés.
Pour corriger cela, le joueur doit modifier la polarité de la phase mobile, en ajustant les proportions eau/méthanol.
Il a le choix entre 75% d’eau et 25% de méthanol OU 55% d’eau et 45% de méthanol. Son objectif est de rendre la phase plus polaire, donc il faut qu’il mette plus d’eau. La bonne solution est donc 75% d’eau et 25% de méthanol.
L’utilisateur doit cliquer sur le bouton "Equilibrer le système" (cette action est à réaliser aussi dès que le mélange change). Il doit ensuite cliquer sur A2, puis "Démarrer".
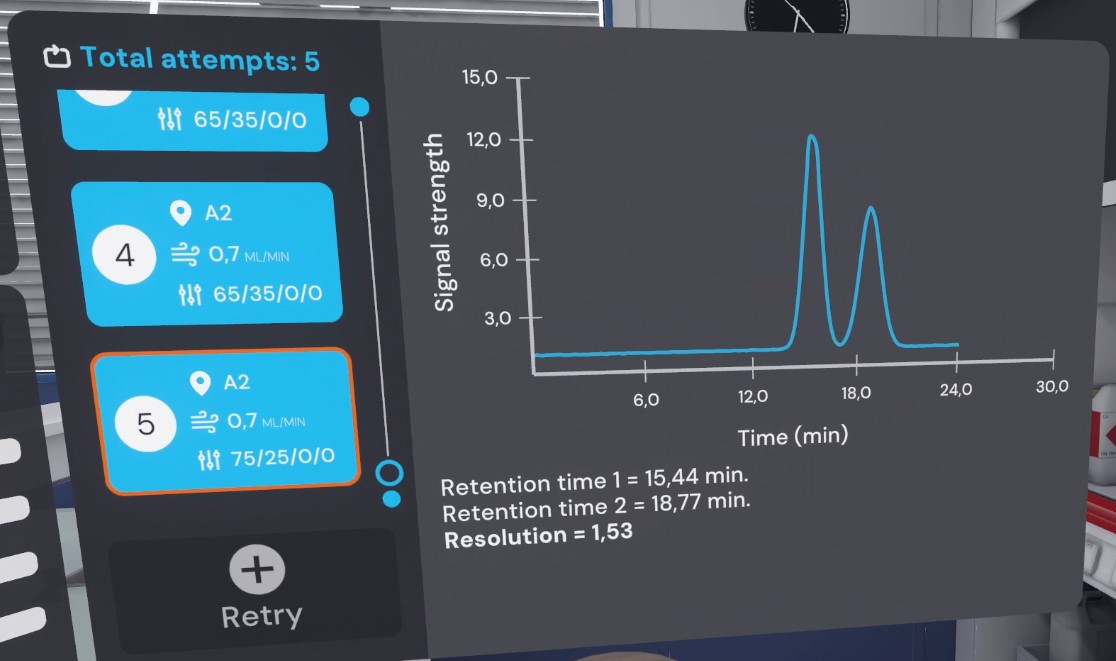
Interim analysis
A multiple-choice question appears again to the right of the curves. This asks the user if they have chosen the correct polarity. Depending on the proportions chosen and the answer to the multiple-choice question (yes/no), the user earns analysis points.
-
55% water / 45% methanol and Yes: Wrong answer.
-
55% water / 45% methanol and No: Correct answer.
-
75% water / 25% methanol and Yes: Correct answer.
-
75% water / 25% methanol and No: Wrong answer
Free experimentation
From this point on, the user can perform other tests by changing the settings to see the differences in the curves. They must be careful not to damage the equipment.
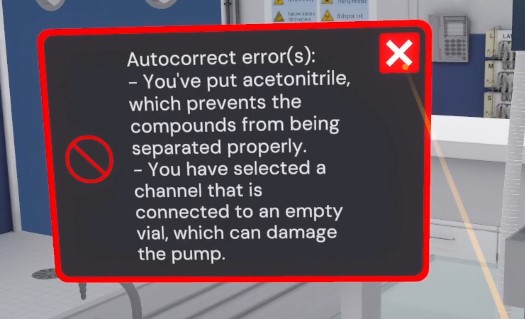
Possible errors:.
-
Setting a flow rate higher than 0.9 mL/min (the column settles, automatic correction).
-
Adding acetonitrile to the mixture (prevents compounds from being separated correctly)
-
Selecting the channel connected to an empty vial in the mixture (damages the pump, automatic correction).
-
Forgetting to check the dead volume when there is a change in flow rate.
-
Forgetting to balance the system when there is a change in flow rate or mixture (automatic correction)
The user can also click on previous attempts to review the curves. This is useful for comparing the influence of parameters on the results.
One of the score sensors depends on the number of experiments performed with HPLC. To obtain a score of 100%, the user must make fewer attempts than the target number of attempts. HPLC is also blocked if the user exceeds the maximum number of attempts.
Default settings:
-
Beginner: 20 target attempts and 40 maximum attempts
-
Advanced: 15 target attempts and 40 maximum attempts
-
Expert: 10 target attempts and 40 maximum attempts
Questionnaire
When the player feels ready, they can answer the multiple-choice question by clicking on the “Start multiple-choice question” button.
Based on what they did in the exercise and the data under the curves obtained, they must choose the best resolution to obtain two sufficiently separated peaks within a limited time frame..
-
1
-
1.5 (correct answer).
-
2
End of the exercise.
After completing the multiple-choice quiz, users will teleport to the lobby in front of the score screen, marking the end of the activity.
5.9.3. Criteria for evaluating the exercise
![]() Protection: Equips the proper PPE equipment.
Protection: Equips the proper PPE equipment.
![]() Analysis: Correctly answers the questionnaire
Analysis: Correctly answers the questionnaire
![]() Procedure: Correctly follows the experiment procedures
Procedure: Correctly follows the experiment procedures
![]() Number of cycles: The user has a limited number of correct attempts
Number of cycles: The user has a limited number of correct attempts
![]() Autonomy: The score decreases depending on the number of times aid was requested. Only in Advanced Mode.
Autonomy: The score decreases depending on the number of times aid was requested. Only in Advanced Mode.