1. Introduction
This document lists the various features available in the MIMBUS LOGISTICS simulator.
First, features that are not specific to a particular exercise will be listed.
Next, we will detail each instruction associated with a exericse in the simulator, i.e., how to complete the task assigned by the system in order to move on to the next step during the simulation.
2. General operation
2.1. Controllers
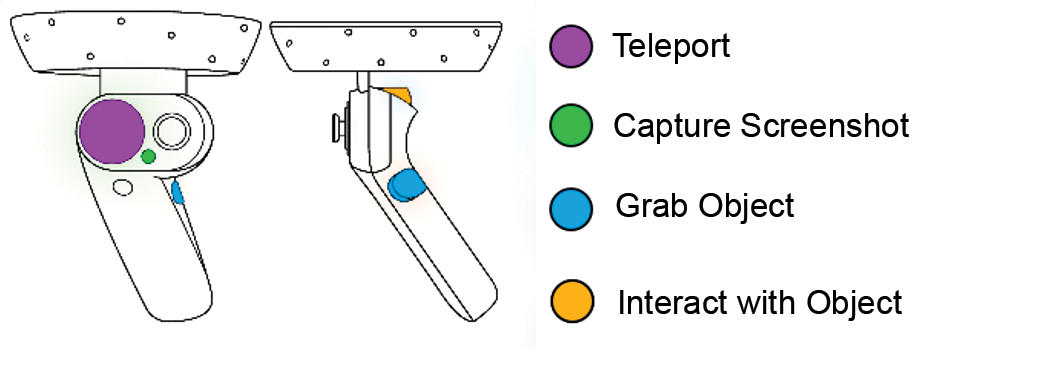
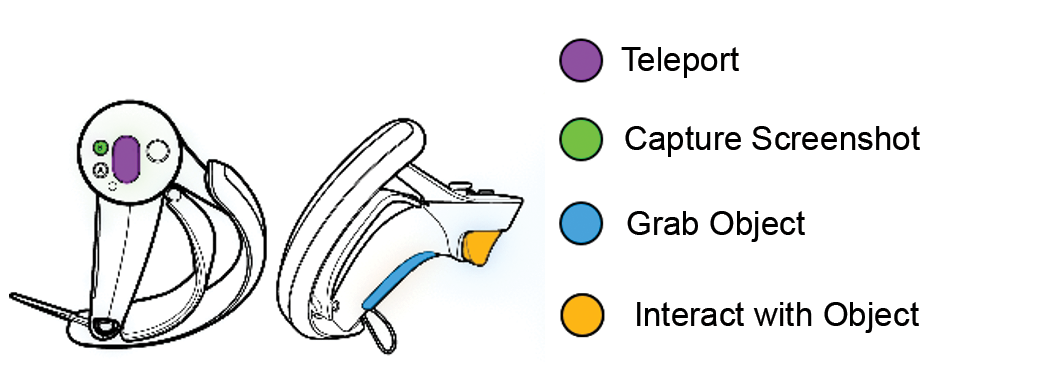
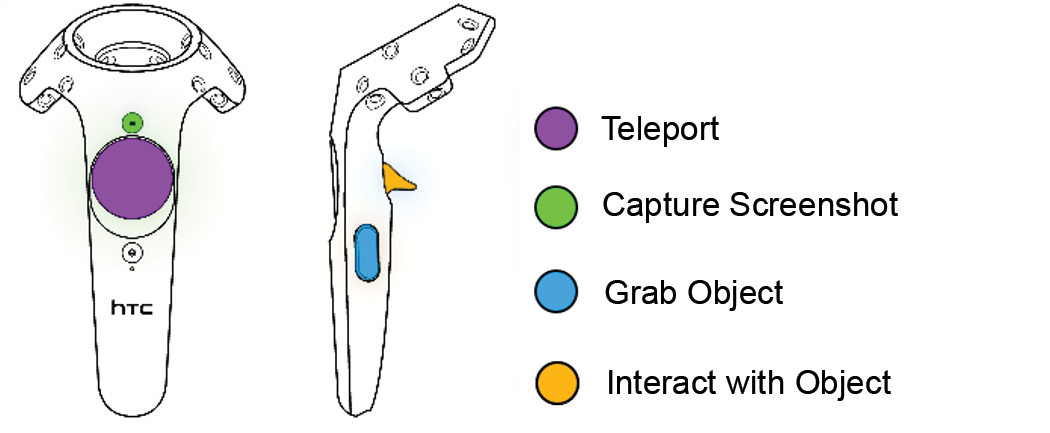
The application is compatible with all OpenXR complient headsets. Depending on the virtual reality headset used, the controllers and hence the associated keys are different.
2.1.1. Windows Mixed Reality
2.1.2. Valve Index
2.1.3. HTC Vive
2.1.4. Oculus Rift

2.1.5. PICO 4

2.2. Authentication
2.2.1. Main Menu
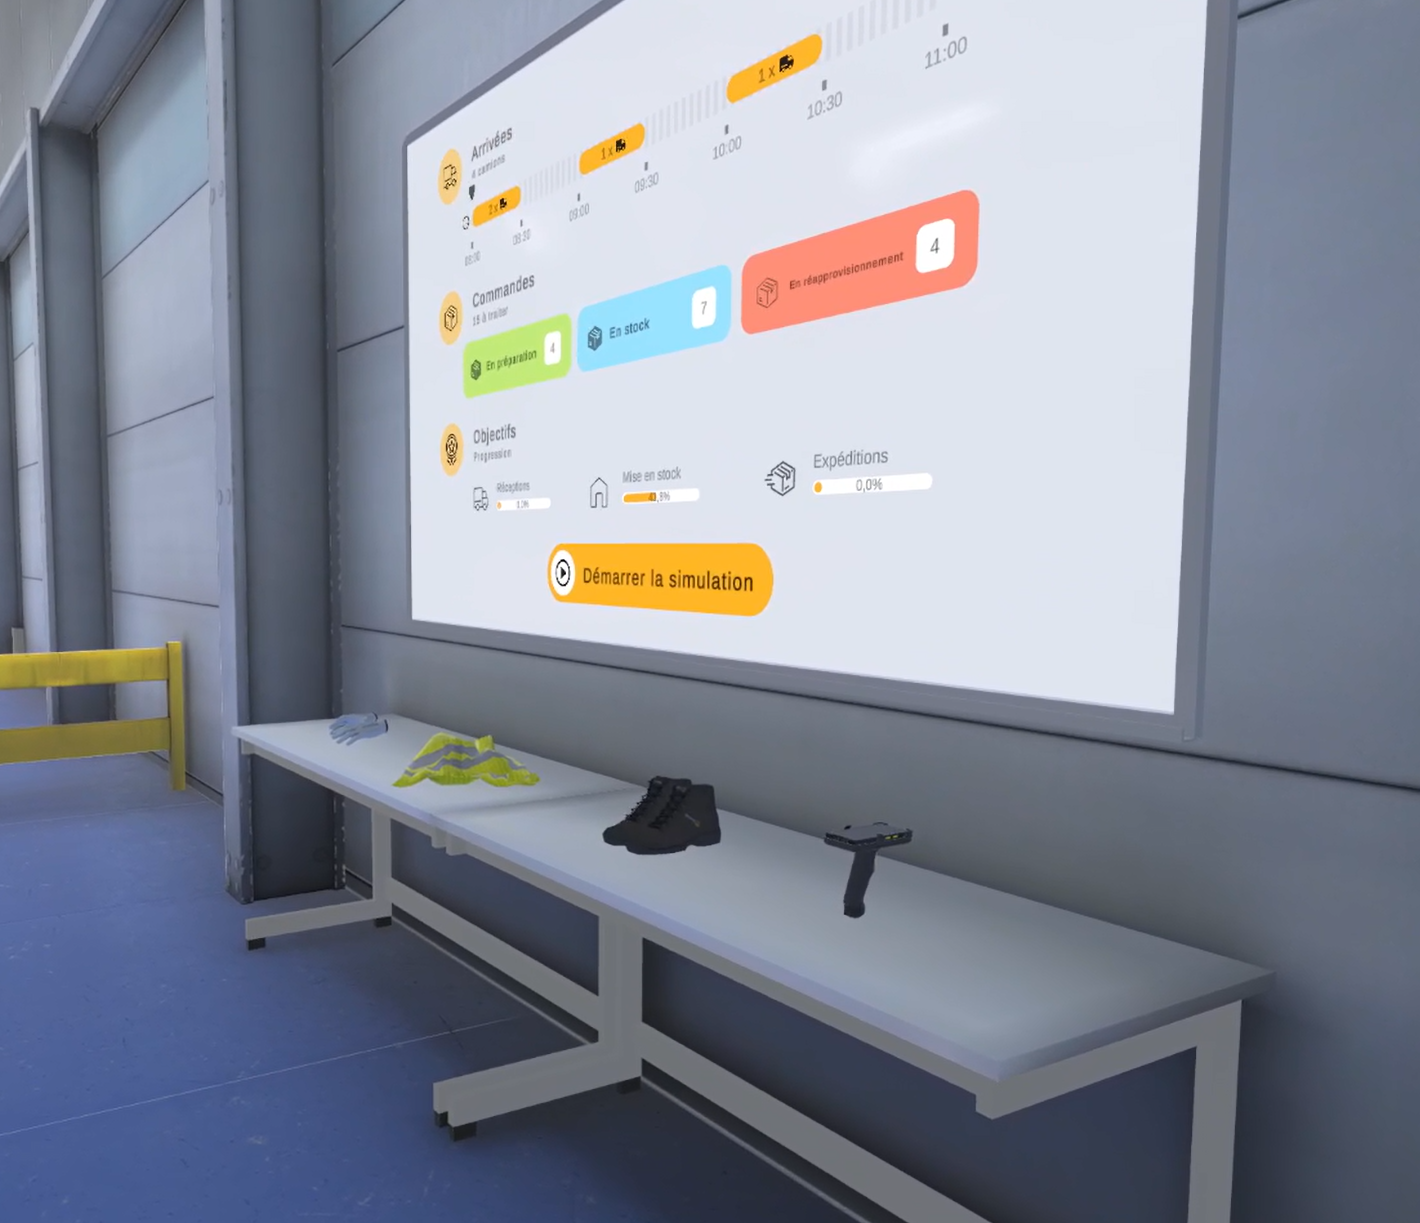
When the application is launched, the user finds themselves in a main room called the “welcome hall,” where they see a screen displaying the simulator’s main menu.
The main menu allows the user to log in and select the exercise they wish to perform. At the end of each exercise, they will be teleported back to this screen.
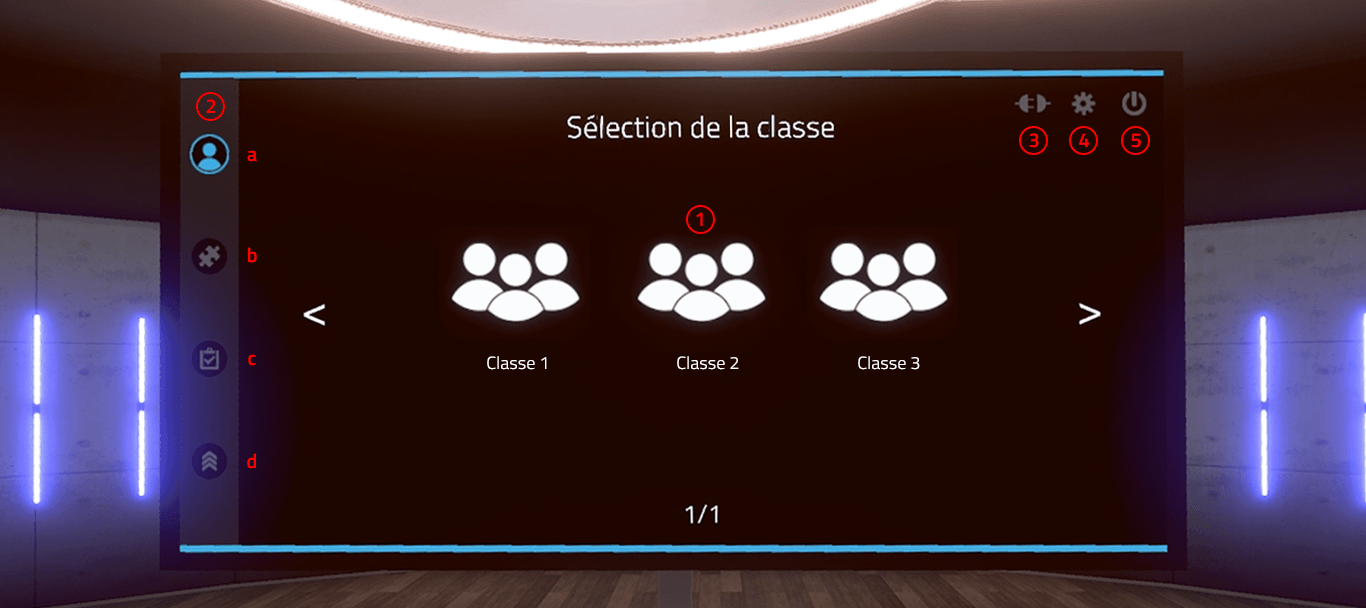
The main menu is organized as follows:
-
Class selection (online mode only): classes are configured on the VULCAN online platform.. Visual indicator of progress on the authentication and exercise selection pages:
-
Authentication
-
Module selection
-
Level selection
-
Exercise selection
-
-
Switching to offline mode: exercises are no longer retrieved from Vulcan and results will not be sent back to Vulcan. A generic user named DEMO is then used instead of a student connected to Vulcan.
-
Displaying the settings screen: the settings screen allows you to change the simulator language, among other things..
-
Quitting the application
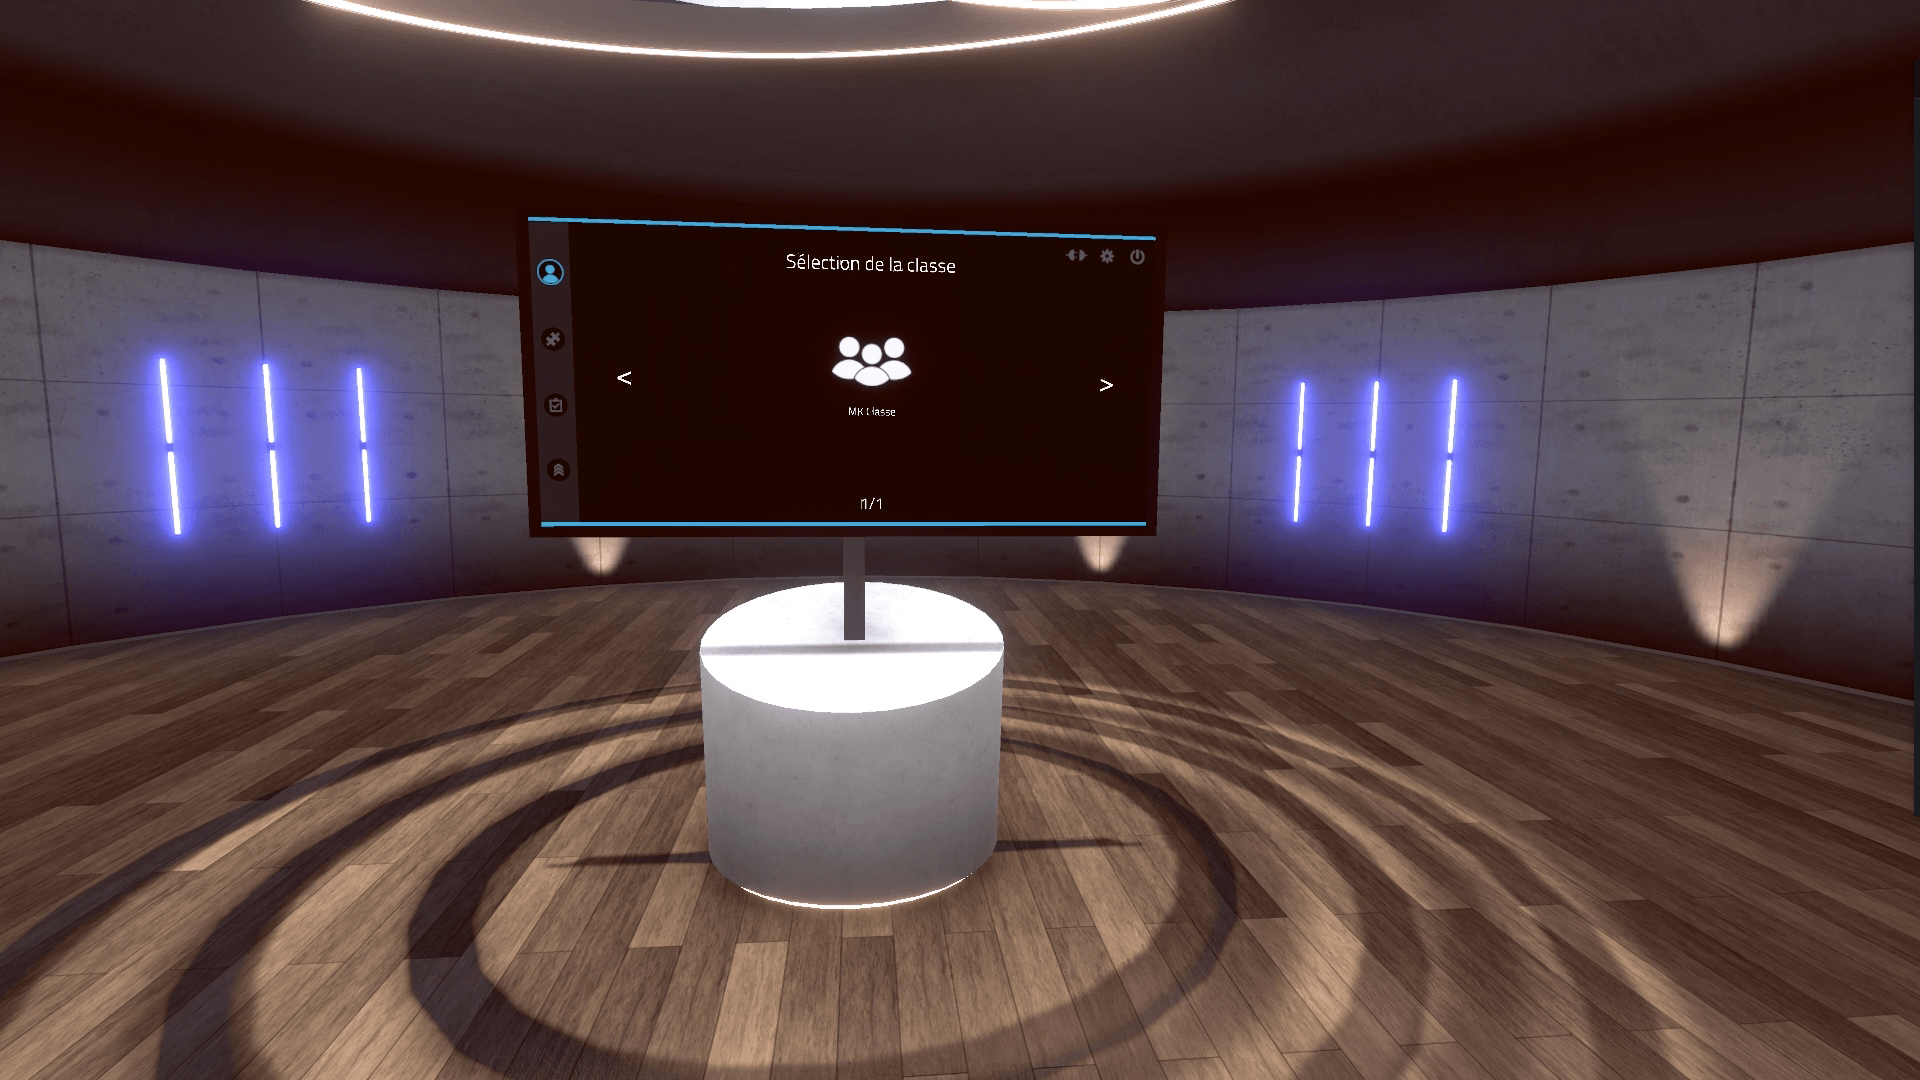
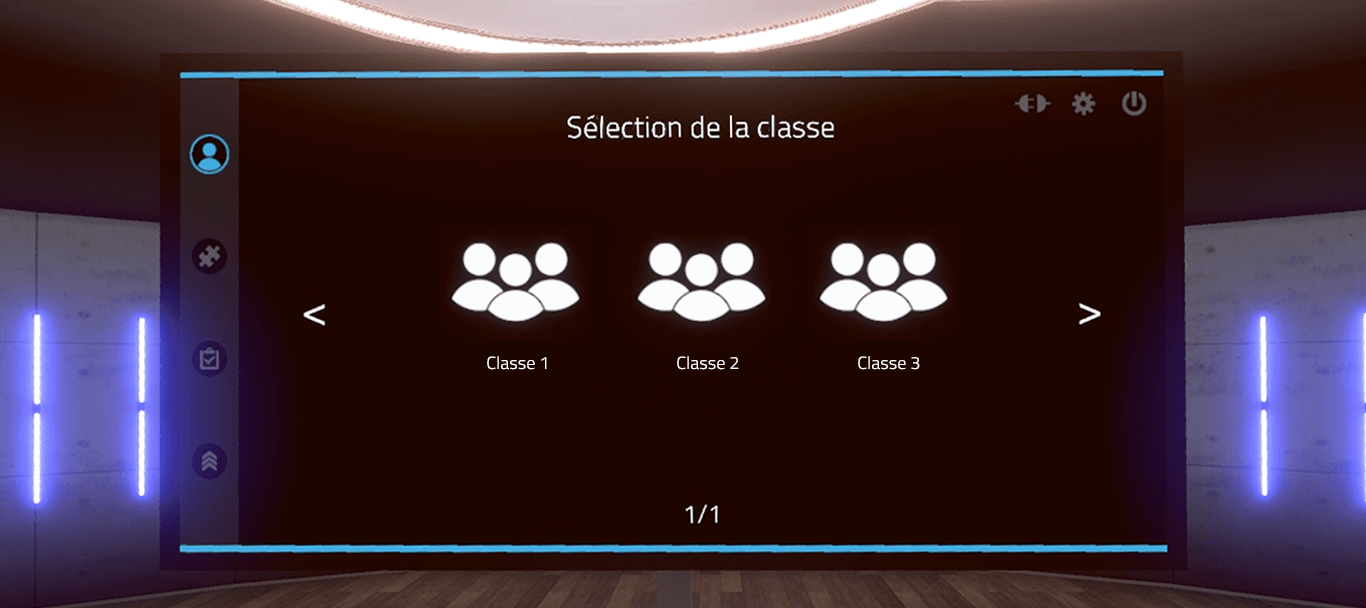
2.2.2. Class Selection
First, the user needs to select the class in which they are enrolled.
This menu only appears when the simulator is connected to the VULCAN online platform.
Click once to select the class, then click again to confirm your selection.
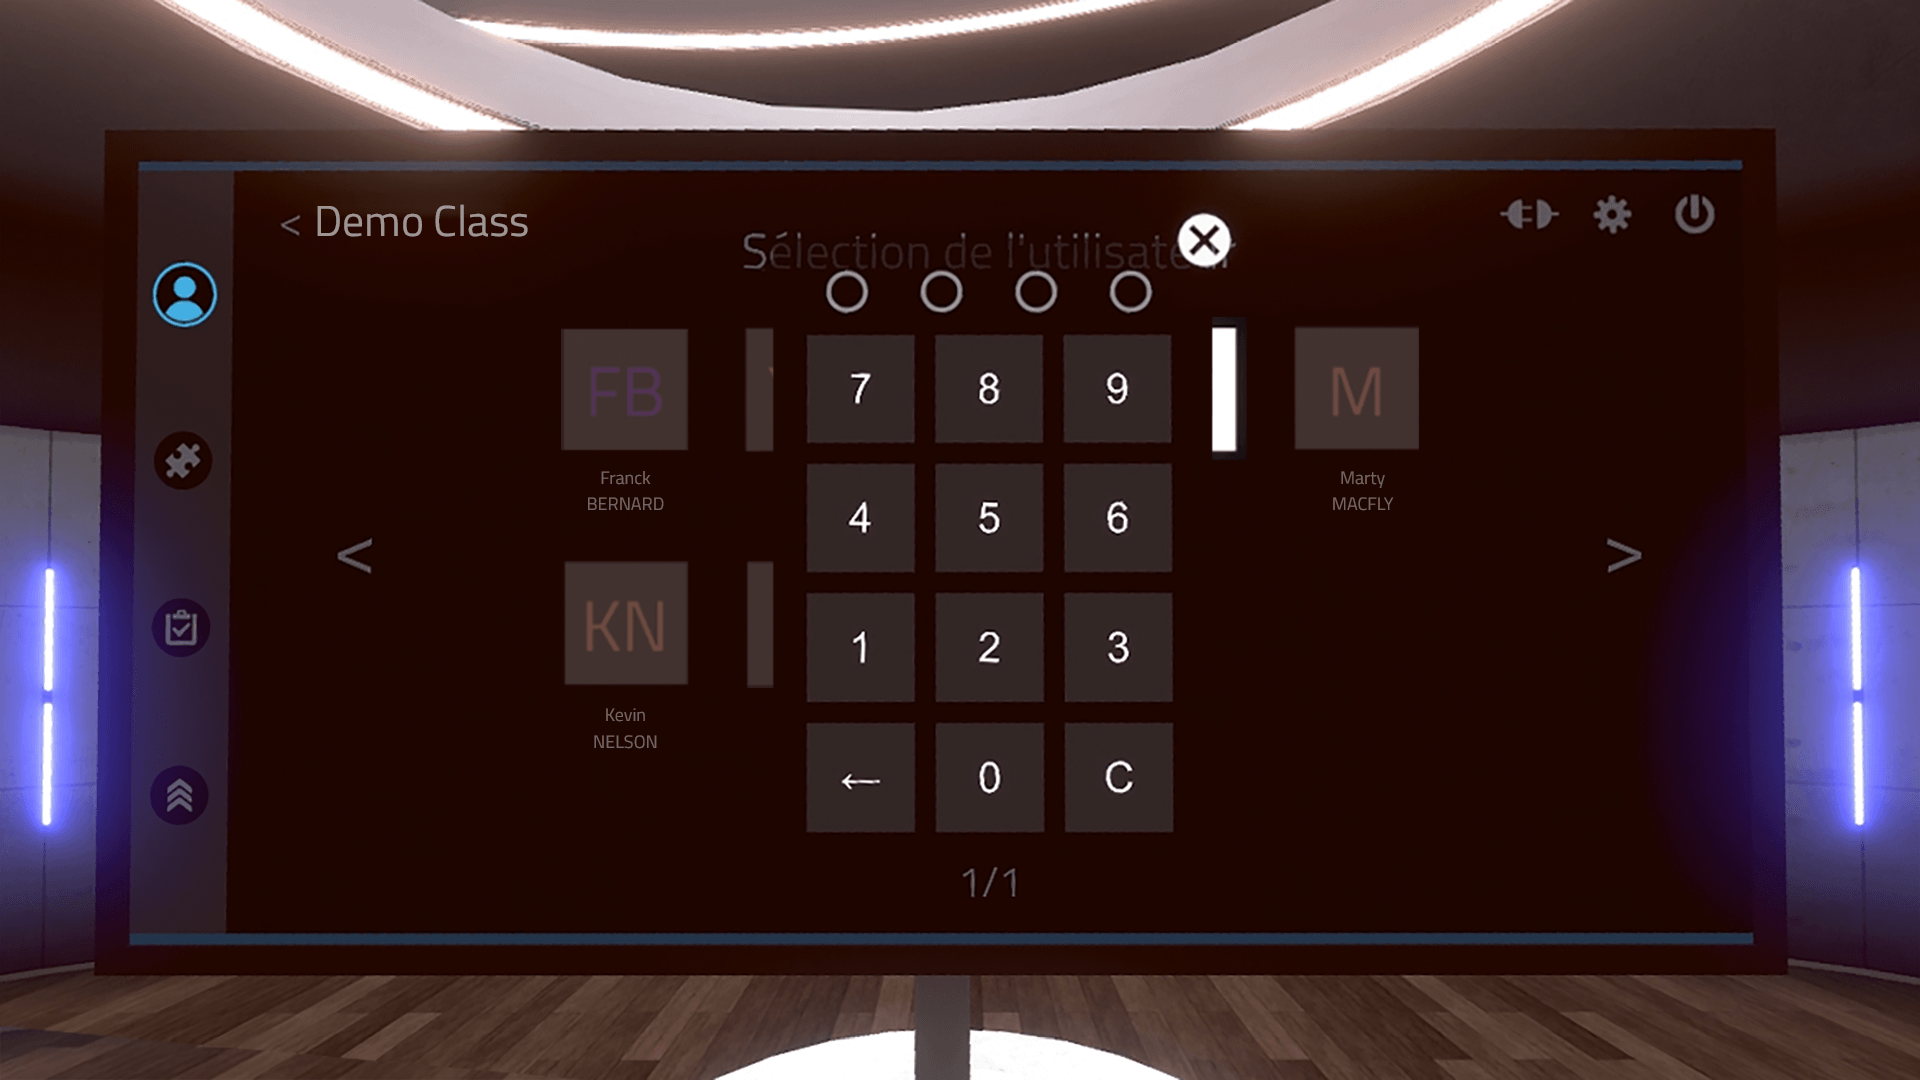
2.2.3. User selection
Once the class has been selected, the user must be authenticated. Clicking on the user’s name will display a window in which they must enter their PIN code, a four-digit number configured on VULCAN. Users who are not assigned to a MIMBUS LOGISTICS learning path will appear grayed out. It will not be possible to log in with them on the simulator.
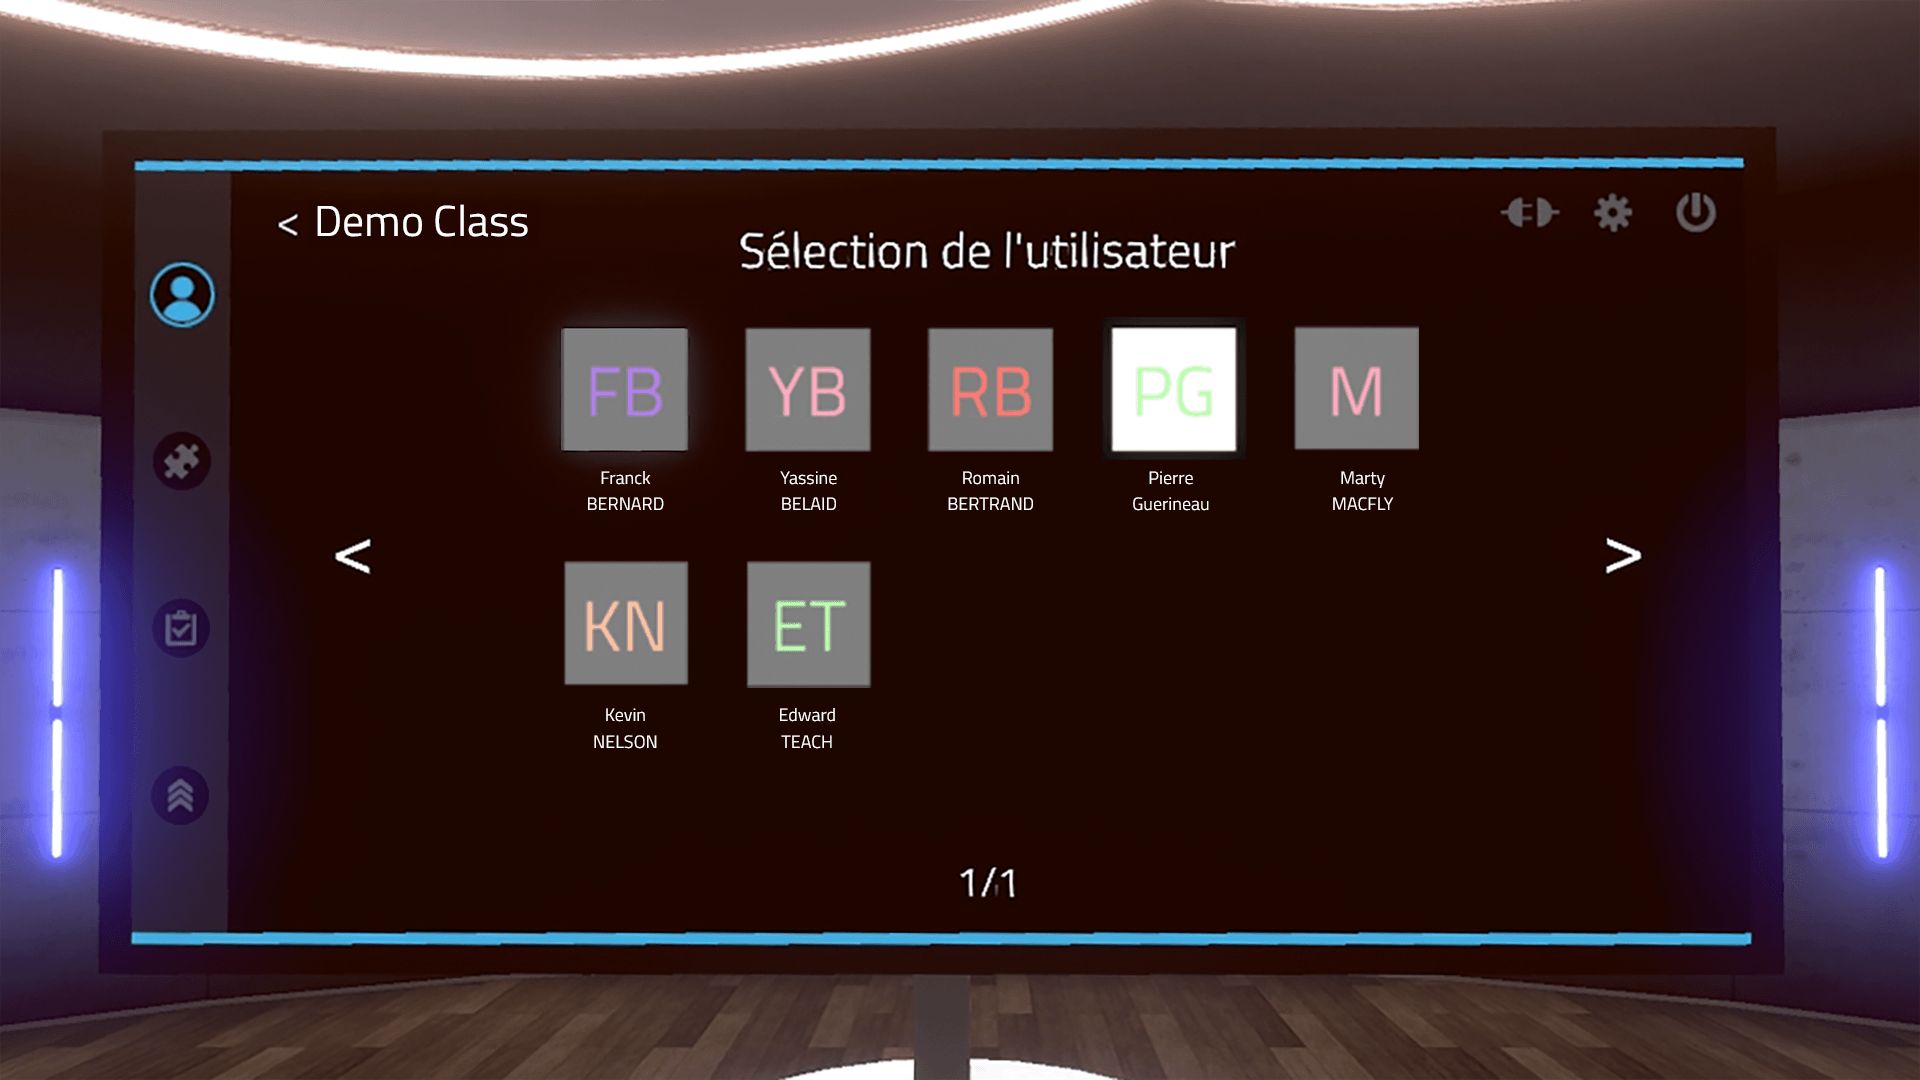
In offline mode, a demo user will be automatically selected.
2.3. Exercise Selection
Once the user has been authenticated, the exercise selection menu is displayed.
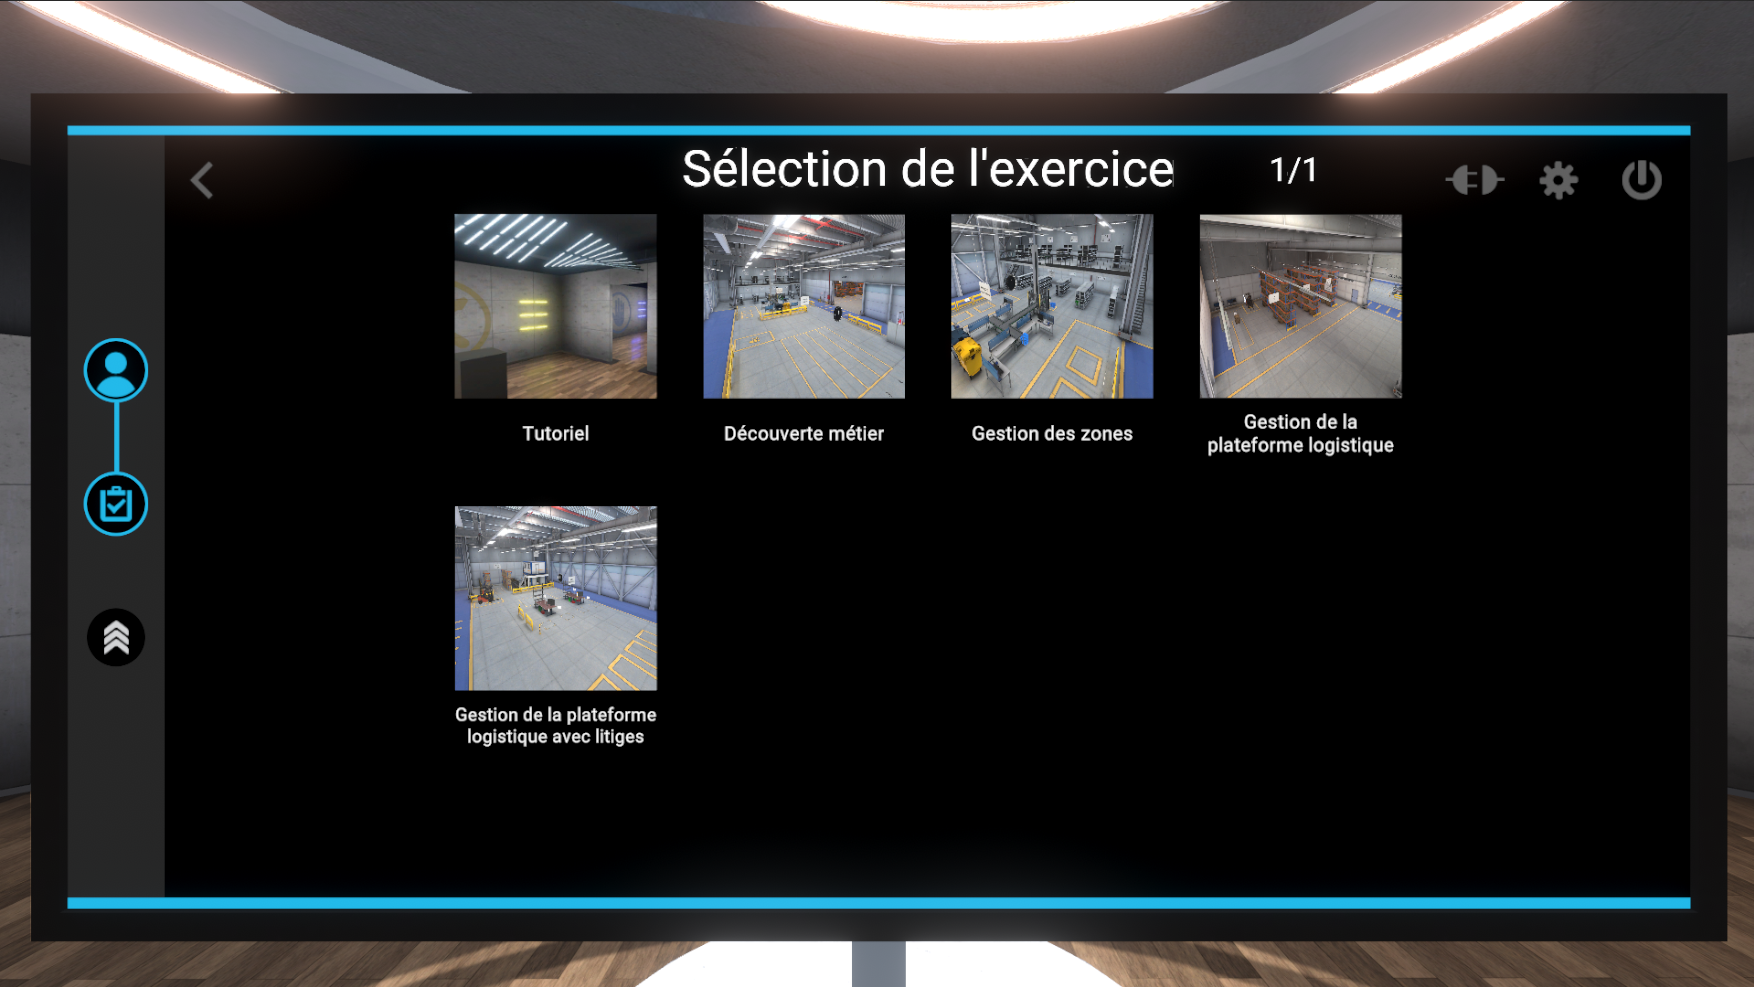
This page displays the exercises corresponding to the module selected previously. Clicking on an exercise once displays a description of the selected exercise; clicking a second time launches the exercise.
The tutorial allows you to familiarize yourself with the commands using a simplified scenario.
2.4. Watch
A watch appears on the user’s left controller, at wrist level. It will accompany the user throughout the exercise and guide them thanks to its three features:

-
Compass: The needle indicates the direction of the areas of interest for each stage of the exercise.
-
Stopwatch: Indicates the time elapsed since the start of the exercise.
-
Exit button: The user can exit the exercise at any time by clicking this button.
To interact with the buttons on the watch, the user should point their right hand toward the watch. A laser activates when the user’s right hand approaches the watch. It allows them to interact with the buttons by clicking on the interaction button on the right-hand controller.
2.5. Score Screen
At the end of each exercise, the user is teleported back to the lobby, where they are greeted by a score screen displaying the results of the exercise.

The score screen is organized as follows:
-
Validation or rejection of the exercise with results displayed as a percentage.
-
Exercise evaluation criteria. The evaluation criteria are specific to each exercise.
-
Events shows all actions validated by the user based on the time elapsed since the start of the exercise.
-
[Optional] Movements shows a map of the user’s movements during the exercise
2.6. Didacticiel
Afin de se familiariser avec les interactions disponibles, un scénario didacticiel peut être lancé depuis le menu de choix du module.
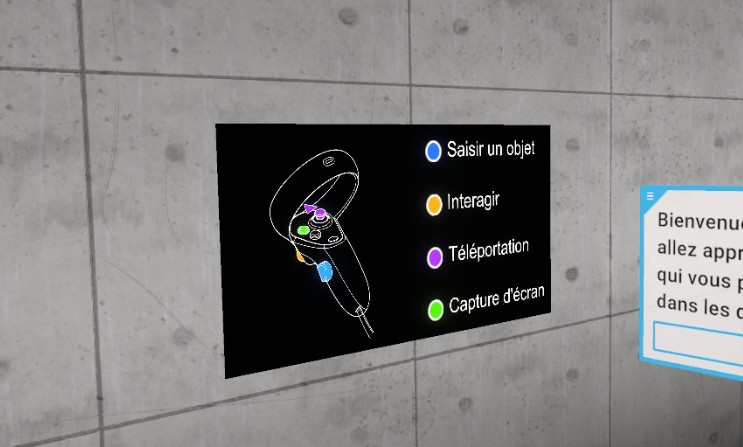
Le didacticiel aura pour but d’apprendre à l’utilisateur les commandes de son matériel de réalité virtuelle et les différentes métaphores utilisées dans l’application de façon claire et progressive. Il prendra place dans un environnement neutre et dépouillé afin de ne pas distraire l’utilisateur des différentes actions attendues.
Un panneau permettant de connaitre l’association entre les touches de la manette de l’utilisateur et les actions sera toujours visible pendant l’expérience.
Le didacticiel se présente sous la forme de salles à thèmes successives, que l’utilisateur devra valider les uns après les autres :
-
Se déplacer
-
Saisir et déplacer un objet
-
Interagir avec un objet
Dans chacune des salles, l’utilisateur apprendra une action (utilisation d’un bouton) dans un espace dédié, puis devra mettre en pratique cette action pour quitter la salle et passer à la suivante. Une fois les trois salles validées, l’utilisateur passera une dernière porte pour terminer le didacticiel.
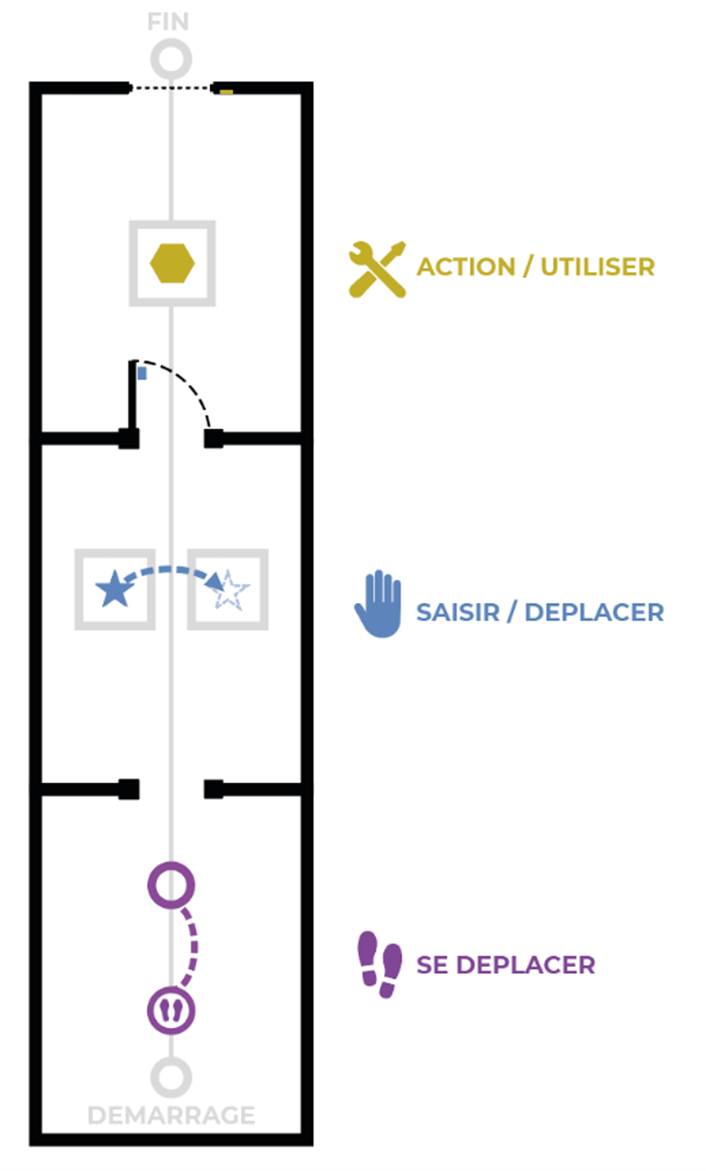
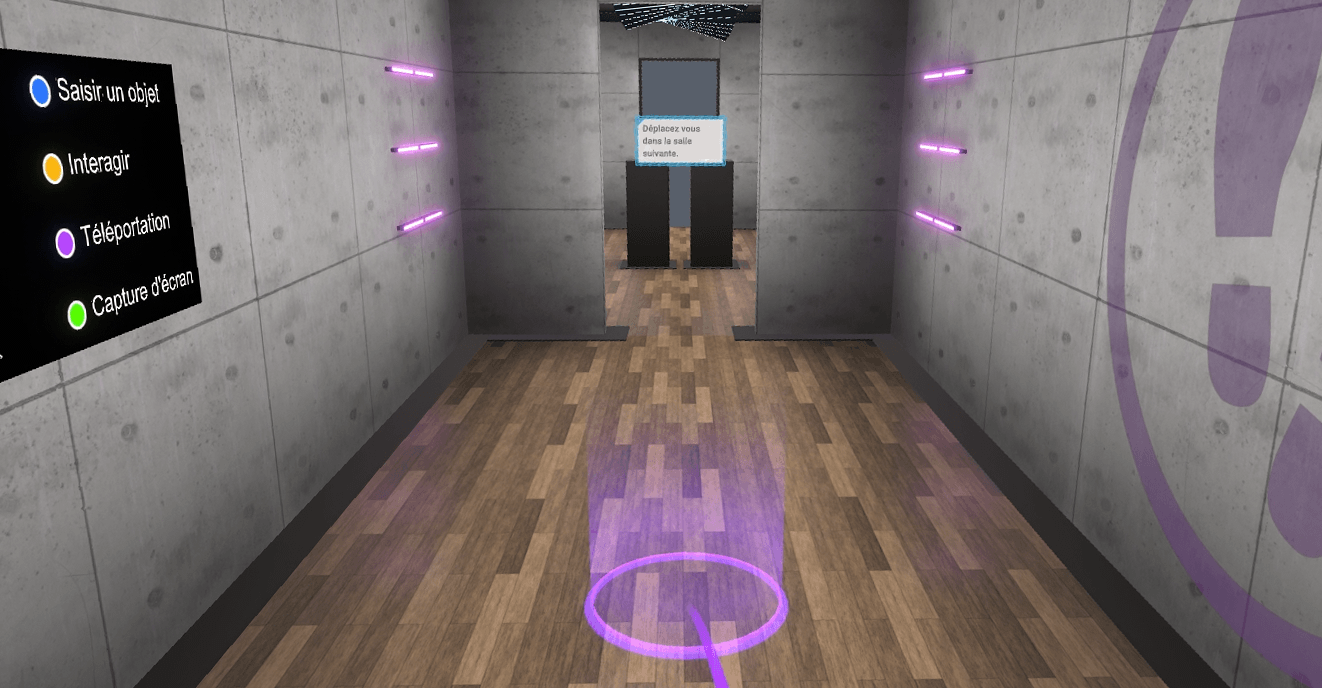
2.6.1. Déplacement
Objectif : apprendre à se mouvoir dans le monde virtuel et à reconnaitre les marqueurs indiquants de se positionner à un emplacement précis.
L’utilisateur apprendra à se déplacer par téléportation. Pour quitter ce premier atelier, l’utilisateur sera invité à se téléporter à nouveau vers la salle suivante.
En appuyant sur la touche "Téléportation" (cf. chapitre Contrôleurs), il est possible d’enclencher une téléportation. Tant que le bouton est maintenu, vous pouvez choisir où vous téléporter. Au relâchement du bouton, la téléportation sera effectuée.
Un pointeur parabolique sortant du contrôleur sera alors visible et symbolise le chemin parcouru lors d’une téléportation. Si une téléportation est possible, ce pointeur est de couleur violette; dans le cas contraire, celui-ci est de couleur rouge.

2.6.2. Saisir / déplacer un objet
Objectif : Apprendre à saisir un objet, le lâcher et le déposer sur une zone aimantée. Reconnaître le retour visuel associé.
L’utilisateur sera invité à approcher sa main d’un objet, visualiser le retour visuel associé (contour bleu), puis à saisir cet objet à l’aide du bouton associé pour et le déposer sur une zone prévue à cet effet sur un second présentoir.
Cette action validée, l’utilisateur sera invité à sortir de la pièce en ouvrant une porte, ce qui lui donnera l’occasion d’utiliser à nouveau l’interaction "Saisir un objet" sur la poignée.

2.6.3. Action / utiliser un outil
Objectif : Apprendre à interagir avec des outils ou des boutons, reconnaître le retour visuel associé.
L’utilisateur sera invité à interagir avec un objet sur un présentoir (l’objet sera entouré d’un contour jaune signalant la possibilité de l’activer) et l’activer en utilisant le bouton associé.
Pour sortir du didacticiel, l’utilisateur devra se déplacer au fond de la salle et appuyer sur le bouton d’ascenseur en utilisant le bouton "Interagir". Un fondu au noir le ramènera dans le hall d’accueil.

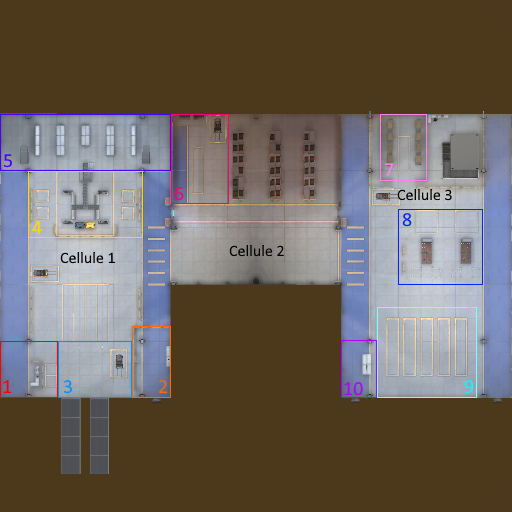
3. Warehouse Layout
-
Receiving area
-
Briefing area
-
Unloading dock
-
Administrative receiving
-
Small volume storage area
-
Large volume administrative receiving
-
Dispute area
-
Order preparation area
-
Shipping dock
-
Shipping area
4. Warehouse Interactions
4.1. Equip PPE
Personal protective equipment (PPE) must be worn during all exercises before entering the work area, otherwise your score will be reduced.
Gloves, safety shoes, and a vest must be worn.
-
Gloves: Press the interaction button on the controller. .
-
Safety shoes: Press the interaction button on the controller..
-
Vest: Press the interaction button on the controller.
4.2. Using the forklift truck
The forklift is an essential tool for moving crates and/or pallets in the simulation.
Users will be required to use forklifts to unload trucks, store, and ship crates.
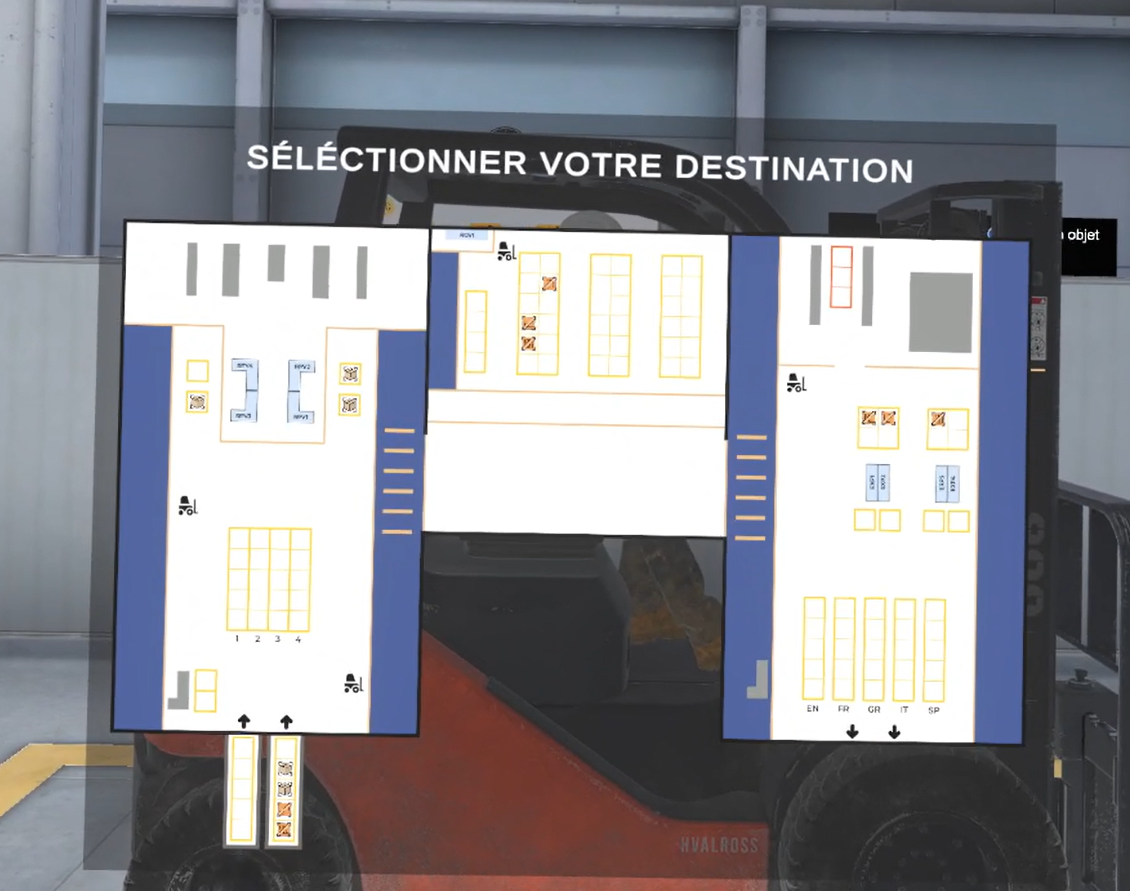
On the forklift interface, users will be able to see the location of all items that can be moved by the forklifts, as well as the spaces where they can be moved.
 Pallet, package used in small volume reception.
 Crate, large-volume package used in large-volume receiving.
 Mobile Storage Unit (MSU), a tool for shipping small volumes.
 Area blocked, currently in use by another forklift truck and/or MSU
4.3. Using the box cutter
On each work surface in the administrative reception area, the user will find a cutter and instructions on how to use it.
They will need to pick up the cutter and then use the interaction button to extend the blade.

4.4. Using the picking scanner
Each user will be equipped with a picking scanner.
This scanner has a screen that displays the locations where the products to be picked are located.
|
Note
|
The locations indicated on the scanner may not be correct if another user has made a mistake in storage. In fact, as in a real warehouse, the work of each position is interdependent. |

5. Explanation of Responsibilities
During this simulation, the user will have the opportunity to take on several logistics agent positions. These will be available during each exercise, so we will describe each of these positions in this section.
5.1. Receiving Dock
When staffing the Receiving Dock, the user’s role will be to unload the trucks using forklifts.
After that, the user will have to scan the labels on the crates and pallets taken out of the trucks using the scanner available at their workstation.
Each time the user scans a label, an “R0” label will be printed, which the user must then take and place on the scanned crates and/or pallets.
Once the pallets have been labeled, they must be placed in the receiving area.
5.2. Smalling Volume Receiving
For small-volume deliveries, the user must collect the boxes from the pallets and process them.
This task is divided into two stages: processing the boxes and storing the products.
Box processing procedure:
-
Retrieve a box from the pallet
-
Place the box on the work desk
-
Open the box using the box cutter available on the work desk
-
Scan the delivery note in the box
-
Retrieve the labels printed when scanning the delivery note
-
Place the labels on the products in the box
-
Remove the products from the box and place them in a conveyor box
-
Place the conveyor box on the conveyor
Product storage procedure:.
-
Retrieve the box from the conveyor belt
-
Place the products in the appropriate bins
-
All products have a label associated with a bin name
5.3. Large Volume Receiving
In Large Volume Receiving, the user will need to process high volumes, labeled items, and stored items.
Procedure for processing high volumes:
-
Take the scanner from the work surface
-
Scan the “R0” labels on the boxes
-
Take the printed labels and place them on the boxes
-
Send the boxes to the correct locations using the forklift truck
5.4. Stock Picking
When picking stock, the user must pick small-volume and large-volume items from throughout the warehouse.
Stock picking procedure (small volume):
-
Take a picking box from the “Order Preparation” desk
-
Go to Zone 1 in the small volume storage area
-
Take the picking scanner
-
Pick the products displayed on the scanner
-
Return the picking box with the picked items inside.
5.5. Order Preparation
In the role of an order filler, the user will be required to retrieve previously picked products and assemble orders to send them to the correct recipients.
-
Retrieve the picked products
-
Sort the products by order
-
Select an order
-
Move the products to the loading docks associated with each order’s destination
-
For small volumes: Take a picking box.
-
Fill this box with the small volumes related to the order
-
Call a Mobile Storage Unit (MSU)
-
Place the box on the MSU
-
-
For large volumes:
-
Use a forklift to move the crate
-
-
-
Go to the shipping area
-
Send the products using the computer
6. Tutorial Modules
6.1. Career Discovery
During this exercise, users will be asked to explore all responsibilities of the warehouse.
They will also discover all the features and mechanisms they will need to use in advanced scenarios, with details and some help.
|
Note
|
To keep this exercise from becoming too long, it contains only what is necessary to learn all of the roles succinctly. |
6.1.1. Scenario Sequence
-
Confirm the start-up instructions.
-
Equip PPE and the picking scanner.
-
Start the simulation.
-
Go to the unloading docks.
-
Move the pallet from the truck to the reception waiting area using the forklift.
-
Go to the receiving waiting area.
-
Use the scanner to scan the label on the pallet.
-
Place the “R0” label on the pallet
-
Move the pallet to the administrative reception area
-
Take the box from the pallet
-
Open the box
-
Scan the receipt
-
Place the labels on the products
-
Take a conveyor box
-
Put the products in the box
-
Put the box on the conveyor
-
Go to the small volume storage area
-
Store the products in the box named on the products
-
Go to Zone 2
-
Take the scanner from the large volume administrative reception desk
-
Scan the crate
-
Put the label on the crate
-
Store the crate in the location indicated on the label using the forklift
-
Go to Zone 3
-
If the user has forgotten the picking scanner, go and fetch it from the starting area
-
Take a picking box
-
Return to the small volume storage area in Zone 1
-
Pick the products indicated on the picking scanner on the belt
-
Return to the order preparation area with the picked products
-
Start preparing the order
-
Call an MSU
-
Place the picking box on the MSU
-
Send the MSU to the area designated on the order screen
-
Confirm order preparation
-
Go to the shipping area
-
Ship the products
-
Return to the briefing board
-
Stop the simulation.
6.1.2. Evaluation criteria
The evaluation criteria are used to determine the final score for the exercise.
![]() Quality of execution: Evaluates the user’s ability to follow instructions rigorously, store products in the right places, and send orders to the right recipients.
Quality of execution: Evaluates the user’s ability to follow instructions rigorously, store products in the right places, and send orders to the right recipients.
![]() Execution time: Evaluates how quickly the user can complete the requested tasks.
Execution time: Evaluates how quickly the user can complete the requested tasks.
![]() Safety: Assesses the user’s ability to perform safety actions such as putting on protective equipment or moving around safely.
Safety: Assesses the user’s ability to perform safety actions such as putting on protective equipment or moving around safely.
7. Training module
The exercises in the training module are multiplayer exercises with no fixed scenario.
They are open-ended and allow users to organize themselves as they see fit to optimize their positions and warehouse management.
7.1. Zone management
During this exercise, users will be able to perform all available tasks in the warehouse. There is one task per position, which will allow users to learn how to collaborate in the simulation and manage the production flow together.
|
Note
|
This exercise is designed to be performed by 1 to 4 people for a duration of 5 to 15 minutes. |
7.1.1. Warehouse contents
Incoming flow |
Truck #001 - 1 Large volume |
Current stock |
Small volume administrative reception - 4 Spoons. |
Outgoing flow |
Order #001 - 3 Spatulas, 1 pallet |
7.1.2. Evaluation criteria
The evaluation criteria remain the same as in the Career Discovery exercise, except that the Quality of execution section is no longer dependent on following instructions.
![]() Quality of execution: Evaluates the user’s ability to follow instructions rigorously, store products in the right places, and send orders to the right recipients.
Quality of execution: Evaluates the user’s ability to follow instructions rigorously, store products in the right places, and send orders to the right recipients.
![]() Execution time: Evaluates how quickly the user can complete the requested tasks.
Execution time: Evaluates how quickly the user can complete the requested tasks.
![]() Safety: Assesses the user’s ability to perform safety actions such as putting on protective equipment or moving around safely.
Safety: Assesses the user’s ability to perform safety actions such as putting on protective equipment or moving around safely.
7.2. Platform Management
During this exercise, users will be able to complete all available tasks in the warehouse. This simulation is designed to represent the workload of a small warehouse, so users will need to organize themselves as best they can to complete all tasks on time.
|
Note
|
This exercise is designed to be performed by 4 to 8 people for a duration of 30 to 45 minutes. |
7.2.1. Warehouse contents
Incoming flow |
Truck #001 - 2 pallets, 4 Pizza cutters, 2 Ladles, 2 Measuring cups |
Current stock |
Small volume storage - 6 Spoons, 4 Spatulas, 5 Scissors, 3 Graters, 7 Ladles |
Outgoing flow |
Order #001 - 2 pallets |
7.2.2. Evaluation criteria
The evaluation criteria remain the same as in the Career Discovery exercise, except that the Quality of execution section is no longer dependent on following instructions.
![]() Quality of execution: Evaluates the user’s ability to follow instructions rigorously, store products in the right places, and send orders to the right recipients.
Quality of execution: Evaluates the user’s ability to follow instructions rigorously, store products in the right places, and send orders to the right recipients.
![]() Execution time: Evaluates how quickly the user can complete the requested tasks.
Execution time: Evaluates how quickly the user can complete the requested tasks.
![]() Safety: Assesses the user’s ability to perform safety actions such as putting on protective equipment or moving around safely.
Safety: Assesses the user’s ability to perform safety actions such as putting on protective equipment or moving around safely.
7.3. Platform management with Claims Management
During this exercise, users will be able to complete all available tasks in the warehouse. This simulation is designed to represent the workload of a small warehouse, so users will need to organize themselves as best they can to complete the entire task on time.
Claims management is a new feature that comes into play when receiving truck deliveries, requiring the user managing this position to sort the pallets/crates received.
|
Note
|
This exercise is designed to be performed by 4 to 8 people for a duration of 30 to 45 minutes. |
7.3.1. Contenus de l’entrepôt
Incoming flow |
Truck #001 - 1 Dispute, 2 pallets, 4 Pizza cutters, 2 Ladles, 2 Measuring cups |
Current stock |
Small volume storage - 6 Spoons, 4 Spatulas, 5 Scissors, 3 Graters, 7 Ladles |
Outgoing flow |
Order #001 - 2 pallets |
7.3.2. Evaluation criteria
The evaluation criteria remain the same as in the Career Discovery exercise, except that the Quality of execution section is no longer dependent on following instructions.
![]() Quality of execution: Evaluates the user’s ability to follow instructions rigorously, store products in the right places, and send orders to the right recipients.
Quality of execution: Evaluates the user’s ability to follow instructions rigorously, store products in the right places, and send orders to the right recipients.
![]() Execution time: Evaluates how quickly the user can complete the requested tasks.
Execution time: Evaluates how quickly the user can complete the requested tasks.
![]() Safety: Assesses the user’s ability to perform safety actions such as putting on protective equipment or moving around safely.
Safety: Assesses the user’s ability to perform safety actions such as putting on protective equipment or moving around safely.