1. Scaffolding Safety Module
1.1. Modes
This section the different modes that are available in Virtual Construct Scaffolding Safety
The available modes are :
-
Free mode
-
Guided mode
-
Assessment / Test mode
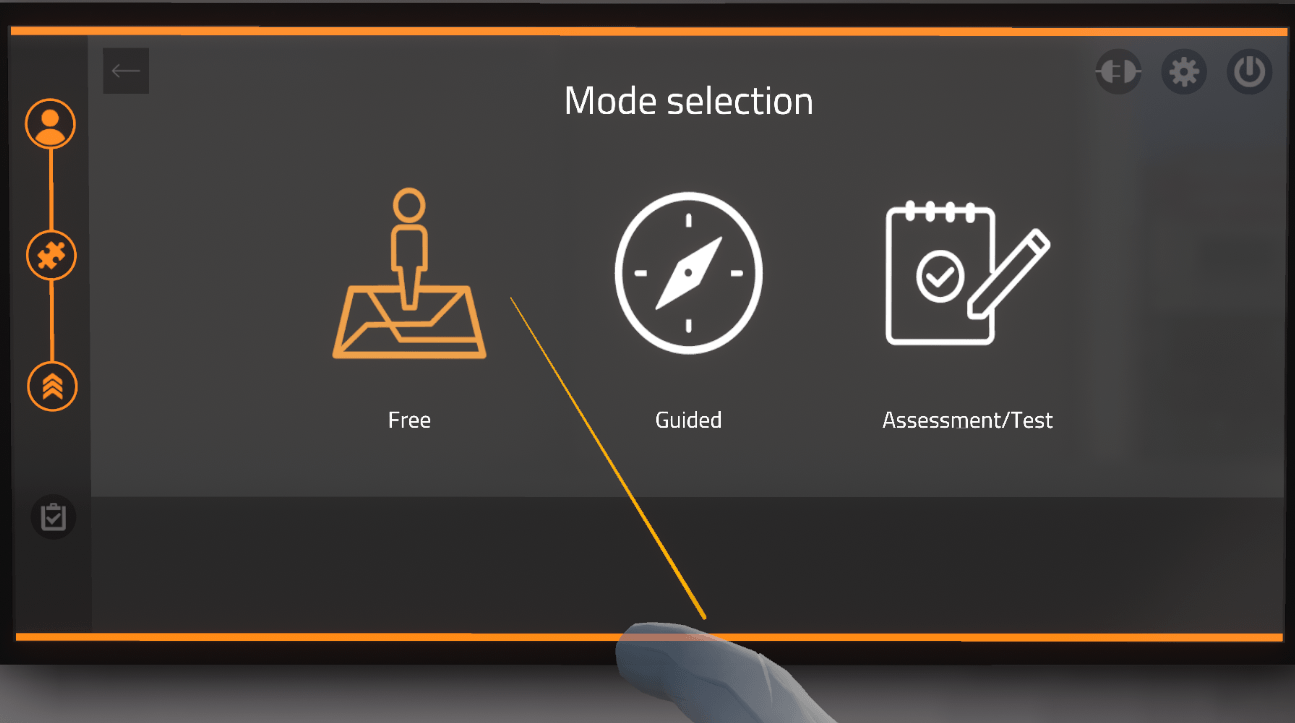
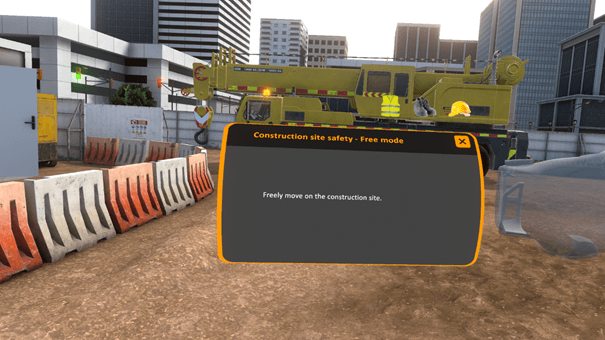
1.1.1. Free Mode
In free mode, the user moves about freely on the construction site. All the possible dangers on the construction site are present and fatal errors may occur if the user gets too close to one of the dangers. If the user becomes a fatality, he then respawns in the locker room and has to start over.

The user passes the exercise if they are able to cover a required distance in a specified time period. Both the distance and time parameters are set by the instructor in Vulcan (more detail on Vulcan at the end of the document).
In this mode, the user does not have the possibility of securing any dangers that he encounters and can leave the exercise at any time by clicking on the cross on the top right corner of the tablet on his left wrist.
When the user is finished, the time and distance statistics are displayed on the menu screen.
The evaluation criteria are:
-
Reaching the floor objective
-
Exceeding the target time "Time to accident"
1.1.2. Guided Mode
The user can select from two different scaffolding sites to use, facade and multidirectional scaffolding. They can be completed in any order.
After selecting an exercise, the user moves to a station which is identified by a red pin floating above it.
Once under a marker, the user is given instructions on the tablet and through the headset.

After one exercise is completed then the user is transported to the locker room and needs to complete the other exercise.
The exercises are described in greater detail later in this document.
1.1.3. Assessment / Test Mode
This mode tests the user on the knowledge they have acquired as they have completed the various exercises.
The user selects Assessment/Test Mode from the three choices on the main menu and then selects which exercise they are to be tested in.
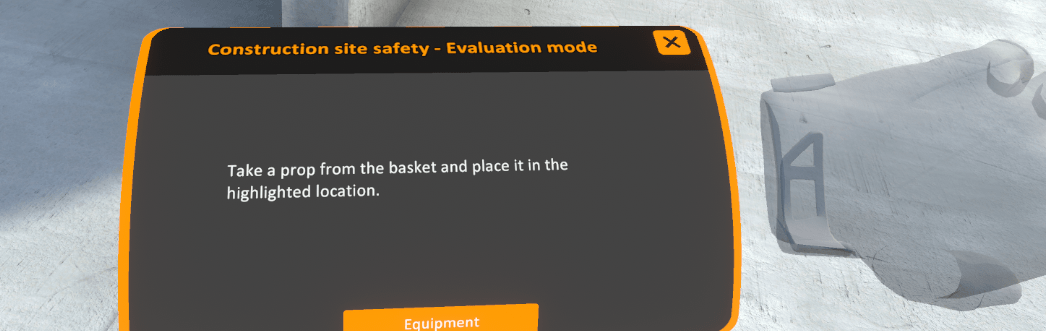
During the Assessment/Test Mode, the user gets instructions on their tablet as well as through the headset.
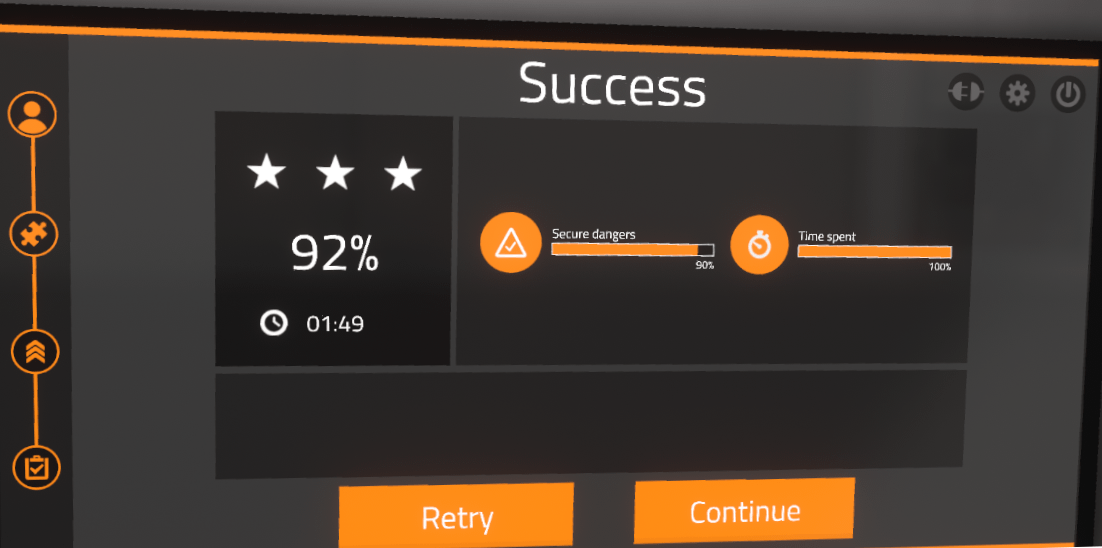
When the user is finished each section of the evaluation, the results are displayed floating beside each station.
When the user is completely finished the evaluation, the final results will be displayed on the main menu. The user will then have the choice to retry that specific evaluation or continue on to the next evaluation.
1.2. Guided Mode Exercises (Reception Exercises)
In guided mode, the user will be helped at each phase of the exercise with screen tips and audible tips. The user is invited to correct any mistakes as he or she goes along to assimilate best practices.
The evaluation criteria are:
-
Analysis: relevance of the user’s answers during the preparation phase
-
Scenario: validation of all of the steps of which the scenario is comprised
-
Identification: capacity to recognize assembly flaws
-
Execution time: capacity to finish the scenario in a defined time
Both Guided Mode exercises start the same way so the procedure will be explained here and then any differences will be explained in the appropriate subsection below.
The following steps must be completed:
1.2.1. Select exercise
User selects an exercise to complete
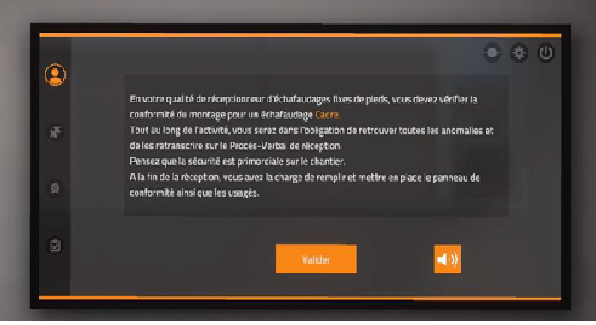
1.2.2. Receive instructions
The screen changes to an instruction screen. Click on the Interactive Button to hear a voice read it to you.
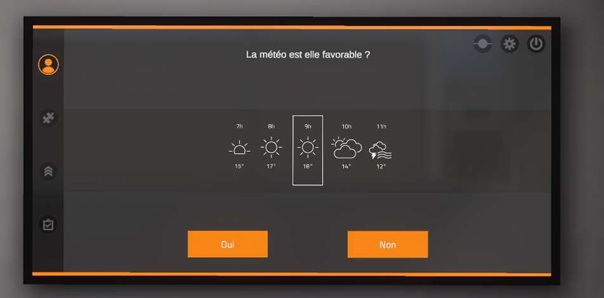
1.2.3. Select weather
After validation, a weather forecast appears. The user must determine if the weather conditions are favourable scaffolding work on the construction site.
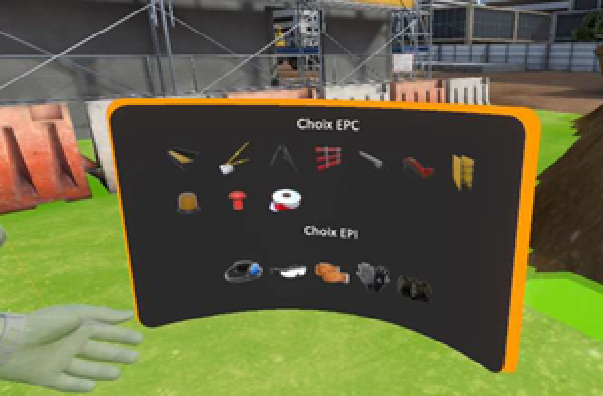
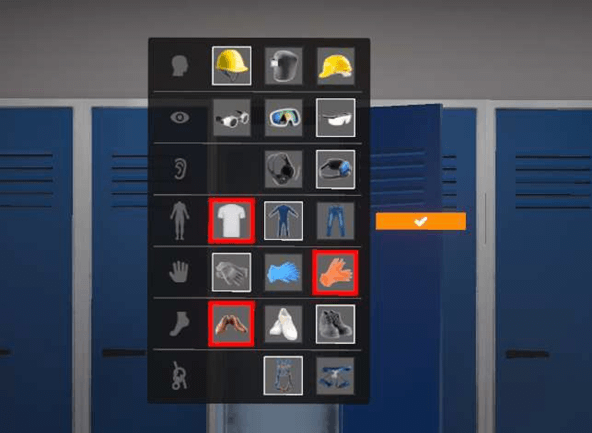
1.2.4. Get PPE
Turn to the left and an open locker is visible with an interface enabling the user to choose the equipment to wear. If the user makes a poor choice, this is highlighted, and the user has to correct the error before moving on to the next phase. Once the user has selected the equipment, click on the checkmark on the right hand side of the screen
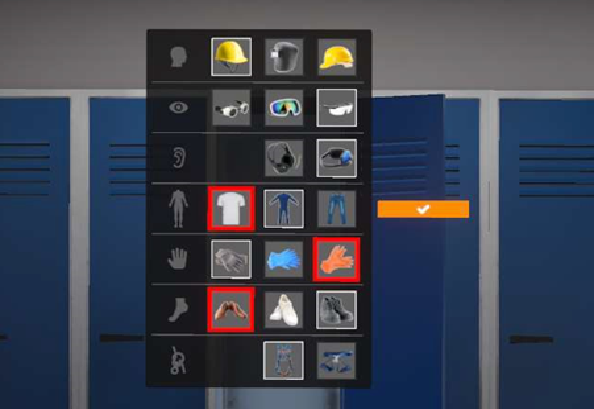
The correct PPE to select is:
|
Hardhat with strap |
|
Protective glasses |
|
Ear protectors |
|
Coveralls |
|
Work gloves |
|
Saftey boots |
|
Harness |


1.2.5. Select location
The user is automatically brought to the work site and has to choose the location that corresponds to the exercise. Teleport to the desired location.

The next steps are specific to their own type of scaffolding and will continue in their appropriate sub-section.
1.3. Facade Scaffolding
In this exercise, the user must evaluate the quality of the mounting of the scaffolding and identify any flaws. All the faults must be found with the scaffolding before the exercise can be completed. The user has to identify all the faults on a level before using the ladder to climb up to the next level.
1.3.1. Mark work area
The user is required to select the appropriate PPE and cution tape to mark the scaffolding as off-limits.

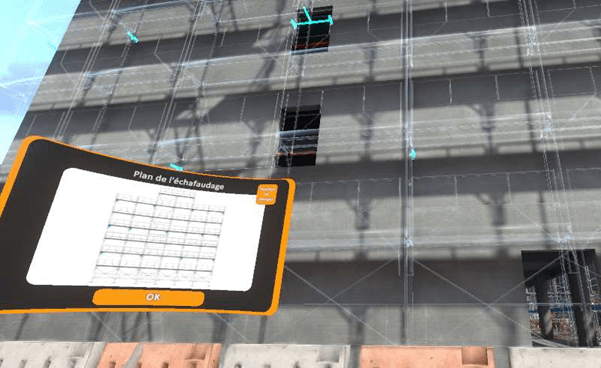
1.3.2. Check anchors
The user then has to look at the scaffolding construction plans and ensure they have been followed. On the top right hand corner of the Tablet, click on the "Highlight Anchors" button. This will highlight in green all the anchors on the scaffolding.
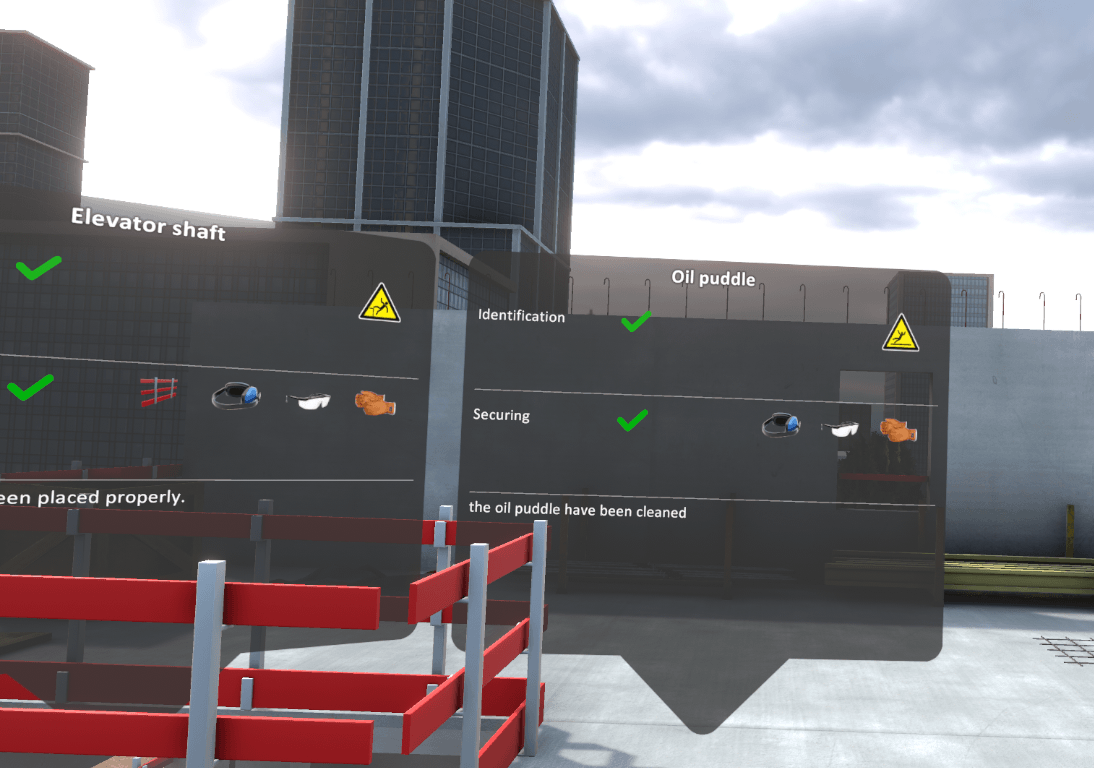
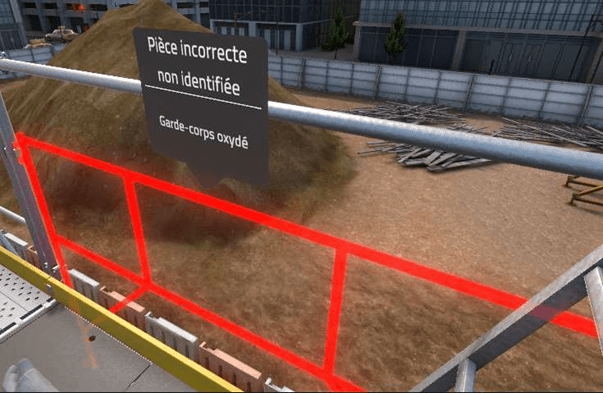
1.3.3. Identify dangers
The aim here is to methodologically identify all the scaffolding assembly flaws, floor by floor. As mentioned earlier, all the faults must be identified before the user is allowed to go up to the next floor. The faults are generated randomly as a function of the instructions given by the trainer on the Vulcan platform, so that each session is different for each user.
With the help of a laser, the user will highlight the parts that he considers to be defective or incorrectly assembled. The parts selected by the user appear highlighted in Cyan.
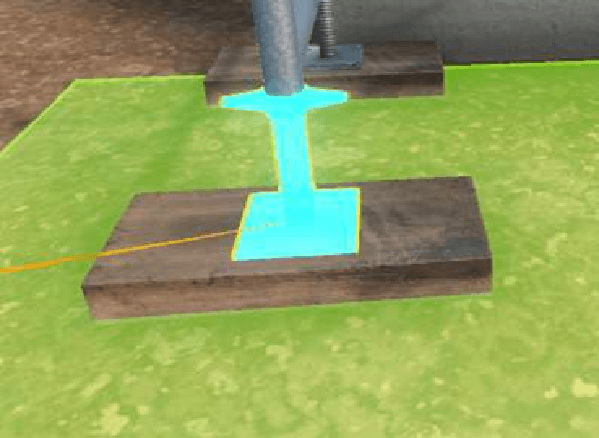
It is during this phase that the correction intervenes in Guided mode: if some flaws have not been identified by the user, the trap door will not open and the forgotten flaws will be highlighted in red, with a message indicating the mistake. The student must correct all mistakes before being able to reach the following level.
Once the user has identified all the flaws on a floor, he moves on to the next floor by using the ladder and oging through the trap door.
The possible faults are shown in the table below:
| Part | Flaw | Photo |
|---|---|---|
Anchors |
Incorrect anchors |
|
Base jack |
Missing nibs |
|
Plateau or tray |
Deformed retaining hook |
|
Metal planking |
Deformed |
|
Metal planking |
Oxidized |
|
Metal planking |
Retaining hook deformed |
|
Walk through frame |
Deformed |
|
Walk through frame |
Oxidized |
|
Guard rail |
Deformed |
|
Guard rail |
Oxidized |
|
Toe board |
Incorrectly installed |
|
Toe board |
Wrongly posioned |
|
Ladder |
Broken rung |
|
Ladder |
Broken hook |
|
Top rail |
Hook not secured |
|
Planking |
broken cable |
|


1.3.4. Multidirectional scaffolding
The guided mode for multidirectional scaffolding is identical to the guided mode for facade scaffolding. The difference is the type of scaffolding the user is required to assess.
1.4. Usage Exercises
This exercise gives the user practice with the use of scaffolding by different trades. The scaffolding is considered to have already been approved and controlled; so the aim of the exercise is to acquire good daily practices.
Such as:
-
IPE management
-
Sign verification
-
Movement between the floors
-
Obstacle management
There are four different modes corresponding to four different trades:
-
Finishing
-
Study of constructions
-
Structural work
-
Wood framing
Each trade will starting in a different zone, depending on the trade.
The evaluation criteria, for this exercise is as follows:
-
Analysis : relevance of the learner’s answers during the preparation phase
-
Scenario : validation of all the phases that make up the scenario
-
Identification : capacity to see and rectify obstacles on the user’s path
-
Execution time : Capacity to finish the scenario in a defined time
1.4.1. Starting the exercise
The following steps must be completed:
Select exercise
User selects an exercise to complete.
Receive instructions
The screen changes to an instruction screen. Click on the Interactive Button to hear a voice read it to you.
Select scaffolding
The user must select the type of scaffolding to be used.
Select weather
After validation, a weather forecast appears. The user must determine if the weather conditions are favourable scaffolding work on the construction site.
Get PPE
Turn to the left and an open locker is visible with an interface enabling the user to choose the equipment to wear. If the user makes a poor choice, this is highlighted, and the user has to correct the error before moving on to the next phase. Once the user has selected the equipment, click on the checkmark on the right hand side of the screen.
Arriving at site
Once the preparation phase is finished, the user is teleported to the construction site and must choose what scaffolding corresponds to the mission. The choice is validated by moving on to the appropriate area indicated in purple.
Ensure scaffolding specifcations
Before going on the scaffolding, the user must ensure that it’s specifications comply with the needs related to the trade selected iat the beginning of the exercise.
The user must read the sign to verify the maximum load is allowed:
-
Finishing : scaffolding bearing 200kg/m² or more
-
Construction studies : scaffolding bearing 150kg/m² or more
-
Structural work : scaffolding bearing 600kg/m² or more
-
Wood framing : scaffolding bearing 450kg/m² or more
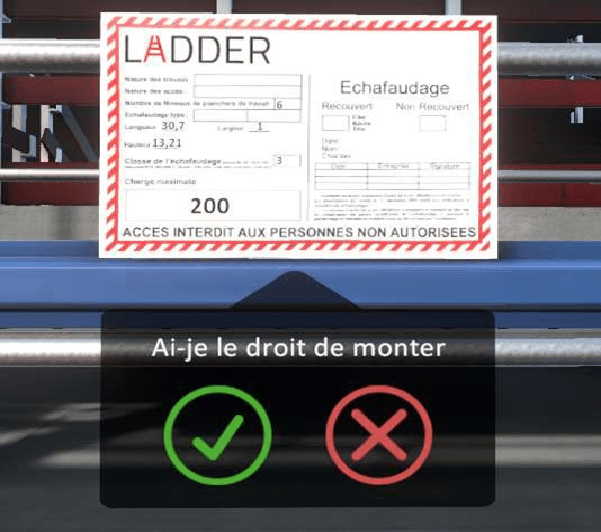
If the weight limit presented on the sign is not correct, and the user has answered the question, the value is automatically corrected to be able to continue the exercise.
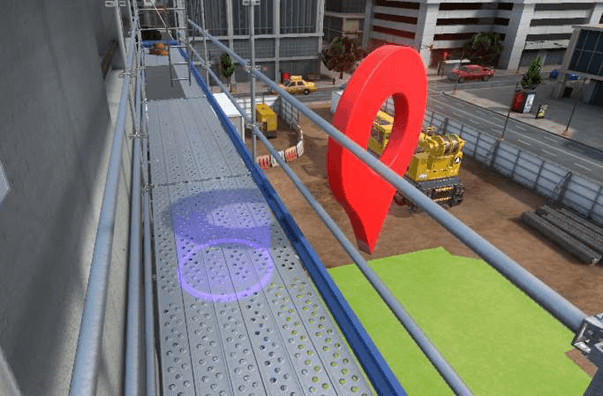
Climb the scaffolding
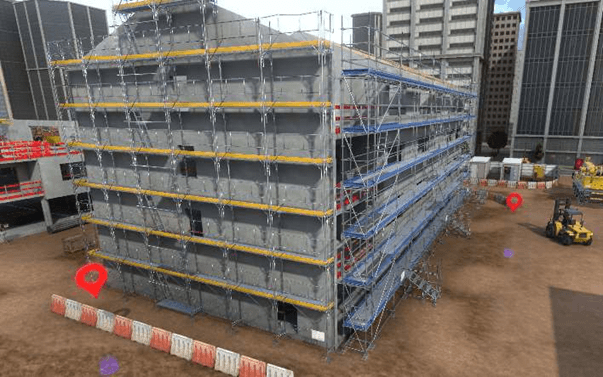
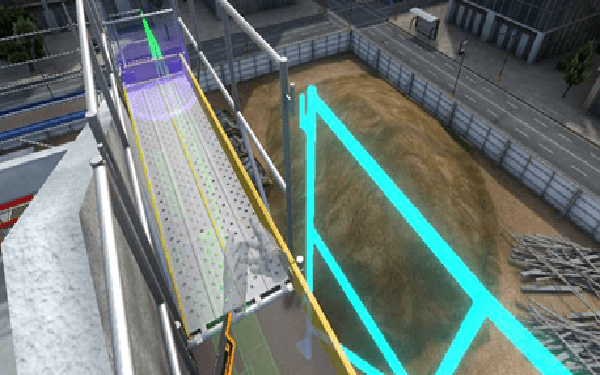
The user can now mount the scaffolding. The simulator will evaluate his capacity to move around safely, in particular his capacity to close each trap door after himself. The user must move to the work area indicated by a red icon.
Clear obstacles
On the way to the objectives, the user may encounter obstacles: heavy loads or materials which block the passage. In this case, he will have to point at the object and click on the Interact Button to put them in their correct place.

Move to purple circle
Once he has reached the intervention site, the user must walk to the purple circle. A sound confirms that the work went well.
Climb down
The user then must climb down the scaffolding, always maintaining all the saftey rules. It is impossible to teleport off the top of the scaffolding. Move to the purple circle where the exercise started and the user will then be teleported to the locker room where the results will be shown.
The exercise is now complete.
1.5. Assessment / Evaluation Mode Exercises
In evaluation mode, the user doesn’t receive any hints and mistakes will be controlled at the end of the exercise.
The criteria for evaluating are:
-
Analysis: relevance of the user’s answers during the preparation phase
-
Scenario: validation of all of the steps of which the scenario is comprised
-
Identification: capacity to recognize assembly flaws
-
Execution time: capacity to finish the scenario in a defined time
For both the facade and multidirectional scaffolding assessment, the user is required to find all the faults but no hints are given. If the user misses a fault, it is considered to be a fatal error and the assessment is immediately stopped and the student fails. Once, the user has completed all seven floors, he moves to the purple circle at the end of the scaffolding to be teleported to the locker room where the results are shown.
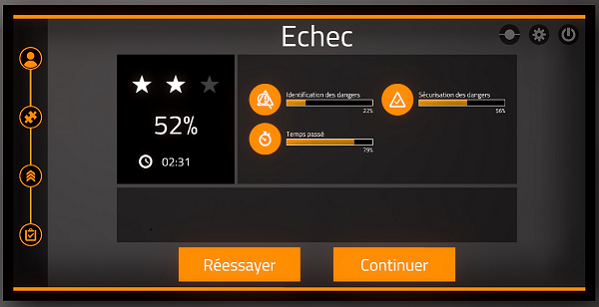
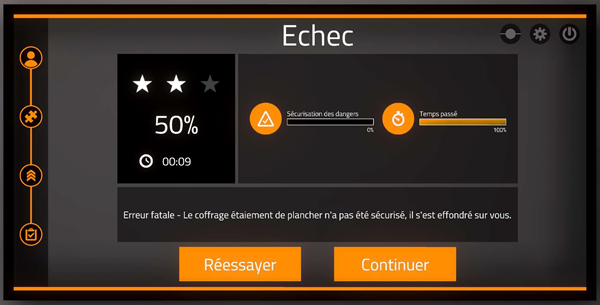
1.6. Score sceen
At the end of each exercise, a score screen will be displayed with the user’s results for that particular exercise.
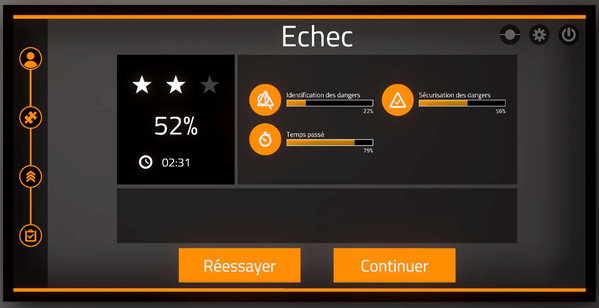
If a fatal error occurs, the exercise will immediately stop and the score screen will display the reason for the error and prompt the user to Retry or Continue.
1.7. Vulcan Exercise Settings
The default exercise settings may not be modified, but it is possible to create editable copies of the exercises and then modify the parameters. This will allow the trainer to change the weight of the marking of each parameter (coefficient) based on different criteria.
The parameters that can be modified are:
Exercise Name |
makes it possible to modify the name of the exercise as it will be displayed in the simulator |
Level |
corresponds to the level of the exercise, it is important to not modify this parameter during the copy of an exercise by default (beginner=free mode, advanced=guided mode, expert=evaluation mode) |
Validation threshold |
minimum score required to pass the exercise |
Inclusion threshold |
score below which the result of the exercise will not be taken into account |
Percentage penalty per identification |
how much of a penalty for not identifying a fault |
Percentage penalty per securing error |
how much penalty for not securing a fault |
Percentage penalty per incorrect PPE |
how much penalty for choosing the wrong PPE |
1.7.1. Scaffolding safety sensors
This table shows what the saftey sensors can be set for and their minimum and maximum allowable values.
Min |
Target |
Max |
|
Floor objective |
0 |
Number of floors that the user must reach to pass the exercise |
7 (there are 7 floors) |
Time before an accident (seconds) |
Minimum amount of time user must spend in the exercise, anything less will result in 0 |
Duration spent on the exercise starting from which the score will be 100% |
Unlimited, but must be set to a number |
Execution time (seconds) (applies only ot Reception and Usage) |
0 |
anything below this will result in a score of 100% |
any time spent on the exercise above which will result in 0% |
The non-adjustable sensors in scaffolding are as follows:
-
Analysis
-
Securing
-
Identification
1.7.2. Scaffolding safety variables in Vulcan
It is possible to change some of the variables in the editable copy of the exercise in order to adjust for the difficuty and complexity of the exercise.
They are as follows:
-
Number of defects on individual floors: number of errors generated randomly on the floor concerned
-
Activate fatal errors: when the function is activated, a fatal error results if the user has forgotten to identify a fatal error on the current scaffolding floor
-
Number of obstacles on individual floors: when the function is activated, a fatal error results if the user has forgotten to identify a fatal error on the current scaffolding floor